


In Blender you can mark edges, which can be used for several reasons, allowing you to give special treatment to these edges in various ways.
These are the edge markings available in Blender:
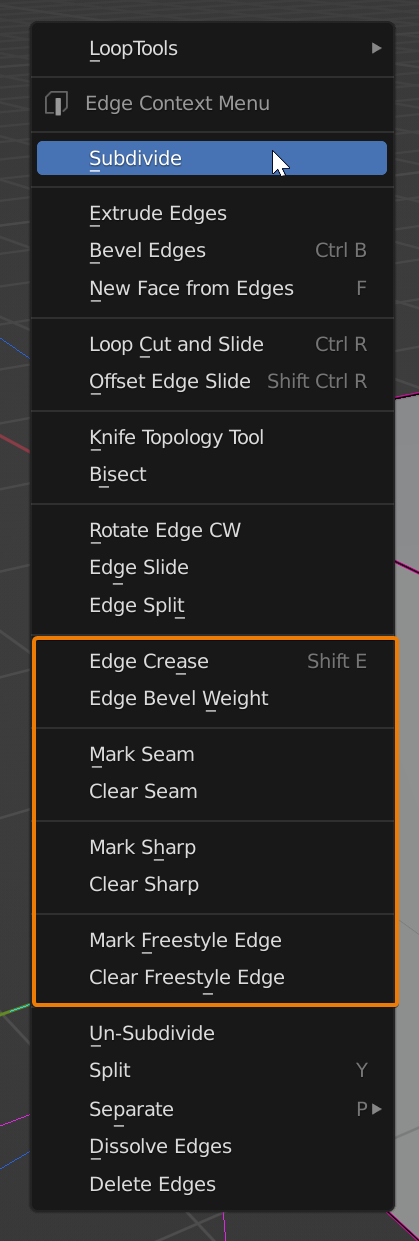
To mark an edge, enter edit mode, select an edge. Then click Ctrl+E to open the edge menu. Choose one of the Mark options in the dropdown menu.
Let’s have a look at further details on how to mark an edge in Blender and also what you could use edge markings for.
There are a few different ways to mark an edge in Blender. The first way is to go to Edit mode and access the edge menu from the top of the 3D viewport. You could also click Ctrl+E to open the Edge men.
Another way is to select one or more edges and right click to access the context menu. This is the same as the edge menu. But the context menu is different depending on your mode and selection in Blender. So, make sure that you are first in edge select mode by pressing two on the number row or choose edge select from the top left corner of the 3D viewport.
You can also access some edge marking options from the right-side properties panel also known as the N-Panel. Toggle it with the N hotkey.
To mark an edge, you need to select the edges that you would like to mark first. For instructions on selections, you can read this article.
Related content: How selecting works in Blender
There are edge markings that have 2 options; either on or off, such as seams and mark sharp, whereas some edge markings have a value that you can set from 0-1, such as crease and bevel weight.
Marking seams are commonly used during UV mapping in Blender.
To mark a seam, click tab to enter edit mode, select one or more edges, click U and then choose mark seam. In this same way you can clear any seams.
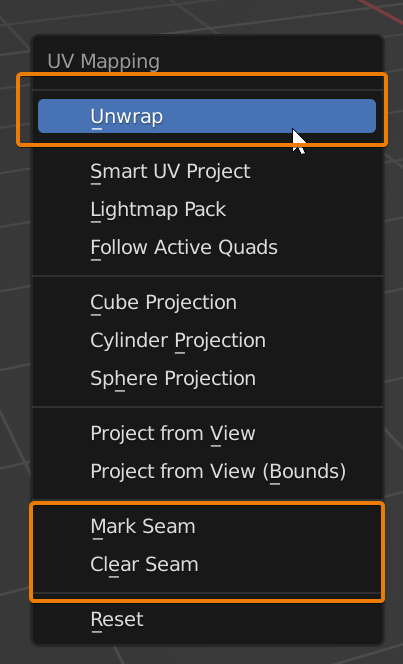
Semas can also be marked from the context menu and edge menu as discussed above.
A seam is either marked or not marked. There is no value attached to a seam. It is simply an on/off value.
Blender has several ways of UV unwrapping. In edit mode, you can go to the UV menu or open it by pressing U on your keyboard. The selected mesh will be unwrapped if you choose any of the unwrapping methods. The first entry in the list, simply called "unwrap" will take marked seams into account and make cuts at the marked edges.
You should mark seams on your mesh where the UV would be disconnected, and in ways that would avoid stretching.
For a detailed tutorial for UV mapping in Blender, you can read this article.
Related content: The definitive tutorial to UV mapping in Blender
Seams are essential to learn when it comes to dealing with UV mapping and textures.
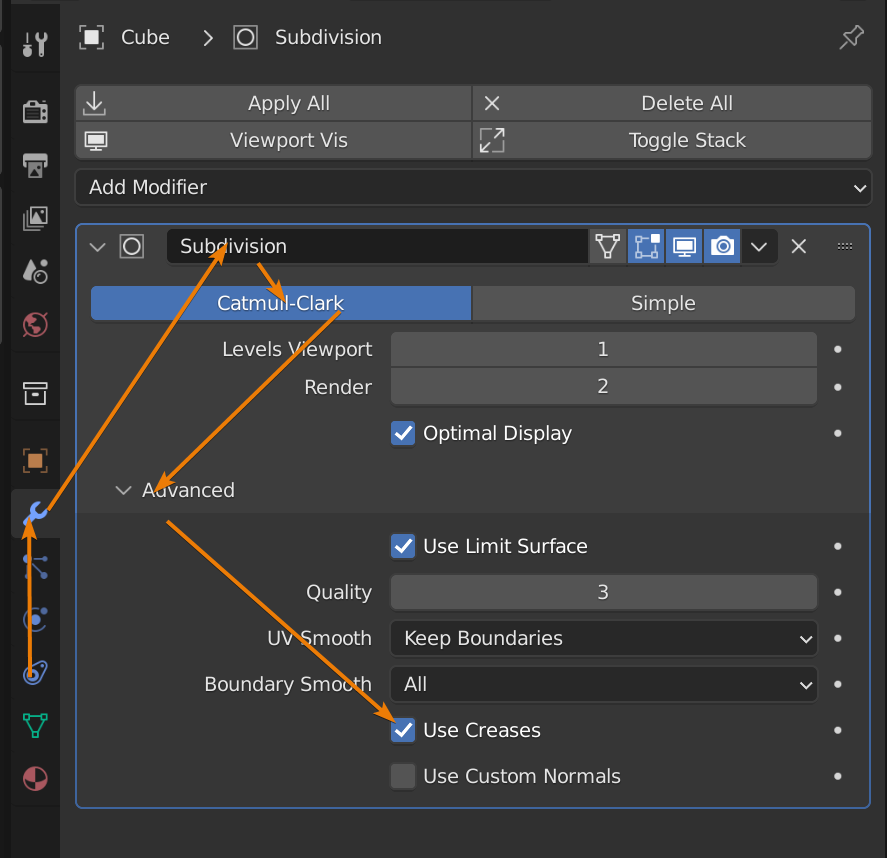
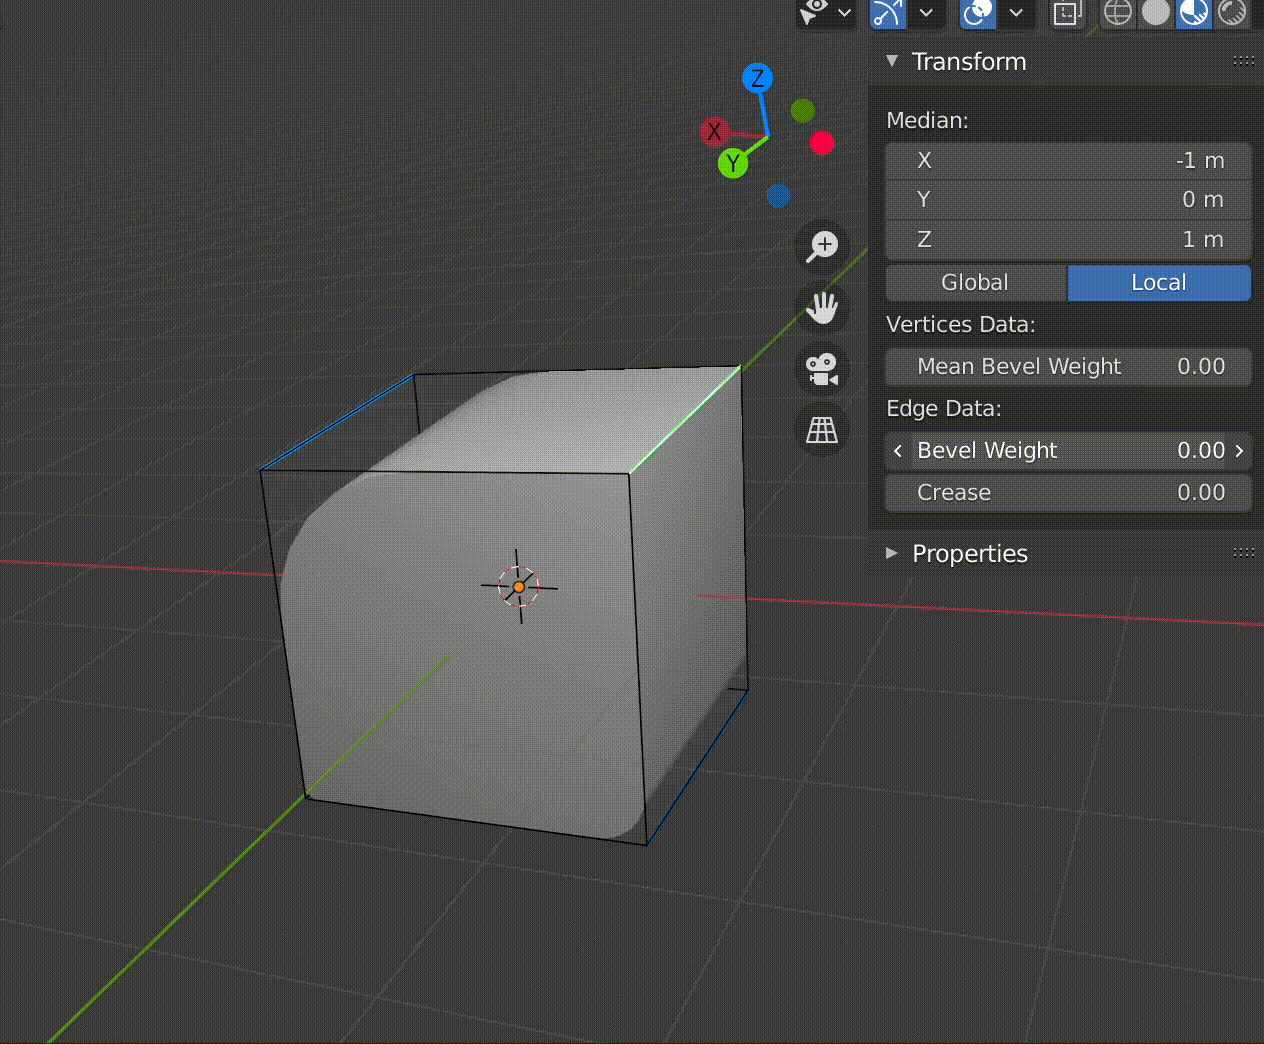
Creases are another type of edge marking that you can do in Blender. They work as part of the subdivision surface modifier using the default Catmull-Clark smoothing technique.
They mark where you want the mesh to be more creased or sharper. Creases can be set to the value of 0-1. In other words, a percentage value.
The shortcut for creating a crease on a selected edge is Shift+E. Then you can drag the mouse to adjust the value of the crease. You could also select the edge and then open the N-panel and type a value in the crease field under edge data in the item tab.
After you have pressed Shift+E you can also type a number and hit enter to mark the exact value you want without having to open the N-panel.
We can think of a crease as Blending between the simple subdivision surface modifier setting and the Catmull-Clark geometry smoothing. If we use Catmull-Clark and crease all edges with a value of 1, it will have the same effect as using the simple subdivision surface option.
In the subdivision surface modifier, we can also turn creases on or off by expanding the advanced section and unchecking "use creases".
If you are interested in the subdivision surface modifier you might be interested in how to use it adaptively.
Related content: How to use adaptive subdivision surface in Blender
Bevel weight is a property that you can apply a value between 0-1. It is made to be used in conjunction with the bevel modifier in order to have more control over the edges that the bevel will be applied as well as the bevel’s intensity.
To use bevel weight follow these steps:
You could also select the edge and then open the N-panel and type a value in the bevel weight field under edge data. The higher the value you set to the edge, the sharper the bevel will be for that particular edge.
For more information on beveling and the bevel modifier, you can take a look at this article:
Related content: How to bevel in Blender using the tool and modifier
Using weight as the limit method allows us to mark edges with a value from 0-1, which will determine the width and intensity of the bevel. Thus, bevel weight gives a lot more control over how the bevel modifier acts in accordance with your mesh than using the more common angle limit method.
Marking sharp sounds similar to marking crease but the function is quite different. Marking an edge sharp makes it so that smooth shading does not affect that edge. This is especially useful in situations where you want both smooth and flat shading on the same object.
Mark sharp must be used in conjunction with shade smooth and auto smooth.
Follow these steps to mark sharp:
You can take a look at this article for a more in-depth understanding on smooth shading:
Related content: How to smooth the shading on an object in Blender?
Freestyle markings are completely different than the other edge markings. Whilst the other edge markings affect the modelling process, freestyle markings affect only the render.
Rendering with freestyle has many uses such as creating a more cartoon-like style or for rendering wireframes, since it can be customized to produce a more artistic/hand-drawn appearance or more technical lines.
Essentially what it does is add lines to the wireframes and around your mesh, which can be customized greatly.
To enable freestyle rendering, you need to check the freestyle box in the render settings. Then, similar to the other edge markings, select an edge in edit mode, click Ctrl+E and choose mark freestyle edge. For the freestyle marked edges to take effect, you will need to check the edge mark box under edge types in the view layer properties.
Marking freestyle allows us to tell Blender exactly which edges we want drawn in the render, instead of through an angular threshold. The view layer properties are where you can access all the freestyle customization options and settings.
There are so many customization options for freestyle in Blender. For further details on freestyle and how it can be used, you can take a look at this article:
Related content: A guide to Blender freestyle rendering with Eevee and Cycles
There are many different types of edge markings that you can use in Blender. These are quite simple to learn and can be accessed easily in the edge menu or through the shortcut Ctrl+E.
I definitely encourage you to play around with the different markings and settings to see the many different ways that they could be used to assist you in your own workflow.
Thank you for your time.
