


Film grain is often used in renders, whether its subtle or a very noticeable effect it can help bring a render together and set the tone.
Film grain is small metallic particles on the photographic celluloid. It is a defect from the old film camera process that we have become so used to seeing that we sometimes want to add it in our digital process.
In the rest of this article, we'll go into more detail about film grain, how to set it up in the compositor, as well as how to create an animated film grain effect.
Film grain can be a very useful effect to add to a 3D render. While we should use effects like this in moderation they can help with the unnaturally clean look of renders. It can also help bring an image together.
Depending on the render film grain can also help set the tone. For example, film grain may be good for giving the render a more aged look or creating a more moody feel.
To Create a film grain effect in the compositor:

One way we can speed up the process of adjusting the film grain is by setting up a viewer node in the compositor.
First go to Add > Search > Viewer and place in the graph by the render layer node. Connect the same image output going to the render layer image input to the viewer image input.
On the top right of the composting window click on backdrop. Now if we render our image it will show up in the background. Sometimes the background image won't fit inside the the view. To fix the background size press N to open the side panel then under the view tab click fit.
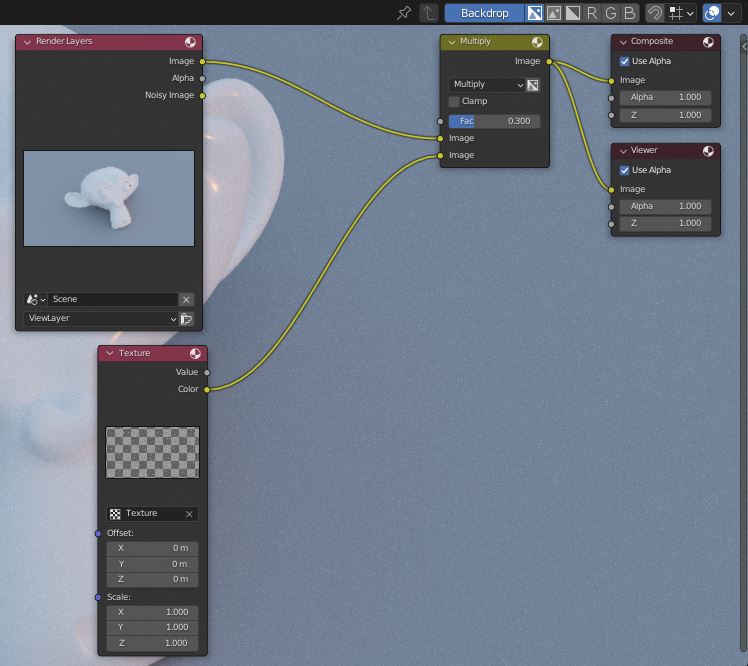
We could change the texture we use for the texture node. For example, we could set it to Stucci or clouds and set the texture scale value to something large so that the noise is very fine.
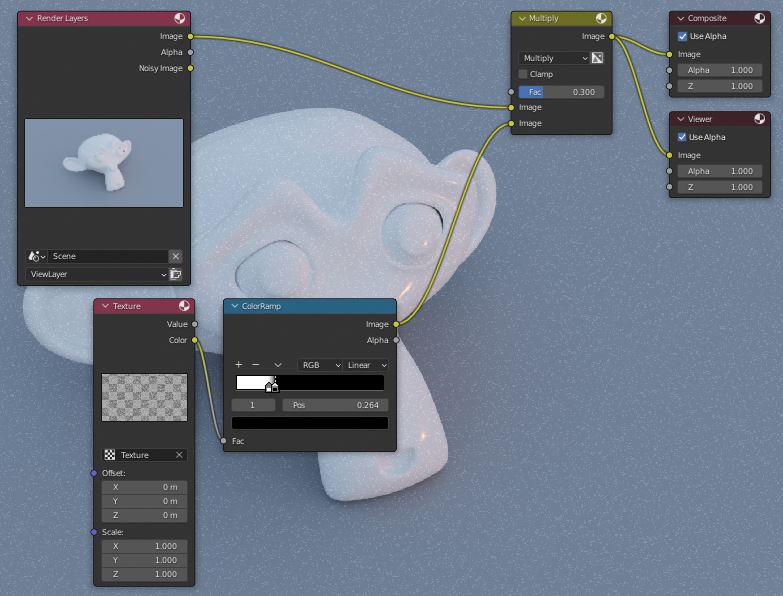
To adjust the falloff of the film grain and make it more sharp we can go to Add > Search > ColorRamp. Connect the texture image out to the ColorRamp image in and then connect the image out to the mix node second input.
Related content: How the color ramp node works in Blender
Now just adjust the handles on the ColorRamp node to change the falloff of the noise. I recommend pulling both towards the middle and having them fairly close to have a sharp falloff. It might also help to bring the black handle in more so that the splotches are smaller.
Instead of using a noise texture we could also use a isolated film grain texture. Instead of using a texture node we could create an image node. We could also just set the texture type in the texture properties to Image and select our image from there.
To create an animated film grain texture:
You may notice that the steps for setting up the animated film grain effect is the same as the steps for setting up the film grain effect for an image.
The reason we can use the same node setup is because the noise texture randomizes itself each frame automatically.
Setting up film grain for an animation is a bit of a different setup then for an image render. Still images won't look right as the effect that creates film grain in real life creates a different pattern for each frame.
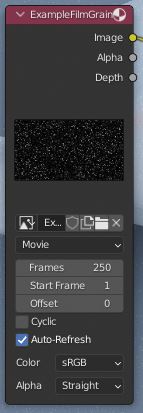
One way we can maintain the realism of a film grain texture in an animation is to use a video of an isolated film grain effect.
To Bring the video into the compositor go to Add > Search > Image and place it in the graph. Take the image out and connect it to the ColorRamp Fac in. Set the frames to the length of the animation we're going to render.
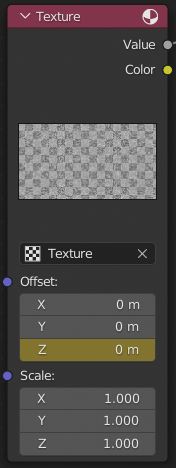
For any of the noise textures in the texture properties such as clouds and stucci we can just use the z offset to get a completely random pattern each time.
To animate the Z offset on the texture node first set the timeline current frame to the start of your animation. Right click on the texture z offset and select insert single keyframe. Next we'll need to access the graph editor.
In the dopesheet editor on the bottom set the editor type to graph editor and make sure the texture node is selected. We should see a keyframe at frame 0 in the timeline. Press N to open the side panel and then in the modifiers tab click Add Modifier > Generator.
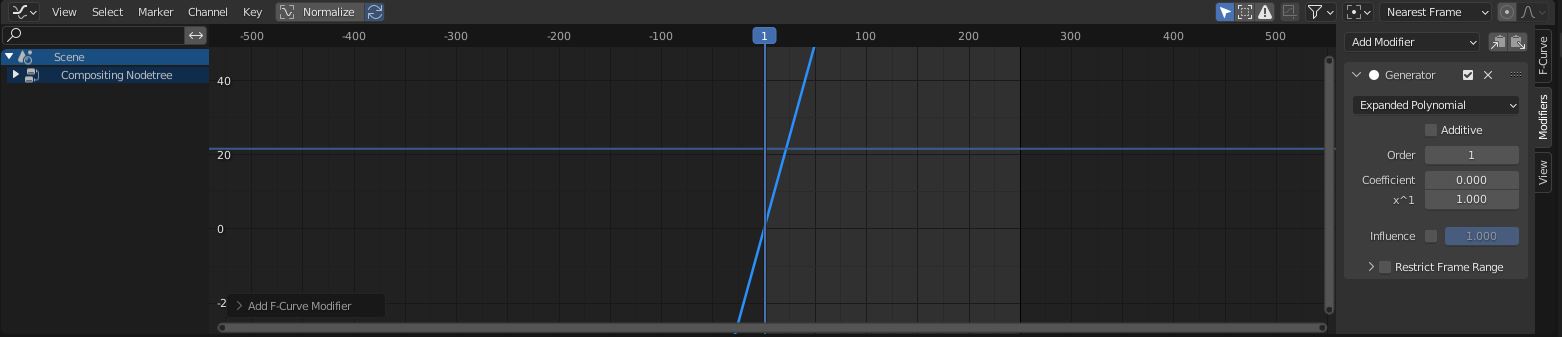
Set the x^1 value to something like 100 and now the film grain should be animated.
A subtle film grain can be a nice artistic effect to add to a finished render. With the methods we went over in this article we can achieve film grain in a variety of different ways.
The image and video method can be useful when we want our render to look more realistic. It also is useful if the generated noise looks off.
The noise method works well when we just want a quick film grain effect. We can also animate the noise textures fairly easily.
Thank you for your time.
