


Using grease pencil to draw on objects can help give our renders a more stylized look. Whether we want to give our objects a hand drawn outline or use or objects as a reference for the grease pencil strokes. So how do we draw on objects with grease pencil?
To draw on an object with grease pencil in Blender:
In the rest of this article, we'll go into more detail about how to use the grease pencils. We'll also go into more details about tools we can use to place our grease pencil strokes.

First select our grease pencil object and set the object interaction mode to draw if we haven't already. At the top of window click on the stroke placement dropdown and select surface.

Surface snapping can be a bit unintuitive. The distance from the surface that a stroke is placed is relative to how far away the camera is from the surface. We can adjust this relative distance by going to the stroke placement dropdown and changing the offset value.
The distance from a surface also depends on the angle of the surface relative to the camera. The more skew a surface is to the camera the closer a curve will be to a surface.
we can lock in the plane we draw on by changing the drawing plane. This allows us to set the plane to front, side, and top. Front being the X axis, Side being the Y axis and top being the Z axis.

One possible issue we might run into is that our stroke placement setting conflicts with our drawing plane. To make sure we are snapping to the global X, Y, and Z axis we can set our stroke placement to origin.
Another method of achieving this is setting our drawing plane to view. We can still draw on the x, y, and z axis by just using the view snapping shortcuts on the numpad. We can also just use the axis gizmo at the top right of the window.

We can either lock the drawing to the view or create a plane object and use surface snapping.
To lock the drawing plane to the view go to the top of the window and click on the drawing plane dropdown and select view. Now all of our grease pencil strokes will lock onto the angle of the view.
We may also want to have our strokes placed on a consistent plane. We can achieve this by using a large plane object and using surface snapping. To do this go to add > Mesh > Plane and scale it as well as position it how we'd like.
Now select the grease pencil object and set the object interaction mode to draw mode. Finally set the stroke placement to surface. With this method we can easily view the plane we are drawing on.
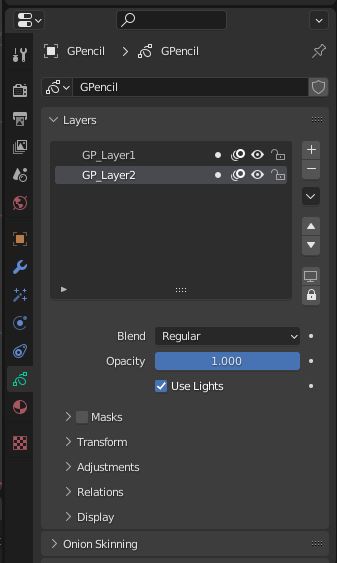
We'll need to setup layers so that we can change the order. To setup layers navigate to the properties window and in object data properties we'll find the Layers.
Here we can add and remove as well as configure layers. When we add a new layer and select it all lines we make will be put into this layer. If we've already setup our grease pencil strokes, we don't need to redo anything though.
Create the layers we want to sort and then set the object interaction mode to edit. Select the stroke we want to change the layer of. At the top of the window go to stroke > move to layer and select the layer we want to move the stroke to.
Once we have our layers setup all we have to do is organize our layers. Layers on the top will render above lower layers. We can change the order of layers by going to the right and using the two arrows.
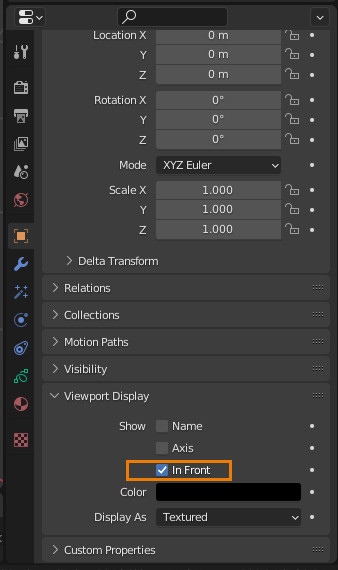
To make the grease pencil object render on front select the stroke object. In properties > object properties > viewport display enable in front.
While just setting our grease pencil objects as always on top will work in simple cases we may want to use multiple objects. For this we can use the compositor to manually adjust the order. This method is more advanced but allows for much more customization.
We will setup a render layer for working that we won't render. We'll also setup a render layer for our objects and one for the grease pencil objects. We can also setup as many grease pencil object layers as needed.
Before we can setup our render layers, we'll need to create collections for each of our layers. To create a collection, go to the top right of the scene hierarchy window and click on the new collection button.
Move all the objects we want for one layer into this collection using the scene hierarchy. repeat this for each of the layers we want to have in the compositor.

Once we have our collections setup, we'll also need to make the background transparent. To make the background transparent go to render properties > Film and enable transparent.
Now we can setup our view layers. Go to the top right of the window click on the add view layer button.
Make sure ViewLayer_001 is selected and now we can active and deactivate the collections we want for that layer. We'll leave View Layer the same so we can view the whole scene at once and just add a new view layer for each view layer we want.

Once we have our view layers setup navigate to the compositing workspace and enable use nodes. Go to add > search and find the alpha over node and place it in the graph. Repeat this step to create another Render Layers node.
For our first render layer node set the layer to our grease pencil layer. On the second render layer node set the layer to the objects layer. Connect the first render layers image out to the alpha overs second image in. Connect the second render layers image out to the alpha overs first image in.
Finally connect the alpha over image out to the composite image in. To make sure we've got everything right we can use a view node.
To setup a viewer node go to add > search > viewer and connect the alpha over image out to the viewer image in. Press N to open the side panel and under view enable backdrop and click on fit. Now when we render the final image will be shown as the background of the compositor.

If our grease pencil layer isn't visible, we can always try flipping the alpha overs inputs until everything is ordered correctly. We can use the viewer node to help speed up this process.
With what we've gone over in this article we should be able to draw on the surface of objects. We've also gone over many of the ways we can adjust stroke placement. Finally we touched on some basic compositing we can do to combine our grease pencil objects with the objects we've drawn on.
Thank you for your time.
