


The compositor in Blender can seem to favor single frame renders. But it really isn't too difficult to composite an animation in Blender.
There are primarily two ways we can composite an animation in Blender, directly at render time as each frame renders, we can apply compositing, or the second way is to first store our animation to disk and then go back into Blender to composite as a second step.
In the rest of the article, we'll go over compositing our animation at render time as well as how to output a sequence of multilayer EXRs that we can then reimport to run through the compositor.
Let's dive in!

To Composite an animation at render time in Blender follow these steps:
Navigate to the compositing workspace and enable use nodes
Setup up the compositor with the nodes we'd like to use
In properties > output properties > set the output path as well as the format we'd like to use
Press Ctrl + F12 to render the animation
Compositing at render time can be a lot quicker than outputting an EXR and then having to reimport and composite later. This method is also great for saving on file size.
We can directly output our files in a more compressed format since we won't need multiple layers for compositing later. We may also not need nearly as much color depth or accuracy.
This compositing step will also be applied if we were to use our scene as a clip in another scene's video editor. When we render all the compositing will be included. This can help cut down on render time as well as file size since we can render everything in one go.
Another great way to composite an animation is to do all the compositing after we've rendered. The advantage of this method is that if we want to change our compositing setup we can render those changes much quicker since we won't need to render the whole scene again.
This method also allows for the separation of rendering and compositing for example if we're working in a team and have someone who specializes in compositing. This method also allows for compositing outside of Blender.
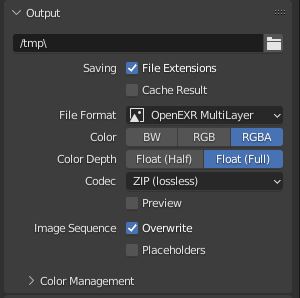
First we'll want to specify our file output path if we haven't already. To set the path go to Properties > Output Properties > Output. In the path input field click on the file button and navigate to the folder you want to output to.
Next we'll want to output our frames as multi layer EXR so we can save all of our compositing data and later reimport it.
In the output properties under output click on the file format dropdown and select OpenEXR MultiLayer. We can leave all the options as is for now and head over to the compositing workspace.
In the compositing workspace enable use nodes and then go to add > search > File Output. Place the node in the graph and select it. Press N to bring up the side panel then go to Node > Properties. in the input section we can click add input to add different layers to our exr file.
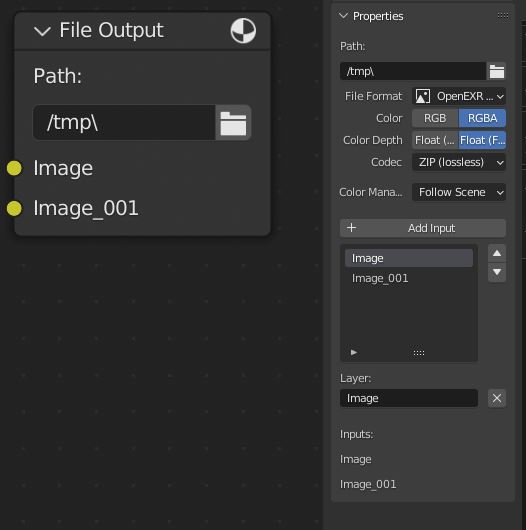
For each input we add here we'll see an input added to the node. Whatever layers we'll need for compositing later we can connect here. Once we've configured the file output node we can go ahead and render the animation.
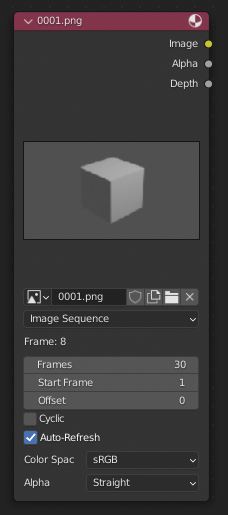
While we've used the EXR format in this case we could also configure the file output node to output each layer as its own separate image sequence. To do this set the file output format to something other than a multilayer exr such as png. Now each layer will show as a separate image.
We can also export each layer in a different format if we want. To change the formats separately press n to open the side panel and then go to Node > properties and select an input and then under format disable Use Node Format. Now we can change the settings for this input individually.

Now that we have our animation rendered, we many want to bring it back into Blender. First navigate to the compositing workspace. I recommend creating a new Blender project file for this. Delete the Render Layer node as we won't need it and then go to add > search > image.
Place the node in the graph and then click on open. In the file browser dialogue that opens find the folder than we rendered our image sequence to.
Click on the first file and then scroll to the final file and Hold shift then click again so that we select all the files. Now click open image and this should show up as an image sequence on the Image node.
If we've been adjusting the post processing setting it is possible, we may have disabled compositing at some point. To fix this go to Properties > Output Properties > Post Processing and enable Compositing.
On top of that we'll want to make sure we're using the right shortcut to render the animation. To render an animation and not just a single image we'll need to press ctrl + f12 instead of just press f12.
Even if we've added nodes to the graph in the compositor we'll need to make sure use nodes is enabled before Blender will apply them to the render.
To enable use nodes navigate to the compositing workspace. At the top of the compositing workspace enable the checkbox for using nodes.

In the Timeline Window as well as the output properties there are two input fields which allow us to input the start and end frames. These frames are the range that Blender will render and we'll need to make sure that the end value covers our whole render. The start frame value also cannot go below 0.
If we've only partially render our animation we can just set the start frame value to where we've stopped rendering and then set the end frame value to cover the rest of our animation.
There are quite a few different ways to composite our animations in Blender. Compositing at render time can be a quick and easy option when we don't need as much customization or don't plan on making many changes.
Compositing after we've rendered allows for much more customization as the cost of requiring a little setup. Depending on how many change we'll need to make after we've rendered this can end up saving us a lot of time especially on longer animations.
Thank you for your time.
