


Adjusting Renders and compositing footage in Blender will often require us to use masks. Blender provides many tools we can use to do most masking jobs. So how do we mask in Blender?
In the compositor we can create basic masks with the Box and Ellipse nodes. These nodes also support combining of different masks so they can be stacked together to create more complex mask shapes. We can also use the double edge mask to blend masks together.
For masking specific objects in a render, we can use Object ID. For masking objects, materials, or groups of objects we can use cryptomatte.
In the rest of this article, we'll go into more detail about how masking each type of masking works on how to set them up, including custom masks.
To setup either a box or ellipse mask:
Let's start by looking at the box mask node.
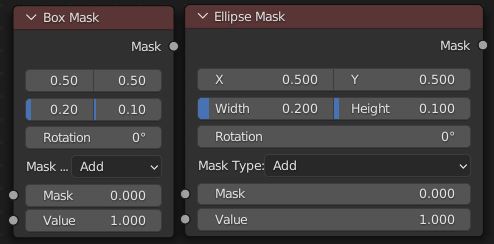
The box mask outputs a white square and a black background. We can adjust the scale and position as well as the rotation.
The top two values are for adjusting the position of the mask. The second two values adjust the scale and the rotation value adjusts the rotation.
The mask type setting will adjust the method used to combine the mask input with the current node. For one mask node we don't need to adjust this or the mask value.
We can use the mask value to combine the current mask with another mask. The mask type lets us adjust how the two masks are combined.
The ellipse mask works the same way but instead of outputting a square mask it outputs a circular mask.
The double edge mask can blend two mask nodes together. The way this works is by creating a gradient from one mask to another.
We can use the double edge mask to feather the edge of a basic mask by having two masks, with one being smaller so that the double edge masks blends to full white in the middle.
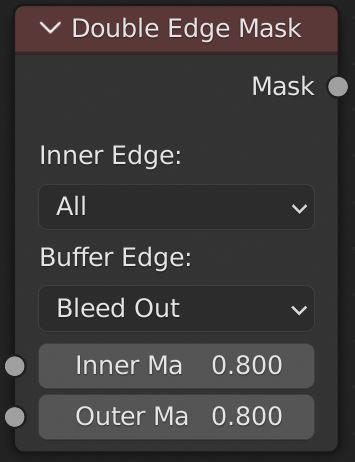
As the names imply the outer mask is the mask that the double edge will blend from, and the inner mask is the mask that the double edge will blend to.
The inner edge option lets you pick whether all shapes will contribute to the gradient on the outer mask or only the shapes that are inside of the outer mask.
Buffer edge lets you choose whether the double edge mask gradient will end at the image border or keeps being blended so that the gradient looks like it continues past the border of the image.
There are primarily two ways we can use an object as a mask. ObjectID and cryptomatte. ObjectID is the older simpler way of setting up a mask. It does not support antialiasing and can therefore produce jagged edges.
Cryptomatte is a newer alternative, and in most cases the preferred method. But we will cover both here. Starting with ObjectID.
To use objectID follow these steps.
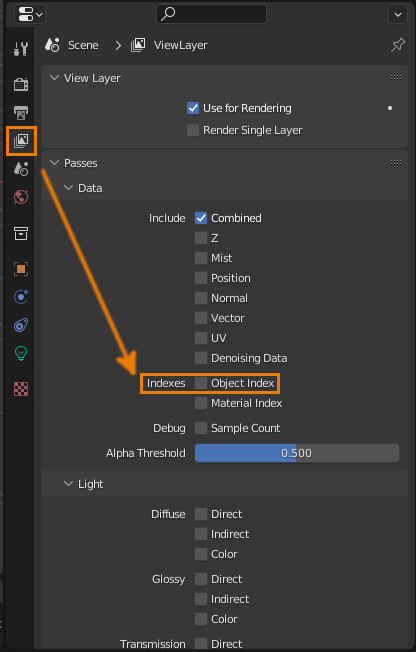
First go to View Layer properties > Passes > Data and under indexes enable Object index.
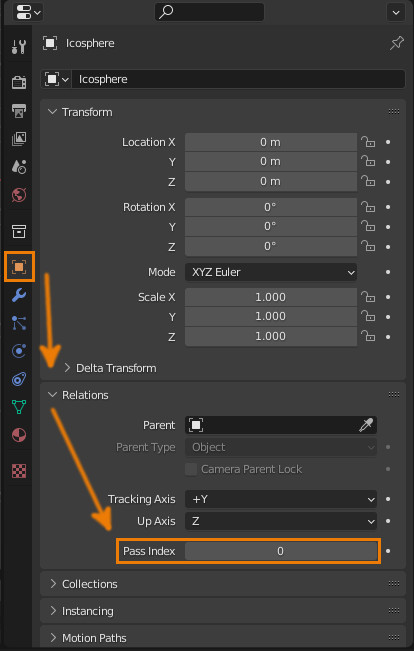
Now select the object you want to isolate and go to object properties > Relations and set the pass index to anything higher than 0.
We can also set identical pass indexes on other objects to include them in the mask.
Once we have the object or group of objects, we want to isolate set to a separate pass index we can go into the compositing workspace and setup the mask.
In the compositing workspace go to add > search > ID Mask. The Render Layers node should also now have a IndexOB output, connect this to the ID mask ID value input and then set the Index to the Index of the object you want to mask.
The Cryptomatte node provides a very easy way to mask objects in the compositor. To use crypto matte we will first need to enable it, if we don't do this the Cryptomatte node outputs will be blank.
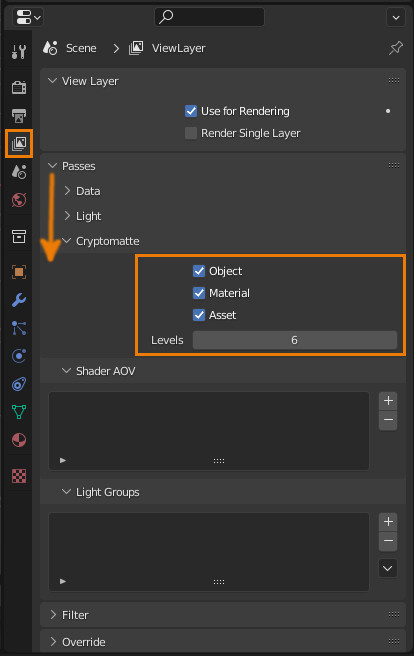
To enable Crypto Matte go to the properties window > View layer properties > Cryptomatte and enable Object, Material, and asset.
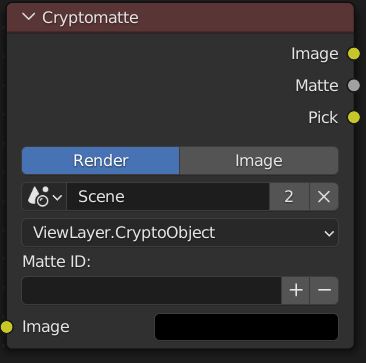
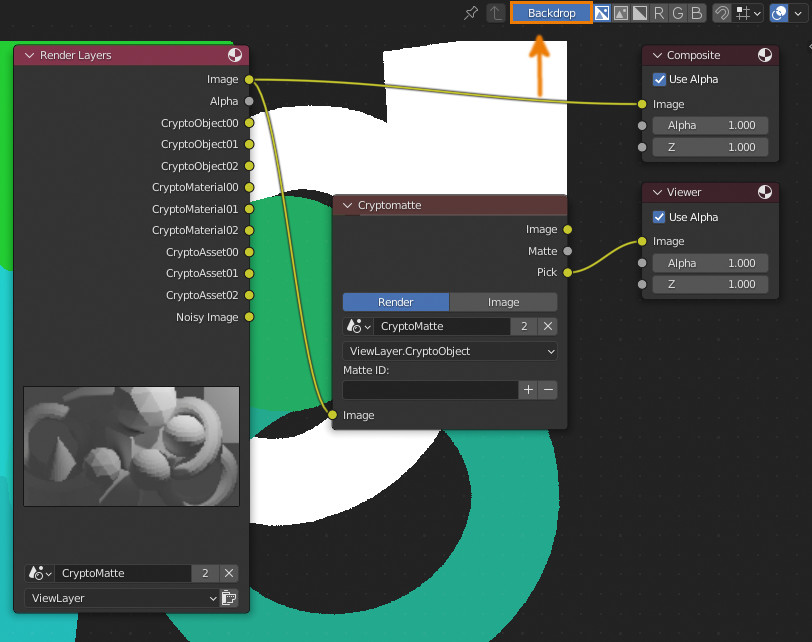
Next go to the compositing workspace and enable use nodes, next go to Add > Search > Cryptomatte and place it in the graph.
Connect the Render layer image output to the Cryptomatte Image input.
Create go to Add > Search > Viewer and place it in the graph. Connect either the Pick or Image output of the matte node to the viewer image input. Pick will make it easier to see the different materials to pick and image will just be the rendered image.
Now we need to render our scene so we can use the viewer node. We can do this from the compositor by just pressing f12. On the top right of the compositing window enable backdrop and we should now see whichever output we connected to the viewer.
On the bottom of the matte node click on the dropdown to select the type we want to add to the matte, this can be a material, object, or asset.
Click on the + icon, this will turn the cursor to an eyedropper and now we can just hover around the background image and the cursor will display the name of what it's over, now we can just click and that will be added to the mask.
For a more detailed guide on cryptomatte you can read this article:
Related content: How to use cryptomatte for masking in Blender
While we can access most options for masking with the mask dropdown and the mask properties let's go over a few shortcuts we'll use often when creating our mask.
| Tool | Shortcut |
| Create Point | Ctrl + Click |
| Scale Feather | Alt + S |
| Move Point | G |
| Point options | W |
A few other important options that are in the mask menu or W menu:
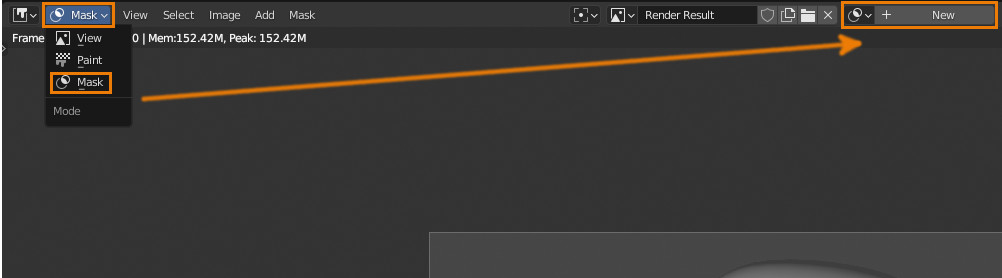
To access the mask tools navigate to the rendering workspace. At the top left set the mode to mask and then click on new to create a new mask. Press N to open the properties panel and go to the mask options. In the mask layers dropdown press the + icon to add a new mask layer.
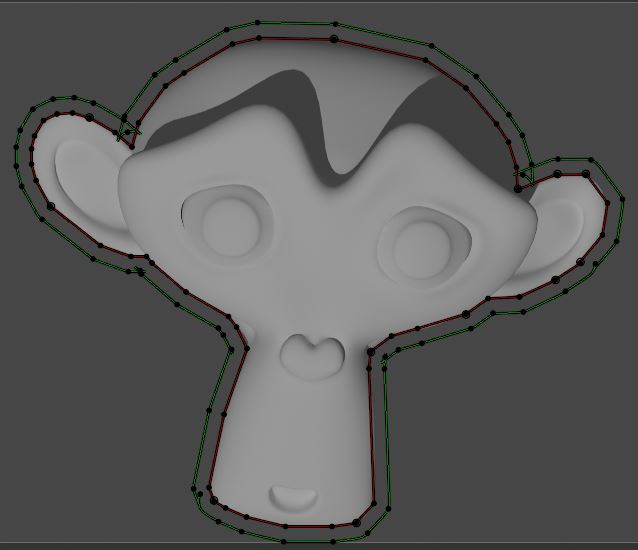
Once our mask layer is created, we can Ctrl + Click on the image to start creating points our mask, if we click and drag it will also create a control point and if we just click it will create only a point.
once we have the shape of our mask, we can open the properties panel on the right with N and then in Mask > Active Spline and enable cyclic to complete the mask shape.
We may also want to add feathering to our mask, first select all of the point in our mask by pressing A and then press ALT + S to scale the feather.
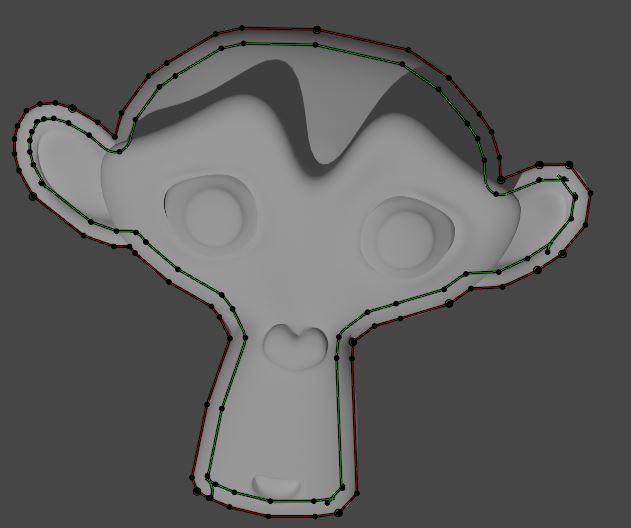
In this example you can see that the feather is going towards the middle of our mask, if this isn't the effect we want go to the top left and click on mask and then select Switch direction from the dropdown.
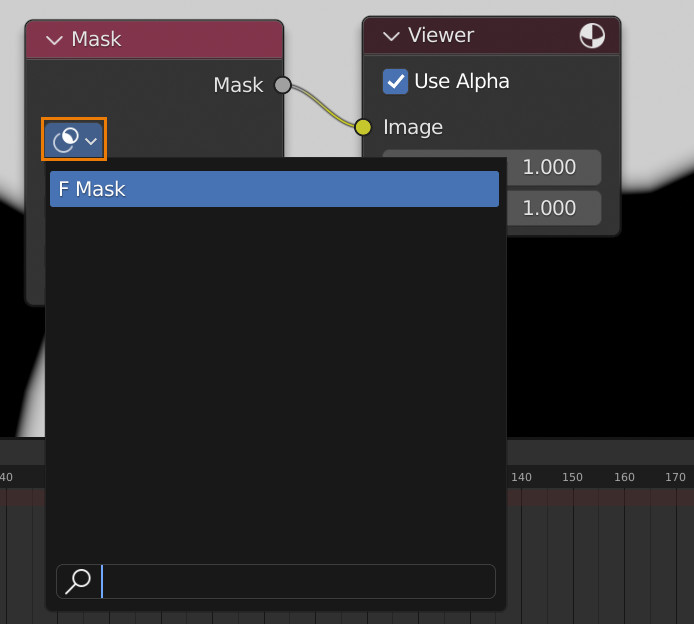
With our mask made we can navigate back to the compositing workspace and mask sure use nodes is enabled then click on Add > Search > Mask. Click on the two circles dropdown and this will bring up all the masks available. Select the mask we just created and now we can use this mask in the compositor.
Blender provides many different ways to mask our renders. We can create some pretty advanced masks just with the box and ellipse mask. The double edge mask can help us achieve even more with just these two nodes
Object ID can be a quick way to isolate objects in our renders and cryptomatte is a quite powerful tool that can isolate objects, materials, and groups of objects. The mask node allows us to create masks by hand and works for any image.
Thank you for your time.
