


When you have struggled for a long time to get a 3D scene together in Blender, only to start a render and realize that there are major differences between your 3D viewport and final render. That can be a very frustrating experience that we will try to solve in this article.
The most common cause for inconsistencies between the 3D viewport render preview and the final render is that we have one or more hidden objects in one of the views. To fix it, go to the outliner, change the filter to include the eye, screen and camera icon and make sure that they are consistent.
There are several things that can cause a difference between the viewport and final render. In this article, we will cover the most common causes.

The 3D viewport is there to help us visualize our scenes and not primarily to show us the result. Being able to see the result directly in the 3D viewport is a luxury that has just recently become possible in some circumstances.
Your final scene may have many millions of polygons and high-resolution textures that are just not possible to render at a speed that you want to work with, so we choose to view different portions of our scene at different times.
This allows us to keep working effectively without being bogged down by too much data at once by helping us filter what we see in the 3D viewport.
There are many tools in Blender that help us filter the data we see in the 3D viewport compared to the final render. But sometimes it can also become a problem when we have filtered out too much.
When we render, we instead get a completely different look or objects that we had forgotten about in our final scene.
In the rest of this article, we will look at some examples where we may have configured differences between the final render and the 3D viewport.
If you have a problem with rendering at all or if your render turns out black, you can read more about common render problems in this article:
Related content: 4 Common render problems in Blender and how to solve them
Many features and settings in Blender are double. One for the 3D viewport and one for the rendered result. The modifier stack is an example of this.
Modifiers can be turned on or off for the viewport or final render individually. There are also some settings within certain modfieirs that have two identical settings. But one of them relates to the viewport and one is for the final render.
In the header of each modifier, there is a screen icon and a camera icon. Wherever you see these icons, the camera icon is a toggle to turn something on or off for the final render, and the screen or monitor icon is to toggle something on or off for the 3D viewport.
Here is an example with the array modifier.
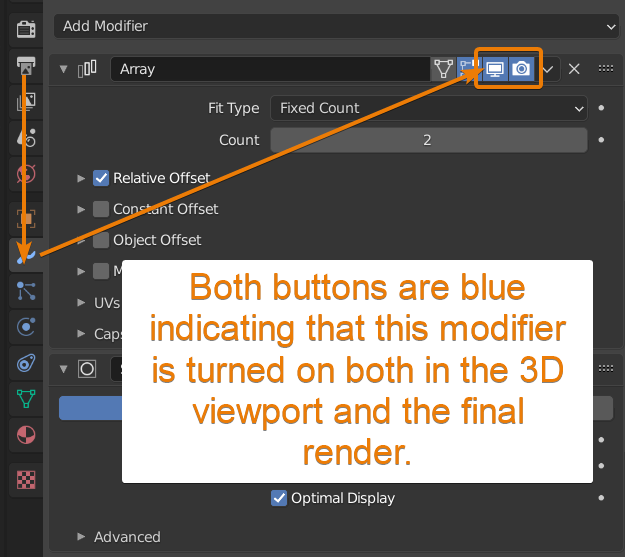
Both buttons are blue, showing that we turn this modifier on both in the 3D viewport and the final render.
If one of these buttons is gray, it means that there is a mismatch between the 3D viewport and the render result because we turn the modifier off for one or the other.
For the next example, we will look at the subdivision surface modifier. Here we have two subdivision surface levels. One for the 3D viewport and one for the render.
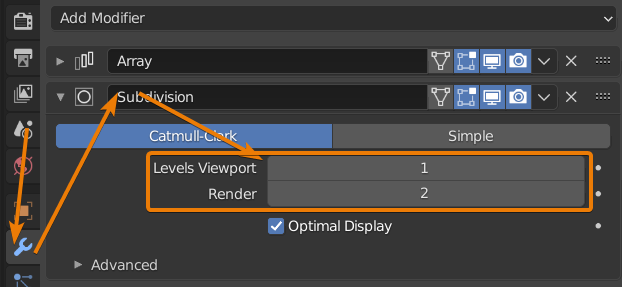
It is common practice to keep the viewport level lower so that we don't add too much geometry in the 3D viewport while still getting a higher quality render with a higher render number.
This of course also causes a difference between the 3D viewport and the final render result.
Sometimes we may want to, at least temporarily, set these to the same value so that we can see how dense geometry we add and to preview all the details.
But in the long term as we work on a project, we want to keep the subdivision surface lower for the 3D viewport so that we spare performance resources where it is needed until it is time to render.
We have primarily two viewport modes where we can see and preview our materials. These are material preview mode and rendered preview mode.
Material preview mode uses Eevee in the background, but it is configured to use built in lighting that acts as indirect light, and this means that we don't see any shadows in this mode by default.

But we see a clear view of how the material will look when we have the same amount and kind of light everywhere.
The color of the light is based on the preview hdri image set in the viewport shading settings.
In rendered mode though, the lights and world material from your scene are used and you get a more accurate representation of what your actual render will look like in the end.
But you need to set up lighting for this, of course.
If you check scene world and scene light in the viewport shading menu, you can use the lighting from the scene instead and material preview mode becomes more or less an Eevee rendered mode.
You can read more about how this works in my viewport shading guide here:
Related content: Blender viewport shading guide
Solid mode and wireframe mode will only show you geometry data. You can change colors and even turn on textures, but it will only show you the currently selected texture in the material using the default UV Map as the projection.
This depends on if we aim to create our final render in Eevee or Cycles. But if we aim to use Cycles as our engine for the final render, there are a few things to keep in mind.
First, there are two different sample counts. One for the viewport rendered preview mode and one for final render.
We may also have denoising turned on for the viewport or render, and this will make a difference on our final look. A denoised render will always be smoother but will much less noise.
Another setting that makes the viewport render faster but with lower quality is in the performance section, we have a viewport subsection. Here we find pixel size for the viewport.
You can read more about render settings for each of the built-in render engines in these guide.
Related content: Blender: A Cycles render settings guide
Related content: A guide to Blender Eevee render settings
By settings this to 1x we decrease the pixel size in the viewport to the same as in the final render, creating a more detailed viewport, but we also need to do a lot more calculations when preview rendering.
The materials rarely cause much problem with differences between viewport and final render. But one thing that can trip you up is that some shader nodes are only supported by either Eevee or Cycles.
For instance, if you are using the shader to RGB node to create NPR (non-photo-real) renders, you need to use Eevee as both your final render and preview renderer since this node is not supported in Cycles.
The most common issue with lighting differences is what we discussed in the viewport shading differences. That we use a built in hdri that is meant for previewing and we think we will get the same lighting once we hit F12 to create the render.
This is not the case, and we have to set up our own lighting in Blender. The most accurate preview mode is rendered mode, and if you want to have an as accurate preview as possible, use rendered preview mode.
Another problem could be that we have some light disabled in viewport or rendered mode.
To fix this, go to the outliner and press the filter button. Then activate the camera icon and the monitor icon.
Related content: 10 New or hidden features in Blenders outliner
The monitor icon enables an object for the viewport, and the camera icon enables or disables the object for rendered view.

It can also be that if the eye icon is gray, the object is hidden in the viewport and you need to show it again to find out if there is an object that is there but hidden.
You can unhide all objects with Alt+H and hide individual objects with H in the 3D viewport.
Much like with lights, it can be that an object is disabled for either rendering or for the viewport. If this is the case, just do the same procedure as was explained with the lights.
Go to the outliner and in the filter icon, enable the camera and monitor icons.
Make sure that these icons are either both gray to disable or both white to enable an object for both the 3D viewport and render.
Also, make sure that all objects are visible by pressing alt+h in the 3D viewport.
Particle systems can also differ between the viewport and rendered mode. They are often heavy to work with and can use up a lot of system resources if every particle needs to be on the screen at all times.
Therefore, we can disable a particle system either for the viewport or for the render. We can also tell the particle system to show only a certain percentage of the particles in the viewport or show a lot fewer child particles than what is actually being rendered for the final render.
Particle systems can also be configured to not show the emitter. This may or may not be desirable and sometimes we can accidentally check this the wrong way and it's hard to find if the object is otherwise visible and enabled.
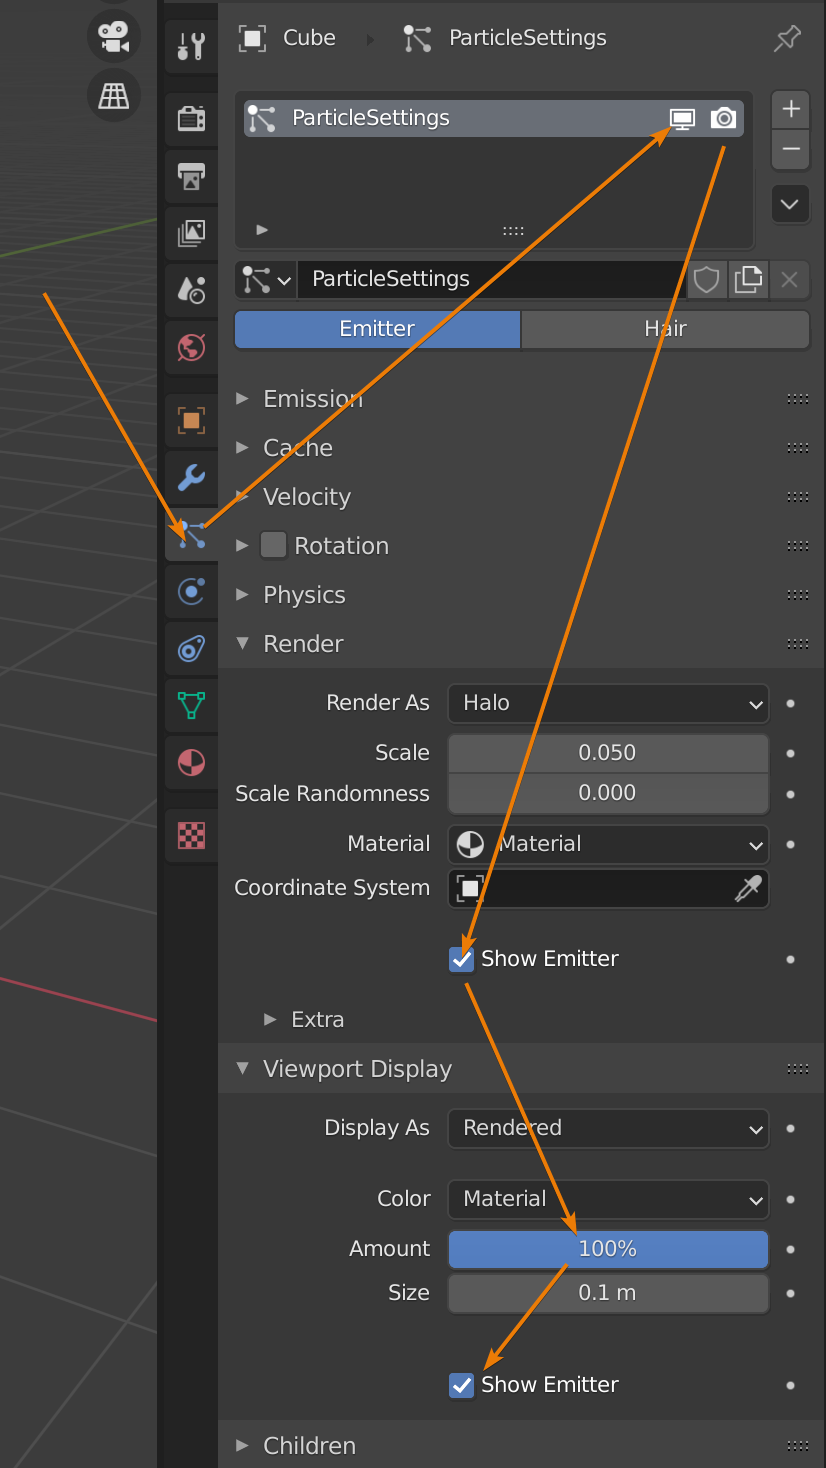
In the particle system tab, you can see the list of particle systems active on an object at the top. Here you also see the camera and monitor icons to enable or disable the particle system for the viewport or render.
In the viewport display section, we can choose the show fewer particles in the 3D viewport and there is a show emitter checkbox. This is only for the viewport.
In the render section, we have another show emitter checkbox. This is for the final render.
If you use child particles, you will see display amount and render amount at the top of the children section. By default, the display is 10 and render is 100.

By default, we will therefore get 10 times more children in the final render than in the viewport.
The final render and 3D viewport is not meant to show the exact same thing. The final render is the product of our hard work, while the viewport is there to support us through the process.
It needs to show the data that we need to see. Anything else is a waste of resources and may clutter our interface and make 3D art much harder to create.
Thanks for your time.
