


Subdivide, or adding a subdivision surface modifier is something we do quite often as Blender artists and a quick way to add it is to use a shortcut.
To subdivide an object in Blender, select the object and press Ctrl+1 for a subdivision level 1, Press Ctrl+2 for a subdivision level of two and so on. We can also subdivide our selection in edit mode by pressing right click and choose to subdivide.
Let's see how the subdivision surface modifier is setup when we use these shortcuts and how we can use the subdivide tool found in edit mode.
Related content: Top 10 Blender modifiers and how they work
We can press Ctrl+1, Ctrl+2, or any number up to Ctrl+5 to add a subdivision surface modifier to all selected objects at once.
Related content: How selecting works in Blender
However, keep in mind that the subdivision surface modifier has two different settings for the level. One for the viewport and one for the render. Setting up subdivision surface with the shortcuts only adjust the viewport level.
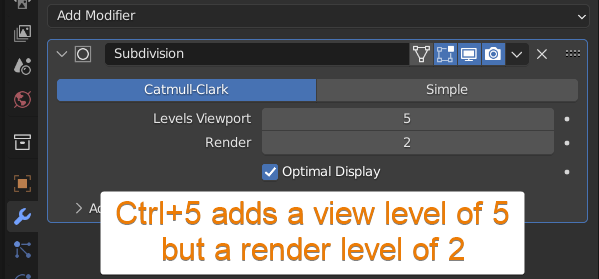
The render subdivision level is always set to two, no matter the number you use.
If we want to change subdivision level for the final render, we can follow these steps.
The render level value will then be copied to all selected objects that have a subdivision surface modifier attached to them.
In edit mode, we also have a subdivide tool. We access it by right-clicking and in the context, menu choose to subdivide.
Subdivide is available from this menu no matter what the selection mode we are currently in. We can use it to subdivide both edges and faces.
Related content: Shortcut for vertex, edge, and face select in Blender
If we want to have a dedicated shortcut key for this tool, while in the context menu and hovering the subdivide tool, right click and choose assign shortcut.
Then press the key you want to assign as a keyboard shortcut.
When we use the subdivide tool, it has certain parameters that we can change right after we used it and before using any other operator.
We can access these parameters in the bottom left corner of the 3D viewport by expanding the operator panel that appears there.
Alternatively, we can press F9 while our mouse cursor is in the 3D viewport to have the operator panel appear at the mouse cursor and we can change the parameters from there.
We can change the number of cuts and how much smoothness we want to apply to the new geometry.
There are also a few other settings, like how corners should be calculated and a way to randomize the position of the mesh.
For example, using a plane we can use fractal, along normal and the seed value to create an uneven ground terrain.
In this article we covered the subdivision surface shortcuts and the effects they have on the mesh and the modifier they add to the stack. We also looked at how we can add a shortcut to the subdivide tool in edit mode and how some of its parameters work.
Thanks for your time
