


Animation can be a complex process that requires a deep understanding of the software being used. Whether you are a professional animator or a hobbyist, it's important to be aware of the common problems that can arise when working with Blender.
This article will provide a general overview of some of the most frequently encountered issues and provide tips on how to avoid them. With the right knowledge and a little bit of practice, anyone can master the art of animation and create stunning visual effects using Blender.
These are the main problems we will be looking at:
Let's now head into a definitive guide of how to solve all of these frequently faced animation problems.
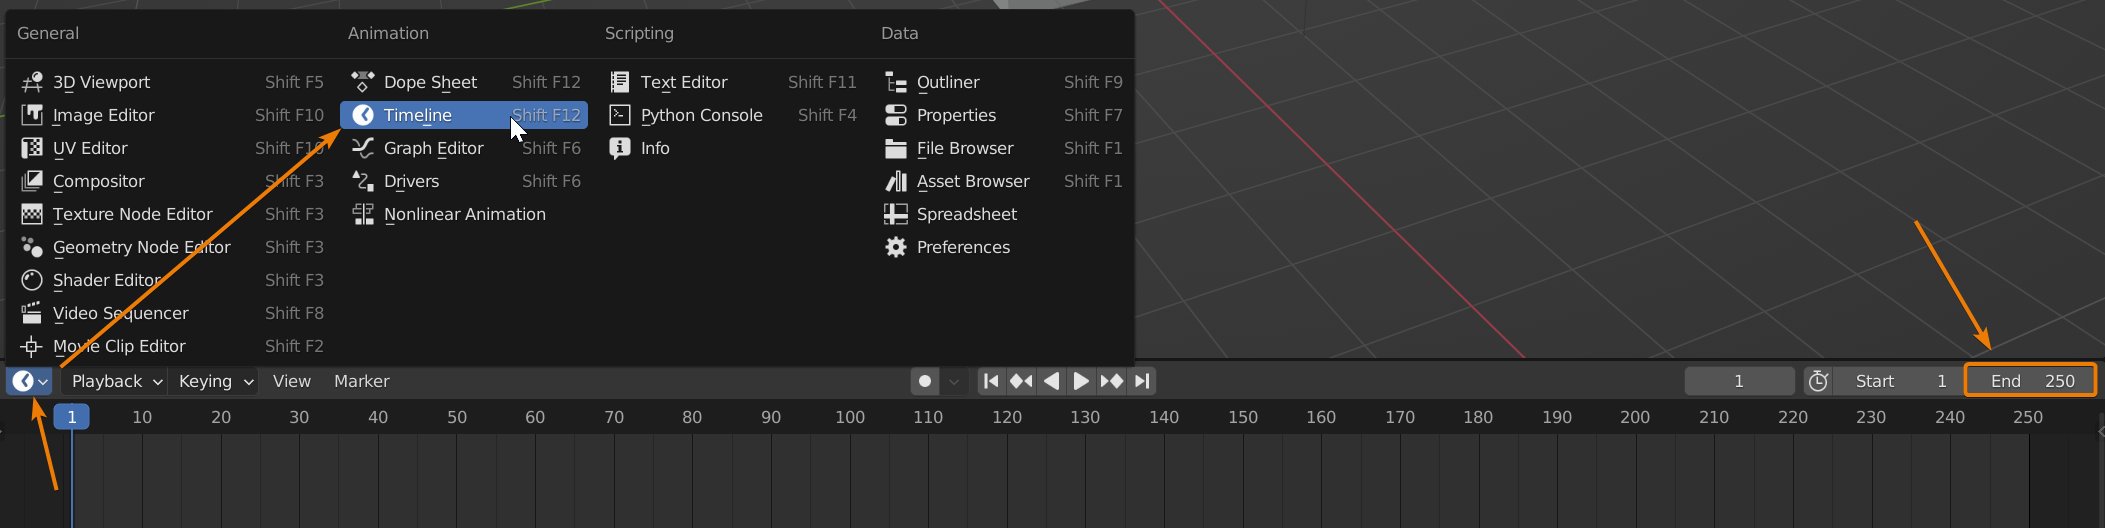
One of the most common animation problems faced in Blender is the animation itself stopping at 250 frames, which is the default number of frames for an animation, and luckily enough this is one of the easiest ones to solve as well.
To change the number of frames, simply head to the timeline editor and edit the "End" value for the keyframes at the top-right of the editor.
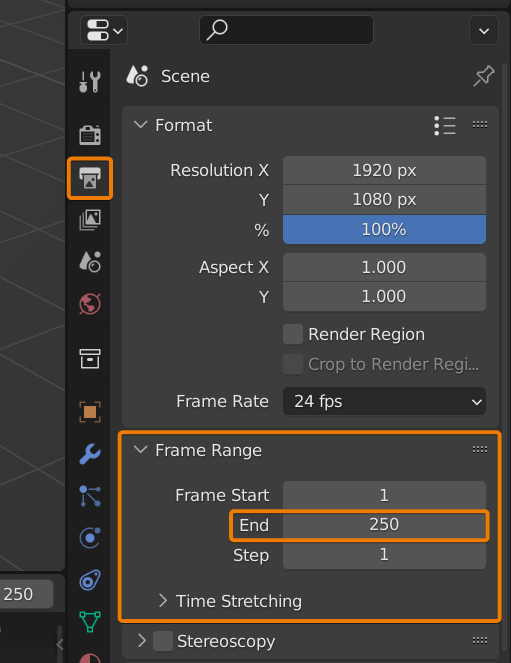
Another method to accomplish this is to head to the "Output Properties" section marked by a printer icon in the Properties panel. Here, underneath "Frame Range", change the end value for the frames just as before.
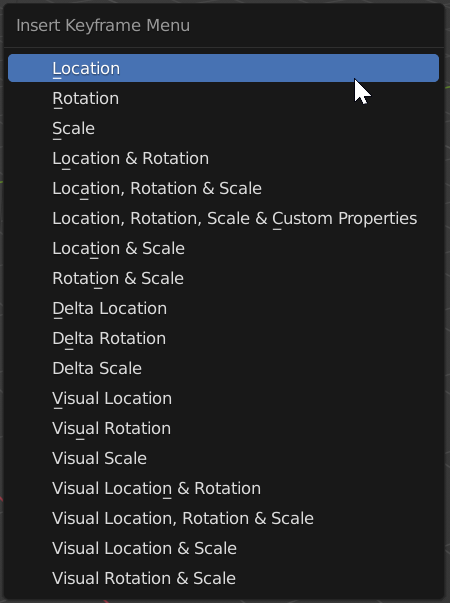
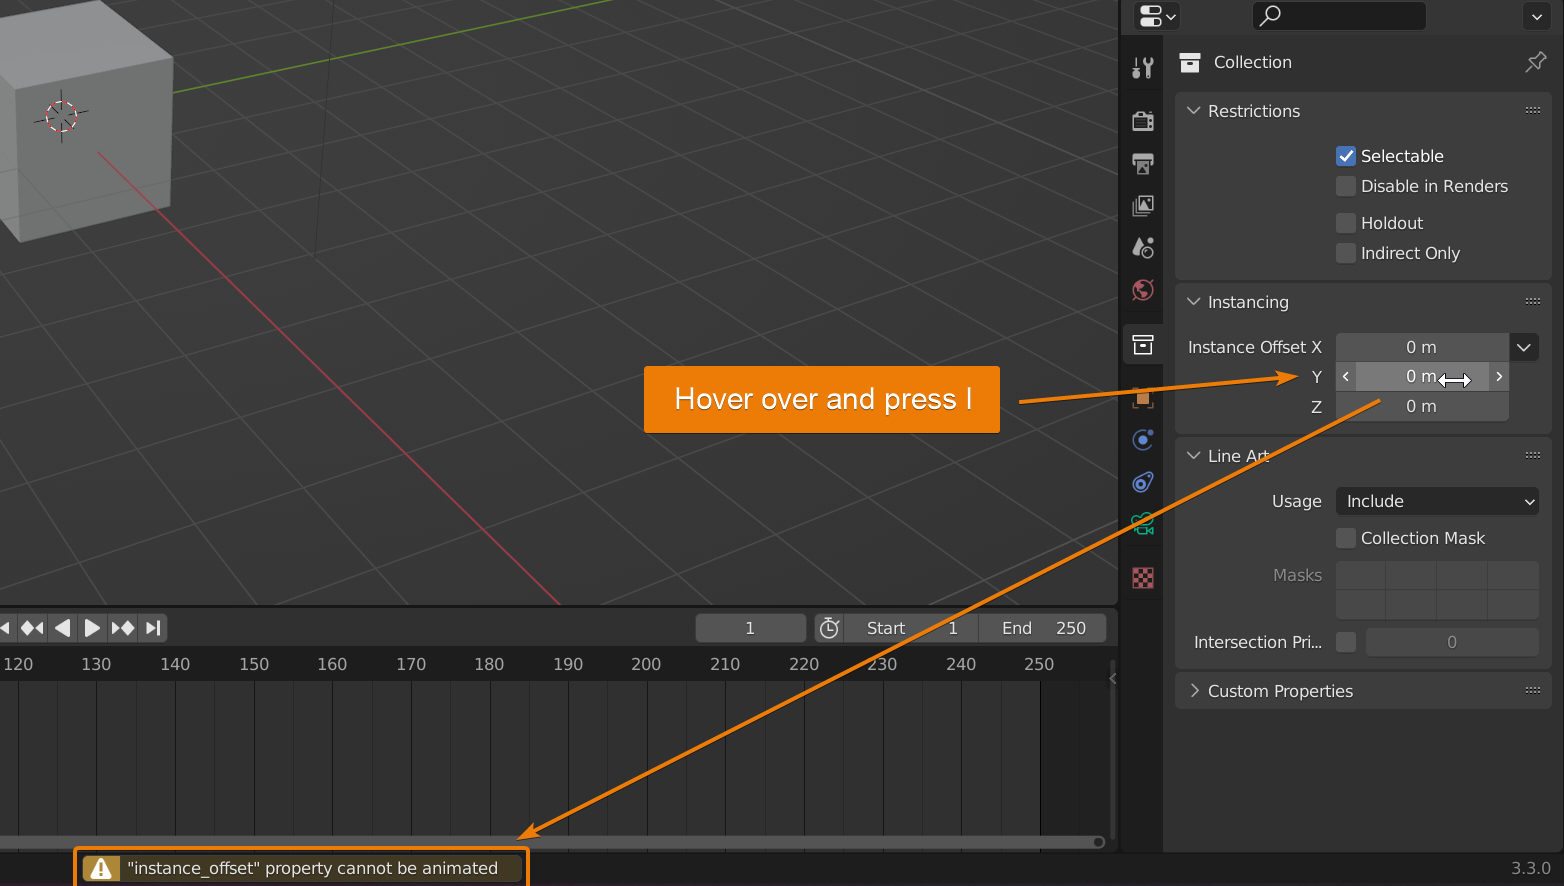
Being unable to insert a keyframe is also a commonly faced problem. A keyframe is a point in time where a specific property of an object or animation is recorded. This property can be the object's location, rotation, or other attributes. To insert a keyframe, simply hit I on your keyboard after manipulating an object, data field, etc. This brings up a menu to select which attribute to insert a keyframe for.
It is possible that after selecting the attribute the following error pops up:

To avoid this, make sure you have selected the object in either the 3D viewport or the Outliner as well as that the cursor is hovering over the 3D viewport when you press I.
If you are unable to insert a keyframe for a data field, it is likely that the value is not animatable:
There can be multiple reasons an animation looks blurry when rendered, so let's quickly go through some of them now:
Many animations make the use of motion blur for added realism or dramatic effect in their video, especially in scenes with lots of fast-paced movement. In often cases, an animation can look overly-blurry if the motion blur is too intense.
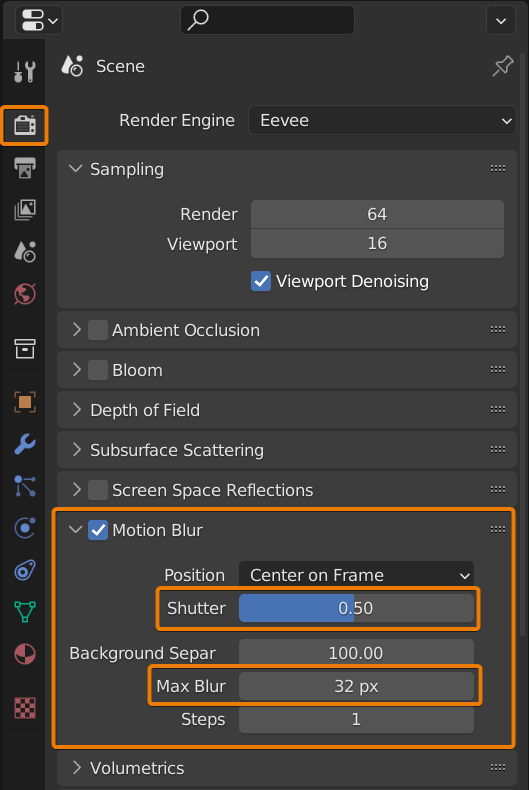
Motion blur settings can be found in the "Render Properties" tab denoted by a camera icon in the properties outliner. The "Shutter" setting is key here, as it sets the amount of time between the camera shutter opening and closing.
The lower the shutter value, the less motion blur will be visible in your animation.
Similarly, changing the "Max Blur" also changes the radius that the motion blur affects your scene, and hence reducing this value also reduces the overall blur in an animation.
A lower sample count is bound to make your render more pixelated and hence more blurry, with this effect being felt even more in animations. Lower sample counts give an uneven "grainy" effect on the render, and since this grain might not be consistent between frames this might lead to extra visible blur in an image sequence.
To fix this issue, simply change the render sampling number under the "Render Properties" tab.

This setting can be changed in the same way when using the Eevee render engine as well.
In Cycles, reducing the light paths are a very effective way to significantly reduce render times of images, which is preferable for animation renders with many hundreds of frames.
However, a low light path count can also lead to more blurry animations. Try playing around with the total number of light paths in your scene, found under the "Render Properties" tab in the properties panel, until the blurring is reduced.
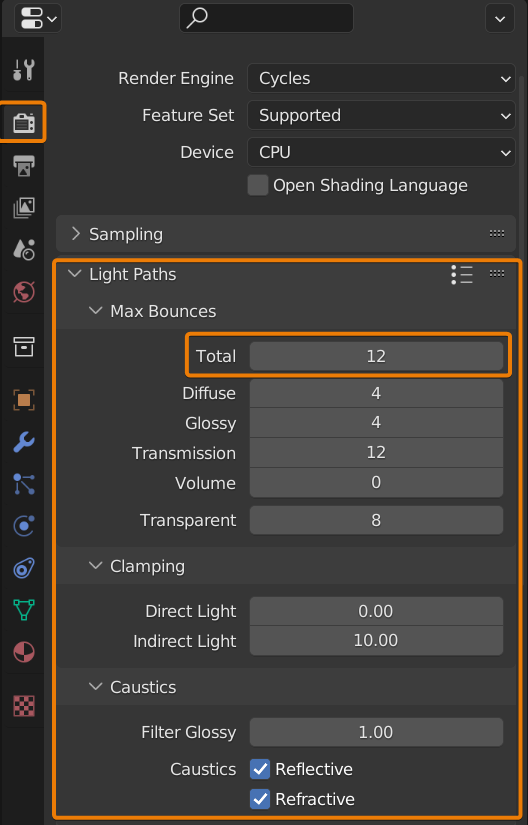
The individual number of light paths for diffuse, transmission, etc. can also be changed individually in order to get higher quality for certain parts of your scene compared to others.
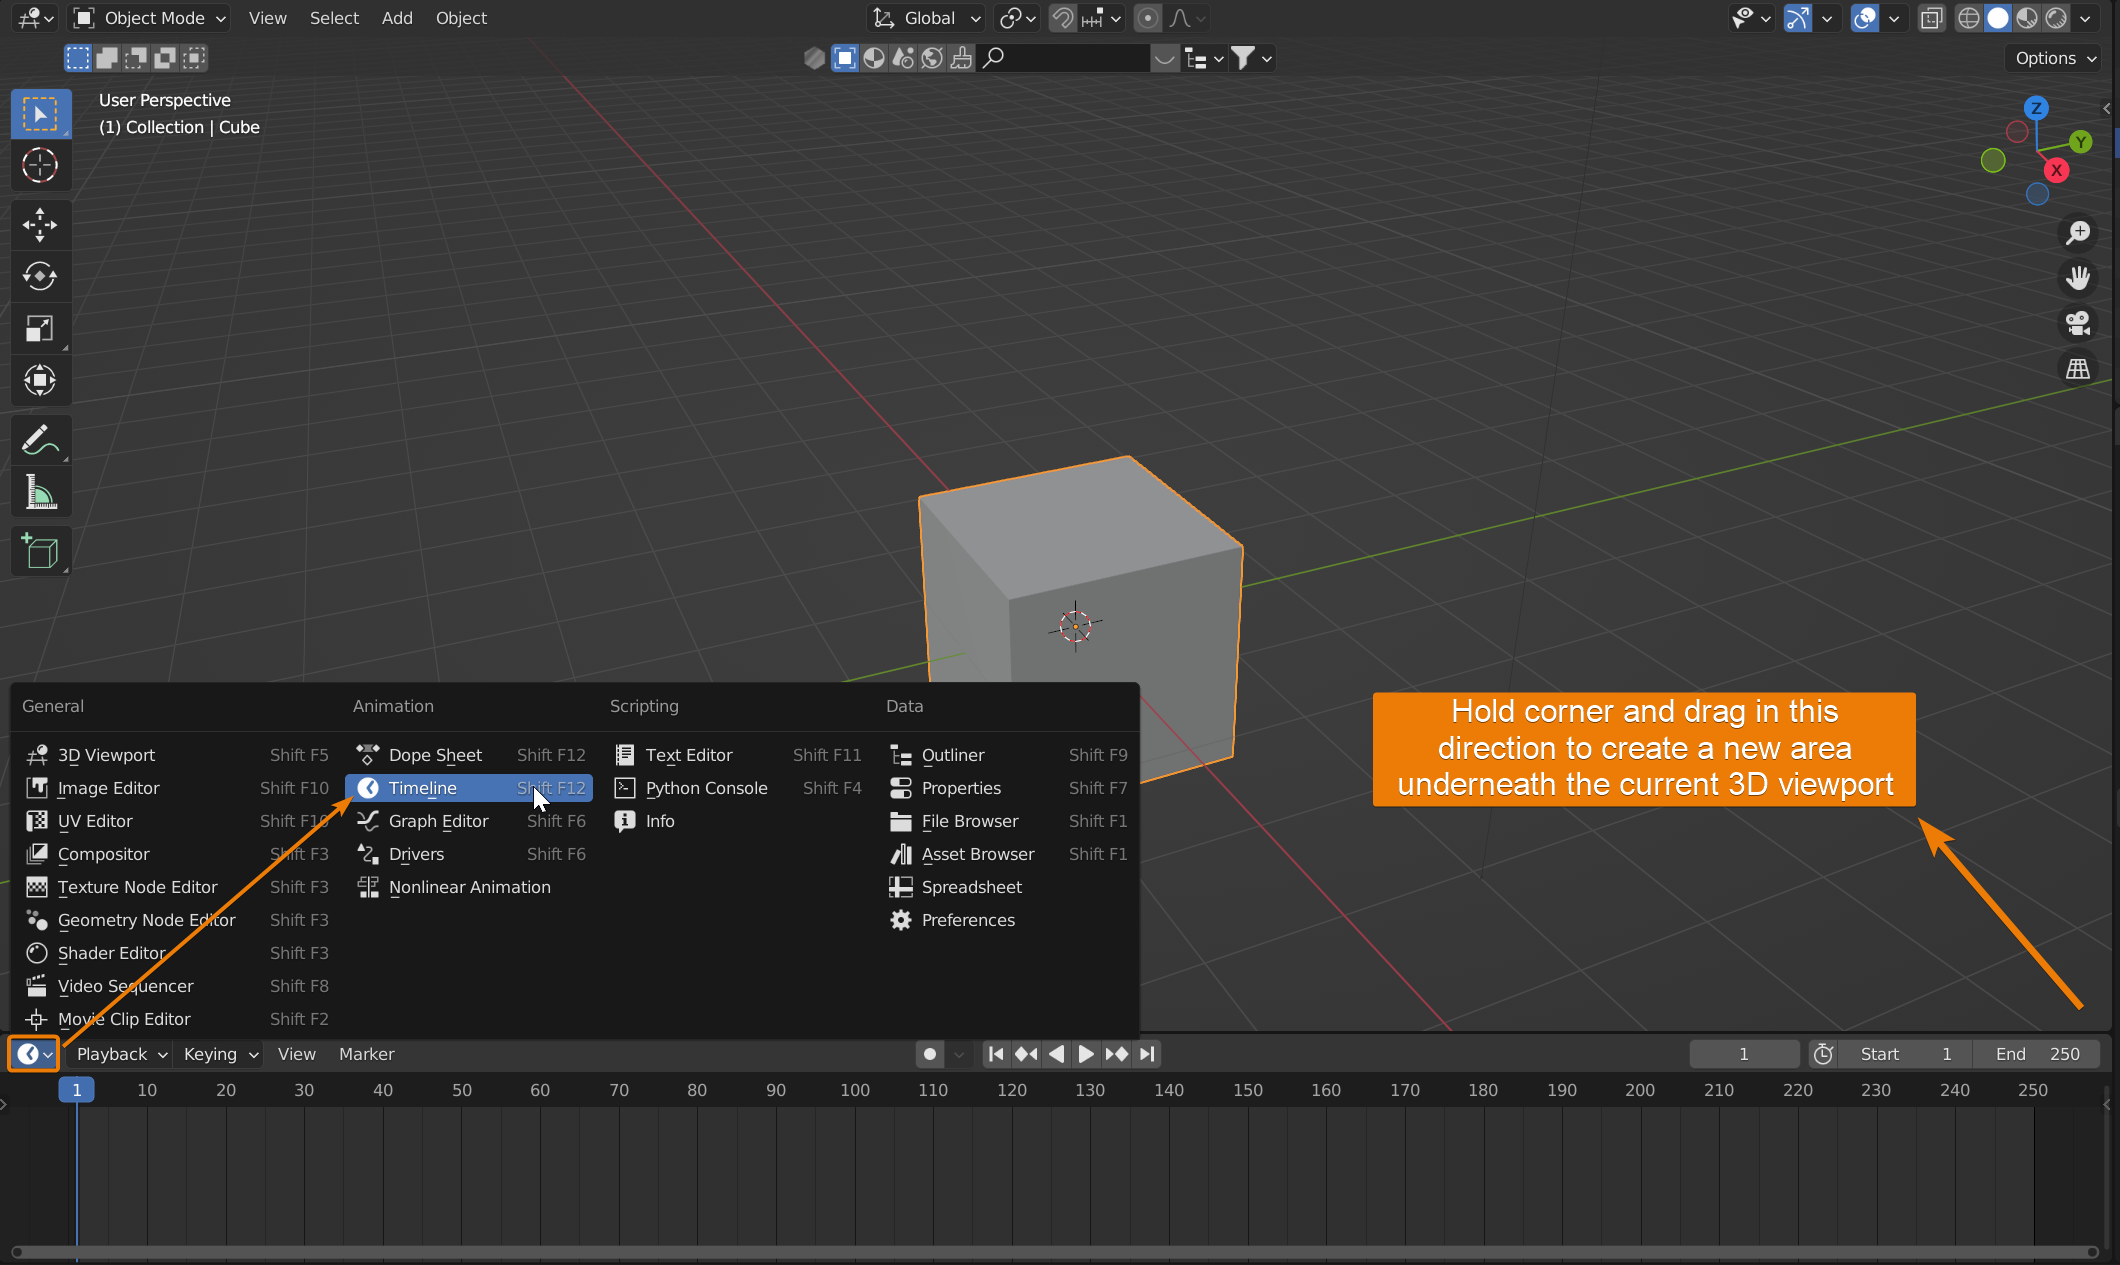
If the animation bar is gone or you can't find it, you simply need to reopen the timeline editor in a new area or switch an existing area to display the timeline.
In order to open the timeline in a new area, hover over a corner of your 3D workspace until a + shaped cursor appears. Hold and drag this corner to create a new area. This area can now be set to show the timeline of your animation by opening the "Editor Type" dropdown and selecting "Timeline" editor under the animation section.
Similar to a blurry animation, a choppy or jittery animation could be caused due to a multitude of reasons.
One of the most common reasons is if the scene is too complex or has too many elements, causing the software to struggle with rendering it smoothly.
Simplifying the animation or reducing the number of elements can help resolve this issue. This includes reducing the number of particles for any particle systems (especially in the viewport), or even reducing the number of polys for a detailed mesh.
Another way to simplify a scene is by changing textures or lighting in the scene. This includes reducing transmission surfaces or adjusting materials with high amounts of subsurface scattering.
When working with the Cycles rendering engine, always ensure that the render device is set to "GPU Compute" and not "CPU", as in most cases the CPU is significantly slower at computing. Changing this one option can make a major difference in render times and can hence improve choppy playback.
The shortcut to play an animation in Blender is the Spacebar key. In case this does not play the animation, you can press the "Play Animation" button shown as a right-facing arrow at the top of the timeline editor.

It is also important to ensure the animated keyframes are within the starting and end keyframe numbers, shown at the top-right corner of the timeline.
If the above solutions do not work, it is possible that there may be a problem with the computer's performance. This can be resolved by closing other programs and increasing the amount of memory allocated to Blender, or simplifying the scene as mentioned above.
Lastly, it is possible that a problem may exist in the file itself. In this case, it may be necessary to go back to a previous save or start a new file to ensure that the animation will play properly.
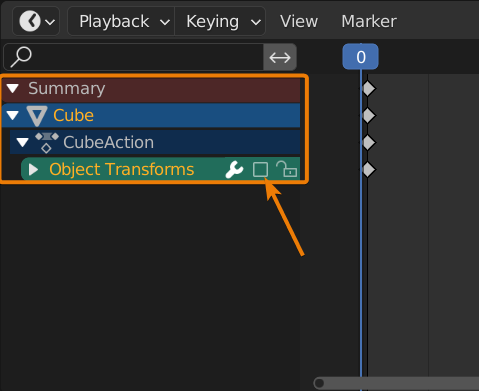
The keyframe not showing in the timeline can be for one simple reason: by default, the timeline editor only shows keyframes for selected objects. Hence, to solve this problem, ensure you've selected the animated object(s) in the 3D viewport or in the object outliner.
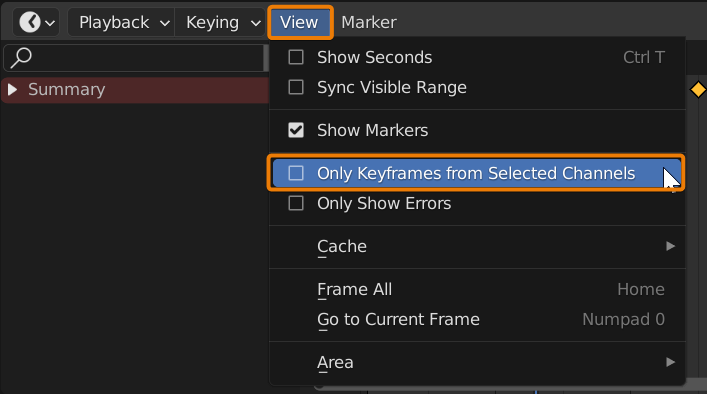
If you would like to see the keyframes of all objects at all times, even if they are deselected, simply disable the "Only Keyframes from Selected Channels" under the "View" dropdown in the top-left corner of the timeline editor.
If the animation type is set to non-linear, certain keyframes might also only be visible in the "Non-linear animation" editor, instead of the timeline editor.
Most of the times, a keyframe not working may be solved by making sure that you have selected the correct object or bone that you want to animate. Keyframes will only be applied to the selected object or bone.
Moreover, make sure to check that you apply the keyframe for the correct attribute. For example, if you change the location of an object, ensure that you select the "Location" attribute from the menu after you press the I key.
Keyframes could also not work if you have muted the channel that you have animated. To unmute this, follow these steps:
To solve this issue, make sure the animated keyframes are within the range of start and end frames for the animation.
Once more, another common reason for the issue might be due to the scene being too complex and the hardware not being able to handle the number of elements. To solve this, reduce the number of particles, simplify textures, etc.
Always double-check that you are on the latest version of Blender, as this may also cause issues with animation playback.
By far, one of the most common of all these problems faced by beginner users is the animation itself not rendering, and the issue mostly lies behind render settings.
First, ensure you have selected a valid output folder for the rendered animation to be saved to. Unlike a single frame or image render, the user does not need to manually save the rendered image as each frame is automatically saved to the output folder before the software moves onto the next frame. To change the output folder, simply head to the output tab in the properties editor (indicated by a printer icon), select the file icon underneath the "Output" heading, and use the Blender File View to locate an output folder.
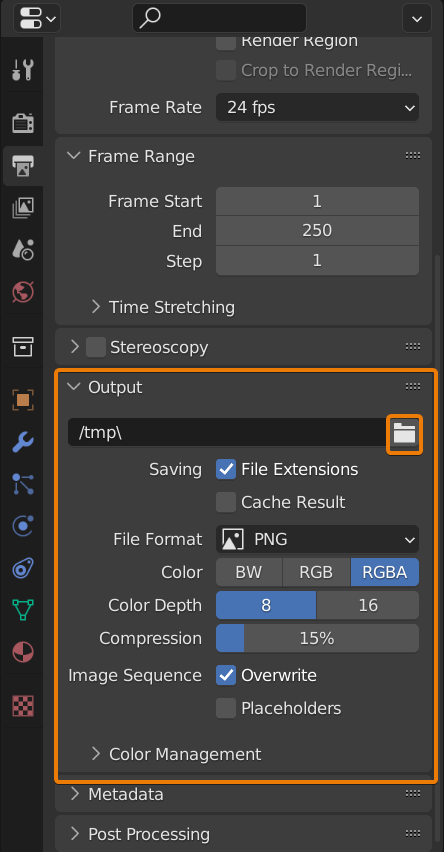
It is also preferred to render the animation as a series of PNG images rather than a single FFmpeg video, which can be changed using the dropdown for the "File Format" settings. This way, if you face any issues halfway through the render, you will not need to render the first frames again as they are all already individually saved.
In order to convert the series of PNG images into a single animated video, you must:
Following this simple workflow helps avoid a lot of different issues regarding the animation not rendering.
As mentioned before, an animation may also have difficulty rendering if the scene is too complex for your PC or laptop's hardware to handle. Try simplifying the scene and, if you are working with the Cycles render engine, ensure you are rendering using the GPU and not CPU.
And there you have it - we've gone over some of the most commonly occurring problems faced while animating in Blender, why they might occur, and how to solve them. Quite often, problems might arise due to a mix of the above mentioned factors, so always try to troubleshoot in a few different ways.
Thanks for your time!
