


In Blender, the normal is the direction a face is pointing. But you may also have heard the term "true normal". The true normal represents the actual direction of the normal, and when referring to just the normal, it can have an altered or changed value.
The effect the normals have is the shading of the object. For example, normals can be averaged between faces so that when light hit it, we cannot see the sharp edge created when light hit two faces that are connected but are pointed in different directions.
There are actually multiple kinds of normals in Blender.
Related content: 5 Different types of normals in Blender
However, showing, recalculating and flipping normals are all related to shading and solving shading issues.
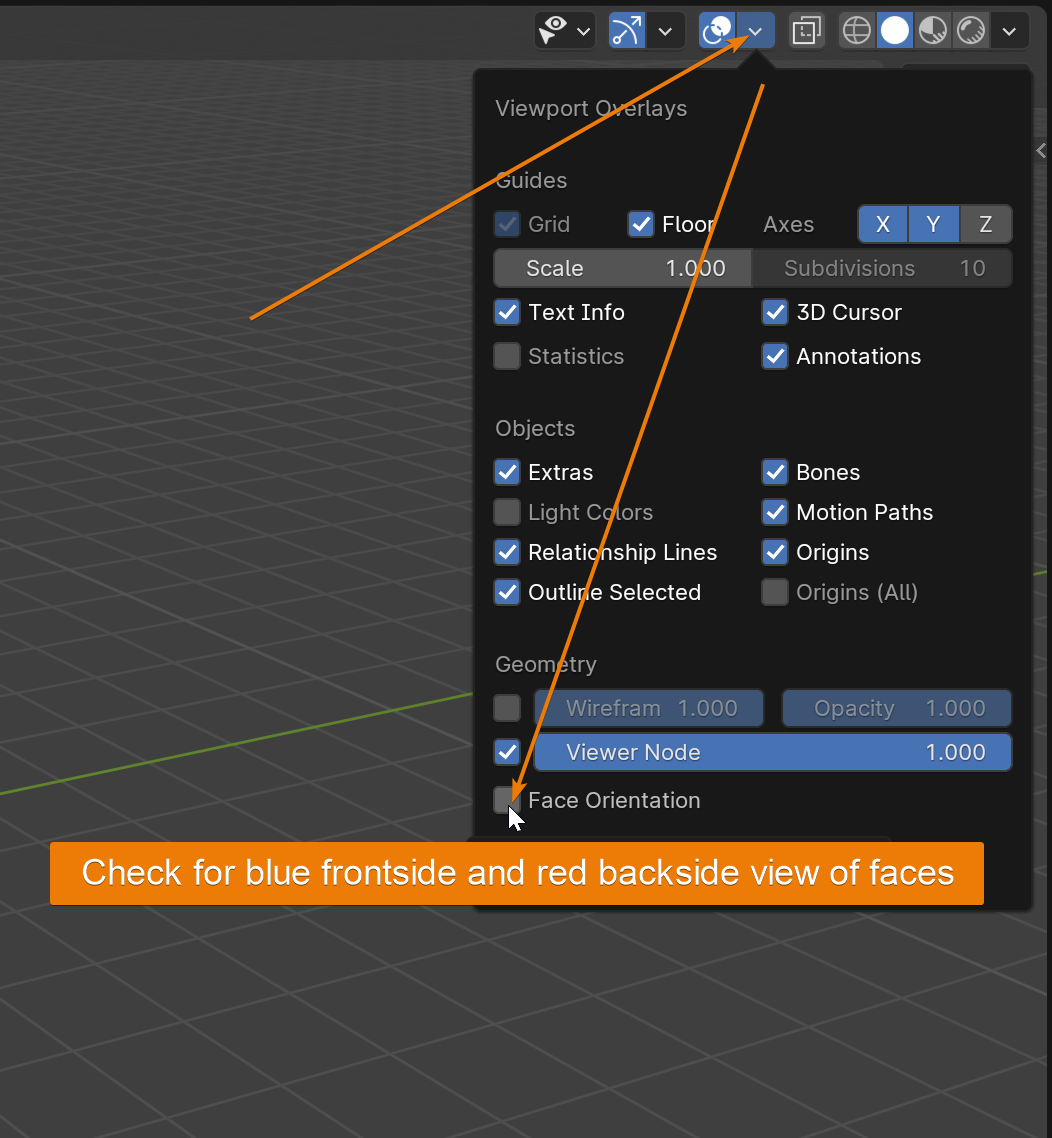
To show normals in Blender, go to the overlay menu in the 3D viewport upper right corner and check face orientation. Blue shows the front side and red indicate the back side.
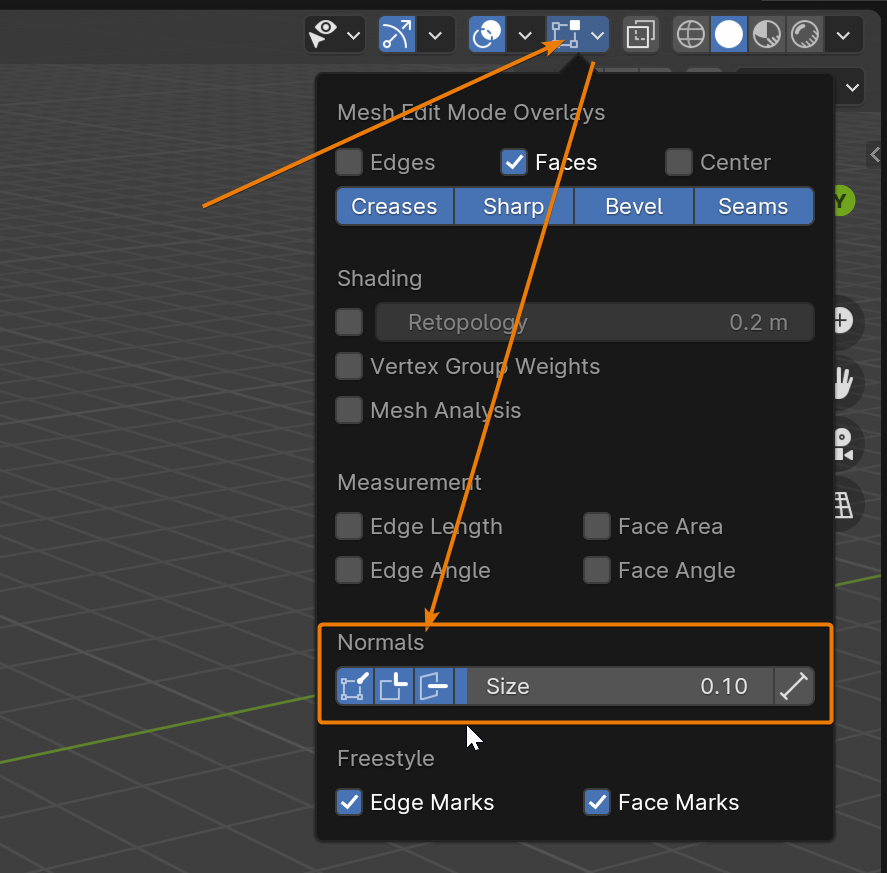
Alternatively, while in edit mode, in the edit mode overlay menu, go down to normals and click the kind of normal you want to view. This will draw a line showing the normal from faces, edges or vertices depending on your choice.
To recalculate normals in Blender, follow these steps:
To flip normals in Blender, follow these steps:
In the 3D viewport and both object mode and edit mode, you have access to the viewport overlay menu. Make sure that the blue icon next to the down arrow that opens the menu is blue or overlays are disabled.
Then press the down arrow and go down to where you see face orientation and check it to view the face orientations. Blue shows front side and red shows backside.
There is another way to view normals as well, but this is only available in edit mode. Tab to edit mode and a new edit mode overlays menu appears next to the regular overlays menu. Click it and in the normals section you will see three buttons and a slider. The three buttons enable you to toggle the view of normals as lines for faces, edges and vertices separately.
The size slider just gives you the option to display longer lines and the far right icon allow you to toggle between relative size or constant size of these line drawings.
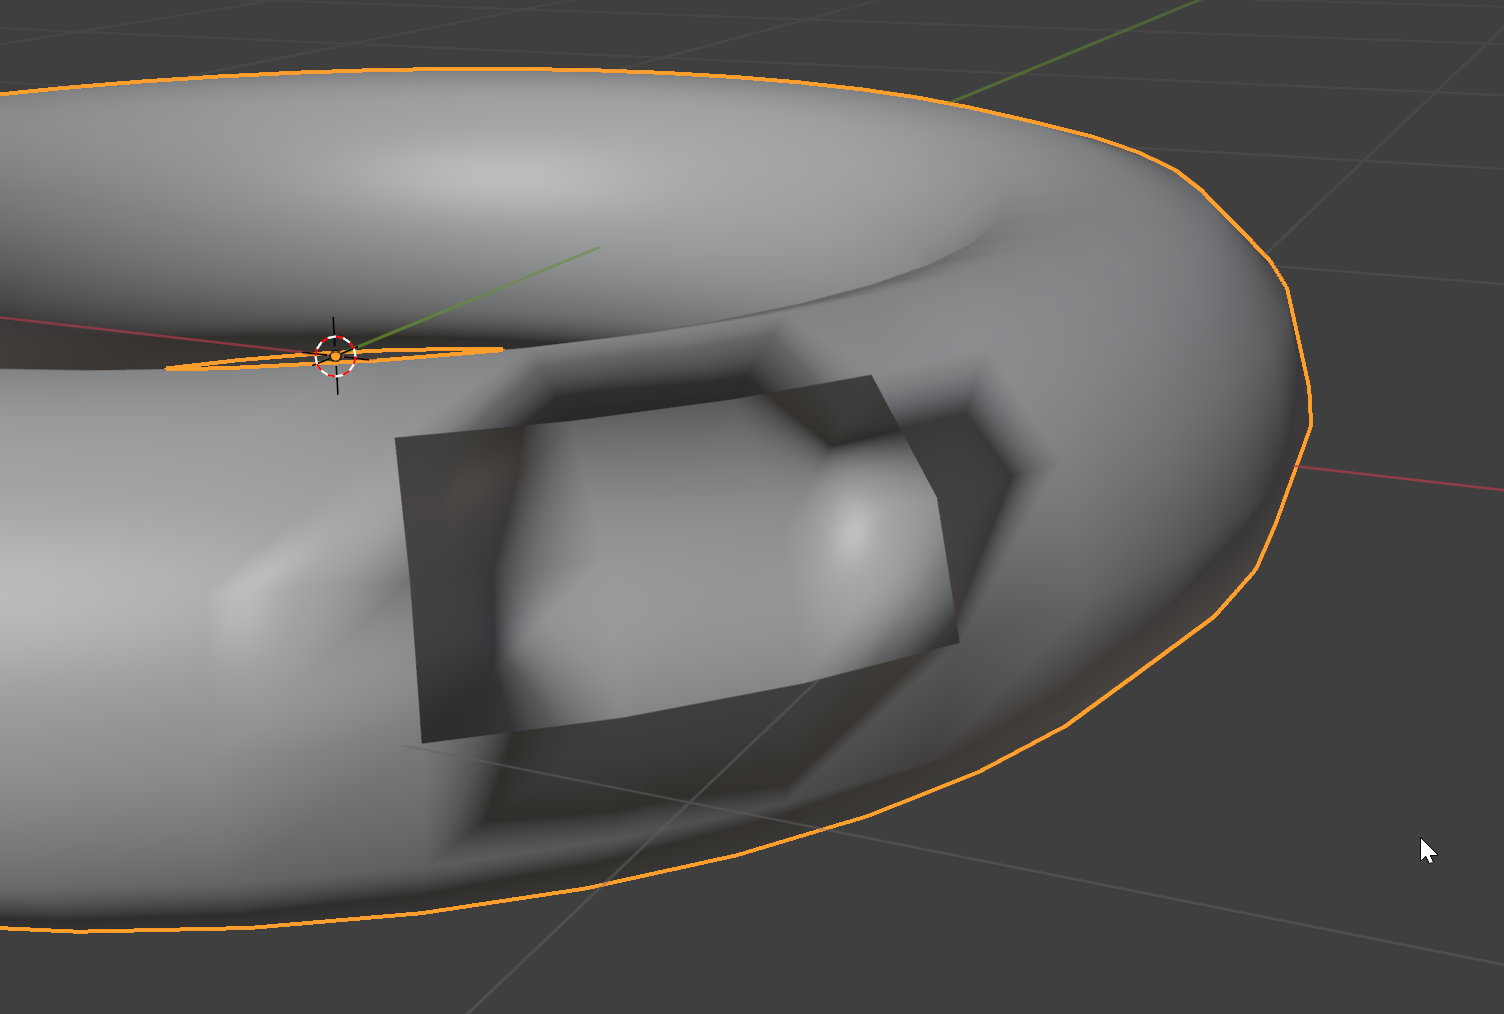
Normally, we don't need to see the normals on our objects. But sometimes we might get shading issues, often seen as darker gray shading. In these cases, we might need to check and make sure that our normals are correct.
Here is an example of a patch of faces with flipped normals on a rounded shape.
We may also need to view the length of our normals if we are baking textures for complex objects. Settings the size here the same as the ray distance in our baking settings show us if the length of our rays will penetrate through multiple layers of mesh or if we are ok. More about baking here.
Related content: How to bake textures in Blender
If we find that we have shading issues in our mesh and that it is because our normals are inconsistent, we can have Blender recalculate them for us automatically. This works most of the time and is worth a try.
If it messes up your normals more, just press Ctrl+Z to undo the last operation.
When recalculating normals, Blender will use the current selection and this is an edit mode operator. Therefore, tab to edit mode. And most of the time, we can recalculate normals for our whole mesh, so press A to select all.
Then hit Shift+N to recalculate normals that are supposed to be facing outwards.
If you have a mesh where the normals are supposed to all be facing inwards, use Shift+Ctrl+N.
Ensure that you orient your normals towards the direction of the main light source and camera.
You can also recalculate normals by using the Normals menu. You find this by going to Mesh>Normals>Recalculate normals Inside/Outside.
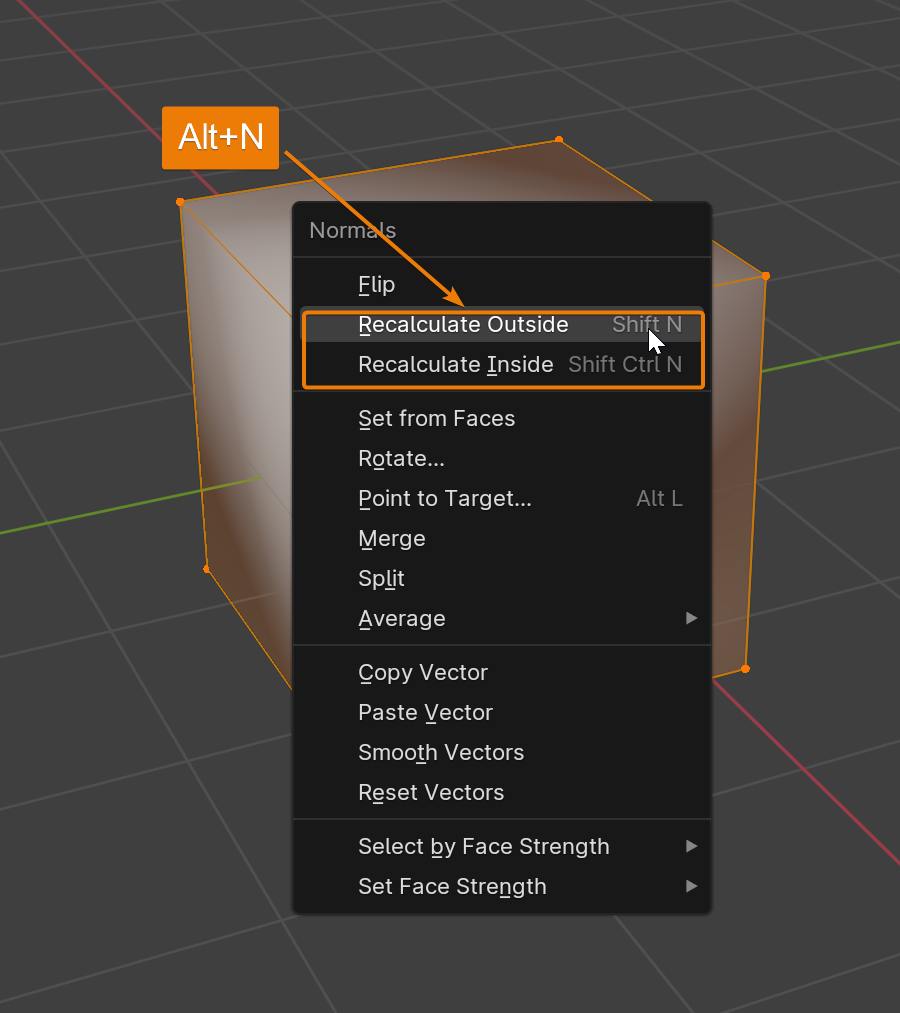
You can also hit Alt+N to bring up the whole normals menu. If you choose the wrong recalculation, you can also use the operator panel in the lower left corner or press F9 and check/uncheck the box to toggle between inside and outside.
Another way is to press F3 and search for recalculate and Blender will filter the recalculate operations for you to use.
Sometimes Blender just flips the normals the wrong way when recalculating, or we might have made a mistake when modeling that made it so that all normals point the wrong direction.
In these cases, you can flip the normals, either for the whole mesh by selecting everything with A or by selection a portion of the mesh and using the flip normals command only on that part.
describe all ways to get to it, shortcut, through menu, through search by hitting F3 and searching, alt+n menu
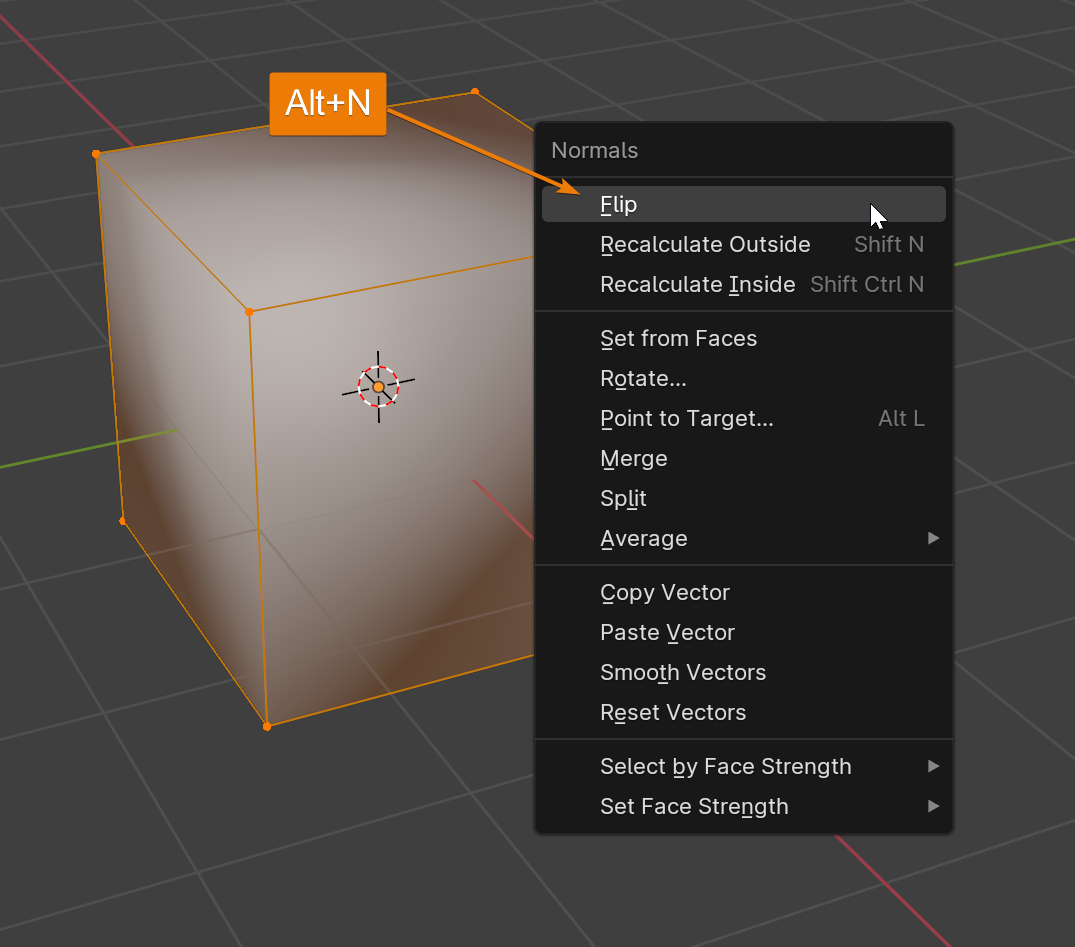
Flipping normals doesn't have a shortcut. But you can use the Alt+N shortcut to bring up the Normals menu and choose flip to flip the normals for your selection.
We can also flip normals by using the F3 menu and searching for Flip.
Remember that flip normals is an edit mode tool only and isn't available in Object mode.
Viewing, recalculating and flipping normals is something every 3D modeller will need to do from time to time.
With experience you will get a sense for when your normals are pointing in the wrong direction based on the color of the shading. Normally, you will see a darker gray shading in the faulty area. But sometimes when the whole object is pointing in the wrong direction, you might not see it until you render where you may notice much darker patches in the shading and materials.
Thanks for your time.
