


We can divide the factors that matter to our render speed in four categories. Hardware, render settings , scene and external software factors. Higher end hardware is invariably going to speed up our renders. But there are a lot of ways we can improve performance, both in our scene and by tweaking render settings. What I mean by external software factors are things we can do in software to improve our render performance that is outside of Blender.
Each way we can improve render performance discussed below boil down to these undelying goals.
In this article, we are going to look at these techniques that impact how fast we can render with Blender. Primarily focusing on Cycles rendering. Each link in this list takes you to the corresponding section down the page.
However before you move on, make sure that you are using the latest version of Blender since a lot of performance changes are done with each release. Also, make sure that your graphics card drive is updated as well since some features features and perforamnce improvements may not be available for older drivers.
External content: Download the latest version of Blender from Blender.org
The first thing we can change is the samples count. Cycles is a ray-traced render engine. It casts several rays per pixel into our scene and lets them bounce around to determine the color of each pixel. If we lower the amount of rays cast, called samples, we will reduce the accuracy and introduce more noise, but we will render faster.
Going back to our factors determining render performance, this helps by decreasing the number of calculations we perform.
Blender also manually setting the samples count and adaptive sampling. Adaptive sampling means that the correct number of samples is automatically determined for each pixel. Pixels with big color differences will receive more samples, while those with accurate color will stop sampling sooner.
You find the sampling settings in the render tab in your properties panel.

The interface divides sample settings into viewport and rendering. This is so that you can set a different samples count for each of these so that you can have improved performance in the viewport while working compared to your final render where quality might be preferred over speed.
In each of these we have noise threshold that is turned on by default. This is the adaptive sampling. A lower value will set adaptive sampling to render longer while a higher number will accept a higher level of noise.
The max samples value will set the maximum number of allowed samples. At a value of zero this will be turned off and fully be determined by adaptive sampling.
The min samples value can also be set to any number higher than zero. This will make it so that no matter how many samples adaptive sampling think it needs, it will at least render this amount of samples for each pixel in the scene.
If noise threshhold is checked off, manual samples will be used instead. This is set in the max samples setting.
For the final render settings we also have a time limit. This is the maximum amount of time used to render the scene. If the time limit is reached before all samples are calculated, the render will stop. A value of zero will turn off this feature.
Generally, adaptive sampling works well and is a major contributor to faster render times.
Denoising uses AI to remove noise from a render. We consider this a post-processing effect that, together with lower samples, helps us reduce noise. Blender has two denoisers that are available in a few different ways.
Optix denoise and OpenImage denoise. Both are available through the Cycles render settings. You can use OpenImage denoise in the compositor. Optix also has a temporal denoise mode in the Python API.
The quickest and easiest way to use denoising is to go to your render settings, extend sampling and render and make sure that denoise is checked. If Optix denoise is available for you, Blender will use that and if not, OpenImage denoiser will be used instead.
For denoising the viewport, do the same but go through sampling>Viewport and enable denoise.

OpenImage denoiser should always be available while Optix has certain requirements.
Optix denoise requires you to have an Nvidia Graphics card that supports compute capability 5.0 or above according to the Blender manual.
External content: Blender manual Optix requirements
Nvidia has a page listing compute capabilities of all their cards. If you go to this page:
External content: Nvidia: Your GPU compute capability
Extend the "CUDA-Enabled Geforce and Titan Products" and see if your graphics card is listed with a compute capability with 5.0 or above and Optix should be supported in Blender. Recommended is the 20xx series of graphics cards or above.
If you want to learn more about denoising using the compositor, you can read this article:
Related content: How to use Intel denoiser in Blender
If you want to render an animation in Blender using Cycles, you might find that denoising will make the frames flicker quite a bit. This is because the denoisers don't take adjacent frames into account when denoising. Instead each frame is denoised separately and often end up with significant differences between them.
To solve this, you can try to use Blenders temporal denoiser based on Optix. You can read more about using it here: Just keep in mind that it is not perfect either. Consider it an experimental feature for now.
Related content: How to denoise an animation in Blender using temporal denoising
We can render at a lower resolution and then upscale the rendered image using AI. This is a combination of lowering the amount of calculations needed and a post-processing effect to make up for that loss.
To change the resolution, go to the output settings in the properties panel. In the format section, you will find the resolution X and Y settings along with a percentage slider.
We can change either the X or Y resolution to a lower value or drop the percentage slider to let say 50% to render half of the X and Y resolution.

After we rendered, we can use either a Blender add-on or a separate software to upscale the image to the resolution we want. Creating a very similar image to what would have been if we had rendered the original resolution from the start in just a fraction of the time.
If you want to use an add-on and upscale within Blender, you can use AI Upscaler for Blender that is available here:
External content: Github: AI Upscaler for Blender
The upscaler that I typically use however is an external software called Upscayl. An open source upscaler that is easy to use.
External content: Upscayl.org
Press download, choose your operating system and click the option for your system and install like you would any installer.

Once the software is downloaded installed and started, simply drag and drop an image into the interface. Select the model. This is the AI that will do the upscaling. The default is fine in most cases and the software will upscale your image by 4x.
Caustics is the light pattern thrown on a surface after passing through a glass object. We can decrease calculations by turning off caustic, as it eliminates the need to calculate these intricate light patterns.
In this image, you can see an example of what caustics may look like.

In version 3.2 Blender got improved caustics, allowing us to render beautiful glass shadows. However, this is a very demanding process, both for earlier versions before 3.2 and later versions like 3.6 and 4.0 and probably beyond this as well.
If we don't need to render caustics, we can disable it in the render settings so that Blender doesn't waste render time on it.
Go to the properties panel and the render settings tab. Next, press light paths and expand caustics. Here, disable reflective and refractive caustics.

Another way to decrease the amount of calculations needed is to decrease the amount of light bounces. If samples are how many light rays we calculate per pixel, the light bounces is how many bounces each of those samples should be allowed.
You find the light bounces by going to your render settings in the properties panel. Expand the light paths section and the max bounces subsection.
Here you will find a handful of different ray types we can adjust. Including:
Depending on your scene, experiment with this. But if you are experiencing slow render times, I would suggest to start by cutting the defaults in half.

However, keep in mind that decreasing the light bounces can really make your scene look more flat. Many times, you will actually want to increase the amount of bounces to get the most out of your scene. Especially if you are working with scenes having a lot of layered geometry so that the light fall-off doesn't become unnatural.
By clicking the hamburger menu on the light paths section drop-down, you can see that there are several presets and the defaults are already at the lower end.
If you want to learn more about light bounces, explore the light path shader node. You can read more about that here:
Related content: How the light path node works in Blender
Fast GI approximation has been around for quite some time, but it has been hidden in the simplify settings and not talked about very much. This feature allows an approximation model to take control of lighting after a certain number of bounces. Reducing the need for calculations while still illuminating the scene.
Keep in mind that this is a feature that breaks the physically correct aspect of Cycles but it is quite effective.
Turn it on by going to your properties panel and find the render settings. Then expand light paths and check Fast GI Approximation. Expand the Fast GI Approximation section to adjust the settings.

The method we want to reduce render time is replace. Otherwise, this model will be added on top of our lighting.
The viewport and render bounces tell after how many bounces this feature should take over the lighting. The fewer bounces, the faster this model will take over and improve performance.
The AO factor controls the blending of AO while the AO distance determines how far away objects can be to affect the AO of each other.
If you want to learn more about AO, you can read this article.
Related content: Ambient occlusion in Blender: Everything you need to know
The simplify settings are really several settings that all serve the purpose of simplifying your scene in a single convenient place. We can reduce geometry, number of particles and texture sizes and culling away objects that don't contribute to the final render.
You find the simplify settings in the properties panel by going to the render tab and expanding the simplify settings.

Here we will focus on the render and culling sub sections. But first, not that there is a checkbox on the simplify section that allows you to enable and disable all these settings with a single button.
Starting from the top, the max subdivision will limit the maximum subdivision level of any subdivision surface modifier in your scene. So if you are using subdivision surface modifiers, this is a simple way to limit all of them at once to a lower level.
Alternatively, we can use adaptive subdivision in Blender. Read more about it here:
Related content: How to use adaptive subdivision surface in Blender
The child particles refer to the child particles in Blenders particle system. While less commonly used now when we have geometry nodes, if you still use them, this is a percentage slider that limit the amount of child particles rendered.
Related content: How to use a particle system in Blender to scatter objects
The texture limit will lower the resolution of all textures in the scene so that they may be calculated faster. Keep in mind that this does not change your original image texture files. It is only temporary while this setting is active.
The culling settings will disable any object from rendering that isn't within the set limits. These features will use the object origin points to determine if an object is outside or inside the limits.
The camera culling will cull away any object that isn't within the view of the camera plus the distance given by the slider.
The distance culling will disable any object that is further from the camera than the distance given here.
There are several ways we can optimize geometry. But it all boils down to two things. Either using less geometry or using instances instead of duplicates when possible.
Let's start with instances. An instance is one of multiple objects sharing the same data. Really, you can think of objects as either instances or stand-alone objects. However, the only difference really is that an object that isn't an instance does not share it's data with any other object. It is the only instance using its data.
An instance can be created by useing Alt+D instead of Shift+D when duplicating objects. Particles are also examples of instances and geometry nodes also heavily relies on intancing for many tasks.
Related content: How to use a particle system in Blender to scatter objects
Related content: Blender geometry nodes fundamentals guide
The other way is to simply reduce the amount of geometry in your scene. There are several ways we could go about doing this. From turning objects into instances where possible to reducing the complexity of objects.
For example we can reduce the subdivision surface modifier level when applicable or add decimate modfiers to objects that may support this approach.
Sculpted models may be retopologied or a more automated approach using remesh. Although, keep in mind taht remeshing can also increase polycount.
Related content: Remeshing in Blender
We can also remove the backside or bottom of objects that are only going to be visible from one direction.
Another number that can easily get out of hand is particles. If we are using particles, either as instances in geometry nodes or particles from a particle system, dialing these down or distributing them in a more efficient way can make or break the performance of a scene.
One way we can be more deliberate with our particles or instances is to use a vertex group to tell Blender where to distribute them.
For a geometry node setups we genrally use the density parameter on the distribute points on faces or distribute points in volume node. We can use the density slider by pulling it to the group input node and selecting a vertex group in the modifier tab.
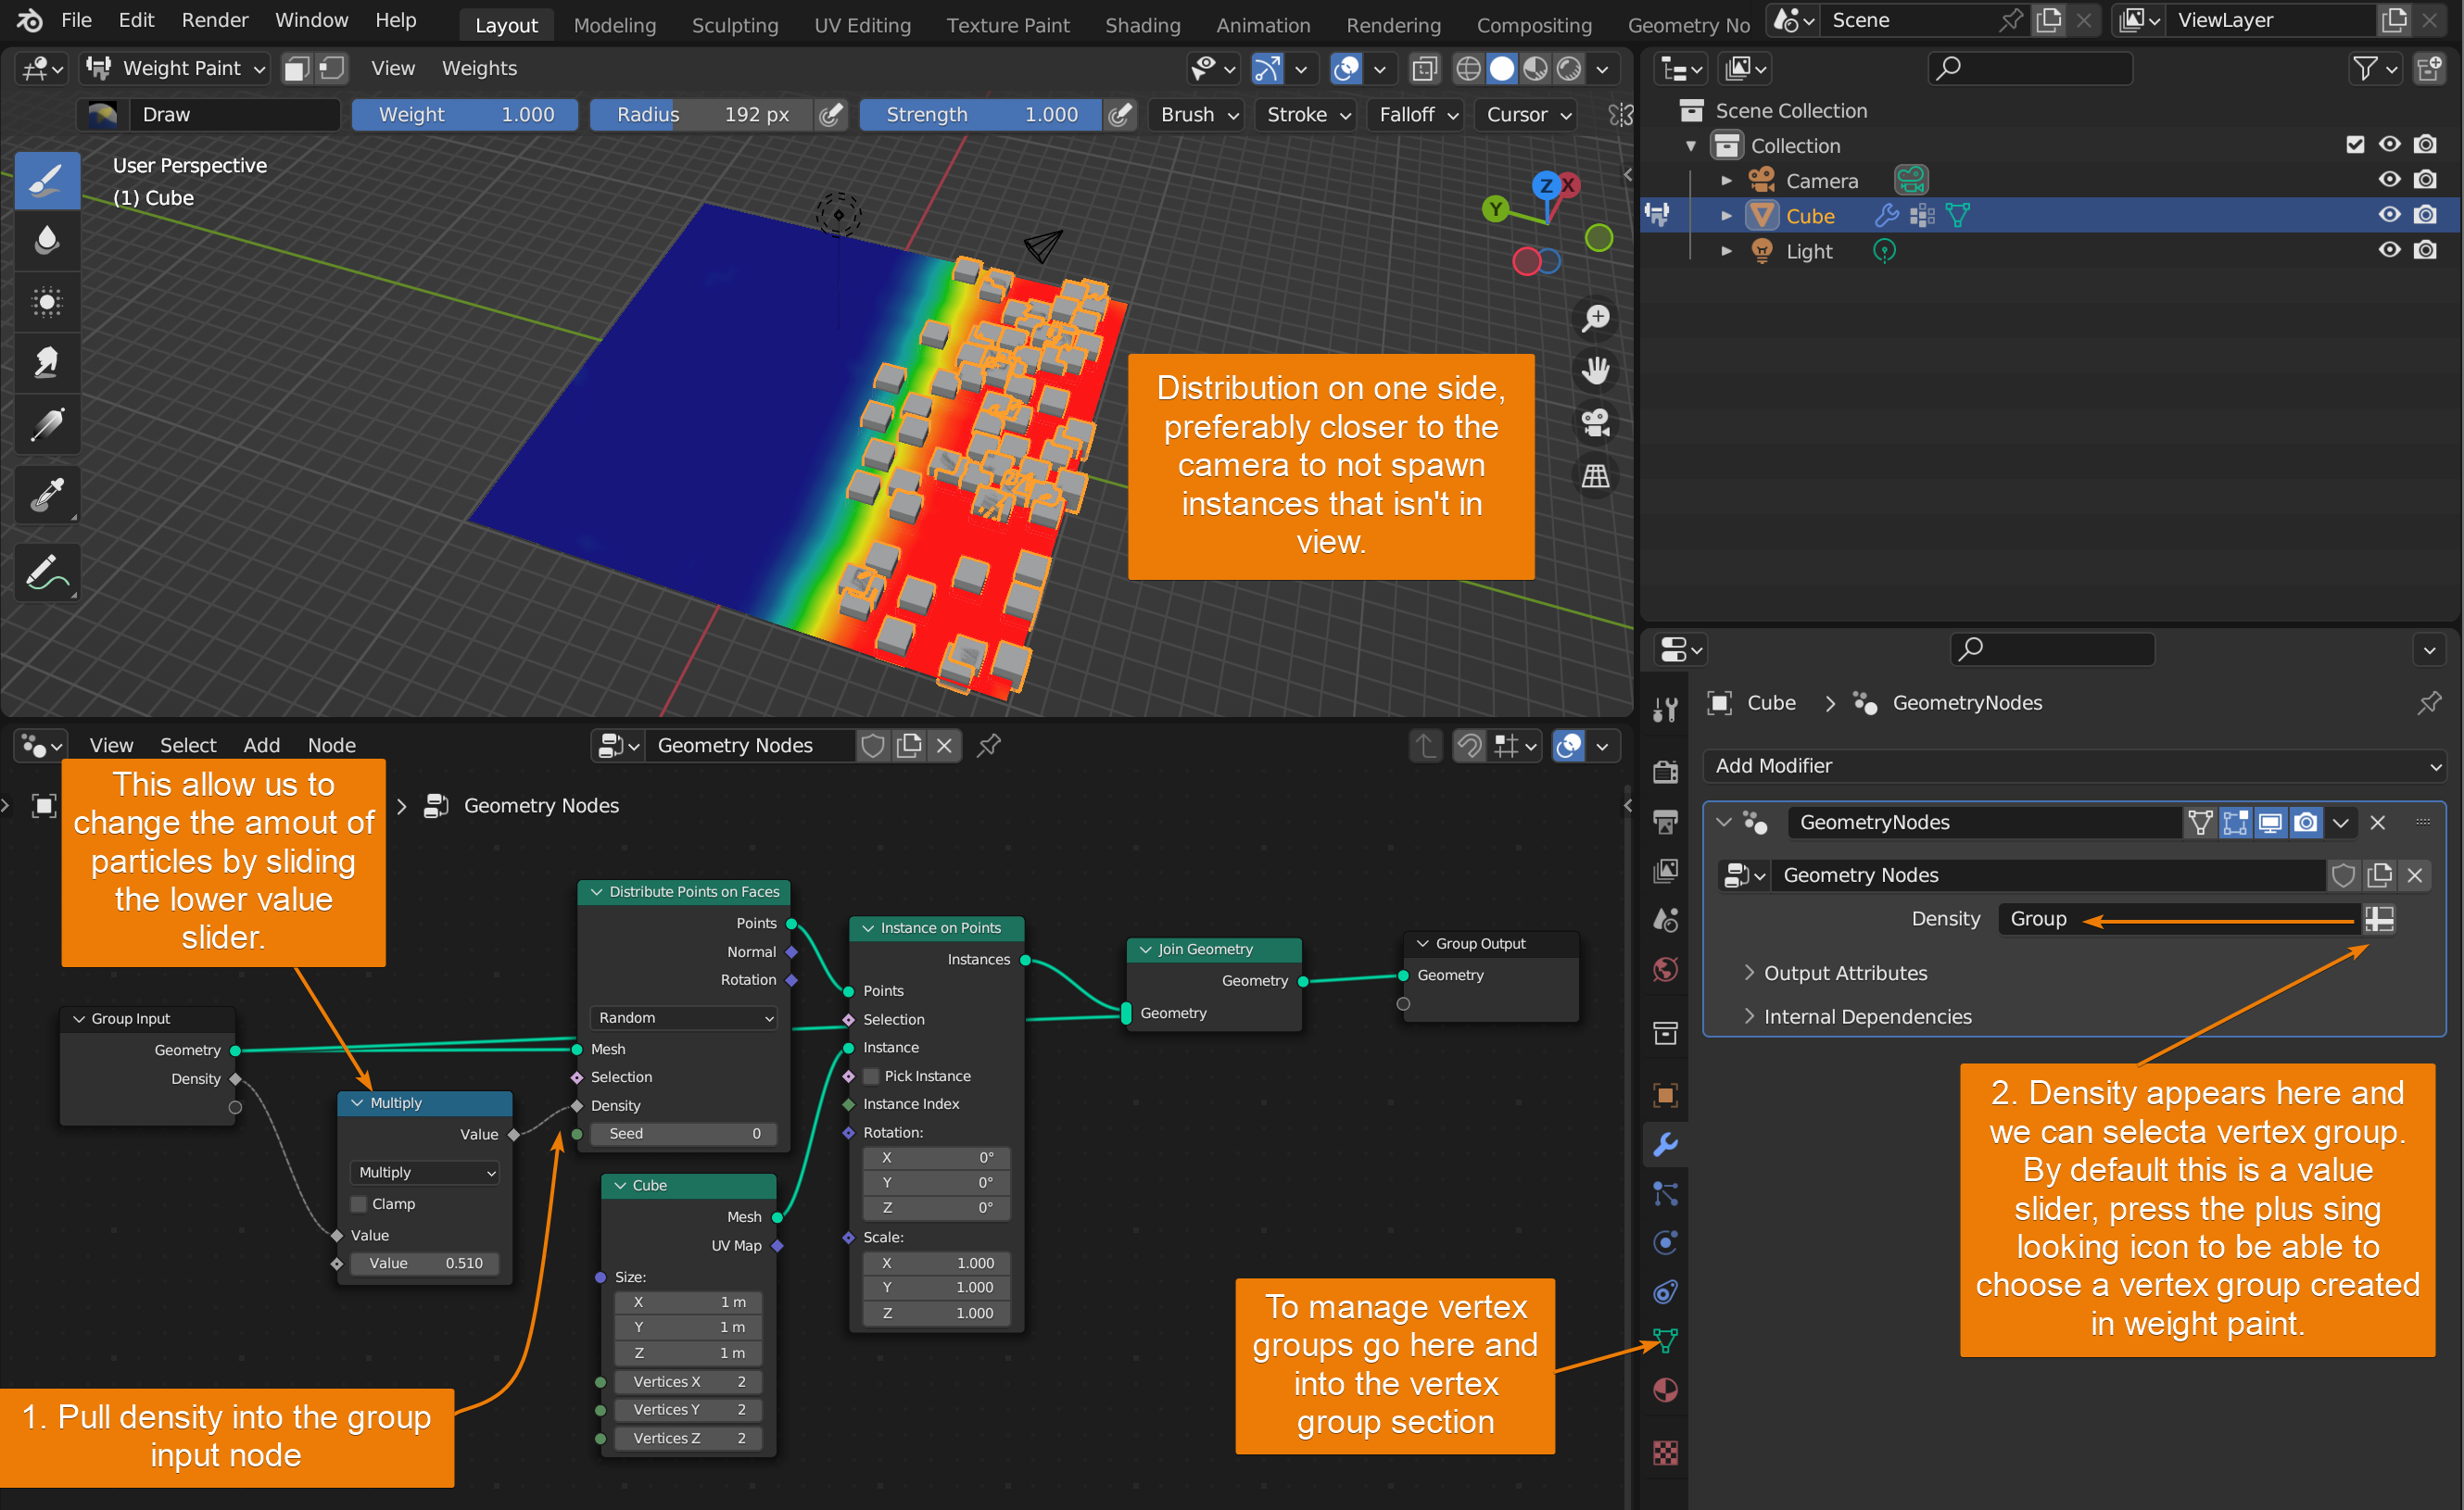
For particle systems there is vertex group section, here we can select a vertex group in the density slot at the top.

If you are using geometry nodes, you can also read this guide where I cover how to scatter objects. It includes a section on how to control distribution with a vertex group.
Related content: How to scatter objects with geometry nodes in Blender
For particle systems, ityou can read this guide.
Related content: How to use a particle system in Blender to scatter objects
Also, this guide covers how to use and paint vertex groups using weight paint:
Related content: How to use vertex groups in Blender
In this tip, we might not save on total time. But we do save on render time and possibly memor, perhaps making that render possible to render at all on our system and avoid that dreaded out of memory message.
Baking, caching and pre-rendering is a category of tools we can use to calculate data beforehand so that at render time these things are already calculated for us and minimum time need to be spent on them at render time.
Essentially, we are trading CPU and GPU cycles for storage. Each of these are quite involved processes with a lot of options.
Starting with baking, this is generally done to shaders. For example, we might use multiple 2k and 4k textures on a model. Baking takes that data and compress it down to a single texture or just a handful or way more optimized images.
We may also bake high density geometry down to a normal map to get away with a more streamlined model without loosing too much detail.
We can also bake light, into our textures allowing us to more or less view our scene in real time even using a ray-traced render engine.
Related content: How to bake textures in Blender
Caching is more related to simulations. Instead of calculating physics and motion in real time, we can cache the data. This allow us to simply read the cache and get the data we need instead of having to calculate it on the fly. Blender supports caching for all of it's simulation types. From liquid, smoke and fire simulation cache to rigid body and cloth.
Each type of simulation has a cache section that works similarly. So if you have learned one of them you are likely to be able to use cache with all kinds of simulations.
After you add a simulation from the physics tab in the properties tab, all of them that cache is applicable to will have their cache settings in a separate section except rigid body. For rigid body physics, you will find the cache in the scene tab and the rigid body world section.
Now, prerendering is not really a standard term. What I mean by it is that we can render elements beforhand and simply put them into our scene as simplified assets. For example we can render a treeline, put it on a flat plane and palce it in our background and render that instead of adding hundreads of trees with thousands of leaves each adding considerable to our render times.
With some smart prerendering and dividing up our scenes into multiple parts we can significantly drcrease the total render time.
For example, imagine, rendering this tree line once and adding it as a plane in our scene or rendering the entire tree line for every frame in a 300 frame long animation. It might be the difference between being able to render the animation at all or not.
This one might be obvious, but with 4k textures having beocme the standard, the quality of a 1k or 2k texture is plenty for a lot of cases, even in very high fidelity scenes. Having half of your textures being 1k, instead of 4k in a scene makes a huge difference to how much RAM is required and the time it takes to process all that extra data.
Often we think we need more but not too rarely, less is more.
If you are in the habbit of using 4k textures. Simply get into the habbit of picking the 2k version and go to the 4k only when nessesary. A 4k textures is four times as large as a 2k texture and 16 times as large as a 1k texture, using up a significantly larger portion of your RAM or GPU memory.
Also consider if you are using PBR materials where each material may have 3, four or 5 textures. This is a lot of extra data. You can even consider using a lower resolution texture for your diffuse while keeping a higher resolution for your normal map for example.
Since Blender 3.5, Blender use a technique called light tree. This is turned on by default. You can find the toggle in the Cycles render settings.
Go to the sampling section and expand lights. Here you will find the light tree toggle to turn it on or off.
For materials with an emission shader there is also an emission sampling setting replacing the earlier multiple importance sampling settings.
This, in the settings section in your materials tab you can find, as Yoda would say.
It is set to auto by default, letting Blender use an algorithm to determine each case. For closed meshes or single sided materials, setting this to fron face only can reduce noise even more in some cases.
A portal is an area light that is configured to behave as a portal. What it does is that it directs light from the world sky box towards the portal. This is helpful if you are rendering an interior scene that is lit by skylight. Instead of the light going everywhere, it is more focused on these portals that you place in front of the windows to direct the light inside.
Create an area light by pressing Shift+A and go to light->Area in the 3D viewport. Next go to the properties panel and check portal. This is all you need to do to create the portal. Last step is to place it in fron if a windows in your scene and size it accordingly.
Cycles will then use the portal to focus more skylight towards this part of the world.
The difference you will experience is that when you render, fireflies are much less likely to happen and therefore you can lower the sample count.
By default, Blennder use the CPU to render in Cycles. If we have a strong dedicated graphics card, we can enable it for rendering and in most cases this is a much faster option.
To enable GPU for rendering in Blender, go to Edit->Preferences then go to the system tab.
At the top you will find Cycles rneder devices. Depending on what graphics card you have you can choose between these:
Cuda and Optix are for Nvidia graphics cards. If your graphics card is from the 10xx series of nvidia graphics cards or newer, use Optix, else use Cuda.
For AMD graphics card, just a handful of fnewer cards are supported. If you have one of them, use HIP and for Intels lineup of dedicated graphics cards use oneAPI.
Note that you can check both your CPU and GPU. Depending on your hardware, it may be a good idea to use both at the same time by checking both. But sometimes the CPU will not be able to keep up with the GPU and you are better of by just using the GPU.
Note that some features are only available while rendering with CPU. But this change with every version of Blender and more features constantly gets both added and compatible with GPU.
If all else fails, we may need to turn to hardware upgrades. For rendering performance specifically, Blender has its own benchmark and data that is available for anyone and you can find it here:
External content: opendata.blender.org
At the top you can download the benchmark software and run it yourself so that you can get your own result and know how your current system perform in relation to other hardware.
You will also see that there is data available for CPU compute units and GPU, with GPUs performing significantly faster. Just don't look at the diagrams but also look at the numbers represented if you want to compare between the two kinds of compute units.
If you press "compare more GPU devices" or "compare more CPU devices" you will be presented with a form where you can choose exactly what to compare.
You are not restricted to the hardware listed. You can write the name of your device and the list will filter.
As an extra tip, if you are thinking about a laptop, make sure that the model you choose is properly cooled. Laptops are rarely designed for prolonged heavy load and may throttle significantly, bringing your render times into the sky.
While RAM has a significantly less impact on actual performance, we need to have enough RAM to fit the scene we want to render.
Related content: How Much RAM Does Blender Use?
If your Blender scene is using so much RAM that the computer need to start to swap memory between RAM and your storage devices to fit all the data, you will have a significantly worse time both working and rendering.
How much RAM you need completely depends on your situation. If you are just starting out, most modern computers will get you going. But for just a little larger scenes or complex materials and textures, you need to start to think about hardware to not have to wait forever.
But then again, following some of the tips in this article can also significantly help, it is a process of trial and error.
A render farm is a large collection of computers that collectively render your footage much faster than any single computer can. There are loads of companies providing rendering as a service and each of them usually have multiple options. For a price ofcourse.
If you have never tried using a render farm and don't want to spend money upfront, you can try sheep it. It is a render farm where people donate CPU and GPU power in exchange for being able to render themselves.
External content: Sheepit render farm
You simply create an account and render a few frames for someone else using your compute. The more you render for others the higher your priority in the que. Then you can upload your own blend files and let sheepits community render it for you.
There are also a lot of commercial render farms out there that you can try. Simply google for "blender render farm" and you will find a bunch.
If you have other software running in the background they could use up valuable resources. This in turn, translates to longer render times and less memory available for your rendering process.
In Windows, you can press CTRL+Shift+Esc to bring up the task manager end see what applications are running and using resources.
Close any software you don't need to run before you start to render. For example if you have a video editor, game engine, web brwoser or some other demanding process running you can end the process to free up more resources. Just be careful so that you don't terminate a process that is crittical for your system to run.
Simply use your better judgement and don't close down a process you don't know what it is.
Blender supports rendering from the command line. The Blender application itself can also use up valuable resources that could be used for rendering. Therefore command line rendering might be a good option.
The gain here is that you don't need to load the application itself before rendering, instead you cna render with the application using up minimum resources. This is in the most basic sense how render farms work, but they ofcourse bunch up a lot of computers and distribute the rendering as well.
The Blender manual has a good page with the information you need for commnad line rendering here:
External content: Command line rendering - Blender manual
For the most part, use the latest version of Blender when you render. With every release there are numerous improvements and bug fixes that speeds up the rendering process. And over the last few years, Blender and Cycles has had an incredible development speed.
But the main Blender is not the only Blender. You can also try to run a third party build of Blender such as E-Cycles or K-Cycles that are build to speed up rendering significantly.
While Blender is open-source and these branches need to be as well since they are building on top of its source code, these branches charge a fee for the download and continious download for new versions.
Since this is tip number 21, I guess I lied.
When rendering animations with a lot of frames and you need to save time, you can choose to render in a file format that does not perform compression. Such as TIFF or OpenEXR.
These file formats are much larger and contains a lot more data. So if you can spare the diskspace your animations will render faster and you will have a lot more data to work with in post-production because your CPU does not need to compress each file.
Render engines are complex pices of software with a lot of moving parts that can be tweaked and adjusted to your hearts content.
From render settings, to how we structure our scenes and external factors outside the application such as what other stuff is running in the background, and hardware.
Even the version or branch of software has a huge impact along with the drivers we use.
All of these parts come with their own complexities and newances and it is not always easy to find the right balance between render speed, quality and time spent. But to end on a positive note, Blender is awesome and I hope you found some helpful tips.
Thanks for your time and happy Blending.
