


Vertex groups are a useful tool when we want to mask things in Blender. Many modifiers have an input slot for vertex group, allowing us to only affect portions of the object. Likewise, we can use vertex groups with particle systems, simulations, and with a little trick convert them so that we can even use them as masks in our shaders. Let’s look at what they are and how we use them to enhance our Blender 3D creations.
To use a vertex group, follow these steps:
In the rest of this article, we will dig deeper into all the details and explore some scenarios. For instance, how to weight paint, convert weight paint to a vertex color, and copy vertex groups between objects.
Let’s dive in.
A vertex group is a collection of vertices in a mesh object in Blender. Each object can have one or more vertex groups assigned to it, and each group within that object can make up a separate collection of vertices.
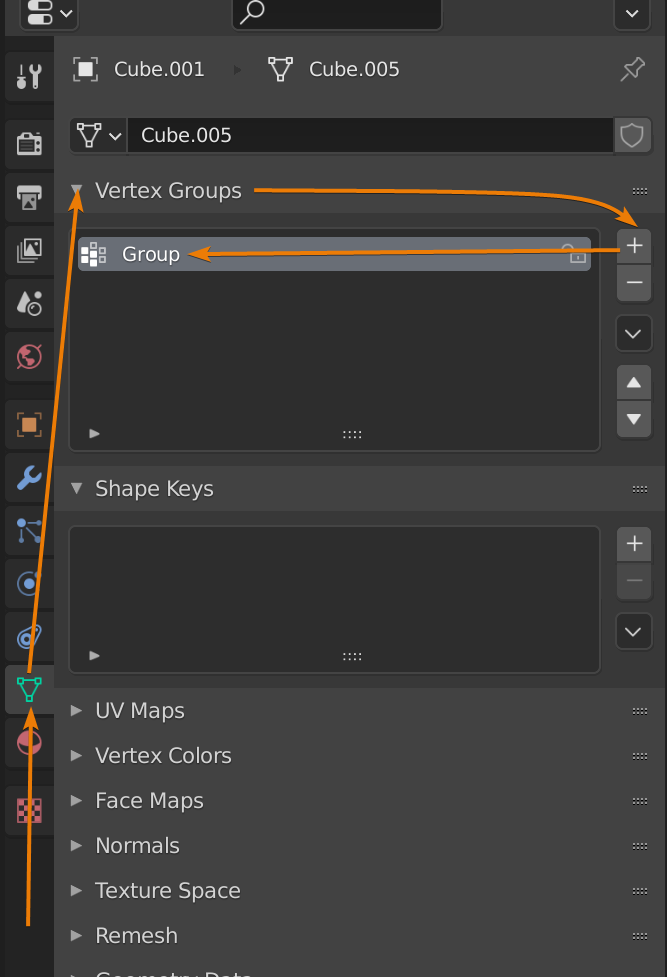
To see what vertex groups are present on an object, first select your object, then go to the object data properties in the properties panel, showed by a green triangle icon.
Next open the vertex group section and you will see a list of vertex groups present on this object. By default, there are no vertex groups for new objects and the first vertex group added will be called “Group”.
In a vertex group, we assign each vertex a vertex weight. The vertex weight is a number between zero and one. If the weight is one, it means that the vertex is a full member of the group. A weight of zero means that the vertex isn’t part of the group.
We can assign a vertex any value between one and zero for one or more vertex groups. Making it either a non-member, a partial member, or a full member of the vertex group.
If we compare vertex groups with colors, we can think of each vertex group as a channel. The color channels we have are Red, Green, Blue and Alpha. Each color channel has a value between zero and one, and combined they make up the final color and transparency level of a pixel.
A vertex group is more like a black-and-white image, with a single channel, and instead of having a channel for each pixel, we have a channel per vertex in a mesh object. The object in this case would be the image itself.
But remember that we can have multiple vertex groups on a single object as well.
To create a vertex group in Blender, select your object, go to the object data tab and expand the vertex group section. Here you will see an empty list. Press the plus sign on the right side to add a vertex group. The group is called “Group” by default. Double click the name to rename it.
To delete a vertex group, press to select a group in the list and press the minus sign on the right side of the list. The selected vertex group will be removed.
To add weight values to a vertex group, we use weight painting. This is a separate mode in the 3D viewport that we can select from the mode drop-down list in the top left corner of the 3D viewport.
First, make sure that you have the correct object selected and the correct vertex group you want to weight paint in the vertex group list.
If you cannot see the weight paint option in the mode menu, it is because you have an object selected that doesn’t support weight paint, such as a lamp or camera object.
You can also press Ctrl+Tab in the 3D viewport and choose weight paint from the pie menu.
Once in weight paint mode, your object will turn blue.
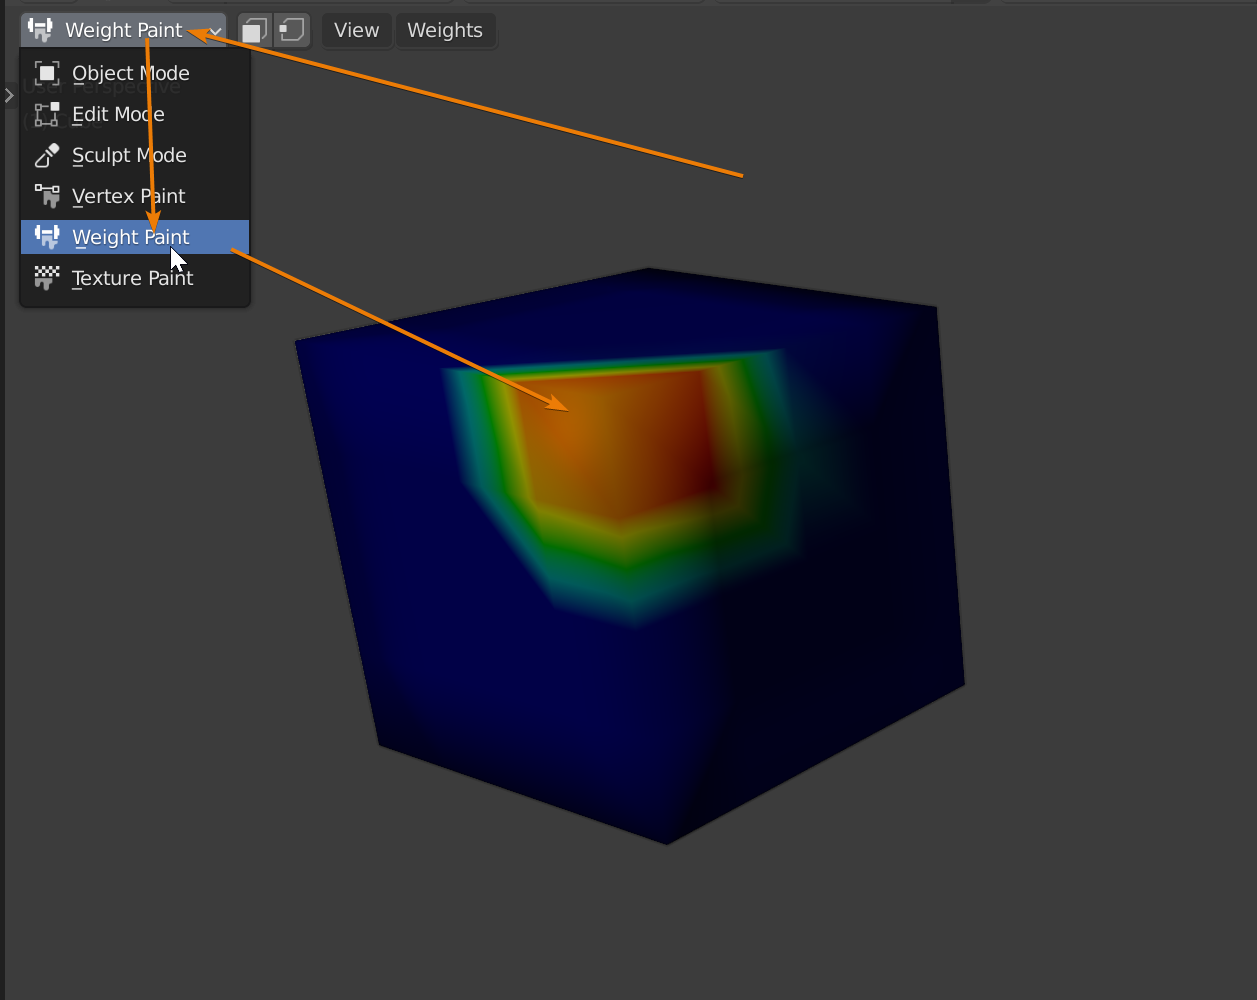
Vertices with a blue color means that there is a zero weight on the vertex and not a member of the group. A green color means that there is a low weight value. Yellow means that there is a higher weight value, while Red means that the vertex has a value of one for the group and is a full member.
By default, you have a draw brush selected set to a weight of one and you can immediately paint.
If you have a hard time to paint and you don’t get any color changes, it is likely because you have too little geometry in the mesh. Remember that only the vertices can receive vertex weight data.
For example, if you are weight painting the default cube, you can only paint at the corners.
One way to increase the resolution of where you can paint is to subdivide the object. Press Tab to go to edit mode, right click and choose to subdivide to add more geometry without changing the shape.
To change the weight of the brush, go to the header of the 3D viewport and change the weight value. You can also change the radius of the brush.
The strength parameter can be thought of as the rate the selected weight should be applied.
You can use F and Ctrl+F to change the radius and weight or right click to open a small widget at the mouse cursor where you can adjust these settings for your current brush.
We can find the brush settings either in the header, the right side preference panel by pressing N and go to the tool tab or in the active tool and workspace settings in the properties panel.
These settings are mirrored, and the different areas to access them are only personal preference.
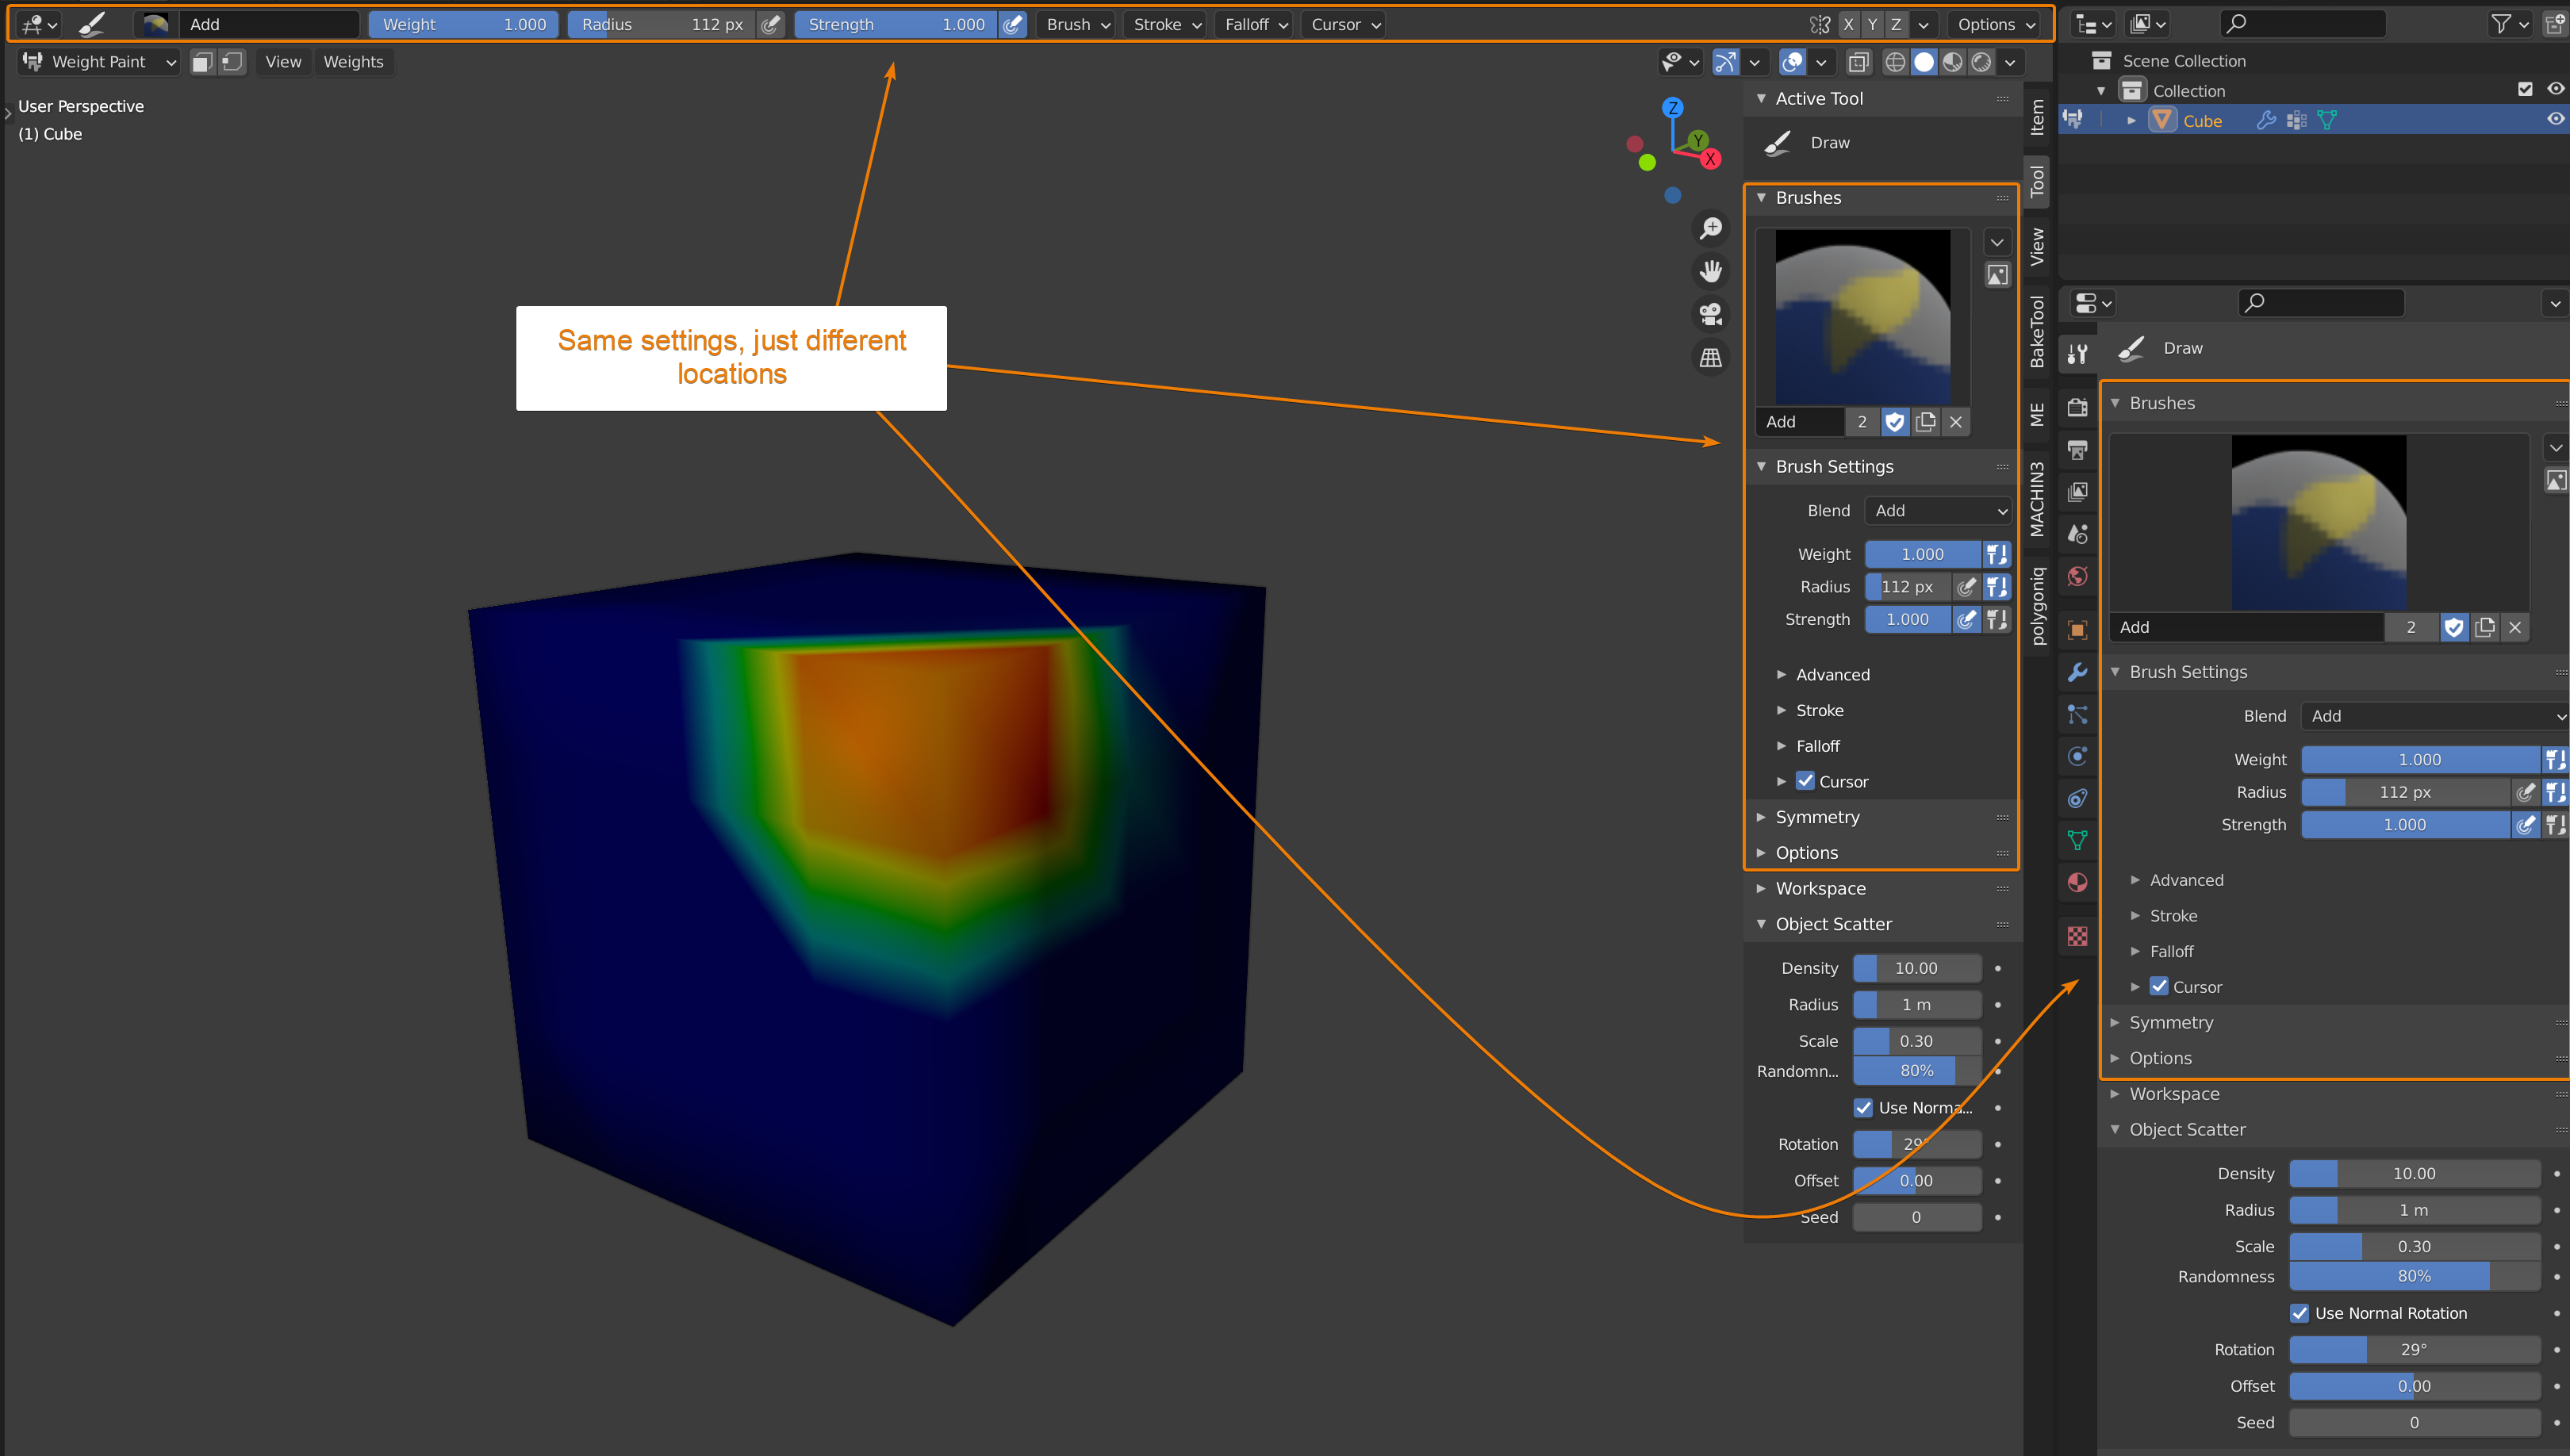
The brushes are also just presets of the same brush engine with different settings. You can choose a brush, or you can change settings for the same brush as you wish.
Apart from the brushes of the draw tool, you can change the tool in the tools panel. Access it by pressing T if it isn’t visible on the left side of the 3D viewport.
You can find tools like blur, average, smear, gradient and eye dropper.
If you haven’t painted yet, you can use the symmetry tools to mirror the weight paint as you are painting it. The symmetry tools are located in its own section. Either in the properties panel active tools and workspace settings or the tools tab in the N-panel.
In the header, they are located to the far right. You may have to middle-mouse click and drag to scroll to the right and find these tools.
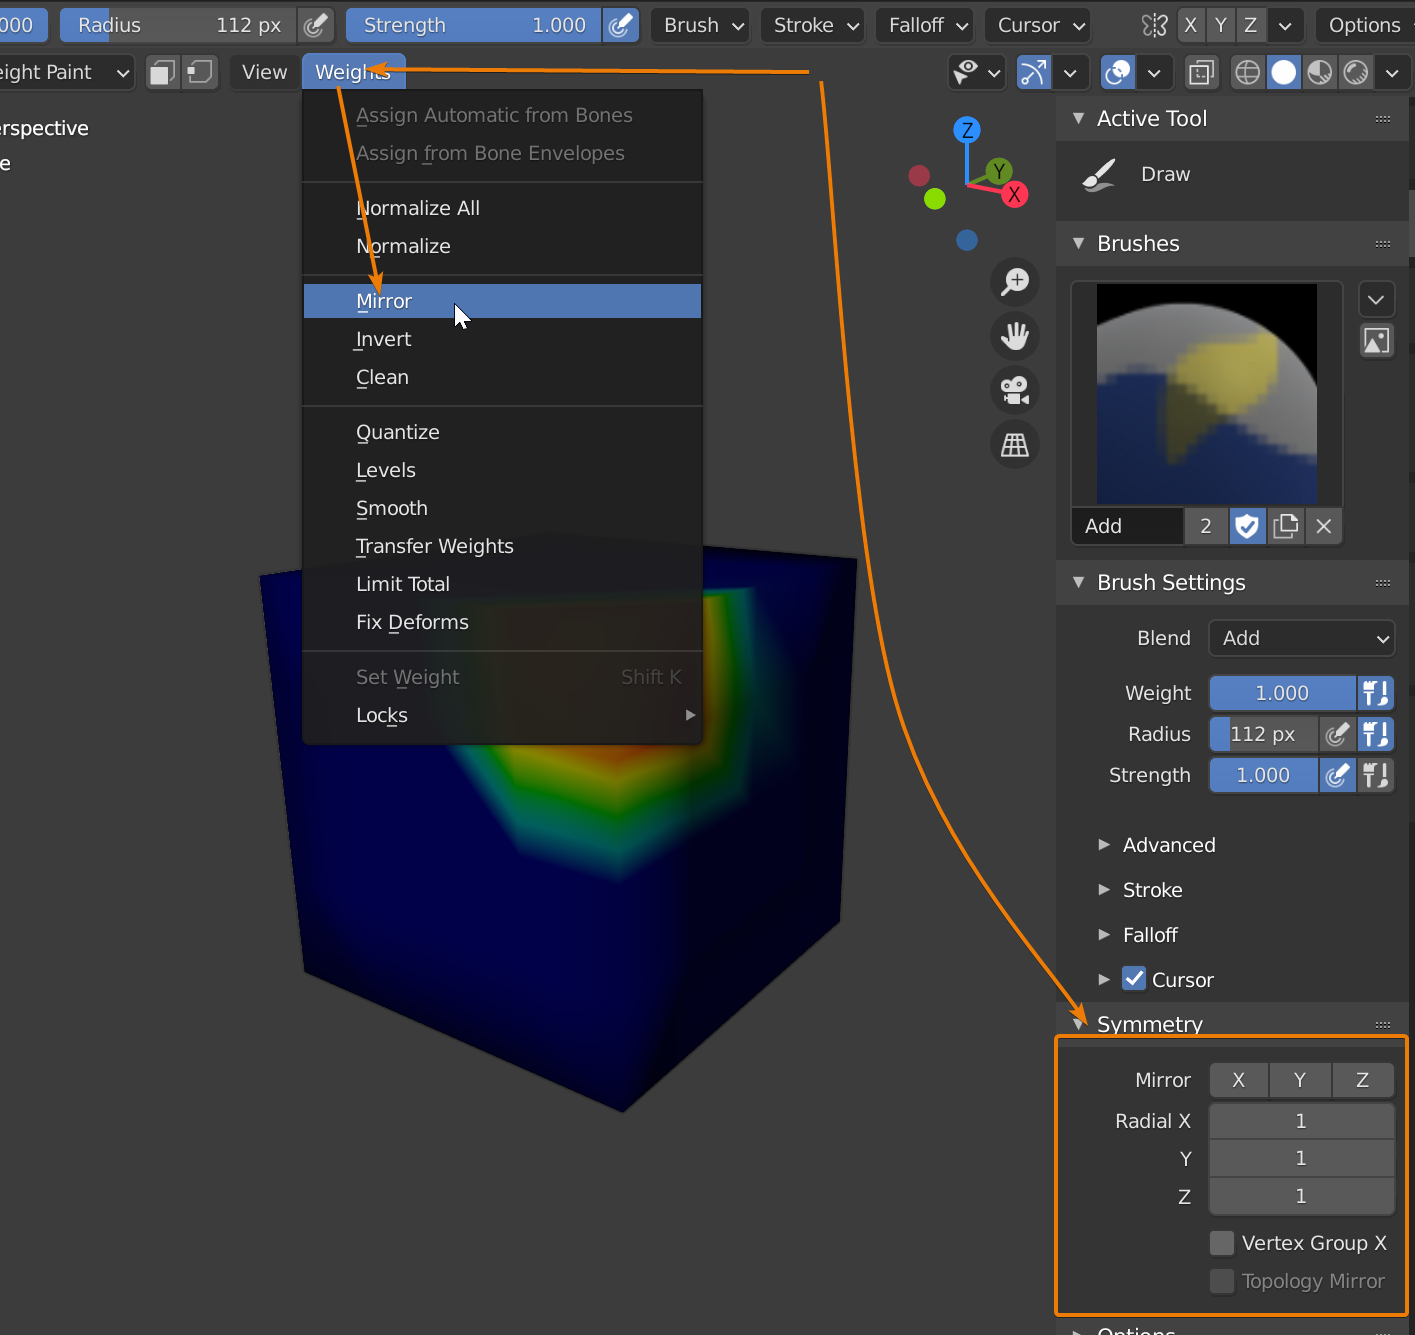
Once they are found, you can select the axis to mirror on. There are also settings for radial symmetry. Remember, when mirroring you mirror from the positive to the negative side of the axis you choose.
If you already painted and want to mirror afterwards, there is a tool that will mirror across the X axis. You can find this in the weight menu at the top of the 3D viewport just below the header. Choose mirror.
If we have two similar objects, we can copy vertex group data from one object to the other. What we need here is a modifier.
If you have two vertex groups on your object and want to mix the result together, we can do so with a vertex weight mix modifier. The requirement is that we have two vertex groups on the same object.
We can do many kinds of mixing between vertex groups with this modifier, but this is how we can easily add two vertex groups together.
If we want to use a vertex group in a material, for instance, to mask one shader from another there is no direct way to do it, but we can convert the weight paint to a vertex color. This way we can get the same effect, but we are missing out on the ability to animate the vertex group.
The easier way to do this is to use the vertex color master add-on.
External content: Vertex color master (github)
If you need to learn how to install and manage add-ons you can ream more here.
Related content: 30 Blender addons (install, manage, free and paid)
Once the add-on is installed and enabled, you will have access to a new tab in the n-panel in vertex paint mode called VCM.
Follow these steps to convert a vertex group you created into vertex paint:
If you see the drop-down next to the dst drop-down, it is set to R by default, this means that the vertex paint channel we transferred the weight paint to is the Red channel.
Remember how we said that weight paint is like a single channel color earlier?
We can now access this converted vertex group as vertex paint in the shader.
To learn more about setting up shaders and materials in Blender, you can use this guide:
Related content: The complete beginners guide to Blender nodes, Eevee, Cycles and PBR
Here is an example setup we can use to preview the vertex color.
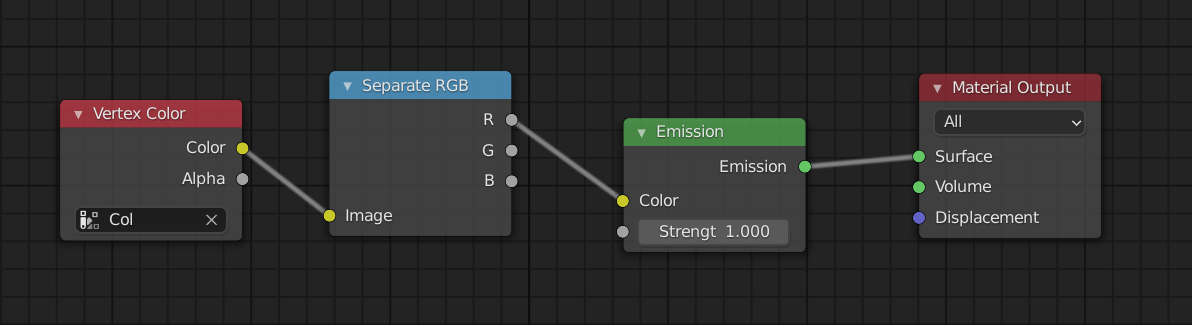
The vertex color node contains the vertex color group. The default name is Col, the name we used in the conversion. We then bring this color output into a separateRGB node to get access to the red channel alone, this channel is then converted to a single black and white output, or single value output that we can view through the emission shader.
This is the basics of creating and managing vertex groups. We can use them for many things and is an essential tool for any Blender 3D artist that passed the beginner stages.
We can use them to decide particle density, what vertices should be affected by a modifier or in simulations to name a few. Here you can learn more about modifiers and particle systems as well.
Related content: How modifiers work in Blender, an overview
Related content: How to use a particle system in Blender to scatter objects
Thanks for your time.
