


Subdivide is probably one of the most common actions in 3D modeling, and it is certainly one of the most common ways to generate geometry procedurally in a non-destructive workflow.
The quickest way to subdivide your mesh in Blender using a modifier is to select your object and press Ctrl+1, 2 or 3. The number giving the corresponding subdivision surface levels.
To subdivide your mesh using the subdivide tool, select your object, press tab to go to edit mode. Make a selection, right click and choose subdivide. In the operator panel, you can change the subdivision levels before doing your next operation.
Let's explore the various ways we can subdivide geometry in Blender.

The subdivision surface modifier takes the 3D mesh object and subdivides the geometry so that every quad face becomes four quads and every triangle becomes three quad faces.
Related content: Triangles vs Quads in Blender
N-gons are also subdivided into quads and the number of quads depends on the number of connected vertices and edges making up the face.
Related content: Blender N-gon guide
We simply end up with a mesh that contains much more geometry and is 100% made of quad faces, each having four vertices and four edges connected.
Subdivisions are often applied multiple times to create even more geometry. When a subdivision is applied multiple times, we call this subdivision levels.
Here are some primitive geometries that were subdivided with a subdivision surface modifier using two levels of subdivision.

Note that objects are also smoothed. When using subdivisions, we have two modes available. Simple and Catmull-Clark, named after the guys who came up with the algorithm.
The simple method simply adds geometry without changing the shape, while using the Catmull-Clark algorithm adds smoothing to the object.
In the example above, we still have flat shading applied, but if we also apply smooth shading, round surfaces will look completely smooth.
Related content: How to smooth the shading on an object in Blender?
Just like we learned in the introduction, we can hold CTRL and click 1, 2 or 3 on the number row to add the corresponding subdivision level to our selected object.
What happens behind the scenes is that Blender adds a subdivision surface modifier to our modifier stack.
You can view the stack by going to the blue wrench icon in the properties panel.
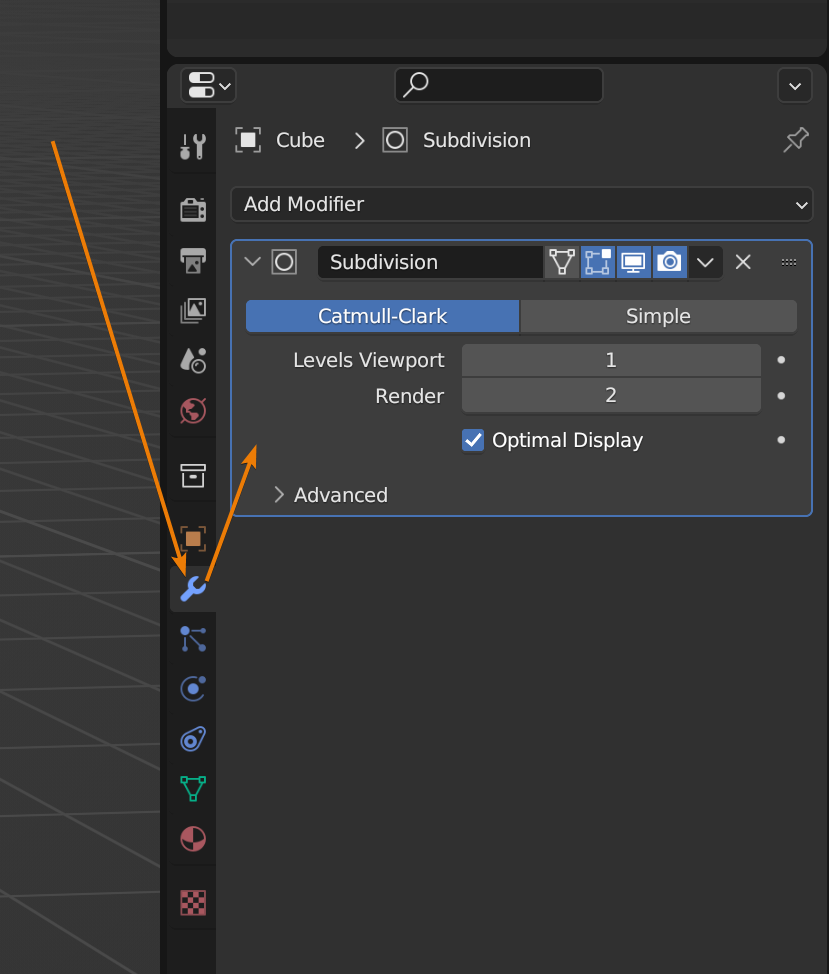
You can also add the subdivision surface modifier directly in the modifier stack.
Note that the modifier tab has had a slight change in version 4.0. The Add modifier button now brings up a menu rather than just listing all modifiers on a single drop-down palette. The UI organization might be slightly different depending on the version you use.

At the very top, you will see some common settings for managing modifiers. Below you can see that we can choose between the Catmull-Clark and Simple algorithms. As discussed earlier, the default of Catmull-Clark will give a smoothing effect to the mesh as well as the added geometry. The Simple method maintains the shape of the object.
Below that we have a levels setting for the viewport and the render. This is so that we should be able to have a different subdivision level in the viewport while we work than what is used in the final render.
Most often, this is for performance reasons in the 3D viewport.
When a modifier is visible in the stack, the changes it makes to the mesh can't be edited anywhere outside the modifier. We cannot alter the generated mesh in edit mode, for example. In order to do that, we need to apply the modifier.
We can apply a modifier in Blender by clicking on it so that its outline becomes blue and press Ctrl+A.
Related content: How to apply modifiers in Blender
We can also press the small down arrow next to the camera icon on the modifier and press apply from this menu.
Related content: How modifiers work in Blender, an overview
Most times, this is all you need when using a subdivision surface modifier. However, there are more settings for specific cases if you expand the advanced section.
So, let's cover that as well, but first, the optimal display checkbox. What this does is that it simply hides the subdivided edges when viewing the mesh in wireframe mode so that the wireframe looks like this.

Instead of looking like this:

All edges are still there in both cases, it is just a hide and show toggle for the 3D viewport. Having optimal display turned on often makes it easier to see what is going on with your mesh without all the excess detail.
Blender also supports adaptive subdivision. This is a feature that subdivides the mesh more if the mesh is closer to the camera and the further away mesh is from the camera, the less geometry is generated.
You can read more about adaptive subdivision here:
Related content: How to use adaptive subdivision surface in Blender
So, for those that need a little extra control, here are the advanced settings. A lot of this information is also well outlined in the Blender manual that you can find here:
External content: Blender manual subdivision surface modifier settings
The use limit checkbox has a slight effect on the shape of the object after being subdivided using the Catmull-Clark algorithm. It makes it so that the vertices are placed as close as possible to the position they would have if we subdivided an infinite number of times and therefore preserving the shape between subdivision levels.
The quality number just below it then gives a number of the accuracy of this calculation. A lower number will be less accurate with better performance and a higher number will have better accuracy at the cost of performance.
Note that according to the manual, a higher number can increase the accuracy of edge creases as well.
Next, we have the UV smooth setting. This helps us determine how UVs should behave when we subdivide the mesh.
Related content: The definitive tutorial for UV mapping in Blender
The UV smooth setting allows you to smooth the UV map together with the smoothing of the mesh or keep certain positions within the UV map if the texture is distorted because of the mesh deformation.
There are options to keep corners, junctions and concave as well as boundaries. What you should use depends on the shape of your mesh, so if you experience misalignment between the UV map and mesh, try changing this setting.
If your object is not manifold, like a plane, the ground for a landscape or similar, you can use the boundary smooth and set it to keep corners if you don't want it to smooth the edges.
At the bottom, we have two checkboxes. The first one is called Use creases, enables or disables the effect of creases.
A crease is a setting found in the Item tab in the N-panel while we are in edit mode. It allows us to determine how much an edge should be smoothed. With zero crease, the edge will be rounded using the catmull-clark algorithm, but with a crease we can set a percentage between 0 and 1 on how much deformation should take place on an edge by edge basis.
If an edge has a crease of 1 it will stay in its original place.
The use crease checkbox toggle edge creases on and off.
The use custom normals checkbox, is a similar toggle but for custom normals. If you have set custom normals and then add a subdivision surface modifier on top, this setting determines if those custom normals should be recalculated together with the mesh when subdividing.
Moving on to the subdivide tool. This is an edit mode tool, meaning that instead of adding a layer of geometry generation like we do with the subdivision surface modifier, we instead alter the mesh directly.
As opposed to the modifier, that is a non-destructive operation. We can change or remove it on the fly affecting no other part of the mesh. The edit mode subdivision tool is a destructive operation. Once we have made it there is no simple way to undo or change the settings of the operation.
To use the subdivide tool, press tab to go into edit mode, select your whole mesh or part of the mesh you want to subdivide, right click and choose subdivide.

You can also find subdivide if you go to the Edge menu and find it there along with a couple of variations called subdivide edge-ring and un-subdivide.
Once the subdivide operation has been performed, we can make some changes to how it behaves in the operator panel found in the lower left corner of the 3D viewport or by pressing F9 while the mouse is hovering the 3D viewport.

First, we have the number of cuts. This defines how many cuts should be added along each edge to create the subdivision.
The smoothness allows some smoothing of the newly created vertices to account for round surfaces. But it doesn't alter the position of the original vertices in the mesh.
The create N-gons checkbox allows or disallows the creation of N-gons when needed. If disabled, quads and triangles will be used instead.
Quad corner type allows you to change how faces are cut in special cases. For example, if you have a quad and subdivide two adjacent faces, this setting allows for multiple ways of cutting the geometry.
The fractal setting can add some randomness to how the newly generated vertices are placed. For example, you can use this to subdivide a plane and make it start to look a little like a landscape.
The along normals tell the fractal setting how much normals should influence the position of the vertices in the effect. Should newly generated vertices only displace in the direction of the normals or should all directions be used, or a blend in between?
The last setting is the random seed, allowing for a different random value to be used for the fractal generation.
We can also subdivide in geometry nodes. Geometry nodes act like a modifier.
Keep in mind that it makes little sese to use a geometry nodes network to just subdivide. In most cases we want to do more calculations in a geometry nodes network.
But for the sake of completion, we will go through how this works as well if you are interested in combining subdivisions with other areas of geometry nodes.
Related content: Blender geometry nodes fundamentals guide
Start by opening a geometry nodes workspace by pressing the plus icon next to the rightmost workspace in the header. Go to General->Geometry nodes.

Select the object you want to work with and press New at the center of the geometry nodes header.

This will add a geometry nodes modifier to the modifier stack as well as adding a group input and output node.

The geometry socket on the group input node is our object coming into the geometry nodes network. We are then sending the result out through the geometry socket on the group output node.
Between these nodes is where we can add other nodes to change the behavior of our geometry.
For mesh objects we have two nodes that we use to subdivide in geoemtry nodes. The Subdivide mesh node and the subdivision surface node.
You can think of the subdivide mesh node as a simpler version of the subdivide edit mode tool and the subdivision surface node as a simplified version of the subdivision surface modifier.
By simple, I just mean that they allow slightly fewer settings. For example, the subdivide mesh node doesn't allow us to fracture like the subdivide tool and the subdivision surface node doesn't have the simple algorithm in geometry nodes to give a couple of examples.
In the node graph, press Shift+A or go to the add menu. Go to Mesh>Operations where you will find both the subdivide mesh and the Subdivision surface nodes.

You can also press search in the Add menu and start typing "subdivi" and those nodes will filter out for you to find them in the list.
Next, either place the node on top of the connection between the group input and group output nodes or drop them above or below the connection.
Next click and drag out a new connection from the input, through the mesh input of either the subdivide mesh or subdivide surface node.
Then pull the mesh output from either of these nodes into the geometry input of the group output node.

You should see the subdivision happen in the viewport.
Keep in mind that the subdivide mesh node only adds geometry without changing the shape, so it might not be immediately obvious that something is happening.
In that case, you can go to the wireframe view in the top right corner of the 3D viewport to see the underlying mesh changing.
If you want to subdivide your whole model, use the subdivision surface modifier. The subdivision tool is better used in combination with other modeling tools to create new shapes.
For example we can subdivide a window using the subdivision tool to create a base for mullions. We then might inset the edges created and extrude the inset to create a more finalized mullion.
The subdivision surface modifier is a tool to create more detail instead. For instance to allow displacement across a surface.
There are a few things we can look out for if the mesh does not behave as expected.
If a geometry is non-manifold this can cause trouble in some cases. For example if you have internal faces, duplicate vertices, or edges that don't contribute to creating faces.
Sometimes n-gons can also be a problem if you have them in your mesh. They might subdivide in an unexpected way since Blender takes some liberty in how they are subdivided.
If you mesh is too complex this might also cause problems when adding a subdivision surface modifier. The mesh might start to self intersect or an excessively high polycount may cause performance issues.
If edge creasing is used it can also cause issues, like pinching in the wrong areas or sharp edges in the wrong places.
Another issue might be the modifier stack order or suboptimal setting configuration. Make sure that your stack is in the correct order if you are using multiple modifiers.
Often, the subdivision modifier is placed last, but if you intend to use the generated mesh for deformation, you might need it above something like a displacement modifier.
Also make use that you are aware of the subdivision level for viewport and render. If they are set differently there will be differences between what you see in the 3D viewport and the final render.
Also make sure that the monitor and camera icon on the modifier are set as intended. If they are both blue, you will see the result of the modifier both in the 3D viewport and the final render.
In this article we learned three ways we can subdivide in Blender. Through the subdivision surface modifier that is likely the most commonly used. Then we learned about the subdivide tool in edit mode, and at last, we learned how we can use geometry nodes to subdivide a mesh in Blender.
We then looked at some troubleshooting and how we can solve common problems we may encounter as we subdivide.
I hope it was helpful and thanks for your time.
