


There are differences between different versions of Blender, and there are multiple problems you may encounter. But here is the brief answer.
In Blender version 2.9x and later you can apply a modifier by clicking it so that the outline becomes blue, press Ctrl+A to apply it. You can also press the menu showed by a down arrow icon on the modifier and choose Apply.
If you need to learn the basics of how modifiers work, you can first read here:
Related content: How modifiers work in Blender, an overview
Or, if you need a guide to the most common modifiers, this article is for you.
Related content: Top 10 Blender modifiers and how they work
In the rest of this article, we will dive into some common error messages you may encounter, as well as how to apply the entire modifier stack or apply modifiers on multiple objects. We will also look at some edge cases and errors you may come across.
In Blender version 2.9x, there were some changes to the interface. Most of them for the better, and some of them to prepare Blender for a more versatile interface in the future. But when you are following older tutorials and guides, you may find that these changes can trip you up.
The modifier stack was one of those interface elements that saw a major overhaul and now differs from older versions. Here are the steps to apply a single modifier in 2.9x and later.

In 2.8x and earlier follow these steps:
It may seem like they made the process harder, but we can now just use a quick shortcut(Ctrl+A) to apply the selected modifier. There is also drag-and-drop to rearrange the order of modifiers in version 2.90 and above.
To apply all modifiers on an object, select it and go to Object->Convert To->Mesh. This operation not only converts other object types to mesh objects, but it applies the modifier stack in the correct order from top to bottom.
In earlier versions of Blender, you can use Alt+C and choose “Mesh from Curve/Meta/Surf/Text”. Now, that shortcut is removed. But we can right click the operation in the menu and choose “Add to quick favorites”. Now press Q to bring up the quick favorites menu and use the operation from there.
There is also the modifier tools add-on that can help us easily apply modifiers. Enable it by going to Edit->Preferences and go to the add-on section.
Search for “modifier” and you will filter the list down. Check the box next to “Modifier tools” to enable it. Close the properties.
Open the modifier tab for your object and add at least one modifier to the stack.
Now you will have four buttons above the “add modifier” drop-down. You can perform these operations from here now:
Viewport vis will hide all modifiers in the viewport while toggle stack will minimize and expand the stack.
To apply all modifiers on multiple objects, select all objects you want to apply modifiers for, then go to Object->Convert To and choose mesh. We can also use the modifier tools add-on and use the apply all operators while having multiple objects selected.
There is currently no way to apply just part of the modifier stack on multiple objects. In that case, you must manually apply.
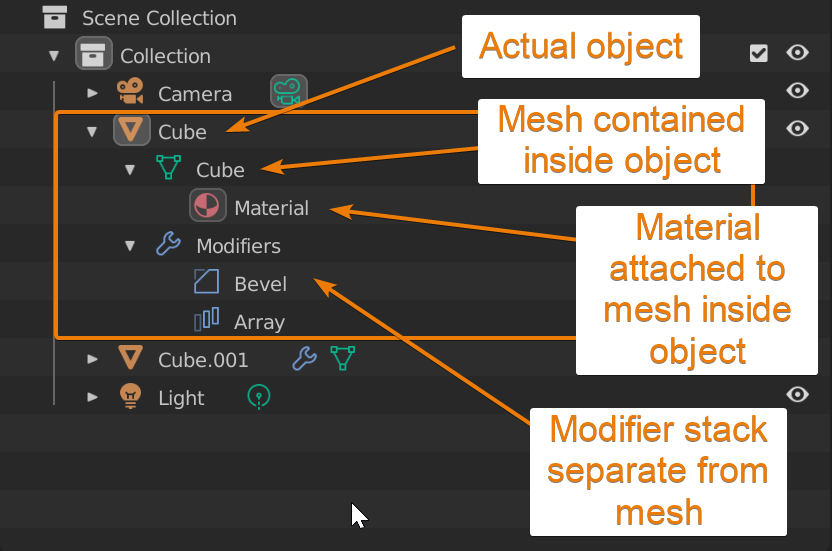
This is because modifiers are not part of the geometry contained inside the object. Instead, modifiers are mathematical functions performing their operation from top to bottom on the geometry contained inside the object. The geometry contained inside the object being the geometry we access in edit mode.
So, modifiers are separate from the data we have access to in edit mode and cannot be directly accessed in edit mode.
If you expand your mesh object in the outliner, you will see a visual representation of how the different data relate to each other.
Modifiers from the generate and modify categories cannot be applied when there are shape keys on an object. This is because of the order of operation. Since shape keys exist on the mesh level and these modifiers add data later, Blender cannot know how to handle the generated data for the shape keys when applied.
Related content: Blender shape key basics guide
To apply the modifiers, you need to first remove the shape keys, apply the modifiers and create new shape keys.
For the simulation and deform categories, we can instead apply as shape keys. In this case we don’t add or remove data from the mesh. Instead, we just deform or change existing data. We can then convert these changes to shape keys by applying the modifiers as shape keys.
We cannot apply modifiers on multi-user data because if we apply a modifier, we would change the data in all objects that share this data.
Other objects sharing the data could, for instance, have a different modifier stack and various conflicts could occur.
If you want to apply modifiers for an object with multi-user data, we first have to make it single-user. Follow these steps.
The error message “Modifier is disabled, skipping apply” occurs when a modifier does not have the correct parameters to perform its task.
For example, a Boolean modifier needs a second object to perform the Boolean operation against, but if none is supplied, the modifier can’t carry out its task.
When a modifier doesn’t have the correct parameters to perform its operation, the icon will be red. This is how you know you need to supply it with more information.
We can enable a modifier in three different ways.
We find these toggles in the header of each modifier, showed by a camera, monitor and mesh square icon.
The difference between applying and enabling a modifier is that when we apply a modifier, we commit the changes a modifier does and bake it into the mesh data. Enabling or disabling a modifier instead change if the modifier is turned on or off without altering the data contained inside the object.

In this article, we covered some common roadblocks that you may run into while exploring modifiers.
There are several pitfalls we can fall into when dealing with modifiers. Everything from how to apply them, what is the terminology around them, and how to find out what a specific error message means.
Thanks for your time.
