


Rendering is at the heart of what we do in Blender. When you are starting out it is good to understand how it works so that you can actually get some output to show and use.
To render in Blender Press F12 for rendering a still image or Ctrl+F12 to render animation. You can also go to the render menu and choose render image or render animation from there.
Of course, there is more to the story. In this article we explore the basics of rendering and what goes into it. I will also direct you to additional resources that are good to follow up with as you learn more about rendering.

Rendering is when the computer calculates the light in our scene to create the final image or animation. To calculate the lighting the render engine needs information from our scene. This includes things like:
There is more to it, but these are the basic building blocks used by the renderer in our scene.
By the way, if you enjoy this article, I suggest that you look at my E-Book. It has helped many people learn Blender faster and deepen their knowledge in this fantastic software.
Suggested content: Artisticrender's E-Book
Let's continue.
Blender has two render engines built in. Eevee and Cycles. These two render engines aim to be similar in look but work completely different.
Eevee is a rasterized render engine, meaning that its primary goal is to be fast. This kind of render engine is suitable for real-time or close to real-time performance.
Cycles on the other hand is a ray-traced render engine. This is a much slower kind of render engine. The benefit is that it is much more accurate and produce an image based on how light bounce in the real world.
It is possible to produce a good-looking image with both engines, but they take vastly separate ways to the resulting image.
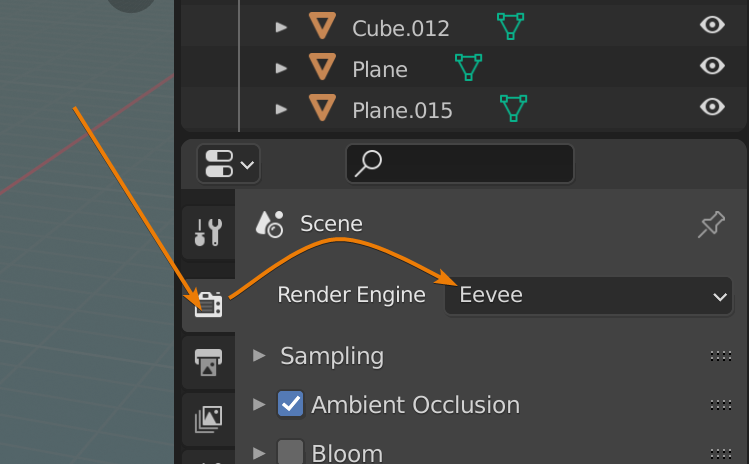
Pressing F12 is the quickest way to start a render in Blender. The render engine we use can be set in the render settings tab found in the properties panel.
Go to the camera icon in the properties panel, find the render engine drop-down and select Cycles or Eevee.
You will also find the workbench render engine here, but we don't need it. It is essentially the same as solid shading in the viewport.
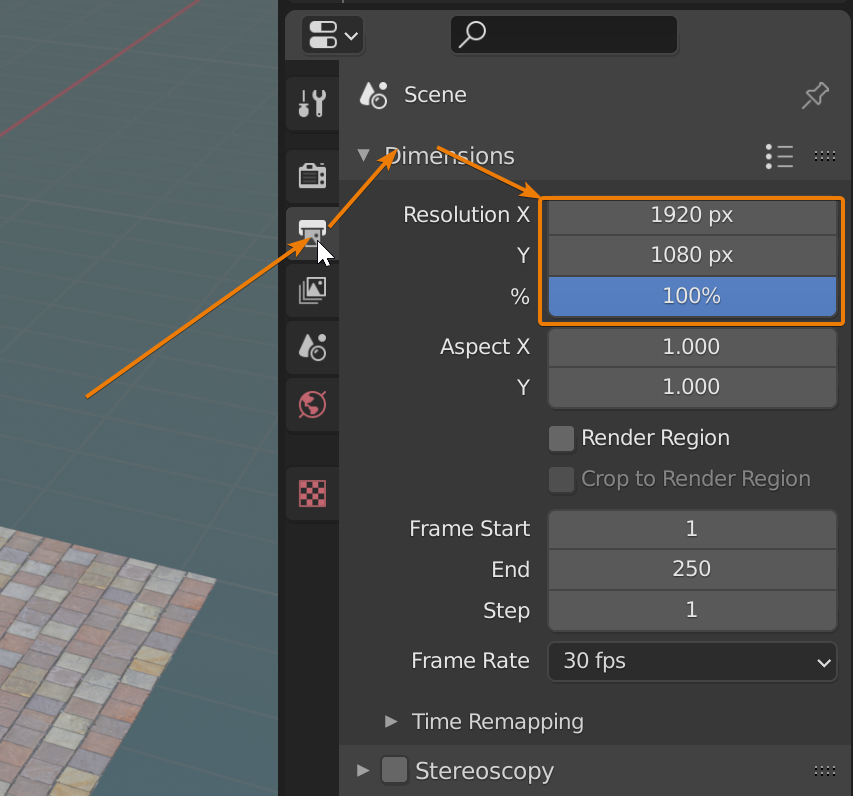
Next, we should also check the output properties tab just below the render settings tab. Here we find the dimensions section where we can set the resolution of our render.
For a complete guide on Cycles and Eevee render settings, you can check out these guides.
Related content: Blender: A Cycles render settings guide
Related content: A guide to Blender Eevee render settings
When the render starts an image editor will pop up showing us the render progress. Once completed, we can save the rendered image by pressing Alt+S or by going to the image menu where we find "Save" or "Save As".
By default, the PNG file format is selected, but if we want to save an image that is equivalent to a photographer's raw files, use OpenEXR. This file format supports high dynamic range and can support multiple layers.
If you are struggling with long render times you might need to configure Blender to use your GPU for rendering. Read how to do that here:
Related content: How to use the GPU to render with Blender
In some cases, this is not enough, even if you have a decent GPU to use. In that case you can check out K-Cycles, an unofficial build of Blender that optimize rendering and can give you a significant performance boost. Just keep in mind that it requires an Nvidia GPU.
External content: Blendermarket - K-Cycles
To render an animation in Blender, we press Ctrl+F12 or go to the render menu and press render animation.
With animations we need to prepare a few things before we start our render. First, Blender needs an output folder to store the rendered frames.
We can set this folder in the output section found in the output properties tab just below the render settings. Here we can choose an output folder as well as a file format.
By default, the output folder is /tmp/. This is equivalent to C:\tmp on Windows.
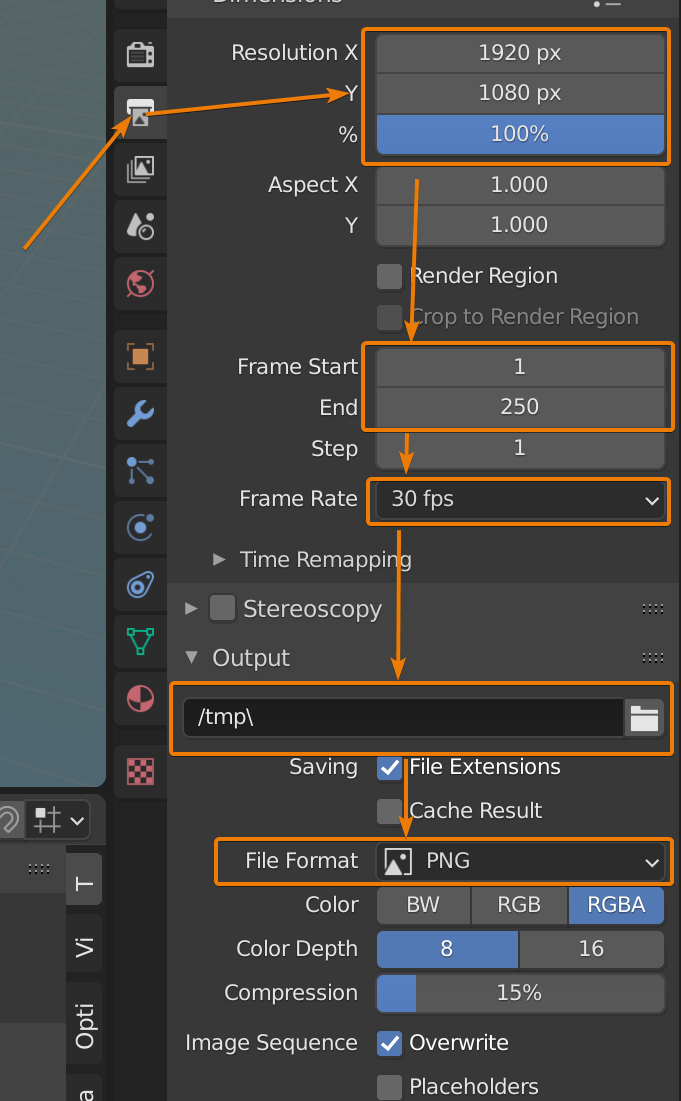
Next, we need to choose a file format. We can choose an image format, for instance PNG. In this case Blender store each frame as its own image file and if an error occurs during the rendering process, we can render from the last successful frame instead of re-rendering the entire animation.
We can also choose a movie format such as FFMPEG Video. In this case, Blender will render each frame directly into a movie file, but we cannot resume the render if an error occurs mid-render.
In the dimensions section found in the output properties, we can also set the resolution and frame settings.
When rendering an animation, the image editor will pop-up and show us the progress one frame at a time until all frames are rendered.
A simple way to get started with animation in Blender is to animate the camera movement through your scene. You can read this guide on how to get started.
Related content: How to animate the camera in Blender?
Rendering an animation can be tough, it can take a long time and end up grainy or flickering if you are not using the correct settings. To learn how to better render animations, you can check out out Cycles settings guide here:
Related content: Blender: A Cycles render settings guide
Also, denoising is known to cause flickering between frames in animations, therefore using a temporal denoising system that takes earlier frames into account when rendering could be a good idea. Blender actually has this feature and you can read more about it here:
Related content: How to denoise an animation in Blender using temporal denoising
However, this is cumbersome and requires some coding. An alternative is to check out Turbo Tools. They have perfected their temporal denoising as shown in their demo video on the page here.
External content: Blendermarket - Turbo Tools
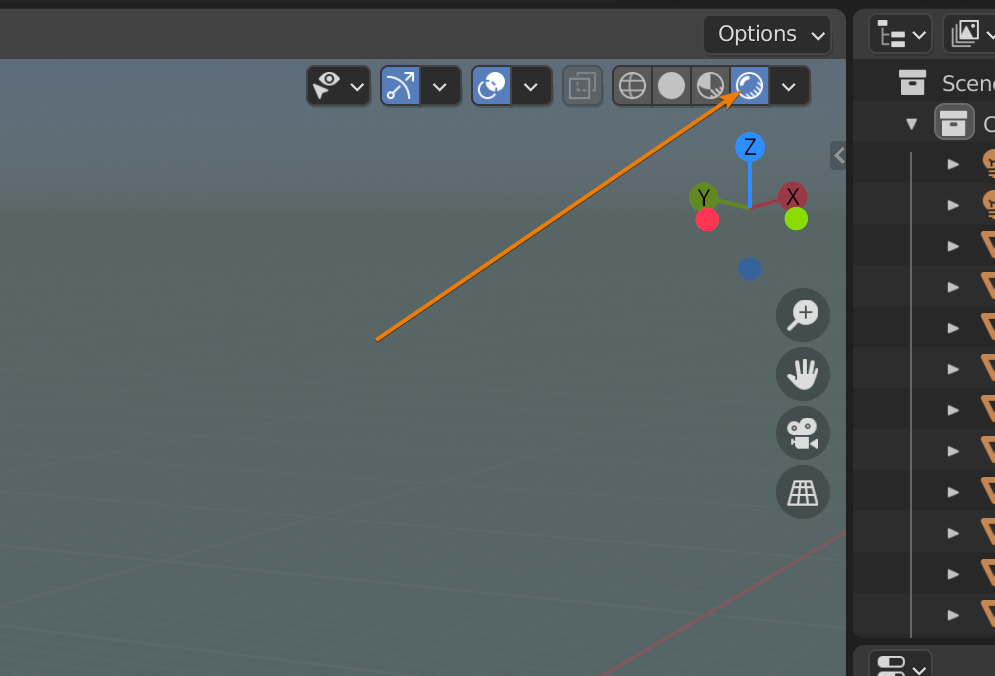
To preview your render in the viewport you can press the rendered viewport shading button in the top right corner of the 3D viewport.
This will change the viewport to display with the currently selected render engine.
Related content: Blender viewport shading guide
As described above, you can change your render engine in the render tab found in the properties panel. Just click the camera icon and at the top you will see a render engine drop-down.
If your render is particularly slow, you can press Ctrl+B and draw a box to render only that area of the viewport. Use Ctrl+B again to draw a new box if you wish or press Alt+Ctrl+B to clear the render border.
Keep in mind that the render border persists to the final render, so clear it before rendering the final image or animation.
There are many ways to speed up rendering. Check the render settings guides for Eevee and Cycles above for more information.
We can also create a viewport render in Blender. These renders are even quicker than rendering with Eevee.
You can think of a viewport render as Blender taking a screenshot of the viewport. These are useful if we want to storyboard or create previews without wasting time on rendering.
To create a viewport render, go to the view menu in the 3D viewport. Close to the bottom we have these three options.
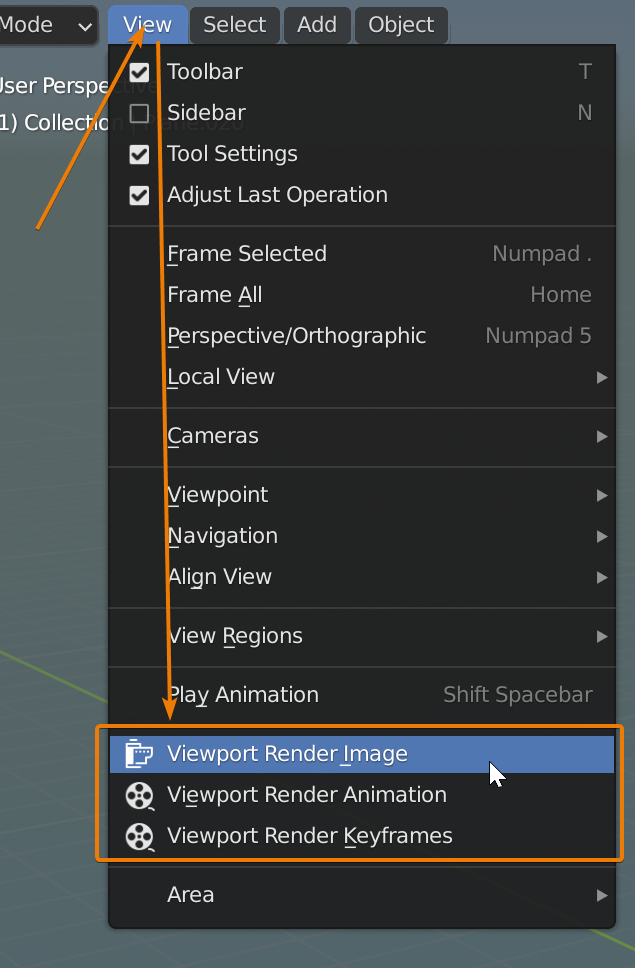
These are pretty self-explanatory. The last one will render every frame that has a keyframe on it and skip the rest.
The output from these is stored in the same output folder we set for animations. For a still viewport rendered image we save the image from the image editor. Press Alt+S or save through the image menu.
Since viewport renders are more or less snapshots of the viewport, it can be a good idea to learn how to set up the viewport shading and overlays. You can learn more about that in these articles.
Related content: Blender viewport shading guide
Related content: How to use 3D viewport overlays in Blender 3D
There is no supported way of pausing a render, but we can pause a render by suspending the Blender process during a render. I have done this with no issues from time to time but there is no guarantee that it will work.
We will look at how we can do this for Windows 10.
As far as I know the task manager in Windows does not have a feature to suspend a process. But we can use process explorer. Process explorer is part of Microsoft's sysinternals suite of tools and you can find it here.
External content: Process explorer
Once downloaded, you extract the zip file. There is no installation process. You can start the program from the procexpexe. or procexp64.exe file.
Find explorer.exe in the list and expand it. Blender will be a sub-process below this process.
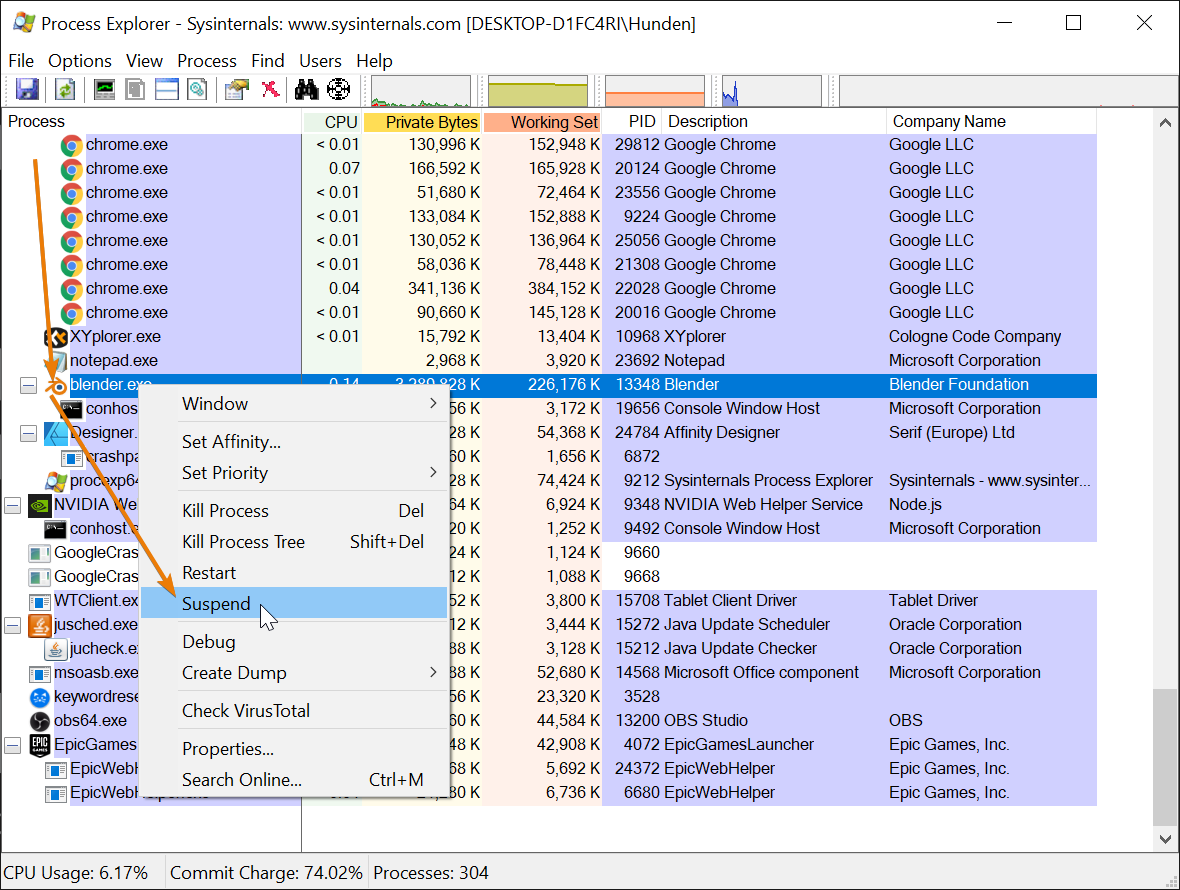
When a render is running, find the Blender process that uses up the most resources. This is likely the process that is currently rendering. Right click and press suspend, and the rendering process will pause.
Right click again and press resume to continue rendering.
Also, don't forget to check out the E-Book.I am convinced that it will help you learn Blender faster. That is why I made it. Click the link.
Suggested content: Artisticrender's E-Book
These are the basics on how we can render in Blender. Both using our "real" render engines, Eevee and Cycles as well as making draft renders with the viewport.
We also learned some basic output settings and how we can pause a render even if that isn't a supported feature in Blender yet.
Thanks for your time.
