


Denoising in Blender has become very easy. You simply check a box in your render settings and Blender will do all the heavy lifting. This works until you try it on an animation. In these cases, you can get back flickering footage that is totally unusable.
A feature that can help reduce flickering when rendering animation in Blender is temporal denoising. Temporal denoising takes multiple frames into account when denoising to create better consistency between frames.
Just know that temporal denoising is only one piece of the puzzle of rendering high quality animations faster. Just putting temporal denoising on top of any animation won't work. You need to have the right render settings and enough samples as well and those depend on your scene.
If you want to learn more about render settings, you can read this guide.
Related content: Blender: A Cycles render settings guide
Now, let's look at how we can use temporal denoising to our advantage in Blender.
If you use Blenders denoiser from within the interface in Blender, be it the OpenImage denoiser or Optix, you will get a result that is individual for each frame. The denoiser does not take past or future frames into account. So the denoising can vary from frame to frame to such an extent that the final result often flickers between frames.
For a single still image, this is not a problem, but for an animation it becomes very obvious and sometimes unwatchable when using the regular denoising.
Related content: How do you Denoise in Blender?
Luckily, there is a solution. But it is not available directly from the interface in Blender. Instead, we first have to render our animation and then run the denoiser separately once all frames have been rendered.
Also, there is currently no interface to handle this, so we need to write a python script in order to run the denoiser with temporal denoising enabled.
Blender's implementation of temporal denoising is based on the Optix AI denoiser.
Using temporal denoising has some specific requirements and workflow to work properly. We will first render the entire scene to disk using image files. Then start a second Blender session that will deal with the denoising of those files. At this stage we need to rely on some scripting. We will cover all this in the article.
After that we can use our favorite video editor to open the image sequence and render it out as a movie file. In this article I will show you this process using Blender's compositor. Just make sure that your video editor can import multi-layer EXR files or you need to convert them to a file format like png. This can also be done in Blender's compositor by piping the image sequence to a file output node.
In the end we will have one sequence of the original images that are not denoised but contain the denoising data. One sequence that is denoised using temporal denoising and a movie file that we can actually play.
While testing, I am using the classroom scene from the Blender website. You can find it among many other demo scenes here.
External content: Blender.org demo files
Let's start with the requirements. When our scene is ready for rendering, go to the view layer properties in the properties panel. Expand the passes section and the data sub section.

Check denoising data and vector. Note that at the time of this writing, the API documentation tells us that the denoising data is enough, but the release notes for Blender 3.1 tells us that both denoising data and vector passes are required and we will run into an error later if we don't have both. So, the release notes are correct.
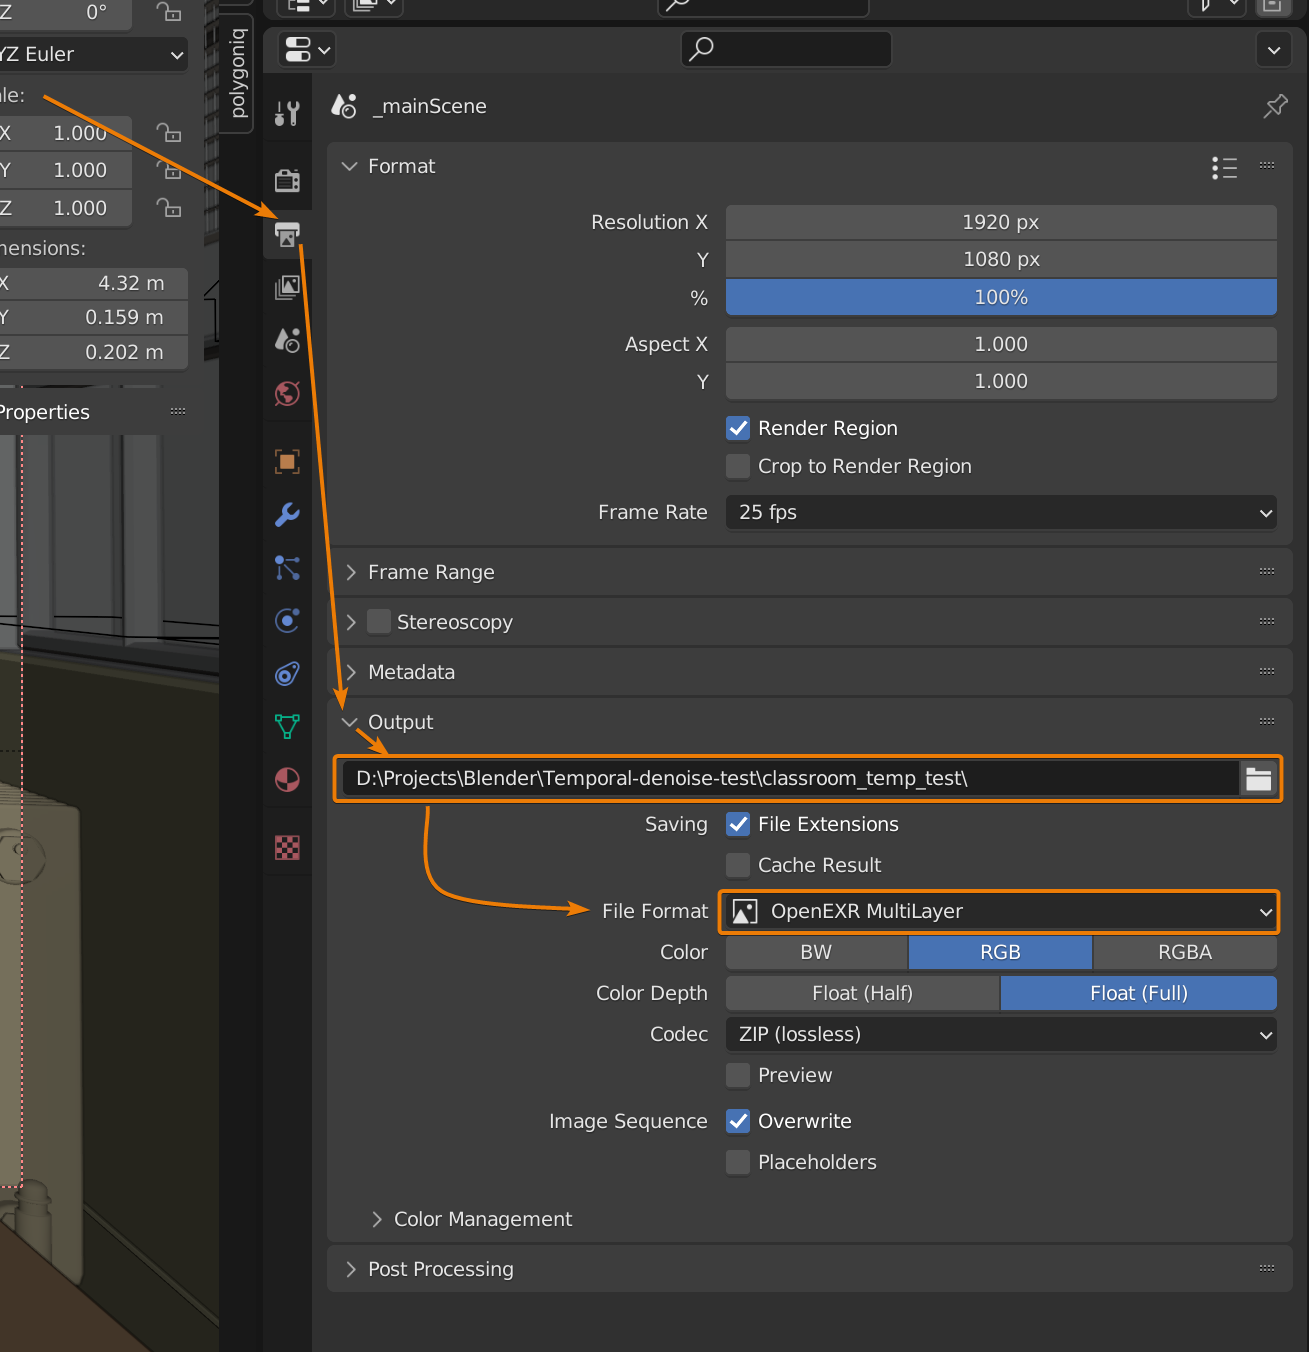
When your project is ready for rendering, we will need to save the output as multilayer EXR files to an output folder. To do this, go to output tab in the properties panel and find the output section. Here, set the destination folder for your rendered files and set the file format to openEXR multilayer.
Once this is setup, go to render->Render animation or hit Ctrl+F12 to render the animation.
For me, I am rendering at 1920x1080 and with the additional passes each frame is about 215mb. So, for 30 frames, equaling one second, that is about 6.5GB. So, make sure that you have enough disk space. You will need at least double of your fully rendered animation since we will need to store both the denoised frames and the original frames during the next step. In my case, that is about 13GB per second of animation.
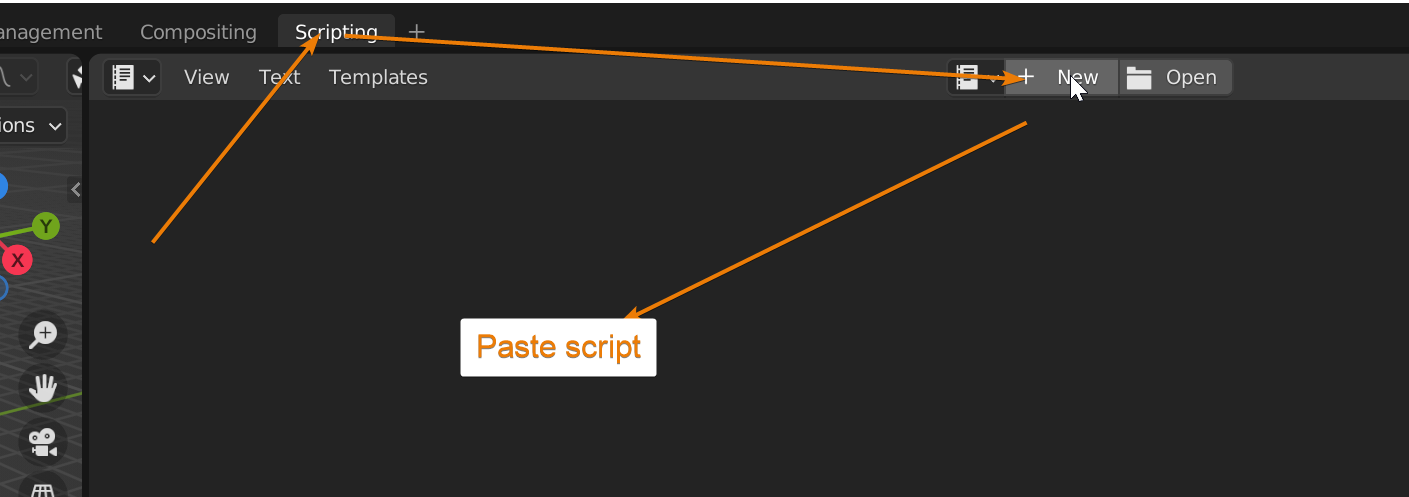
Once the rendering has finished, open a new Blender session. This time we will go to the scripting workspace. If you don't have one, go to the plus sign next to your right most workspace and choose General->Scripting to add the workspace.
Press New at the top of the text editor window to add a new script file to Blender. Paste the code below.
The original code was shared by the user toadfury in this reddit thread.
import bpy
import os
import glob

inputdir="D:/Projects/Temporal-denoise-test/"
outputdir="D:/Projects/Temporal-denoise-test/Denoised_"
os.chdir(inputdir)
myfiles=(glob.glob("*.exr"))
for file in myfiles:
   print(inputdir + file + " to " + outputdir + file)
   bpy.ops.cycles.denoise_animation(input_filepath=(inputdir + file), output_filepath=(outputdir + file))
If you copy and paste the code block above, it should paste with the correct line breaks and spaces into Blender.
Let's cover what the script does.
The first three lines import functions for us to use in our script. This includes os and glob that makes it easier for us to manage the file paths along with the bpy library that is the Blender API enabling us to connect to the various functionality inside Blender.
The next two lines, starting with inputdir and outputdir are variables that we assign filepaths to. Note how both of these lines have forwardslashes to indicate the path as opposed to the standard backslashes in Windows.
The inputdir is the folder that we saved our multilayer EXR files to when rendering our animation.
The outputdir is where we want to store the denoised images. It also contains an addition to the filenames for each output file at the end of the filepath. The "D:/Projects/Temporal-denoise-test/" portion is the folder. The "Denoised_" part will be added to each image file in the sequence. So, the denoised output image file will be called "Denoised_0001.exr" if the original file was "0001.exr" and so on.
The only change we need to make to the script is to set our input and output folders by changing the values of inputdir and output dir. Keep in mind to use forward slashes even on Windows to make it work. You also need to keep the quotation around the file path.
The next line, starting with os.chdir simply changes the directory that your operating system is set to, to the input directory. It is similar to going into the command line and using cd commands to reach a certain path.
After that we create a list, or a tuple to be exact, but it is a sort of list. The list will be made up of all files in our current directory that has the file extension .exr. So make sure that you are working in a folder that does not contain other .exr files than the ones you want to denoise.
After that we go into a loop. The loop will run once for each file in the list of .exr files we just created. For each one of them it will first print to the console the input file and the output file. We can view this output by going to Windows->Toggle system console. Since Blenders interface will freeze while we run this script, it can be good to open this window to get some feedback about the progress.
The last line does the heavy lifting. It runs the entire denoising process by reaching into Blender through the python API and simply telling it what file to throw in and what file to spit out. Internally Blender knows what to do with each file to temporal denoise them in turn as we run through the loop. There is no additional setting we need to do.
Once we have changed the folders and set the new file names as past of changing the outputdir variable, we can run the script.
Press the play icon in Blender's text editor. Blender will freeze during the process, but you can see output in the system console if you turned it on and you can also go to your file browser and see the denoised images populate the folder.
I would encourage you to open the first denoised image once it is done and check so that the denoising worked. This gives you the chance to abort the process if you notice a problem. Keep in mind though that if you open a multilayer EXR file in a program linke photoshop, Gimp or Affinity that supports layers, the top layer might not be the combined denoised layer. In that case, disable all layers above the combined layer to see if the denoising worked as expected.
Once all frames have been denoised, you can reimport them into Blender or any other software to continue either compositing and post-processing or video editing directly.
Let's see how we can turn this denoised sequence into a movie file ready for viewing using Blender.
At last, we can either open a new Blender session or use the previous one where we had our script. Open the compositor and check use nodes.
Delete the render layer node and press Shift+A and go to Input->Image. Place the image node where the render layer node was. Press the open button on the image node and browse for the folder where you have stored your denoised exr images.
Select the first image in the sequence, hold shift and select the last image to select the whole range and then press open image to import the whole sequence.
Drag the combined output to the composite node image input.
Next go to the properties panel and find the output tab. Here go to the output section and select ffmpeg as the output file format and possibly change the output folder. Render the animation.
This will be a quick render and you can find the movie file in our output folder and play it in your favorite media player.
Rendering and denoising can be a hard nut to crack. While temporal denoising is a nice addition to Blender's feature set, it is not an end all be all for rendering animations yet. It can help to sort out some of the flickering but with too few samples or other incorrect setting we will still have issues with inconsistencies between frames.
I encourage you to test it and see how it affects your animations, but don't view it as the ultimate solution to denoise flicker just yet.
Thanks for your time.
