


Denoising can save us a lot of time when rendering. Rather than having to wait hours for the renderer to go through samples until the render finally looks clear we can just render until we want to stop and then let the denoiser clean up the noise in the image. So how do we denoise in Blender?
To denoise in Blender follow these steps:
In the rest of this article, we'll go into more info about denoising and the multiple ways we can do it. We'll also go over the settings to use and a trick to improve the quality.
Related content: How to use Intel (OpenImageDenoise) denoiser in Blender

Sometimes we just want to output the raw render and do the denoising afterwards if it is needed, or just be able to compare the results. We can do this by simply storing the data required for denoising with the image as a pass and use the compositor to denoise as a post processing step.
To Denoise using the blender compositor follow these steps:
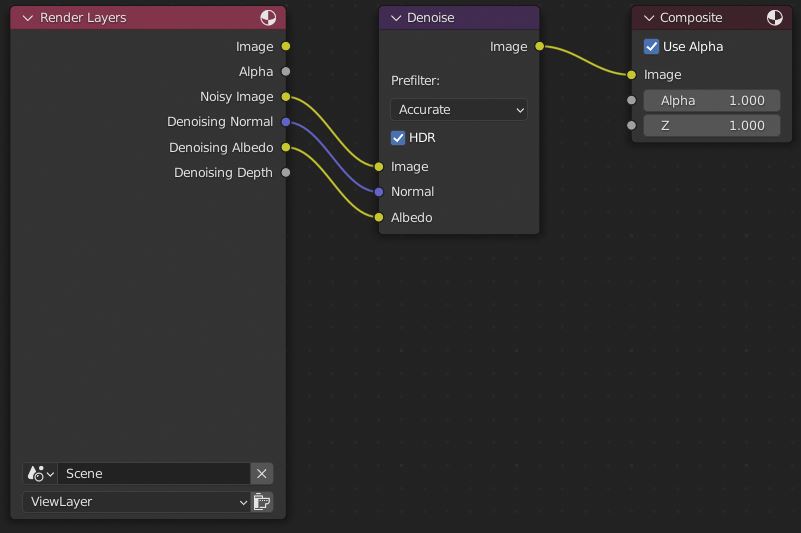
The denoiser will work on images even if we don't have the Normal and Albedo pass. The Albedo and Normal passes will just help the denoiser produce a better quality image.
You may notice that the compositor denoiser doesn't give us the option to choose which denoiser to use. The reason for this is that the denoiser node uses OpenImageDenoise. Optix does not have this post processing option. It is only available at render time.
Slightly transparent objects tend to make whatever is behind them look blurry. Transparent objects usually end up having a lot of artifacts as well when combined with denoising.
Since we're using the compositor, we can do a bit of customization to make the denoiser produce better results in these cases.
A quick fix for this is to separate those elements before the denoise, denoise them separately and then recombine them.
Related content: How to use alpha transparent textures in Blender
The process for separating these elements is a little complicated but first separate the different elements into their own collection. Once we've setup the separate collections go to the top right of the window. Next to ViewLayer click add view layer and select the new view layer from the dropdown.
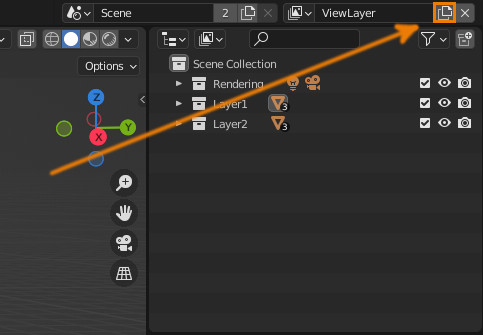
We'll also want to separate all of our lights and camera to another collection. Since this is a new view layer we'll all need to go the view layer properties > passes > data and enable Denoising Data again.
Now we'll use this new view layer for the objects we're separating. Select the collection that doesn't have the objects we're separating in the collection properties enable Holdout and Indirect Only.
Next switch the view layer back to the other view layer and now set the opposite object collection to Holdout and Indirect Only.

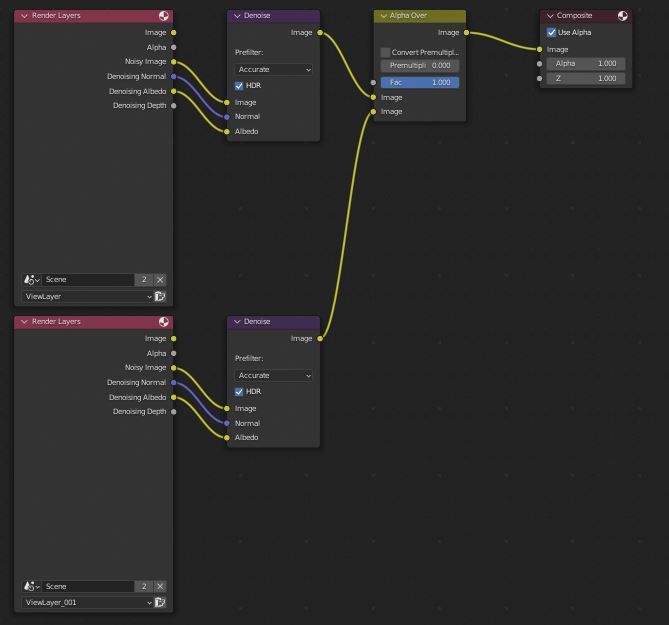
Now navigate over to the compositing workspace and select the Render Layer Node and press Shift + D to duplicate it, on the duplicated Render Layer set the view layer to our second View Layer.
Go to Add > Search > Denoise and place the node in the graph, do this again until we have two and then Setup the Denoise nodes for each Render Layer.
Go to Add > Search > Alpha over and connect one Denoise Node Image out to input 1 of the alpha over node. Connect the other Denoise Node Image out to input 2 of the alpha over node. Note that the order doesn't matter.
Connect the Alpha Over image out to the Composite Image. Now if we've setup everything properly this will result in the same image but with a cleaner denoise.
In case we're having issues the way the view layers work is that each view layers saves the setting for collections separately. When we set a collection to holdout it will make all the objects in the collection transparent and also make everything behind it transparent.
This method also works for elements that look better before denoising. We can just exclude the denoise node for that render layer.
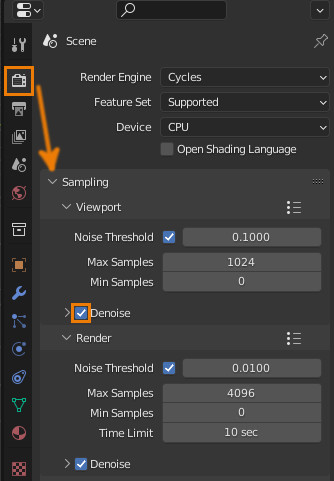
To denoise using render settings:
Note that even if we enable render setting denoising we can still access the noisy pass by enabling the denoise data pass.
To get access to the noisy image go to the view layer properties > Passes > Data and enable Denoising Data. Now if we go to the compositing workspace and enable use nodes, we can access the noisy image from the render layer node.
One issue with the render settings denoiser is that we may like the noisy image more. If we don't enable the denoiser data in the view layer properties, the denoised image will overwrite the noisy image.
Optix is the GPU based solution for denoising, in general this denoiser is quicker but tends to give more blurry results.
OpenImageDenoise is a CPU based denoiser and while slower will usually give a slightly better result. But it depends on the scene and your opinion.
Optix tends to struggle with high frequency details, it will blur out a lot of the finer details even if they aren't that noisy. An example of this would be a wood texture where in the noisy image we can still make out the grain of the wood but after the Optix denoise it looks smudged.
However, Optix has another advantage. And that is its support for temporal denoising. Temporal denoising is when we are rendering an animation and the denoiser takes previous and future frames into account to match frames with each other. Without this feature, denoisers tend to make animations flicker and shift how the denoising is applied. And this can be very noticeable.
To use temporal denoising with Blender however, we need to use the python api. There is no GUI for it right now.
Note that Blenders denoise solutions are constantly under development and in the future Optix may match the quality of OpenImageDenoise or there may be a completely different set of denoisers.
To denoise in the viewport:
If Optix is available we should use it for viewport denoising as it will be the fastest which is what we should configure viewport denoising for.
Sometimes it can be quicker to only start denoising after a certain number of samples, for example if we know or scene is going to be too noisy for the denoiser in the first 10 samples we can just set the start sample to 10.
This should speed up the viewport rendering a bit, usually it's pretty fast but if we're rendering on the cpu and only have access to open image denoise this may be a good option to still have viewport denoising while maintaining as much rendering speed as possible.
Blender provides quite a few different options for denoising, and they can all be pretty handy.
The Render Settings denoiser is quite useful when we just want a quick result without too much configuration. The Viewport denoiser is useful for getting a good idea of what our render will look like without having to render too many samples.
The compositing denoiser is great when we want to fine tune the denoising and adjust it after the render or if we want to individually denoise passes.
Thank you for your time.
