


I remember when I first started out in digital 3D art; I was really struggling to make anything look good in Blender. The pieces that I was neglecting were the lighting. Lighting is one of the most important pieces of any 3D scene. It can make or break any 3D project.
The goal of lighting is to guide the beholders emotion and tell a story. We do this through thoughtful use of light. In Blender we have three ways of lighting. With light objects, through geometry objects with an emission shader or the world background.
In this article, we will explore the basics of lighting Blender. We will look at the different ways we can add light to a scene, what properties those different light sources offer and how we can configure them.
But first we will briefly touch on the most important aspect of lighting. The goal, why is lighting important?

It is said that a photographer is a light painter or someone who paints with light. This is true for the lighting part of the pipeline in a 3D artist's workflow as well.
Studying some photography as a 3D artist is time well spent.
But we can also simplify lighting a lot. The goal of lighting is to create pleasing and balanced contrast. Everything in lighting comes down to contrast. The absence of light is just as important as the light itself.
With light, we can put emphasis on the important parts of our scene and guide the viewer's eyes to our focal point.
We can separate subject from background and create a guide for mood and emotion.
We can also hide or only partially show the scene to create a story or have the viewer make up their own meaning of the artwork.
But before diving deeper into the goals of light and why it is important, we need to know the technical details first.
The lighting is what separates Cycles from Eevee the most. These engines handle lighting very differently. In Cycles, light rays are cast from the camera until they terminate thanks to too many bounces, hit the background, or hit a lamp.
Related content: How the light path node works in Blender
In Eevee we have direct lighting, and any indirect lighting needs to be baked using an irradiance volume.
Thanks to Cycles light bouncing, we get indirect light automatically. But we also use a lot more calculations and rendering of a frame takes much longer than in Eevee.
In Eevee it is not uncommon to use additional lamp objects to fake the indirect light instead of baking the indirect light with an irradiance volume.
The most common way of lighting in Blender is through using light objects. To add a light object, press Shift+A in the 3D viewport and go to the light submenu. You can also use the Add menu at the top of the 3D viewport.
We have four different light object types.
We can move, rotate, and scale the light object using the basic transformation tools accessed through the shortcut keys, G for Grab or move, S for scale and R for rotation.
However, all lamp types do not take all transformations into account when illuminating the scene.
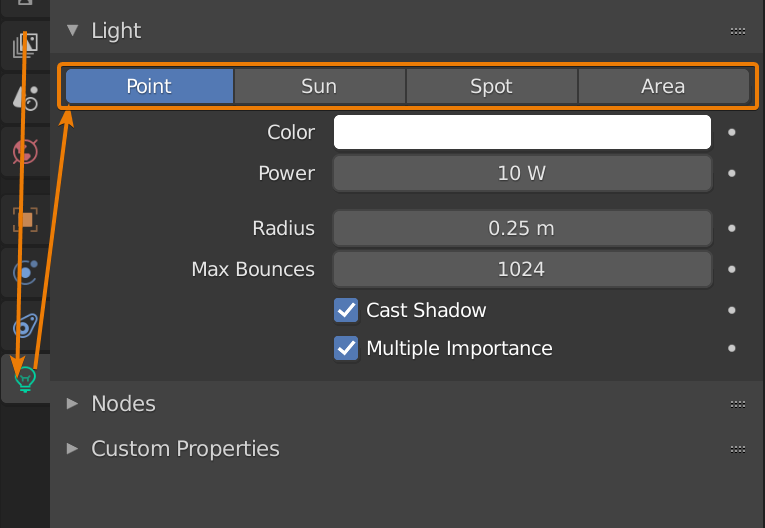
We can then access the parameters of a light object by selecting it and go to the object data properties tab in the properties panel. That is the green lamp icon.
Expand the light section if it isn't already open. Here we can change our light object into any lamp type if we choose the wrong type when we added the lamp. There are also some settings for our light object that differ slightly depending on the lamp type we select.
Common settings for all lamp types are the color and the two checkboxes, cast shadow and multiple importance.
The color is obvious. We change the color of the light cast by the lamp.
The shadow checkbox allows object hit by this light to cast shadows. Without this, objects hit by light coming from this lamp object will let the light shine straight through them.
We may have certain scenarios when we need to fake something and therefore need this. But more common is that we need a specific object to not cast shadows rather than the lamp itself.
To do this, select the object, go to the object properties tab in the properties panel and find the visibility section. Expand the ray visibility subsection and uncheck shadow there.
The multiple importance sampling guides light rays towards the lamp object instead of allowing them to randomly scatter, increasing the likelihood for a ray to hit the lamp.
This reduces noise and should be kept on most of the time.
The power is the same for all types except sun. The sun has a strength value instead. This is because the sun is so much stronger than the other types, so it makes little sense to have the same parameter type here.
The point lamp illuminates the same amount in all directions. The point lamp is represented by a single point in space.
However, a single point light source would produce infinitely sharp shadows. Therefore, the point lamp has a radius parameter that control the area around this point that is considered the size of the lamp.
The real effect this has is that the larger radius the softer shadows this lamp will cast.
The scale and rotation of a point lamp does not matter. The position is the only transformation that has an effect on the environment.
With the sun light, unlike the point lamp, only the rotation is considered from its transformations. The sun is considered to be infinitely far away when lighting the scene and it is lighting the entire scene with perpendicular light rays, so scale is also not considered.
The shadow's sharpness is controlled with an angle parameter for the sun lamp type.
So, the parameters for lamp and sun is very similar, they just have different names since they are calculated differently behind the scenes.
The spotlight is based on the point light, with the difference that a cone is added to direct the light.
We can control the cone with two additional parameters. The size and blend. These settings are located in their own section called spot shape.
The blend and radius may look like the perform the same softening of the shadows. But the blend setting only soften the edge of the cone while radius soften the shadows cast by objects lit with the spotlight as well.
The size parameter changes the size of the base of the cone.
We can also use the scale transformation. It does not affect the lighting, but it increases the size of the cone overlay so that we may easier see what portion of our scene we are hitting with light.
An area light illuminates in one direction and there is predefined shapes.
For each type we get controls to change the shape further.
Apart from this we can set an area light to act as a portal. What this does is that instead of emitting light, the area light now acts as a guide for other light sources.
For instance, we can setup an area light to cover a window and configure it to be a portal. The light we have coming in from the outside is then guided to the window opening. This can dramatically increase performance and reduce noise for interior scenes.
The lamp object also has support for light nodes. You can select a lamp object, open the shader editor and check "use nodes".
Keep in mind that lighting nodes are only supported in Cycles.
With lamp, or light nodes we can setup more complex lighting using light objects. For example, we can use a texture to setup a projector like lighting or use IES textures.
Related content: How to create your own IES light and use them in Blender
I found that light nodes are rarely used by 3D artists and many people that use Blender don't even know that there is a node system for configuring your lamp objects.
The world material is our second source of light. The world background can be both the background we have in our scene and a source of light.
Related content: How to change the background in Blender?
The world background has its own node tree and its own tab in the properties panel. It is the tab with the red globe icon.
More commonly though, is that we use the shader editor to change the world material. Go to the shading workspace or open a shader editor in your existing workspace. In the top left corner of the shader editor, you will see a dropdown set to object. Change this to world to access the world material node tree.
Sometimes you need to check "use nodes" to have nodes appear and be active.
The three most common uses of the world background are to use a flat color, an hdri image or a sky texture that is built into blender.
Keep in mind that if you are using Eevee, the world background is considered indirect lighting. In practice, this means that it does not produce shadows out of the box.
When lighting in Eevee for beginners, I suggest that you stick to lamp objects because the same is true for mesh lighting that we will discuss later in the article.
By default, a flat gray background color is set up for us. To change this to another color, follow these steps.
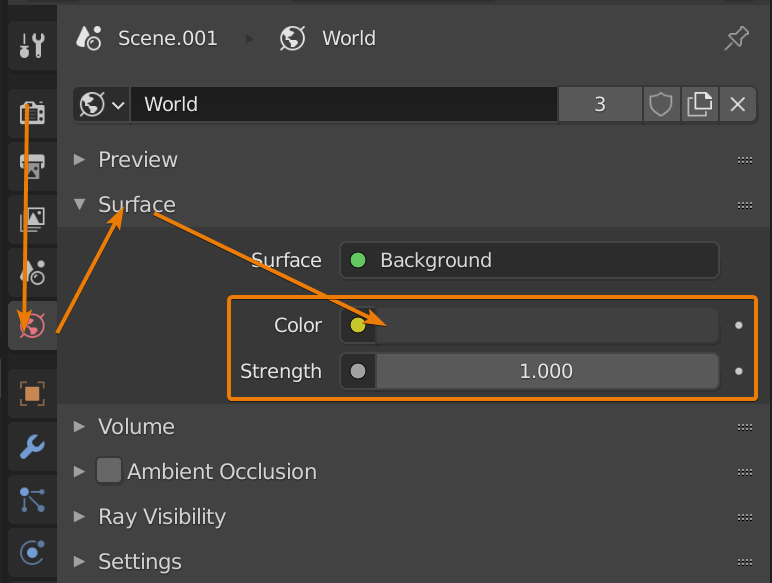
Just below the color value we can also control the strength of the light emitted by the world background material.
To use an hdri image, it is often easier to use the shader editor rather than the interface in the properties panel.
The most popular place to get hdri images for lighting is hdrihaven.com.
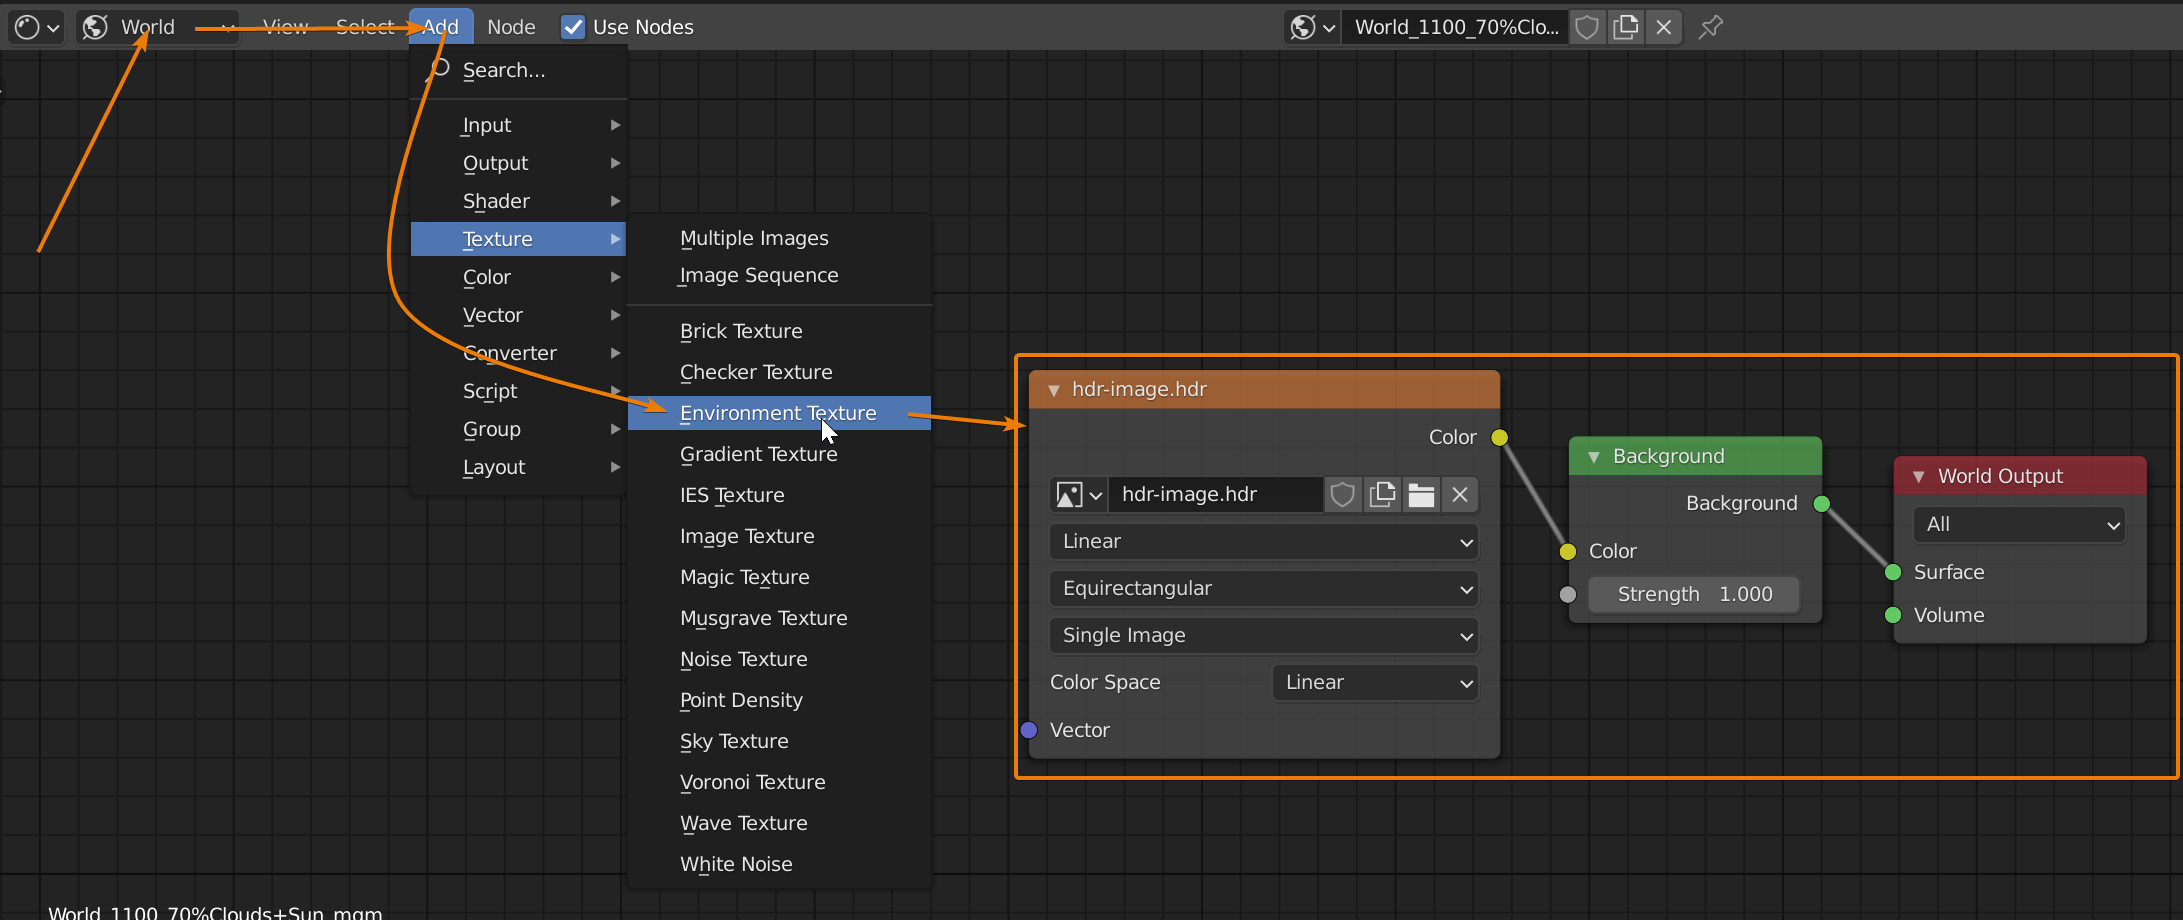
When choosing an hdri from hdrihaven. Look at the shadows and reflections produced in the spheres on the example images and pick on that resembles the kind of look you are trying to create.
We can also use a sky texture. Follow the instructions for using an hdri image but instead of adding an environment texture, add a sky texture and connect it to the color input of the background node.
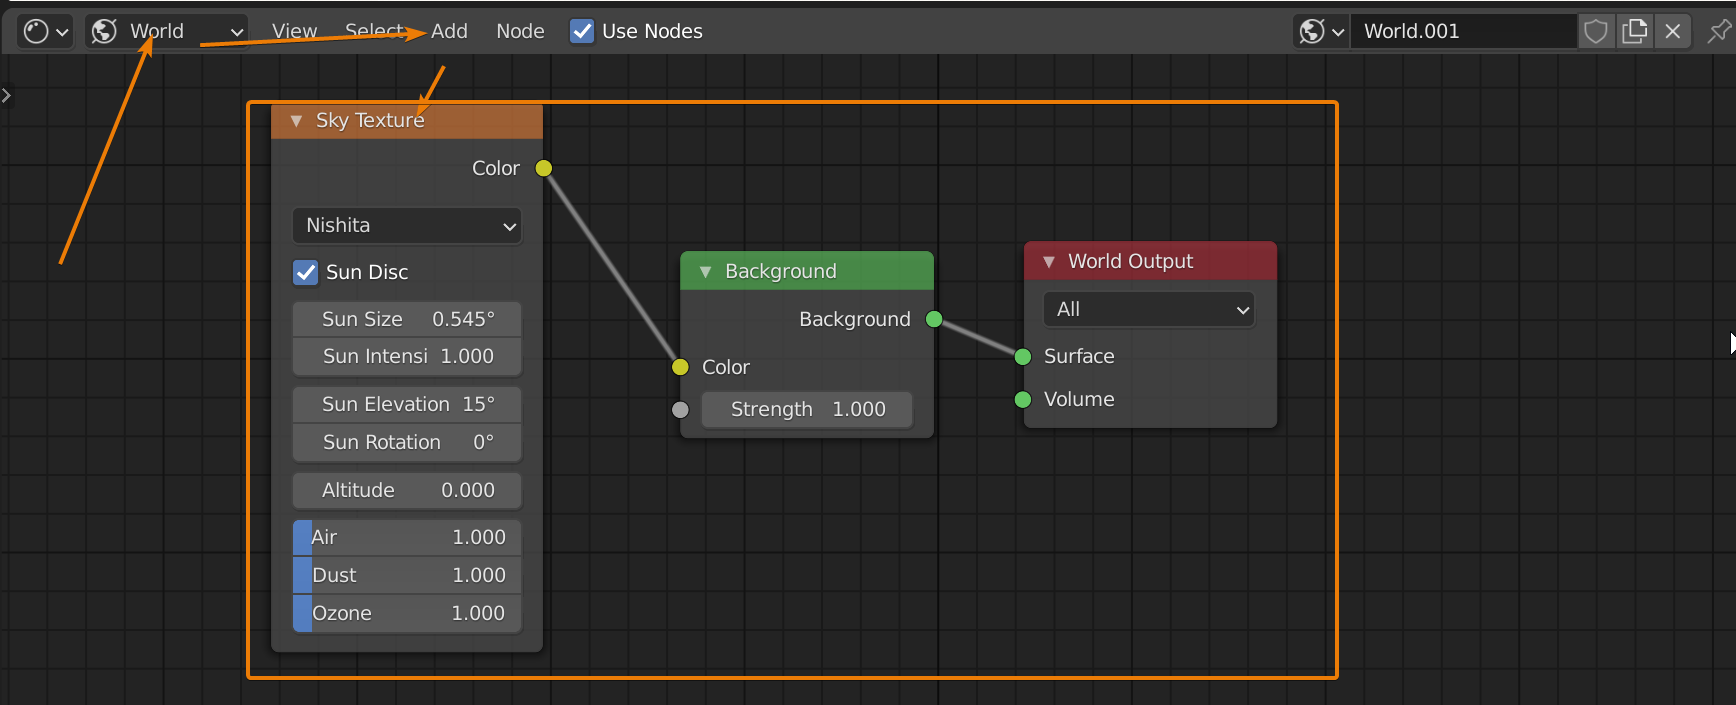
By default, the sky texture node is set to nishita. This type of sky texture is currently only supported in Cycles. For Eevee, use the hosek wilkie variant or preetham.
The last option we have, is to light the scene using emission shaders. This allows us to light using geometry.
We can use any object type that has geometry such as mesh objects, curves or metaballs and apply a material with an emission shader.
To have bloom emit from your emission shaders you can follow this guide.
Related content: How to use bloom with Cycles in Blender

In Eevee, you won't see any light. This is because emission shaders are considered indirect light and needs to be baked. You can read more about the irradiance volume that allow you to bake the light here.
Related content: Eevee lighting interiors
However, keep in mind that using emission shaders in Eevee is not recommended because it is hard to get even lighting. In most cases lamp objects will serve you better.
We can also use the emission component of the principled shader instead of a separate emission shader.
If so, you just change the color of the emission input to something other than black and adjust the emission strength.
I should warn you here. Using both emission shaders and lamp objects will require you to double the number of samples. It is better to just have one of them in your scene. Even just a small emission component on an object in the corner of your scene is enough to require double samples to clear up the image.
External content: Blender conference talk - Introduction to Cycles Internals - Lukas Stockner
We can also use emission shaders with volume objects to light with a volume. But that is a more advanced topic I will leave for another day.
There are primarily three ways to light our scene, through lamp object, the world background and emission shaders on our geometry objects.
We can also use volume objects to light the scene, but that is pretty much the same as using emission shaders.
We should avoid using both emission shaders and lamp objects since it will double the number of samples required. Pick one.
Thanks for your time.
