


By far, the biggest difference between working with Eevee and Cycles is the lighting setup. When I got into Eevee, light probes were a foreign concept to me. Over time, I learned how they worked, but this is the guide I would have wanted back then.
There are three kinds of light probes in Eevee. Reflection cubes and Reflection planes handle reflections and the irradiance volume sample and emit indirect light. We place the probes in our scene, let them capture data by baking and use it to make more realistic lighting and reflections.
That is the overarching thing to understand. But let's dive into the details.

In a ray-traced render engine like Cycles, we shoot rays backwards through the scene, use each material's properties to evaluate how the rays behave and return a color for each pixel.
In this process, reflections, and indirect light is included. We get global illumination by default.
Since real-time render engines like Eevee can’t afford to realistically calculate indirect light and reflections they must come up with all sorts of tricks to provide a satisfactory instant result, thus light probes were born, another cheat in the book of real-time rendering techniques.
Light probes are a way of sampling the environment for light information to create indirect illumination and reflections by baking it beforehand.
We do the calculations of reflection and indirect light that we need before we actually render the image and use this pre-baked data at render time.
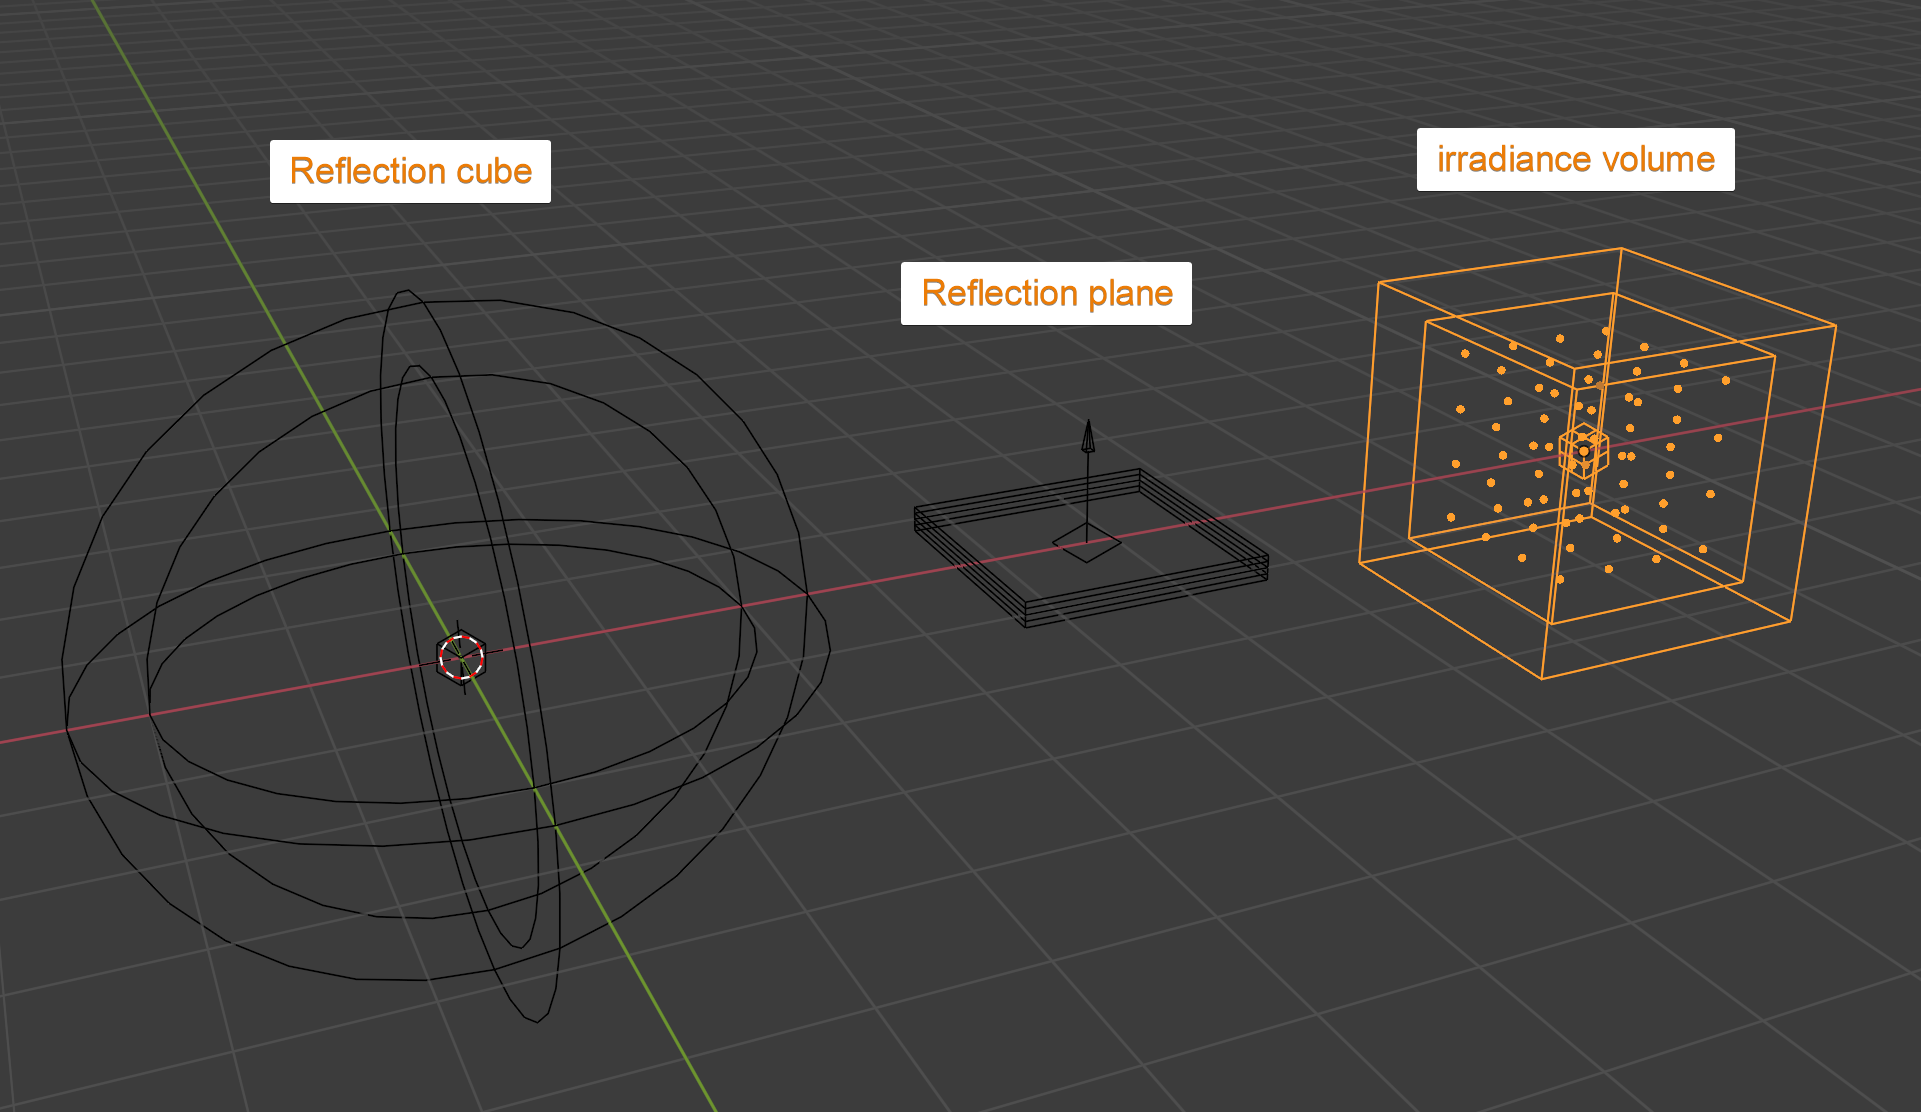
In Blender's Eevee render engine we have three different light probes.
The image below shows what they look like in Blender.
We can add a light probe by following these steps:
We will now go over each light probe and discuss how and when to use it as well as it's settings. But before we move on, I encourage you to read my article on Eevee render settings. It is tightly related to light probes.
Related content: A guide to Blender Eevee render settings
There are 3 types of light probes you’ll find yourself using.
Each has its own purpose, its own set of problems (for which you’ll be given simple solutions) and all of them have some things in common.
Irradiance volume is used for indirect illumination, reflection cubemaps for general reflections and reflection planes for mirror-like reflections.
The irradiance volume is the only light probe that actually deal with light as we normally think of it. The other light probes deal with reflections.
It is a grid or array of dots that when baking captures the bounce light from the surrounding area. During rendering, these dots then act as lights emitting this indirect light back into the scene. This way the irradiance volume can help us get smoother light and tint the color of the light according to the surrounding area.
This may not sound important at first, but it makes a huge difference in how our scene looks. Let’s look at this example.

Here we have a blue light in the bottom left corner and a white light in the top right. Behind the sphere though is a handful of smaller bright red cubes. With no bounce light we cannot even see that there is something red in the scene.
Also note how dark the bottom right is of the sphere.
Here is the same scene when we have added and baked an irradiance volume.

While not perfect, we can see a clear difference. The red object behind the sphere gets some light on them that bounce on the surrounding walls. You can see a tint of red behind there.
The sphere has become much lighter and pleasing to the eye even if we still have some areas that we can improve by placing the irradiance volume a bit better and adjusting its parameters.
Reflection cube maps create baked reflections in specific regions of your scene. They do not work on their own. Instead, they complement screen space reflection.
So, for a reflection cube map to work we need to first turn on screen space reflection. You can do that in the render settings tab in the properties panel. Find the section labeled screen space reflection and tick the box to enable it.
If you are interested in the screen space reflection settings, you can learn more about it in the Eevee render settings guide.
Related content: A guide to Blender Eevee render settings
When screen space reflection is turned on, everything that is inside the viewport, or final render (note that these can be different) can be reflected on reflexive surfaces.
As soon as an object leaves the view or is obscured by another object and not direct in line of sight for the camera it can no longer be reflected in reflective surfaces.
This is where reflection cubemaps come in. They act as a second eye to scan the surroundings from a perspective that complements our view.
So, when we have baked a reflection cubemap we can reflect objects that are both in line of sight for the camera thanks to screen space reflection, but also reflect what the reflection cubemap sees.
Here is an example:

This is the same scene from earlier, just viewed from an angle. The small cube you see in the middle has a metallic material with a low amount of roughness and reflects its surrounding.
From this angle we should see a few red objects that are hidden from view behind the sphere. Screen space reflection is turned on, but the objects are not in our view so they cannot be reflected.
Now I have baked the light from our earlier irradiance volume, but also with a reflection cubemap that sits in the center of the room and has a clear view of the entire room from that perspective.

You can see now that we get a reflection on the cube.
The red bleed through the wall is a result of my poor setup of the irradiance volume. To solve those kinds of issues, I once again recommend you to learn more in the Eevee render settings guide.
Related content: A guide to Blender Eevee render settings
You can also check out the interior lighting guide. It is a bit older and some settings discussed there have been deprecated, but it gives a good idea on how to combat light bleed in Eevee.
Related content: Eevee lighting interiors
If you have a flat surface that needs to specifically have a reflection, we can use a reflection plane. Like reflection cube maps, it works by adding an additional point of view. This time, from the point of view of the plane that needs the reflection.
It can be any kind of reflection, from mirror like, to just some specular highlight in a wooden floor. A reflection plane works out of the box and does not need to be baked.
The drawback is that a reflection plane instead acts as a second camera and the scene is rendered from its view as well as the camera view. So, for every reflection plane you add, Blender needs to render the scene again from its view. This becomes a very performance demanding task with too many reflection planes.
Also, without screen space reflection turned on, we only get perfect mirror reflections from materials with a roughness value of 0. For materials with roughness values between 0 and 1 we need to turn on screen space reflection.

Here is our example scene again, this time without any baked light and with screen space reflection turned off. I also added this noise texture pattern to the floor with crystal clear reflections in some parts and a gradual roughness value that goes to 1. You can see that even if I have the gradual transition of roughness values we get a hard edge without screen space reflection.
If we turn on screen space reflection you can see the difference on the floor.

If we go one step further and bake the indirect lighting, we get this.

Now let's dive into the settings and some practices for each of the light probes. We will start from the beginning with the irradiance volume.
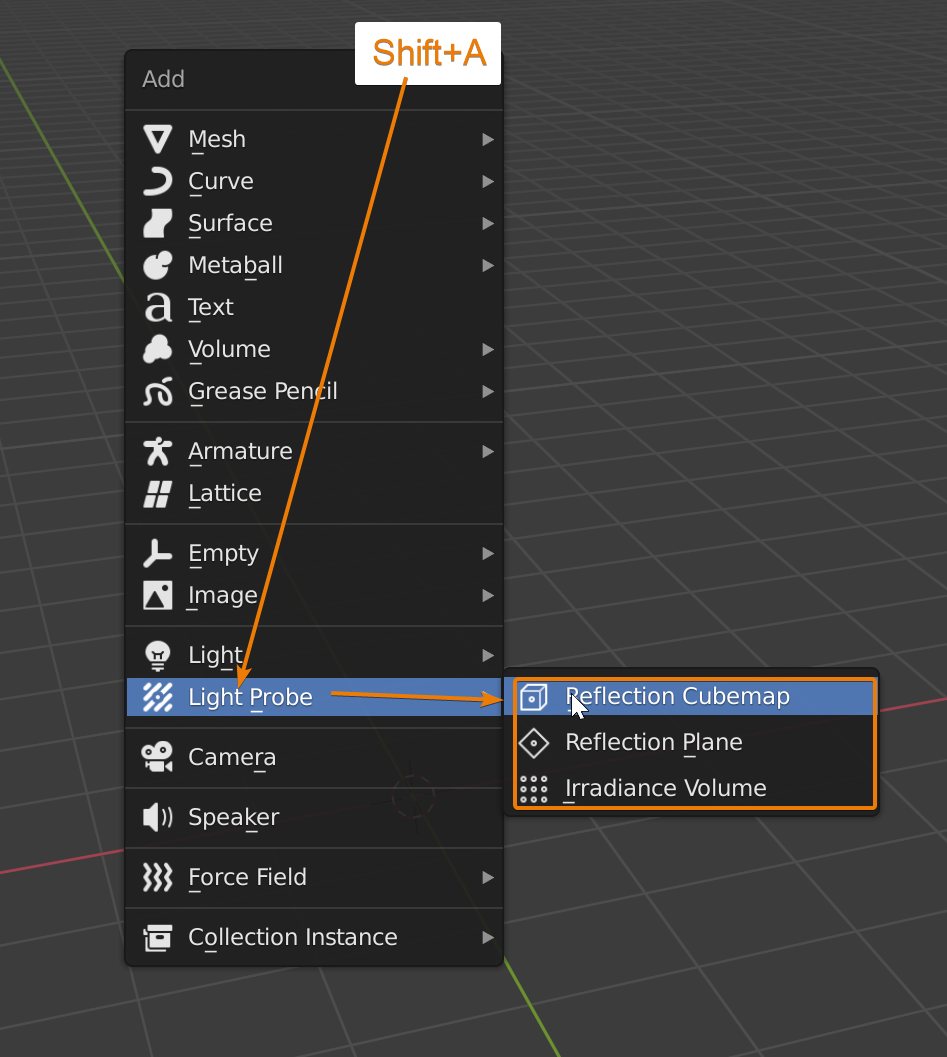
While in object mode in the 3D viewport we add an irradiance volume by going to the add menu or my pressing Shift+A to spawn the add menu at the cursor. Then go to light probe and choose irradiance volume.
Use the regular tools such as move, rotate and scale to transform the object.
The irradiance volume will appear in the scene at the 3D cursor location, just like any object.
From here we place the irradiance volume in a space where we need to sample our light setup for indirect light. For basics on how to setup lighting, you can check out the basic lighting article.
Related content: Blender: lighting basics tutorial
While placing the irradiance volume, we should consider the individual light sample points. We can change the number of points in the irradiance volume by going to the object data properties in the properties panel. That is the green icon. Find the probe section and the resolution settings for each axis.

The placement of the irradiance volume should be such that no point in the object should intersect or be inside another object. This can cause lighting artefacts. In many cases we need to use multiple irradiance volumes to place them so that we avoid this, or we can adjust the resolution so that we end up with sample points evenly spread that doesn’t intersect another object.
Remember that the individual points will acts as lights themselves once the indirect light is baked.
The density of the sample pints is also important, you should have an even grid that is not too dense or too sparse. This depends on your situation, and you will have to use your own judgment.
If the points are too dense, you run the risk of getting a grid like light pattern across your scene. If the points are too far between, you instead miss points where there should be indirect light.
To evaluate the correct resolution to work at, think of how many gradients of light you would need to have in a given space, how many divisions/dots would you need the gradient to have? That’s your answer.
The number of sample points also affect performance and how long the baking process will take.
Once your irradiance volume is placed, go to the render settings tab and find the indirect light section. Press "Bake indirect lighting".
For more information about the light settings here, check out the Eevee render settings guide.
Related content: A guide to Blender Eevee render settings
Let's now look a bit more into the irradiance volume settings.
These settings, as with the resolution settings discussed above are found in the object data tab. First, falloff.
By default, the object’s lightning fades gradually outwards until the bounds of the object are reached, blending into either the world’s lightning or another irradiance volume object, whenever two objects of this type intersect the smaller one has priority.
The falloff field allows you to control the gradient of this blending process, 0 being a smooth gradient from center to boundaries and 1 a sharp outline between the object’s illuminated area and the outer unilluminated areas.
The distance is the outer reach of the light probe all light probes have this setting. The irradiance volume won't affect anything outside this area.
The intensity is essentially the strength of the light emitted from the irradiance volume once they are baked. However, setting this to anything other than 1 would be physically incorrect. You can also think of it as a multiplier of the sampled light.
The clipping defines the closest and furthest part captured by the light probe while baking. Anything outside this range while baking won't be taken into account.
If you are experiencing artefacts after you baked your indirect light, you can take a look in the visibility subsection.
According to the manual these settings help you control a shadow map that is rendered for each sample point in the irradiance volume. Changing these settings can help reduce artefacts and light bleeds if you are having trouble with that.
External content: Blender manual: irradiance volume
We should use reflection cube maps when we need to complement screen space reflection. In other words, when we have objects that are not visible by our view but needs to leave reflections on other objects in the scene.
´We create a reflection cube map like any other object. Press Shift+A in the 3D viewport, go to light probes and choose reflection cube map.
It will come into your scene at the location of the 3D cursor, and you can move rotate and scale it to place it in the world.
We then go to the indirect light section in Eevee's render settings and press "Bake indirect light". This will bake all reflection cubes and irradiance volumes. We can also bake just the cube maps by pressing "Bake Cubemaps only".
For settings related to reflection probes, check the indirect light section in the Eevee render settings article.
Related content: A guide to Blender Eevee render settings
There are some settings related to the relfection cubemap that we can find by clicking the green icon in the properties panel to open up the object data tab.

Most settings are similar to the irradiance volume but the reflection cube also have a type parameter.
Reflection cubemap default shape is a sphere. This shape can be changed into a cube inside the object’s data tab. Open the probe section in the data properties and change the type dropdown to box.
In general, when you want reflections in a box shaped environment such as a room, use the box shape. In other environments, such as outdoors, use the sphere type.
The size option is the influence of the object. Anything outside this area won't be affected by the reflection cubemap.
The falloff is where the influence start to fade linearly until the outer size is reached. A falloff of one will start at the cubemap center and a value of zero will essentially eliminate any falloff.
The intensity should be set to 1 for realistic reflections, a lower value will reduce the effect and a higher value will intensify the effect.
And last, clipping start and end determines the area that the reflection cubemap will sample during the baking process.
Just like with the other light probes, in the 3D viewport go to the add menu or press Shift+A, find the light probe menu and choose reflection plane.
When placing the reflection plane, it is a good idea to place it in the correct location from the beginning. As with all objects it comes in at the 3D cursor location, you can read more on how to manipulate it here:
Related content: How to use the 3D cursor in Blender
Once the reflection plane is in the scene, we place it slightly above the surface we need to have a reflection. If you are in Eevee viewport mode or material preview you will see the effect in real-time. This makes it much easier to position.
Related content: Blender viewport shading guide
If you place it right on top or slightly below the surface, you will capture the backside.
If the surface you are trying to reflect has varying roughness or isn't a sharp reflection, turn on screen space reflection in the render settings.
In my experience, you rarely or never need to change any settings on the reflection plane.
In this article we took a deeper dive into what light probes are and what they do. There are three kinds of light probes that each work quite differently.
The irradiance volume that we use to capture and emit indirect light. The reflection cubemap is in trun used to capture reflections in an area and project it on the surfaces in its influence. Last we had the reflection plane that rendered the scene from and other angle and use that as a reflection of a flat surface.
If you haven't done so, please check out my book where many of the articles on artisticrender.com is included, neatly sorted, and edited so that you can easily find what you are looking for.
Thanks for your time
