


To use the 3D cursor effectively, the first thing we need to learn is how to position it correctly. There are a handful of tools at our disposal to position the 3D cursor either manually or precisely.
We can position the 3D cursor precisely by using the snap menu accessed through Shift+S. Then use the "cursor to selected" command to precisely position the 3D cursor at our selection. The 3D cursor can also be placed manually by using Shift+Right-click in the 3D viewport.
In the rest of this article, we will further explore the interface and functions available to us to change the position and rotation of the 3D cursor so that we can use it effectively together with other tools in Blender.
The 3D cursor is a single point in space we can use together with other tools in Blender when those tools need a reference point.
This is what it looks like in the 3D viewport.

For example, we can use the 3D cursor as a transform pivot point. We can scale or rotate objects around its position. New objects we add to the scene will also come in at the location of the 3D cursor.
The 3D cursor has both a location and a rotation value. Most of the time, we use the location of the 3D cursor. But we can use the rotation, for instance, when aligning objects at a certain angle.
Related content: How to center objects, origins and pivot points in Blender
There are primarily two things we need when using the 3D cursor. We need to position it correctly, and we need a tool that can use the 3D cursor position or rotation.
There are several ways we can position the 3D cursor, but how it is being used depends on the tool we want to use together with the 3D cursor.
Just one thing, if you find this article helpful, perhaps you will find my E-Book helpful as well. It has helped many people become better 3D artists faster.
Suggested content: Artisticrender's E-Book
Let's continue
The 3D cursor gizmo is the graphical representation of the 3D cursor in the 3D viewport. It gives a visual representation of its location and rotation.
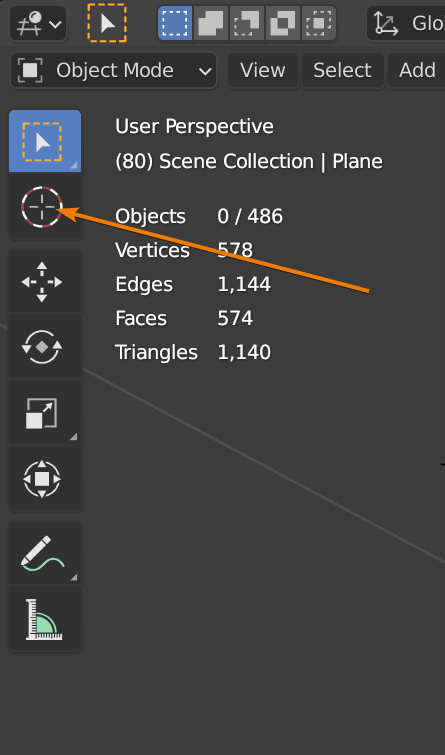
There is also a tool in the tools panel for the 3D cursor. If we activate it, we will move the 3D cursor with the left mouse button.
With the 3D cursor tool activated, we can go to the active tools and workspace tab in the properties panel. Here we find a "surface project" and orientation settings.
The surface project setting will put the 3D cursor on the surface the 3D cursor is moved to. If this is not checked, it will keep the same depth and only change the location according to the view.
For exact movements along an axis, go to the orthographic view and use the number pad, 1, 3 and 7 to position the view from the top, front or right view for example.
The orientation setting will decide how the 3D cursor is rotated as it is moved. We can align it to the view, the geometry we surface project on or the transform.
The transform will align the rotation to the current transform orientation selected from the control options in the top center of the 3D viewport.
We can also leave the rotation unchanged by setting the orientation to none.
If we press N in the 3D viewport and go to the view tab. We find a section called 3D cursor. Here we can see and set the current location and rotation of the 3D cursor.
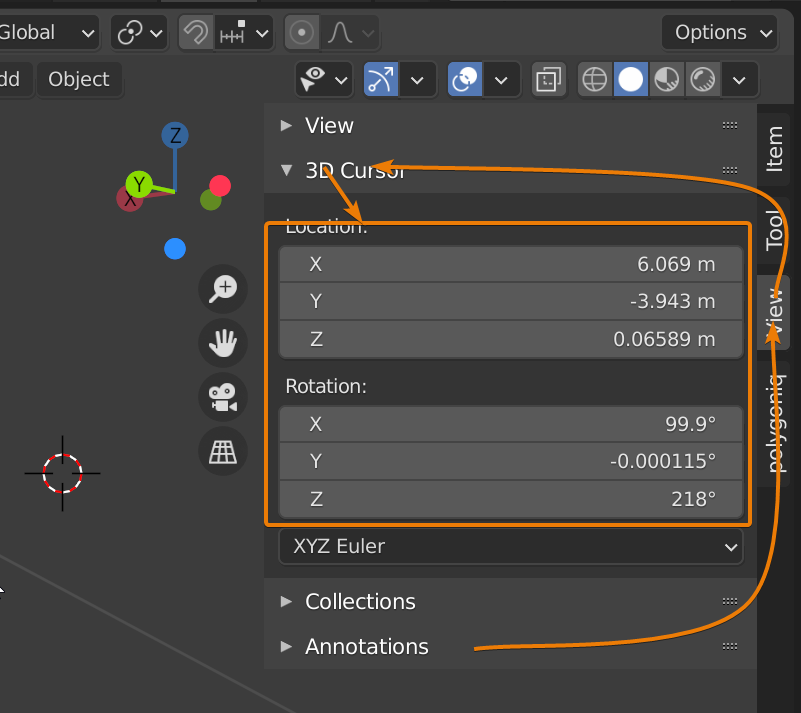
We can change the values here directly or use them as reference to see where our 3D cursor is positioned and how it is rotated.
There are primarily two shortcuts we need to work with the 3D cursor. Shift+Right-click will position the 3D cursor where we click in the 3D viewport and align it with the surface we click on.
The second shortcut is Shift+S. This is the shortcut for the snap menu we also find in the 3D viewport menu by going to Object->Snap.
With the shortcut, we get a pie menu instead of a list.
Related content: Blender shortcut keys: How to find, manage, change, and reset
We bring up the 3D cursor pie menu with Shift+S. Also known as the snap menu. We have eight options on this menu. Four of them help us move the 3D cursor while the other four help us move our selection.

You can use the 3D cursor pie menu quickly by pressing Shift+S and before you release the shortcut, move your mouse toward your option and it will get activated as you release the shortcut.
Using the 3D cursor pie menu a.k.a snap menu, we can quickly move the 3D cursor to exact location. We can also move the 3D cursor manually with Shift+Right-click and the 3D cursor panel on the right-hand side of the 3D viewport by opening the view tab.
Here we will look at some common operations.
There are three ways we can move the 3D cursor back to the world origin. The first is to press Shift+C. This will move the 3D cursor back to the center as well as moving the camera so that it centers on our scene.
The second method is to use the snap menu with Shift+S and choose Cursor to world origin.
Last, we can manually go into the properties panel on the right side of the 3D viewport, find the view tab and 3D cursor section and set the X, Y and Z values for location back to zero.
We can center the 3D cursor to the world as we just discussed using Shift+C. But if you want to center the 3D cursor to something else, such as an object or selection follow these steps.
This will bring the 3D cursor to the median point of the selection. We can to this to move the 3D cursor to any element.
Also, don't forget to check out the E-Book. I am convinced that it will help you learn Blender faster. That is why I made it. Click the link.
Suggested content: Artisticrender's E-Book
We can select a single vertex in edit mode and use these steps to move the 3D cursor to that vertex.
Same with a face or any other part of our geometry.
In object mode, the procedure above will move the 3D cursor to the object origin if we only have one object selected or to the median of all selected origins if we selected multiple objects.
We can move the 3D cursor to any intersection of our visible grid.
This will snap the 3D cursor to the intersection in the grid. It works best when performed from the top, front or right view that you can get to by pressing 1, 3 or 7 on the numpad.
When the 3D cursor does not seem to work it comes down to either of these things.
If your 3D cursor and move gizmo is stuck to each other and can't be separated from each other, it is because the transform pivot point is set to 3D cursor.
In the middle of the header of the 3D viewport. Press the Transform pivot point menu and change it from 3D cursor to anything else, for instance median point.
If the 3D cursor isn't visible, you can press Shift+C to try to center the 3D cursor or Shift+Right-click anywhere to move the 3D cursor to that position.
If that doesn't work, go to the overlay menu in the top right corner of the 3D viewport and press the down arrow icon next to it to expand the viewport overlays menu. Here you will find a checkbox labeled "3D cursor".
Make sure that it is checked to have the 3D cursor be visible.
Related content: How to use 3D viewport overlays in Blender 3D
If you enjoy this article, I suggest that you look at my E-Book. It has helped many people learn Blender faster and deepen their knowledge in this fantastic software.
Suggested content: Artisticrender's E-Book
Using the snap menu through the Shift+S shortcut as well as the Shift+Right-click command to manually move the 3D cursor make up the bulk of what we need to know about moving the 3D cursor.
Learning how to move the 3D cursor to any position is essential to be efficient with Blender. It is a central control point that is very versatile and useful in many situations. It is also the point where new objects we add to the scene are spawned.
