


Metaballs are one of those subjects that are often overlooked as an obscure and niche part of Blender. However, they do have some interesting use cases and can help us quickly create shapes and formations that are otherwise hard to produce or takes a lot of time.
To add a metaball, press Shift+A, go to the metaball submenu and choose the shape you want. As you transform metaballs and move them close to each other they will seamlessly merge. We can use them to create base shapes for sculpting, together with particle systems or directly animate them with armatures to name a few use cases.
In this article we are going to cover metaballs, what they are, how they work and some situations where they are an excellent tool.
Other great places to learn more about metaballs are the Blender manual where there is a whole section of information and the metaball Wikipedia page for more technical details.
External content: Blender manual, metaballs
External content: Wikipedia, metaballs
Let's dive in.
Metaballs are object with a kind of atmosphere around them. When another metaball enters their area of influence they will start to merge and as they do so it looks like a liquid or droplets that merge into each other.

These are the five types of metaballs we can add in Blender, the only real difference between them is the shape. Other than that they all work the same.
Metaballs are useful in a variety of ways. We can quickly create complex shapes with them by creating a cluster and merge them together by moving them close enough to each other. Here are some examples.
Metaballs work with particle systems, this means that we can create almost any type of liquid formations or splash effects. We can use forces or simulations to drive our particle system and then render particles as metaballs.
Another use cases is to shape base meshes. It is quick and easy to produce organic shapes that we can detail by sculpting later by converting the metaballs to a mesh object.
We can also rig and animate metaballs.
Metaballs are not very useful by themselves. The real usefulness of metaballs primarily comes from combining it with other techniques or as a steppingstone to quickly get through some part of a workflow.
Related content: How to work with collections(layers) in Blenders outliner
To create a metaball, go to the add menu in the 3D viewport or press Shift+A to bring up the add menu at the mouse cursor position. Then go to the metaball category and add one of the metaball types available.
Instead of using the mouse to go through the menu, you can also press the underlined letters in the menu to navigate it. For metaballs, press B when the add menu is open, followed by one of these letters for each metaball type.
We can use this feature for any menu in Blender to quickly navigate them.
When we have added the metaball to our scene we can change a few basic parameters in the operator panel. We find it in the lower left corner of the 3D viewport after adding a metaball or by pressing F9 while our mouse cursor is in the 3D viewport.

We can set the exact location and rotation in each axis, we can also align the metaball to either the world, view or 3D cursor.
Related content: How to use the 3D cursor in Blender
And the last two options are to change the radius and the primitive type if we happened to have chosen the wrong metaball shape as we added the object.
Note how changing the radius, changes both the size of the geometry but also the radius of the influence area around the metaball.
Metaballs can be in edit or object mode. There are some extra settings we get access to this way.
In edit mode the ring around the metaball called the selection ring and a green ring is shown. The green ring indicates the stiffness of the metaball.
In the object data properties tab in the properties panel, we get access to an "active element" section. Here we can change the type of metaball that we otherwise decided when we first added the metaball.
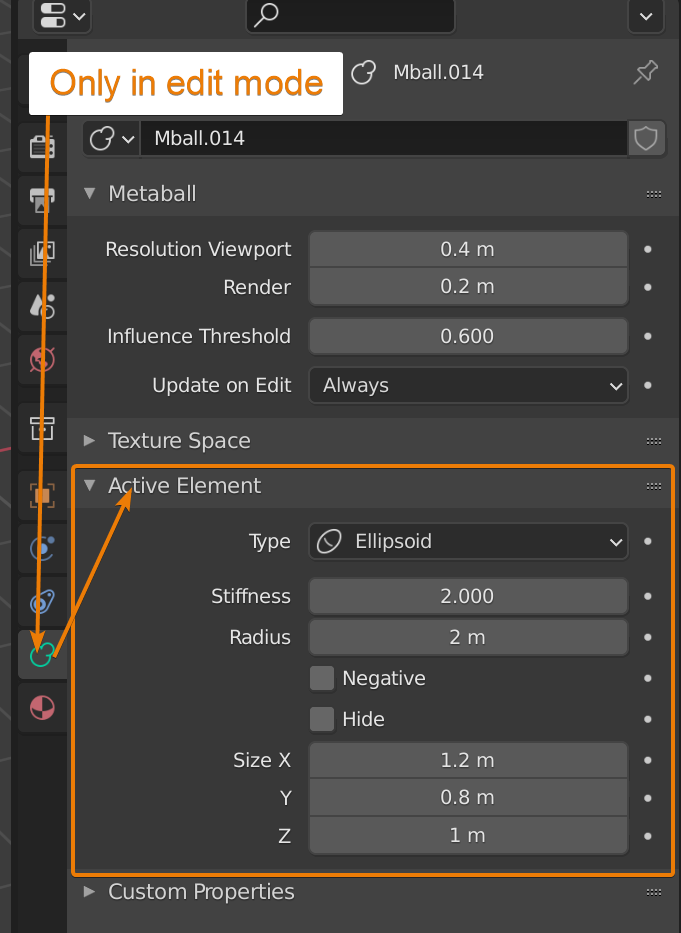
We also have a stiffness and radius setting. Together these decide the size and influence area of the metaball. We can also set the metaball to negative. This will inverse the effect and make this metaball into a hole that push away geometry from other metaballs in the same family.
The last option will hide this metaball.
Keep in mind with edit mode and metaballs is that if we move the metaball in edit mode, the origin will not move with the object data. Just like with any object type, we manipulate the data in edit mode and the container, including the origin point in object mode.

We can also duplicate the metaball in either edit mode or object mode. If we duplicate in edit mode, the metaball will be contained within the same metaball object.
The settings we get access to in edit mode from the active element section is unique for each metaball no matter if they are in their own object or duplicated in edit mode to share the same object.
To select a metaball in object mode we click on the ring surrounding it. Clicking on the geometry of a metaball will select the master metaball of its family. More on families or clusters later.
Just like any other object you can shift click metaball selection rings to select multiple of them or use box, circle or lasso select to select multiple at once.
There are two kinds of joining when discussing metaballs. First, we can join metaballs together by moving them closer to each other so that their geometry merge automatically.
The second kind of joining has to do with grouping or families of metaballs. Metaballs will only influence other metaballs within the same metaball family.
A family is defined by the object name. By default, the first metaball we add is named "Mball". Any metaball we add after that will be named "Mball.001" and increment the number for each added metaball.
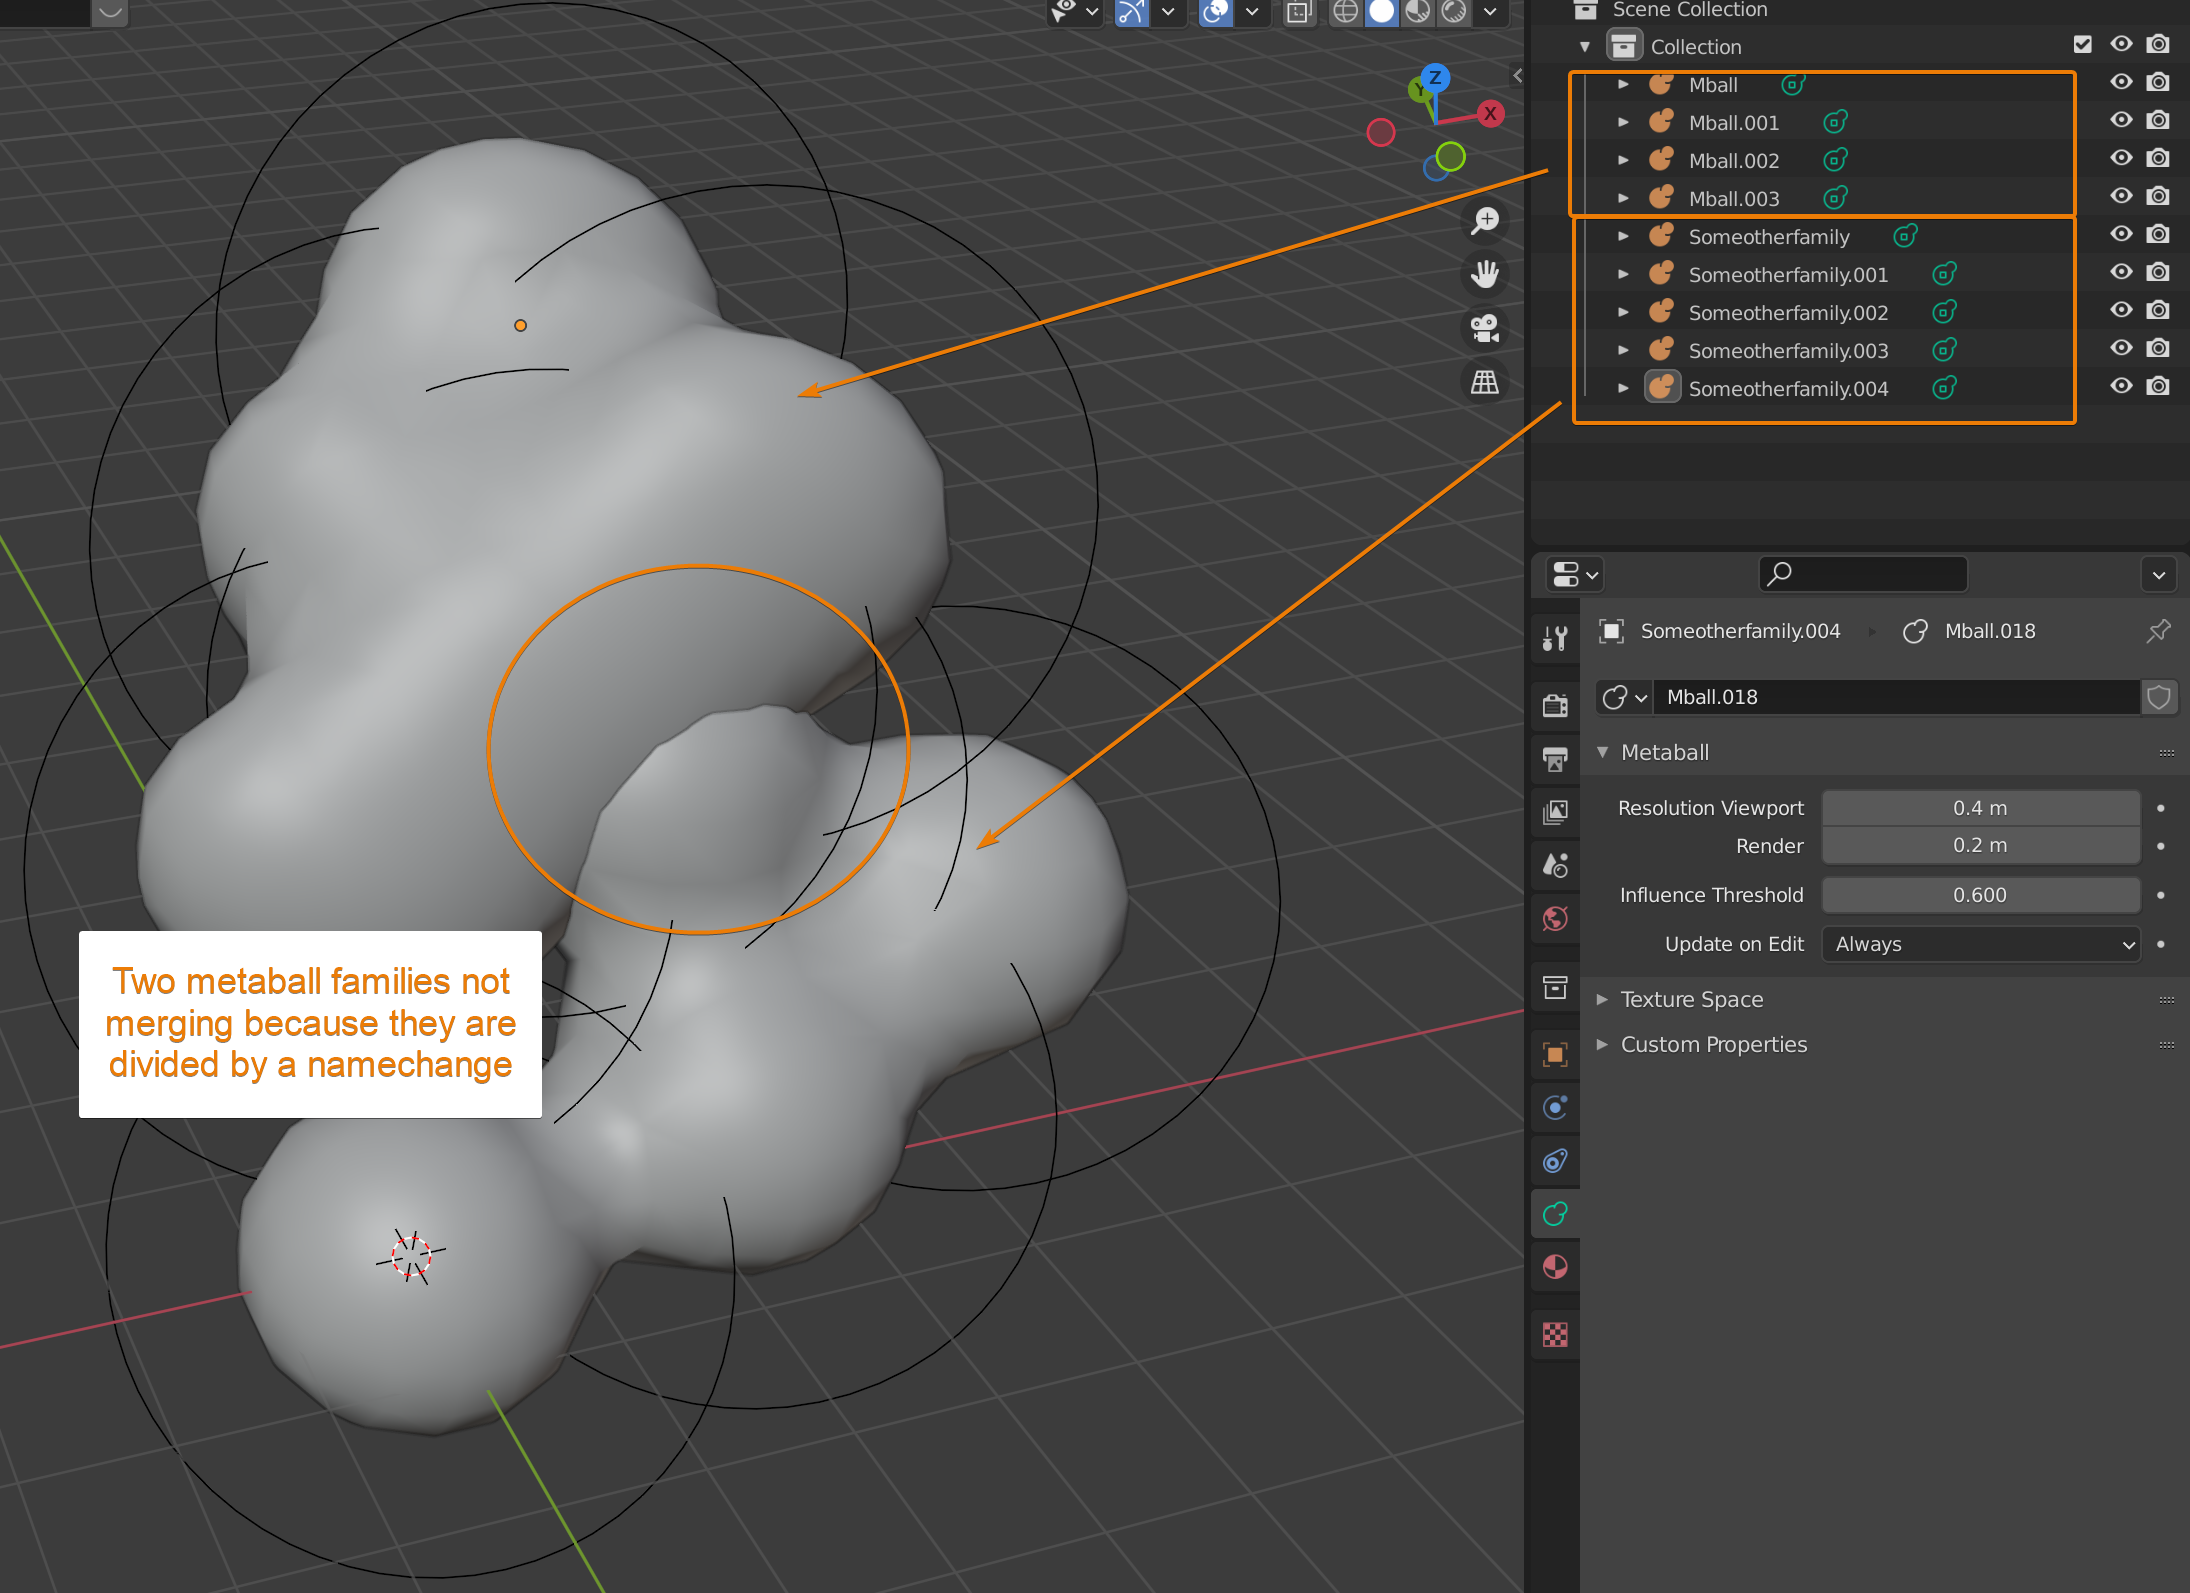
The name before the dot is the cluster or family name and the metaball without a dot and number is the parent metaball or master metaball.
For a metaball to merge with another they need to share the same name before the period in the naming.
Note though that metaball family names cannot contain numbers or they will not work. Numbers can only appear after the period.
So, to create a new group. Simply rename a metaball and duplicate it with shift+D to create new members of the same group.
Metaballs only supports smooth shading, but we can change the resolution of its mesh to smooth out a low poly metaball. The resolution can be changed for either the render or the viewport independently. Follow these steps.
You can use the sliders to change the resolution or input a value outside the specified range by typing in a number. Be careful though because entering a very low viewport resolution number can result in Blender freezing for a long time while it is calculating the high resolution.
Related content: How to smooth the shading on an object in Blender?
There is no built-in way to mirror metaballs in Blender. But there is an addon we can use to mirror them. The addon is called mws or model with speed. You can find it here:
External content: Github page, MWS Blender add-on.
Click on code and download .zip to download the add-on.
If you need help to install and activate the add-on you can read more about how to do that here:
Related content: 30 Blender addons (install, manage, free and paid)
Once the add-on is installed and activated follow these steps to mirror a metaball.
For other kinds of mirroring in Blender you can also read this article.
Related content: How to mirror in Blender
To convert metaballs into mesh, select the metaballs you want to convert, right click, and choose convert to->mesh.
Once you have converted your metaballs you might want to consider remeshing the geometry depending on your needs. Here is an article that will guide you through Blenders remeshing options.
Related content: Remeshing in Blender
In this article we looked at metaballs, how they work and how to use them. It is rare to see metaballs used on their own but as part of a longer workflow they can play an important role.
If you like this kind of content, make sure to check out my e-book for more and to support the site.
Thanks for your time.
