


Selections is an essential topic to master for any 3D artist. It can speed up your modeling workflow tremendously if you learn how to select properly with the right tools. But that is only the second-best part, the best part is that with selections out of the way you will enjoy 3D modeling so much more.
Here is a list of selection tools in Blender:
Edit mode specific selection tools in Blender:
We are primarily concerned with selecting objects and meshes in this article and most of the tools and techniques are applicable and transferable to other areas of Blender. But beware that there are also exceptions and the selection tools available differ depending on what makes sense in any particular context.
For instance, it wouldn't make much sense to be able to select linked elements within an object when working in object mode where the smallest element we can work with is the object. But in edit mode, where can dive deeper into the geometry, it does make a lot of sense.
Through this article I assume the default left click select option is being used.
Let's start from the beginning.
Most of the time the selection we want to make is simple and straight forward. We have a bunch of things we want to do something with, so we simply click on them to select them and do whatever we wanted to do to them. We will cover this kind of selection together with different contexts and selected vs active objects. Later we will look into more advanced selection methods.
In the 3D viewport we have the toolbar on the left-hand side. At the top you can see the currently active selection tool. You can cycle through them with W or click and hold on the selection tool to bring down a menu with the available options.

If you have another tool selected from the toolbar, the first click on W will activate the selection tool before the next click cycles through the selection tool options.
We can also access the selection tools using their shortcuts. Just like with most tools from the tools panel, selection tools also work a bit different when accessed through their respective shortcut key.
Let's take circle select for instance, using the toolbar, we can change the radius of the selection with the radius slider in the 3D viewport header, or from the tools tab in the right-side properties accessed with the N key, or from the active tools found in the properties panel by going to the screwdriver and wrench icon tab at the top.
But if we activate circle select with the shortcut key C, we need to scroll our mouse wheel to change the size. The two ways of accessing the circle select tool also maintain their separate radius setting.
To deal with this schizophrenia behavior of Blender I suggest that you simply skip using any tool from the toolbar and instead learn to use the shortcut version of each tool. Instead use the toolbar as a guide to remind you what tools are available.
I cover a lot of modeling tools in this article.
Related content: More than 30 Blender modeling tools explained
But I still suggest that you set the toolbar to box select, close it with T and forget about it. Blender was made to be used with shortcut keys and the toolbar is an afterthought attempt at making Blender easier to use for beginners. But in my opinion, it makes it harder thanks to how the toolbar works in a different way from everything else in Blender.
There are many selection tools in Blender, but selection also depends on the context. We have different options for selecting objects in object mode and another set of tools for selecting vertices, faces and edges in edit mode, even if the toolsets overlap quite a bit.
Also, where it makes sense, the same shortcut is used in both object and edit mode for different tools. For instance, Shift+G in edit mode bring up the "select by trait" menu while in object mode, the corresponding "Select grouped" menu appears.
It makes sense because we are dealing with data on different levels in object and edit mode. In object mode the smallest thing we can select is an object wile in edit mode the smallest thing we can select is a vertex and they have quite different properties.
But it doesn't only depend on the context of the software. Selection also depends on what we want to achieve. Here are some questions to think about.
The first distinction we have to make is that Blender has two kinds of selection. Apart from selected objects or elements, we also have an active object or element.
The difference between object and element here is rally only a difference between selecting actual objects or something else. For instance, in edit mode, we select different elements, namely vertices, edges and faces, so whenever we are talking about elements or objects it depends on the context.
In edit mode we cannot select objects, only parts of the object, while in object mode we only deal with whole objects. So, whenever we refer to one or the other it just helps us to know what context we are in. But in reality, most principles apply to either or and the terms may be used interchangeably.
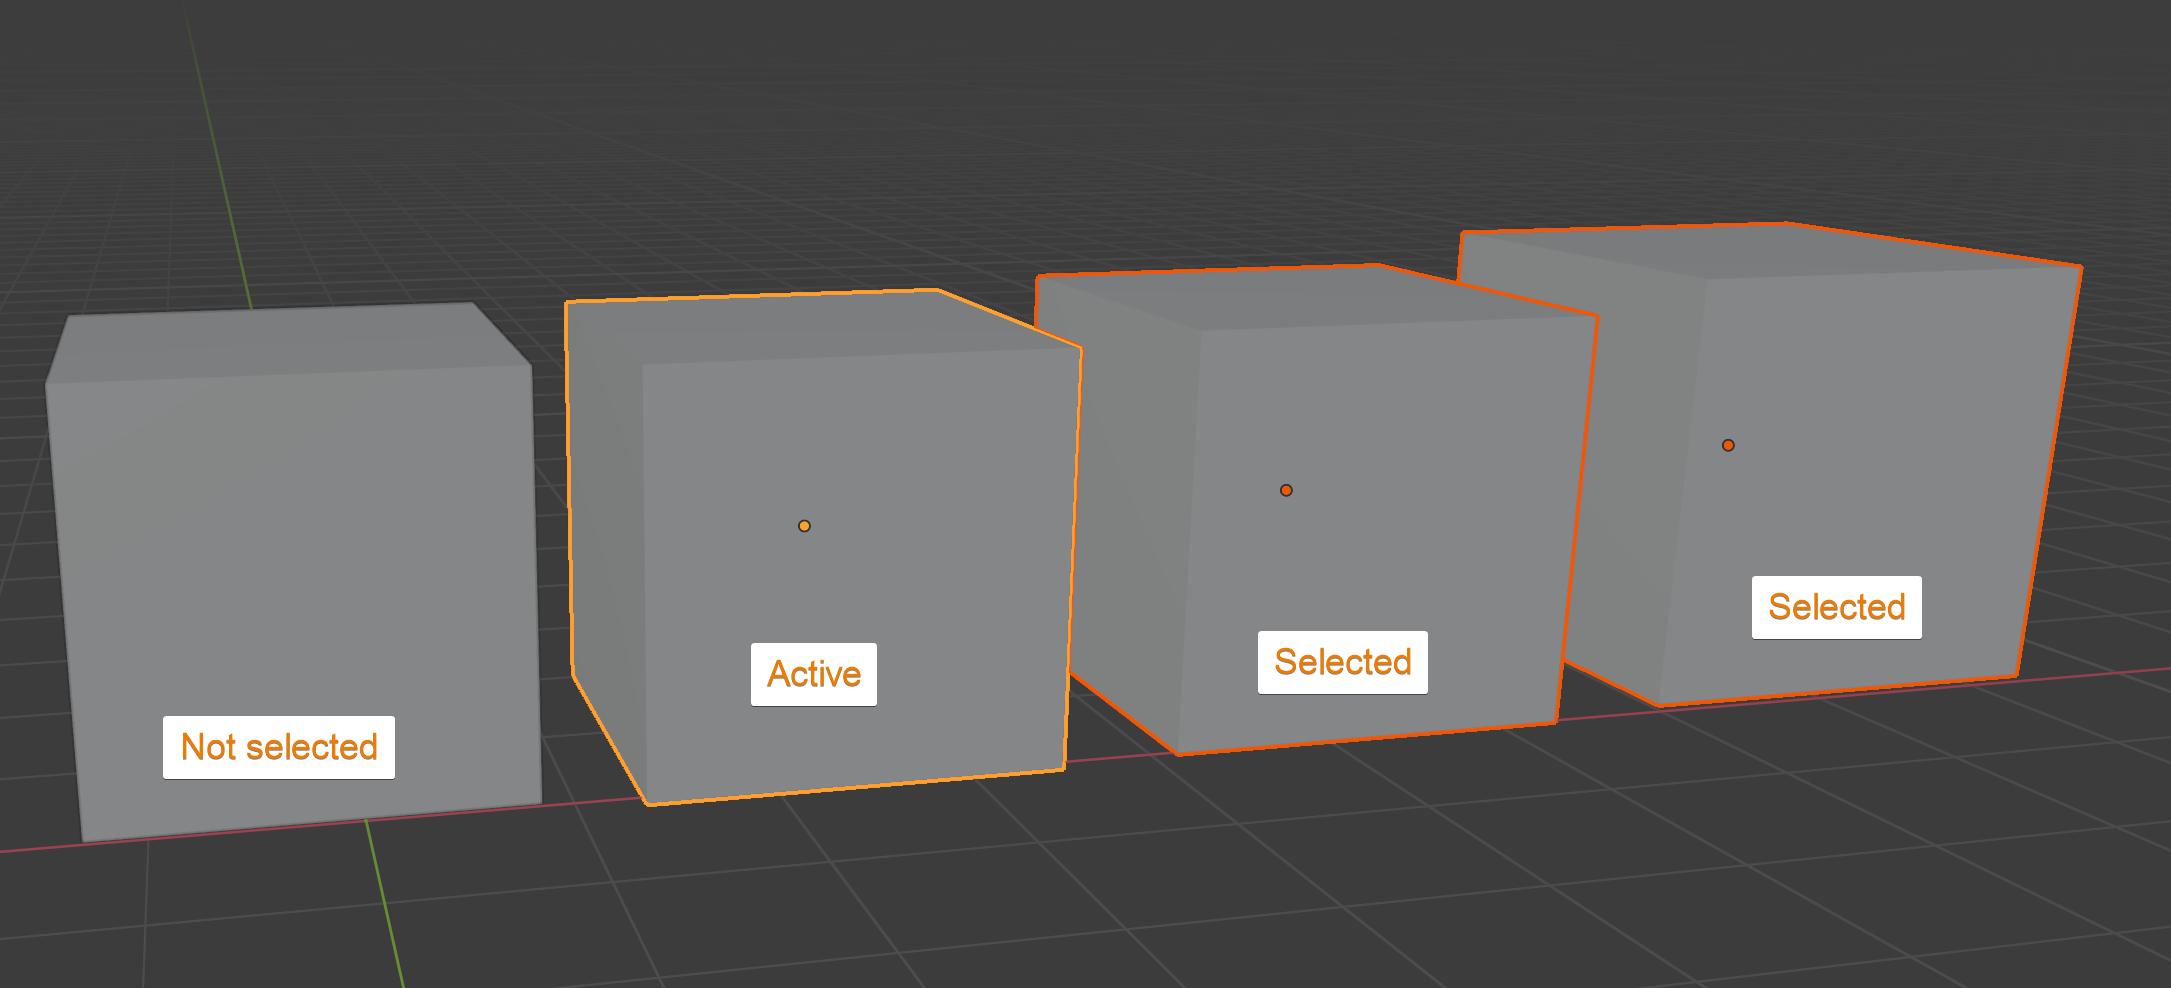
Note that in edit mode, the active element is white.
Anyway, back to the active part. An active object or element is most often the last selected. But not always. If we use box, circle or lasso select, the last active object will remain the same. But if we shift click an object it will turn into the active object.
Whenever we are doing something to a group of objects, the active object play a major role. For instance, if we parent multiple objects at once, we will parent all selected objects into the active object. If we join objects together, we will join all selected objects into the active object.
This has consequences. For instance, if we join objects together, the active objects name, pivot point, modifier stack and so on will be the new objects properties. The objects doesn't join each other, but all selected objects join the active object.
Another example is that we can make transformations based on the active object. For instance, we can scale or rotate based on the position of the active object.
Now we have some basics and background covered. Let's start to look more at the actual tools.
Selection in object mode is really primarily about selecting objects or groups of objects. Selections in edit mode is much more involved and if we can learn edit mode selections, we will easily pick up object mode and any other kind of selection in Blender, so let's get into edit mode first.
In edit mode we can choose between three selection modes, vertex, edge, and face select. You can see the selection modes in the top left corner of the 3D viewport while in edit mode. From here we can click on any of them to activate vertex, edge or face select mode.
We can do this with the number row keys 1,2 and 3. We can have just one selection mode active at a time, or we can have any combination of two modes or all three modes active at the same time.
To activate more than one selection mode simultaneously through shortcut keys, hold shift wile pressing 1,2 and 3 on the number row to add the selection mode to the currently active selection modes. Likewise, we can hold shift and click on the corresponding selection mode button in the user interface to activate or deactivate them.
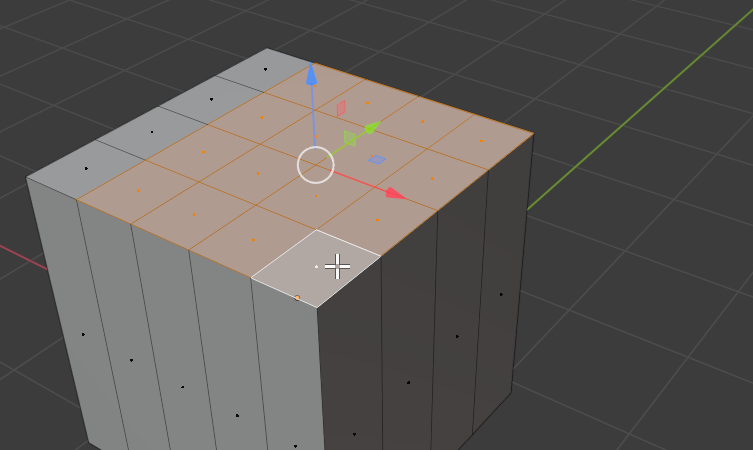
A tip, when in face select mode, it can be hard to see each face, so I suggest that you activate the center dot so that you can easily see the center of each face. You can also click this dot to select the face without having to guess.
To see the center dot, in edit mode, go to the viewport overlay menu in the top right corner of the 3D viewport, halfway down the menu you will find mesh edit mode settings. Check "center". This also helps when troubleshooting a faulty mesh because you can see zero area faces, indicated by a dot.

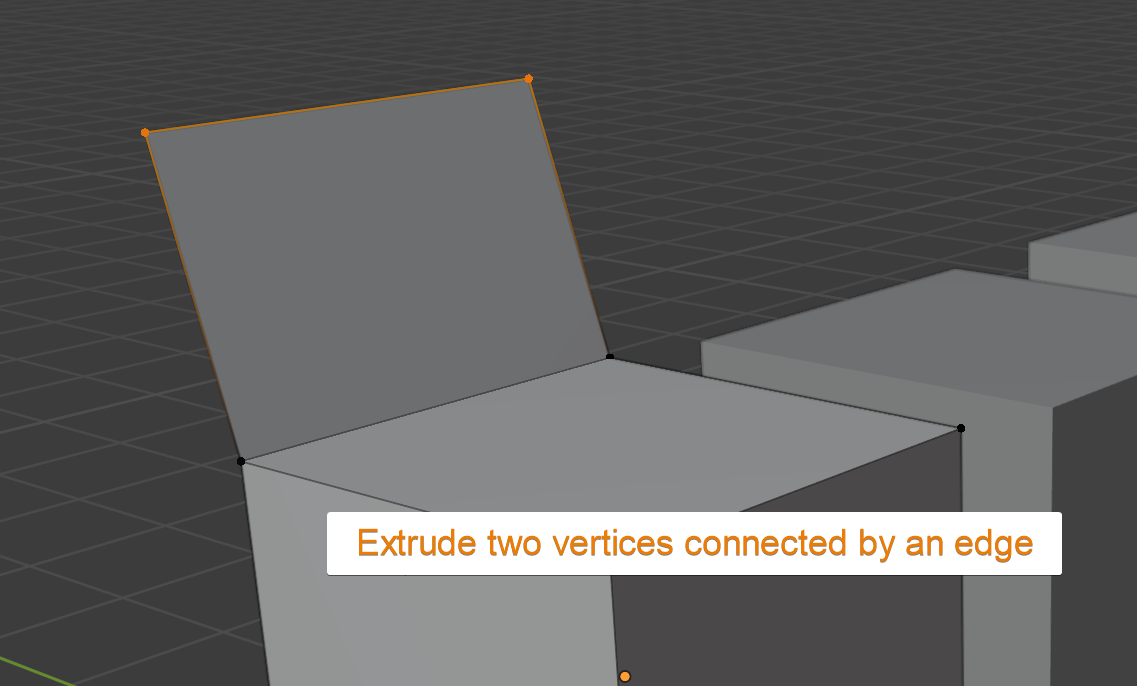
Even if we are in just one selection mode, we are selecting all types of elements, vertices, edges and faces. For instance, if we are in vertex select mode and select two adjacent vertices that are connected by an edge, the edge between them is selected.
Let's use the extrude tool as an example here.
Related content: Extrude in Blender: Basics, along curve, circles, manifold and more
In this image I am in vertex select, left click and hold shift to select two connected vertices and press E to extrude. This extrudes a face connected to the edge between these vertices.
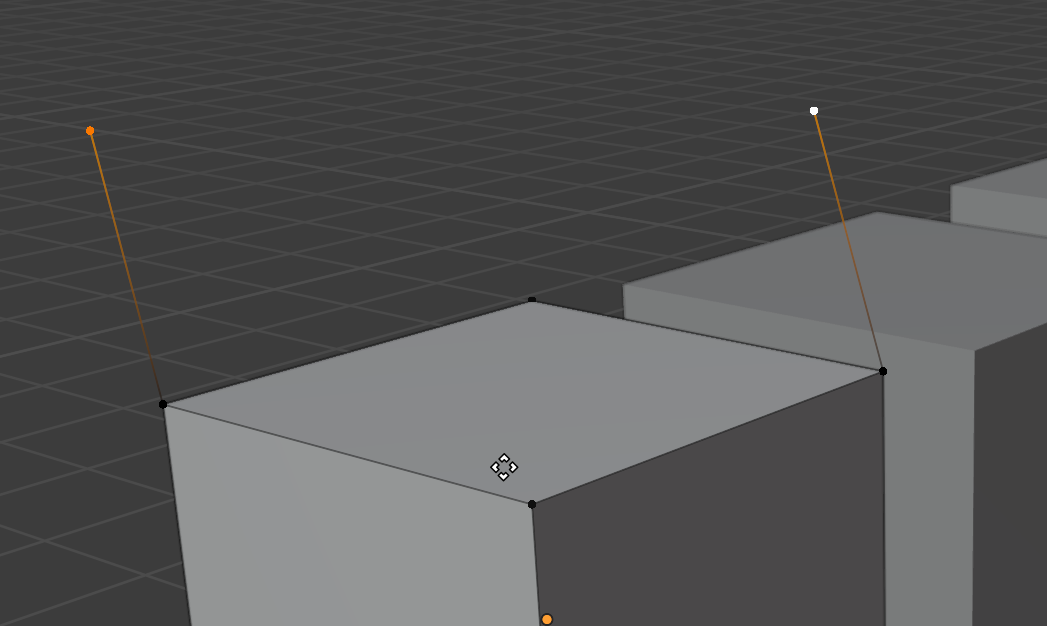
However, if we take the example below instead, I select two vertices that are not connected by a single edge and extrude we get this behavior.
Likewise, if we have connecting vertices and switch to edge select mode, Blender will translate the selection by selecting the edges that are between selected connected edges.
When switching between selection modes Blender does not keep the previous selection in memory. For instance, if we have this selection in edge select mode and switch to face select, nothing will be selected. When we switch back to edge select mode, we lost our previous edge selection and nothing is still selected.

If this happens and you lose a valuable selection due to selection mode switching, you can use Ctrl+Z to undo the mode switching and regain the lost selection.
Related content: Blender 3D: undo, redo and history
Let's move on.
Let's adress right click vs left click. This is kind of a big deal in the Blender community. The community forum where you can present new ideas for improvements in Blender is even named Right-click select.
External content: Right click select Blender community forum
Up until version 2.79, right click was the default button for selections in Blender. In 2.80 this was changed to be in line with other software in the industry.
The first time you open Blender, you can choose if you want to use right or left click to select, as well as what the space bar should do and if you want the A button to toggle between
In this article I assume the default of left click select and most people use this. But if you want to change this setting follow these steps:
You will also see a "select all toggles" checkbox. This is off by default. This makes it so that the A button used to select All also deselect when you press it if everything is already selected. Otherwise, you use Alt+A to deselect all.
Personally, I checked this, primarily because I am used to the default behavior from 2.79 and previous versions when this was the default.
By default, you can only select what you see. This means that Blender doesn't select vertices, faces, edges or even objects that are behind another element. To enable selection through other items, we need to use x-ray mode.
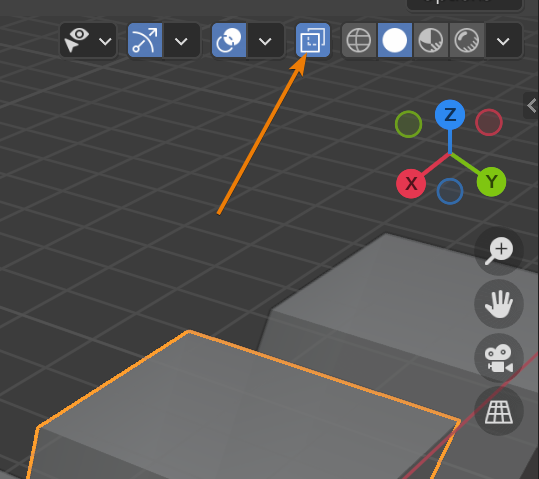
In the top right corner of the 3D viewport there is an icon with two boxes overlapping each other. Click it so that it becomes blue to enable x-ray selection.
When x-ray selection is enabled, everything will become semi-transparent in the 3D viewport so that you can also see what you are selecting behind other items.
The most basic way of selecting in Blender is by left clicking on the thing we want to select. We can modify this behavior in various ways to create quite sophisticated selections. Let's explore that now.
Instead of changing what we select, we can add or remove from our selection by holding shift while clicking.
We can also select a path from one element to another by holding Ctrl. The path will go from the active element to the element we click. There are several settings we can use to change the behavior of this kind of selection from the operator panel found in the lower left corner just after we made an operation.
For example we can check face stepping, allowing the path to be stepping diagonally instead of making as few turns as possible.
We can also use the "deselected" number to select every second or third element along the way.
The fill region checkbox brings us to the next kind of selection. area selection.
By holding both CTRL and Shift we select an area instead of a path. It is the same as making a shortest path selection and use the "fill region" checkbox from the operator panel. When this option is selected, no other setting from the operator panel has an effect. We just select an area from the active element to the new element we click to form the selection.
A loop is a series of edges that are connected in an uninterrupted line. An interruption in the line occurs when the edges meet a triangle or an ngon and there is no longer a single route for it to continue. Quad topology ensures that edge loops remain intact.
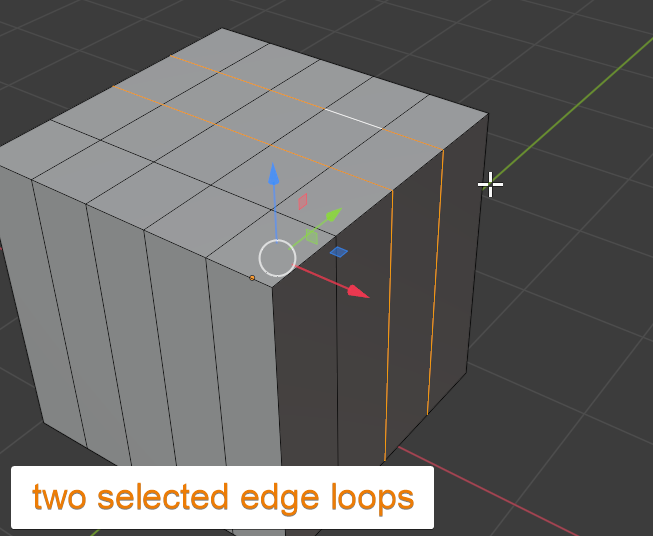
By holding ALT and click on an edge, we will select all edges connected to that edge around in a loop. We can select multiple loops by using Alt+Shift and click multiple edge loops.
While this kind of selection primarily work around edges, we can use it with faces or vertices as well.
As opposed to edge loops, an edge ring is a collection of parallell edges around a loop. Just like edge loops, this also requires quad topology.
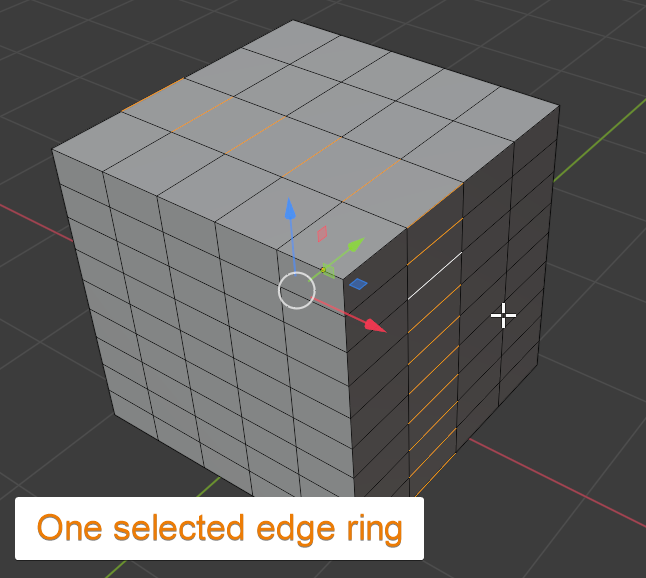
To select an edge ring, hold Ctrl+Alt when clicking on an edge to select all the parallel edges in that ring. By holding Shift down together with Ctrl and Alt, you can select multiple rings one after the other.
Lasso select is like box and circle select, but instead of drawing a predefined shape we free draw a shape for our selection. The lasso tool is available from the tools panel, but we can also hold Ctrl and right click drag to create a lasso selection.

By default, we can just click and drag, and box select will be used as our selection method. Note that this kind of selection does not change the active object.
To change the active object, first click the object you want active to select it by itself and then use box select. Or if you already made a box selection, hold shift to deselect the element and click it again to select it. Essentially, double click the element you want to be active.
You can also access box select with B.
By every nth element we mean ever second, third, 10th or 120th element. Really just about any interval selection.
Start by selecting the first element, then hold CTRL and select another element at the end of your path, then in the operator panel in the lower left corner, set "deselected" to any number above 0. For every second element, set it to 1, for every third elelement, set it to 2 and so on.
The new settings will remain for future selections so you can set the deselected setting and continue holding Ctrl+Shift to select every second element in a shortest path fasion for as long as you need.
Select all works a bit different depending on how your select all toggle setting is configured in user preferences. By default you select All by pressing A and deselect all by pressing Alt+A. In 2.79 and earlier versions of Blender, pressing A would toggle between select all and deselect all.
If you want this behavior, follow these steps:
To invert a selection press Ctrl+I, that is an i for invert.
Inverting a selection is very useful. Sometimes it is much easier to select the elements we don't want to have selected and invert rather than going around and selecting everything that we do want.
Select linked means that we select everything that is connected to another element. So if we have multiple separate meshes inside the same object, we can select everything in a single mesh without selecting all the other meshes.
There are two ways we can do this. First, we can select an element in a mesh and press Ctrl+L to select all linked elements to that selection. If we have selections in multiple separated parts all of those parts will become fully selected.
We can also hover our mouse above a part of the mesh and press L by itself. This will use the mouse cursor position to determine what part is selected rather than what parts are already selected. With this method we can also set "deselect" in the operator panel. This will deselect linked regions instead of adding them to the selection.
For both of these method we can specify different edge markings or use materials as a delimiter for where linked elements end. This way we can select only part of a mesh that is linked together but separated with one of these kinds of delimiters. For instance we can use UV seams to select only a part of the mesh that would make up a uv island.
Related content: The definitive tutorial to UV mapping in Blender
Select by trait allows us to select elements with some kind of similarity or relation. There are multiple options here that very depending on if we are in vertex, edge or face select mode. There is also an equivalent object mode menu called select grouped.
It all works on the same principle. You select something, press Shift+G to bring up the menu and choose what similarity or relation you want the objects or elements. When you have chosen an option, Blender will select all objects or elements with those traits.
There are a lot of options here, so we will cover some of the more useful ones. We will start with vertex select and move to bigger elements up to the select grouped menu found in object mode.
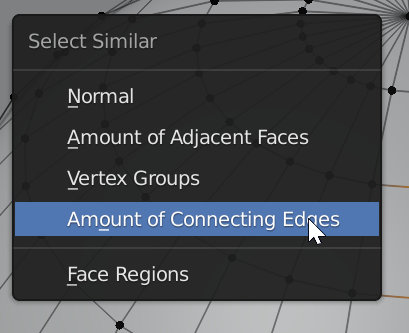
For vertices, we just have a handful of options. Here I find that the option "amount of connecting edges is the most useful. If we have a pretty consistent mesh we can use this to find things like corners or poles that create changes to the flow of the topology.
We can also use the normal option to find consistent edges.
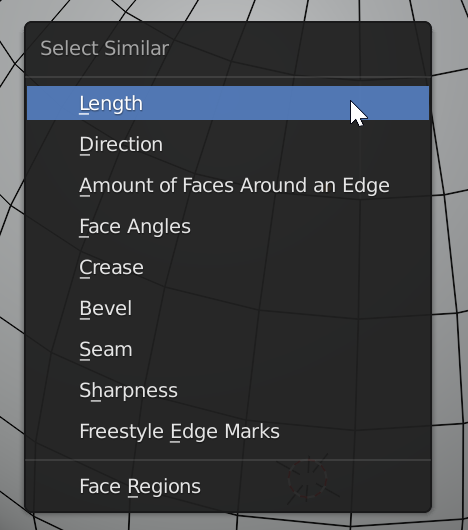
For edges it becomes a lot more useful. Here we can select by the different edge markings we can make, ranging from seams to freestyle edge markings. But the most useful feature here is to select by length. There is also a threshold value slider in the operator panel so if we need to have some variety from the originally selected edge, we can get that as well.
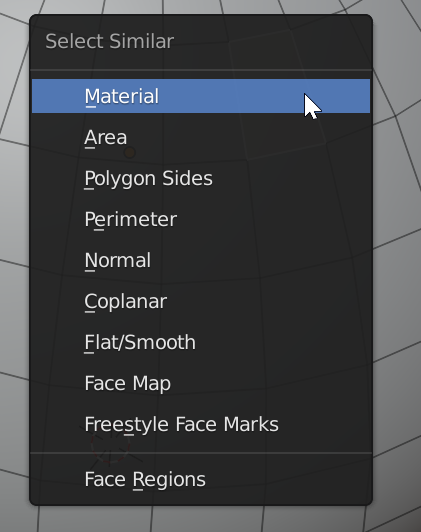
With face selection active, we can use to select by material from this menu instead of going into the material tab in the properties panel to find the same feature. Other than that I find area and coplanar to be the most useful select similar options.
The area option simply selects all faces of comparable size while the coplanar select all faces that are on the same level plane. This is different from using select similar with normal. With normal the faces don't need to be on the same plane, they only need to be rotated in the same direction.
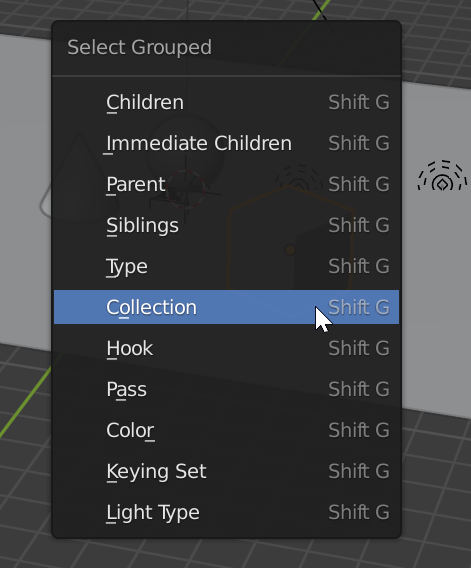
In the select grouped menu I find that I come back to two of these options the most often. Collection and Type. These simply select all objects either in the same collection or by the same type.
For instance, if I select a lamp, and choose to select grouped by type, all lamps in my scene will be selected. Similarly, if I select one object in a collection and choose the collection option all objects in that collection would be selected.
Something that is missing from all of these selection options is a combine feature. For instance, I can't say, selecta all objects with a type of lamp that is also in a specific collection. A Boolean combination like that would be very helpful.
Sometimes we may have spent some time making a complex selection only to realize that we need to perform an operation on something else first. In those cases, we may have to make a new selection and losing the one we spent time on. So, how do we save a selection?
The built-in solution is to use a vertex group, or a material. Simply go to the object data tab in the properties panel and click the plus sign in the vertex group section. We can then use the select and deselect button. This will affect all vertices with a vertex weight greater than 0.
We can do a similar thing but using materials instead. The difference here is that we must select faces instead of vertices.
However, with both ways we may have inconsistencies in our selection. For instance, if we have two connected vertices selected, the edge between them will also be selected when we bring back our saved selection. But it may not have been part of the original selection if we were in edge select mode.
There is no built-in way to save and retrieve selections without risking inconsistencies.
However, there is a free third-party add-on called forgotten tools that include a selection save feature. You can get it here:
External content: Blenderartists forum, forgotten tools thread
To learn more about how to install add-ons check out this article:
Related content: 30 Blender addons (install, manage, free and paid)
Or if you are using our multi version install method, you can read about add-on installation here:
Related content: Install and manage multiple versions of Blender
Once installed, you will find the forgotten tools by opening the N panel and going to the Edit tab.
There is a "selection sets" section. Just make your selection and press new to save a selection. A new row pops up giving your selection a number and buttons to recall, replace or delete.

Items or objects that are not selected are being transformed
If this happens it is likely that you have proportional editing turned on. You can access it in the middle of the 3D viewport header next to the snapping features. You can also toggle it on or off by pressing O(the letter, not zero) on the keyboard.
Also check out:
Related content: 8 reasons why you cannot select your object in Blender
In this article we covered selections in depth. We went from a list of all ways of selecting to explanations on how selections work in Blender specifically. We also looked at active vs selected object and how the context makes selections different.
Also, make sure to check out my E-Book.
Related content: Artisticrender E-book
Thanks for your time.
