


Sometimes we need a way to group objects so that they can work as a single unit when we transform them. In those cases, parenting can be a great option.
You can parent one object to another by following these steps:
To unparent, select the child object, press Alt+P and choose clear parent.
We can find all parenting options by going to object->Parent in the 3D viewport.
Let’s explore parenting in a little more detail in the rest of this article.
When we parent one object to another, we create a relationship. One object will be the child and subordinate to the other, the parent. We say that the child object is parented to the parent object.
The child object will follow the transformations of the parent object. When the parent is scaled, moved, or rotated, the child will follow. It exists in relation to the parents, local space coordinates.
However, when the child is transformed, the parent won’t follow.
When we have a parent relationship, we can see a black dotted line going between the origins of the objects.
Related content: How to center objects, origins and pivot points in Blender
Parenting is very useful when we are working on larger models that are made up of multiple objects. We can then separate each component into its own object while still maintaining their relative position, rotation, and scale.
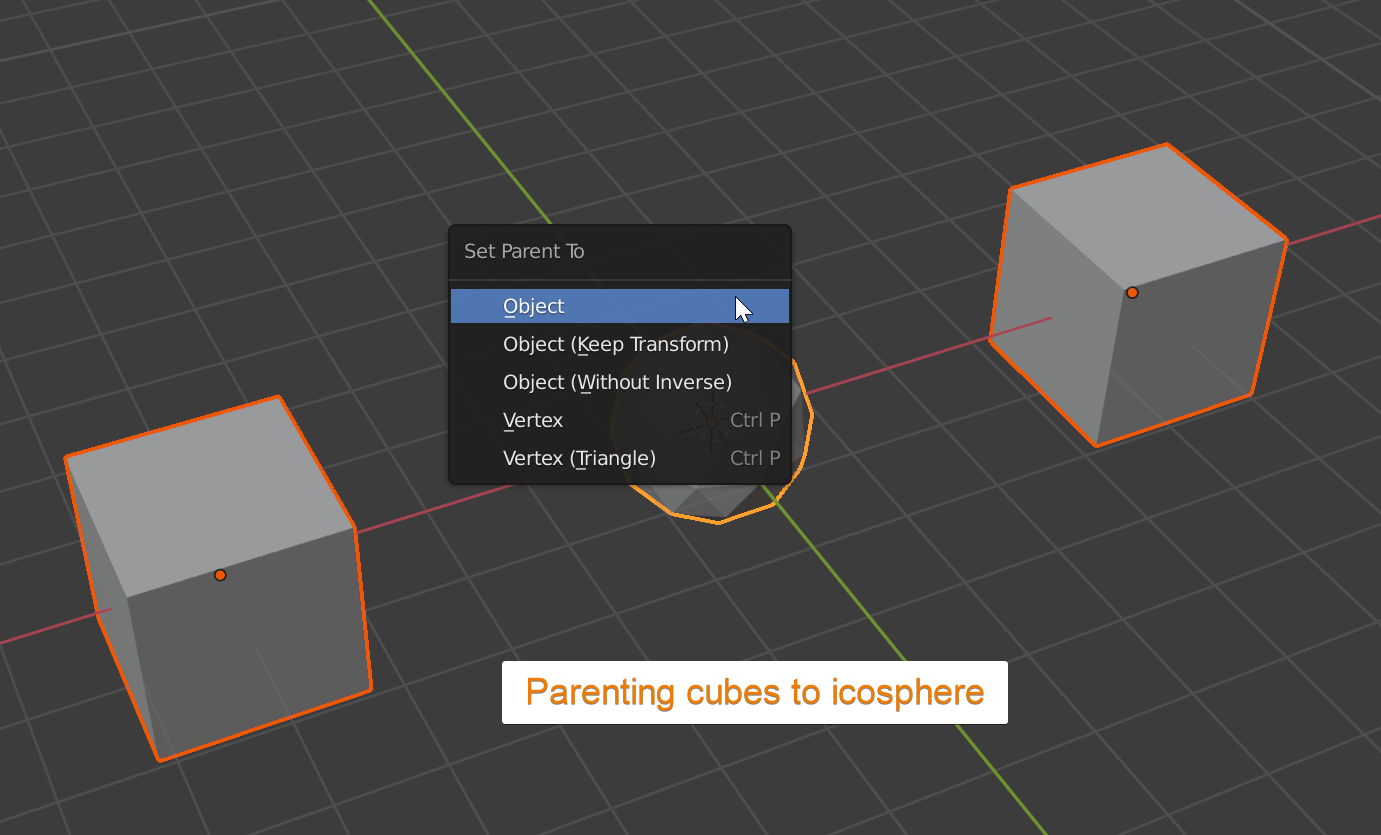
To parent one object to another, we use Ctrl+P in object mode when two or more objects are selected and one of them is the active object. This brings up a menu with several options, these, options can also vary depending on what type of objects we are parenting. We can also reach this menu in the 3D viewport by going to object->parenting where we find all parenting options.
Related content: How selecting works in Blender
For instance, if we parent a mesh object to a lattice, we can parent it with the lattice deform option, this will make it so that the child will follow the deformation of the lattice deform points.
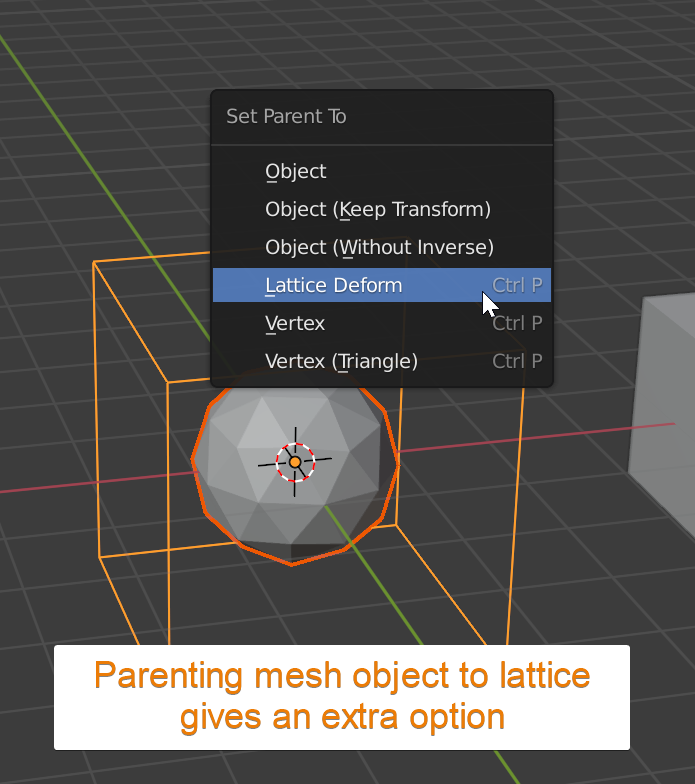
Behind the scenes the difference is that a lattice modifier is added to the child and set to the parent lattice.
Related content: How to set up and use a lattice in Blender
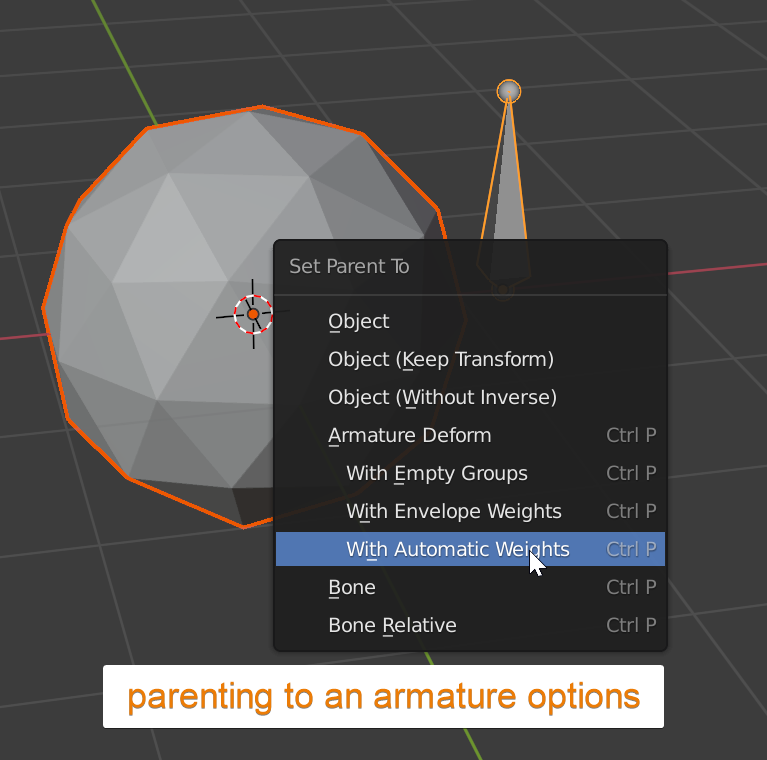
Another example is when we parent a mesh object to a bone, in those cases we get even more options. Assigning automatic weights for mesh deformation is a common practice to create a starting point to animate using armatures.
Let’s now look at the options available when parenting a mesh object to another mesh object.
Object(Keep transform) is the next option. If we have a child object that inherit transforms from a parent and we want to change so that the child is a child of another parent object, we can use the keep transform option to maintain any inherited transforms from the previous parent even if no change was made to the child object.
The object (without inverse) option is slightly more complex behind the scenes. But essentially the location and rotation of the parent will be copied to the child, but the scale will remain the same for the child when the parenting is performed.
Behind the scenes, there is a matrix that is reset when we use this option.
There is also a vertex and vertex (triangle option). These options will parent the child with the offset in relation to a single vertex within the parent object, or three vertices if we choose the triangle option. The child objects will be parented to the closest vertex in the mesh and follow its transformation. In this case, the relationship line is drawn from the child objects origin to the parent vertex in the parent object.
Using three instead of one vertex allow us to rotate the child object by moving the vertices in relation to each other. A single vertex cannot be rotated so if you need to rotate the child objects, use three vertices.
We can unparent by first selecting the child and then press Alt+P. This brings up a menu with our options for unparenting. Here is the unparent menu. This always have the same options.
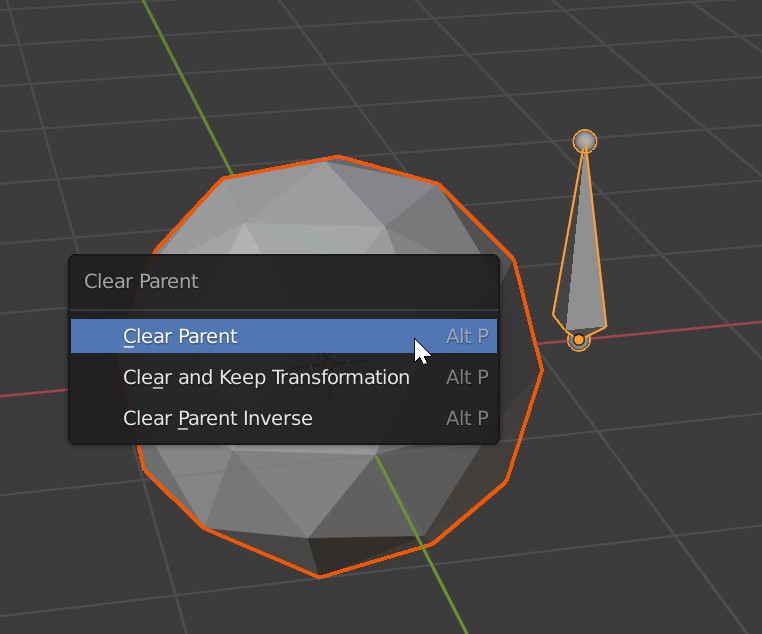
The first option is a simple “clear parent”. This is the basic option that will reset the child to its original transformations without taking the previous parent into account.
By using the “keep transform” option, we can keep the transform of the child that was applied by the parent. In this way, the object doesn’t jump in 3D space when we clear it. Instead, it says at the same transformation.
“Clear parent inverse” is the last option. This does not clear the parent relationship. Instead, it clears the matrix that sits between the parent and the child. The result is that the child gets its own transformations it had in relation to the world coordinates. But now its coordinates are in relation to the parent object.
You can think of it like swapping the child's place in the world for the child's place in relation to the parent.
Parenting is a very useful feature, it allows one or more child objects to inherit transformations from a parent object. We can then transform the child on its own or together with the parent object or vertices depending on the type of parenting.
There are also other kinds of parenting for other object types, such as lattices or armatures. These kinds of parenting typically add some extra convenience so that we don’t have to manually setup the full relationship. However, it is important to know what those changes are so that we don’t end up with settings and properties that we don’t know what they do.
Thanks for your time.
