


UV Mapping is by many considered being the most boring part of the entire 3D art pipeline. A mini game tucked right in the middle like a massive roadblock that does not fit along with all the creativity surrounding it.
After having read this article however, I hope that you are one of those people that does not think this way. But instead appreciate the cool technology.
Using Blender for UV Mapping, you can get far by using Smart UV unwrap together with the regular unwrap operation. In edit mode, use the “U” key for the unwrap menu and transformation and selection tools in the UV Editor and 3D Viewport supplement well.
The goal of this article is to cover as much of the unwrapping process as possible for as many workflows as possible. This is to get a broad understanding of the process and tools.
In the end though, we will boil it down to a handful of tools and procedures that can help you get most of the Unwrapping done efficiently and accurately through looking at some common workflows.
Hopefully giving you the confidence to be fast and efficient while also having some idea what to do when things don’t turn out as you would like them to.
For a more beginner friendly introduction you can find out how to get your texture onto your object here:
Related content: How to add a texture to an object in Blender
UV mapping or UV unwrapping is taking a 3D model and cutting its geometry and lay out the pieces flat on top of an image. We then use the result to map the position of the image to the position on the 3D model.
You may have seen those odd images sometimes that looks like you could print, cut out and glue together to create an origami figure. If you have seen such an image, that is most likely an image custom made to be mapped onto a specific 3D model using a UV Map.
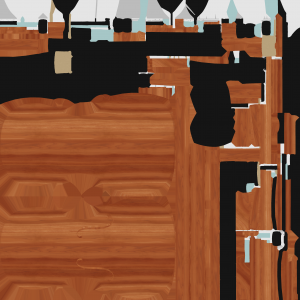
This texture was created using baking to create a texture that would maximize the use of the available space for a specific model. In this case, this violin.

Your 3D model has X, Y and Z coordinates. But under the hood a U and V coordinate can also be stored for each of those vertices in your mesh. These coordinates are the 2D coordinates that is used to map a 2D image to the faces on your 3D object.
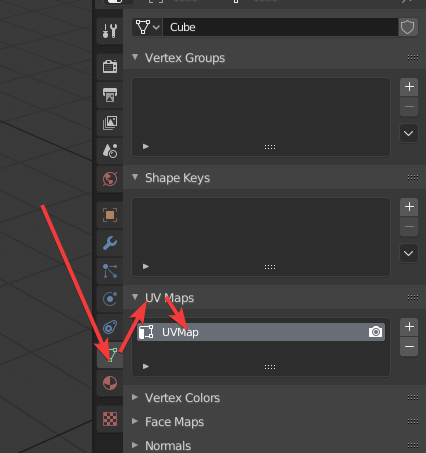
In Blender we can have multiple sets of U and V coordinates. Each set stored in a separate UV Map. The UV Maps live with the mesh object and the list of UV Maps for a specific object can be found in the properties panel.
Go to the mesh data tab and find the UV Map section. By default, a primitive object just added into your scene has a UV Map called “UV Map” that is populating the list.
We can have a maximum of 8 UV maps added to a single object. That should be plenty for any UV Mapping needs. Most often we use one, but sometimes multiple UV Maps may be needed.
We have mainly three scenarios when we UV unwrap.
The first scenario is that we already have textures. Most likely seamless textures that we want to map onto our object. We may want them to tile, and we may want different textures to cover different parts of our model.
The second scenario is that our intention is to bake. We may want to take information from the world, from another object or from the object itself and store that into images so that we may use that information later to create a more detailed set of texture maps that we can later use to texture the object.
There are all kinds of textures that we may like to bake ranging from normal maps, AO maps and id maps to baking the light that is cast on to our object.
Also, don't forget to check out the E-Book. I am convinced that it will help you learn Blender faster. That is why I made it. Click the link.
Suggested content: Artisticrender's E-Book
The third scenario is that we do not yet have a texture but instead we intend to paint one by hand ether inside Blender or in an external application.
All these scenarios come with different planning.
The number one thing we need to consider is how our workflow looks. More precisely how we plan to texture our model.
There is a big difference between having textures dropped right into the node editor to texture while shading and preparing a model for export to an external software like Quixel Mixer or Substance painter.
Related content: 10 tips for UV unwrapping in Blender
We also need to consider what kind of model we are dealing with. Is the model supposed to be for a mobile game and we got very limited resources to render our model in real time?
Perhaps it is for the next AAA game for PC gaming. These are two very different scenarios.
We may not need the model rendered in real time at all. We could deal with pre-rendered animation or still images. The pre-rendered scenarios requiring much less optimization and possibly more detail preserved.
With that said, it mostly boils down to one thing. Can your UV Map overlap or not?
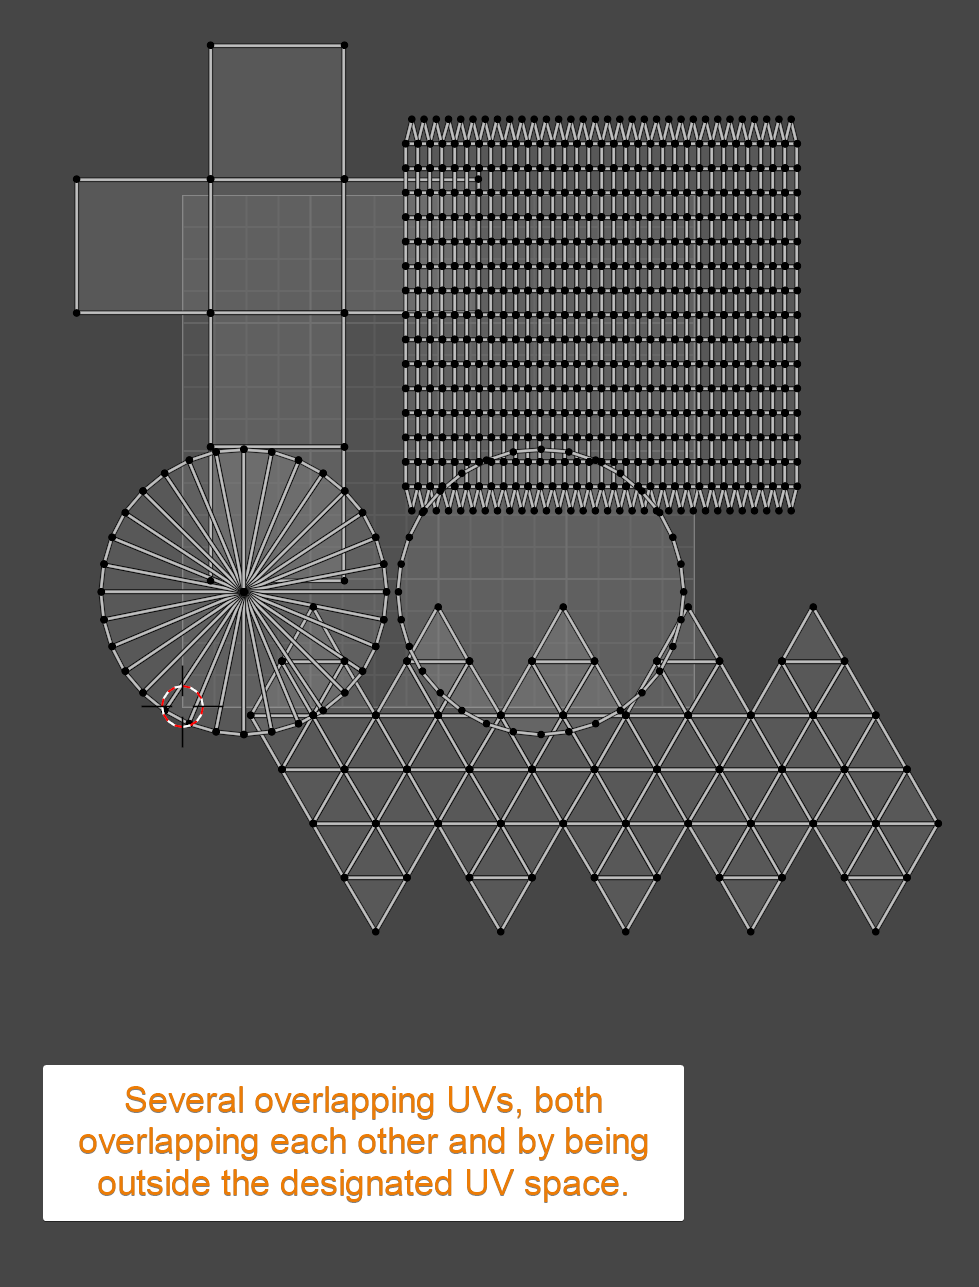
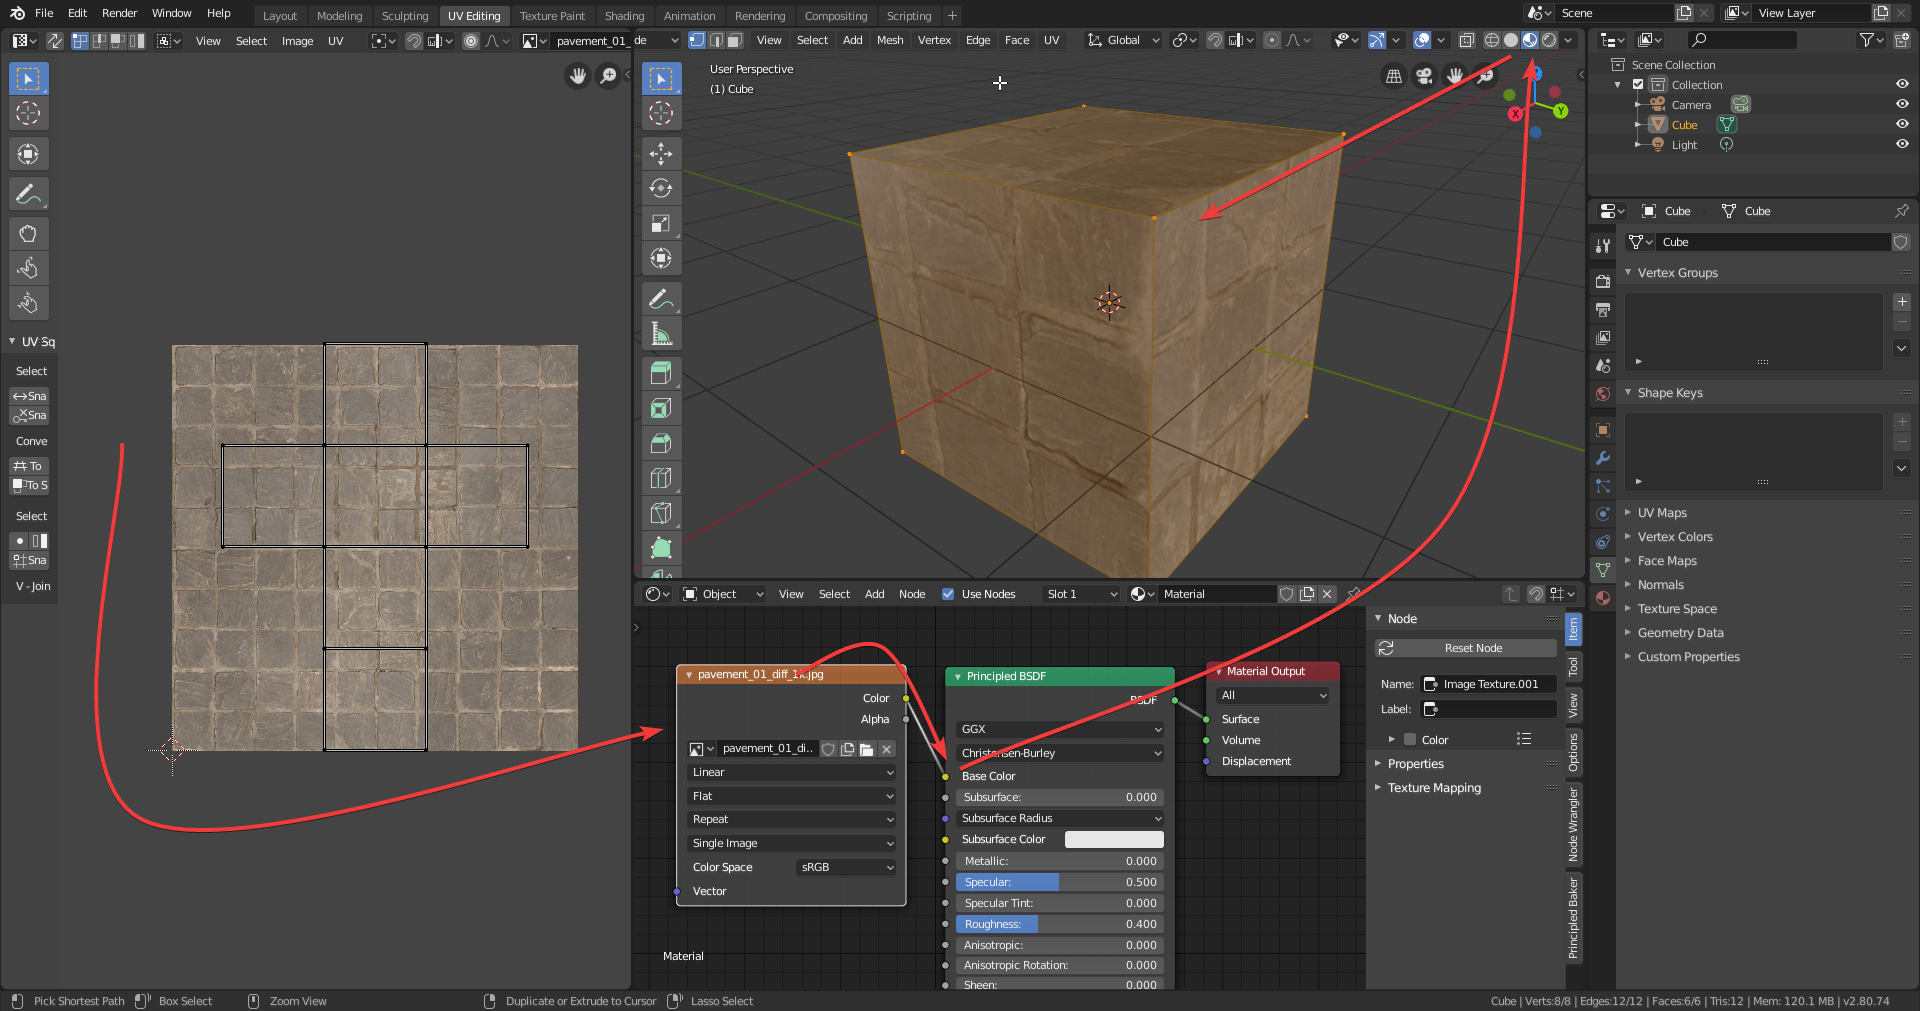
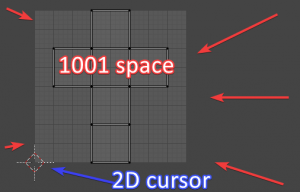
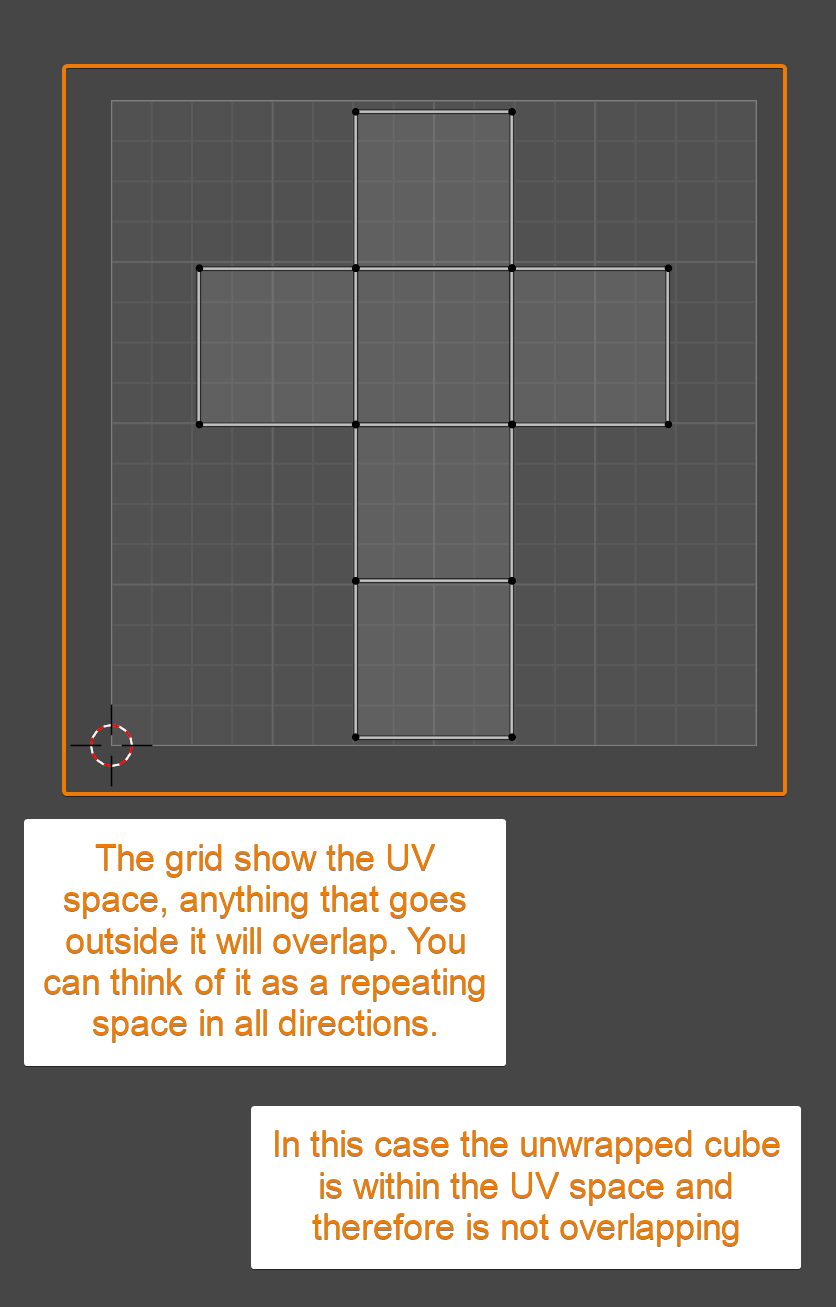
In Blenders UV Editor you can scale your UV Map beyond the size of the image you want to project on to your model. The image bounds can be referred to as the 1001 space.
Scaling the UV Map outside the 1001 bounds will start to tile the texture.
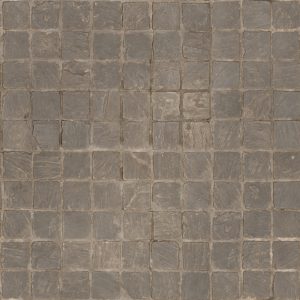
What sticks out on the right side will be textures as if it was sticking into the left side of the texture space. This is when we usually use seamless textures that can tile like the one above.
Related content: How UDIM works in Blender
If you plan to export your model to another software package, you most likely need to stay within the 1001 space. This usually also means baking textures, ether inside Blender or in an external application.
Even if you stay within Blender through your whole workflow, you may still need to consider staying within the 1001 space. For texture painting or baking for example.
The one time you can overlap your UV Map is when using the most common workflow in Blender. That is when you have pre-made textures that tile, and you are texturing and shading at the same time within the node editor.
Therefore, it is common to see Blender users overlap UV Maps. It is a big part of the internal texturing process in Blender.
If you later want to export your assets to another software, you can bake your material setup to a new UV Map that is contained in the 1001 space. This is one of those occasions when we would use multiple UV Maps.
One UV Map when we create the material for the object, and another to bake to.
When working with a UV map that is supposed to be contained within the 1001 space the goal is most of the time to take up as much space as possible within those bounds. We want just a little bit of margins between different UV islands so that we can avoid seams and have just a little bit of margin that goes beyond each UV island.
Personally, I use two different workflows. One where I export for texturing in substance painter, and one where I texture and shade directly inside Cycles/Eevee shader node editor. But out of 10 projects, I estimate that 8 of them does not include Substance painter.
At this point you may think that UV Mapping is complex! Please don’t get discouraged. We are about to jump into the tools and add-ons available in Blender and if you are confused at this point or any time while reading this next section, just stick to it.
If things don’t start to become clear, I think the third and last section will clear up things for you. At that point we will be going over workflows. We will make sense of the chaos, but before we get there, we need to know some concepts and tools.
Let’s continue.
UV Mapping takes place in the UV Editor and in Edit mode in the 3D view. You can use the workspace called UV Editing instead of setting up the interface manually.
We also have a list of our UV Maps in the Object Data tab in the properties panel. In this list a UV Map can be both selected, shown by the background color, and “active for rendering” shown by the camera icon.
If we make a new UV Map, the UVs from the selected UV Map will copy over with it. The selected UV Map will also be the one displayed in the UV Editor.
These are the areas of the interface we need to work with UV Maps. We can also set up a material and view to see how the mapped texture looks.
In the shader editor we will need a material with an image texture node populated with an image to see how the UV Map is mapped to the image.
Lookdev mode will display the texture using the UV Map selected in the UV Maps list in the properties panel while rendered view will always display the “active for rendering” UV Map.
By the way, if you enjoy this article, I suggest that you look at my E-Book. It has helped many people learn Blender faster and deepen their knowledge in this fantastic software.
Suggested content: Artisticrender's E-Book
In edit mode, we will use selection tools and the unwrap menu, shortcut “U”. In 2.80, all tools that we need in the 3D view for unwrapping have moved to this menu.
To clear and mark seams we can also use the edge menu in the 3D view. The shortcut is “Ctrl+E”. For 2.79 users this is where marking and clearing seam functions live. More on seams ahead.
In the UV Editor we will do the finer adjustments, using selections and the same transformation tools as available in 3D view together with tools specific for the UV Editor.
How does the UV Editor and Edit mode work together then? Remember the list of UV Maps?
For the selected map, any selected face that has UV coordinates in edit mode will show in the UV editor. In lookdev mode, we will use the selected UV map to show the current image texture and how it maps using the selected UV map.
In rendered view, we use the UV map with the “active for render” icon as long as we don’t set another UV map in the node editor.
In the UV Editor we also have the option to link what we see from the 3D view. By default, we can only see the current selection in the UV Editor, and we can make selections independent from the 3D view.
We can also sync the selection between the two editors if we so desire. This brings with it some different behavior in the UV Editor. If we mention nothing else though I will assume a non-synced state.
With 2.80 comes a new feature called multiple objects editing. This can be a very useful tool when you are unwrapping multiple objects at once. Hold shift to select multiple objects and hit tab to go into edit mode.
Blender will take all objects in edit mode into account when making its UV map calculations. A smart UV project with all objects fully selected will make a UV map on each object but will take in consideration all faces when placing them into the 1001 space.
In the UV Map list Blender will use the selected UV Map for each object when in multi-object editing mode.
We have already started to touch some concepts not introduced until this next part, like Smart UV Project for instance. Read on to learn the full story.
Seams are a big part of UV unwrapping. We can think of seams as the manual approach to UV Mapping. A seam can refer to multiple things. I will try to explain three definitions starting with the most important one.
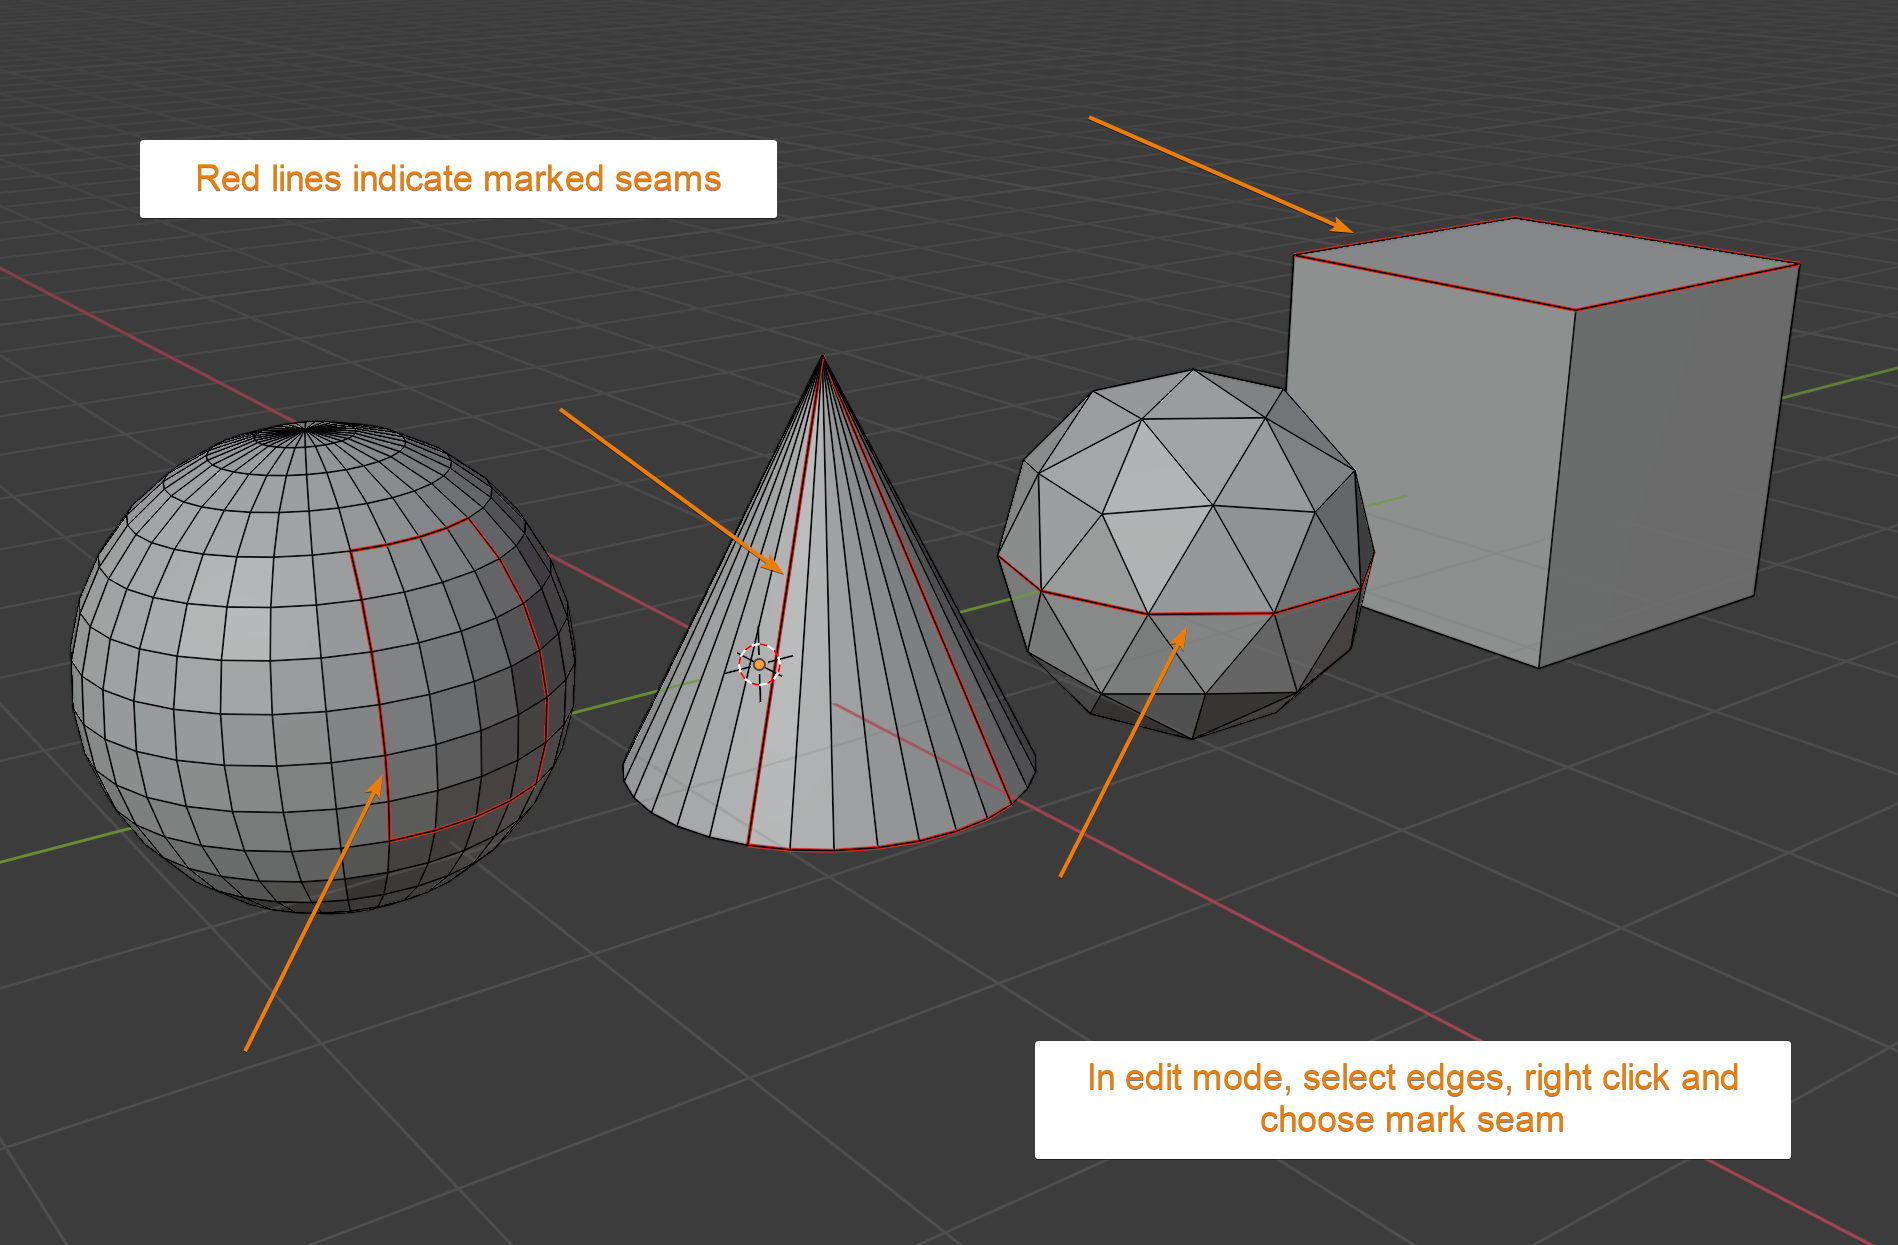
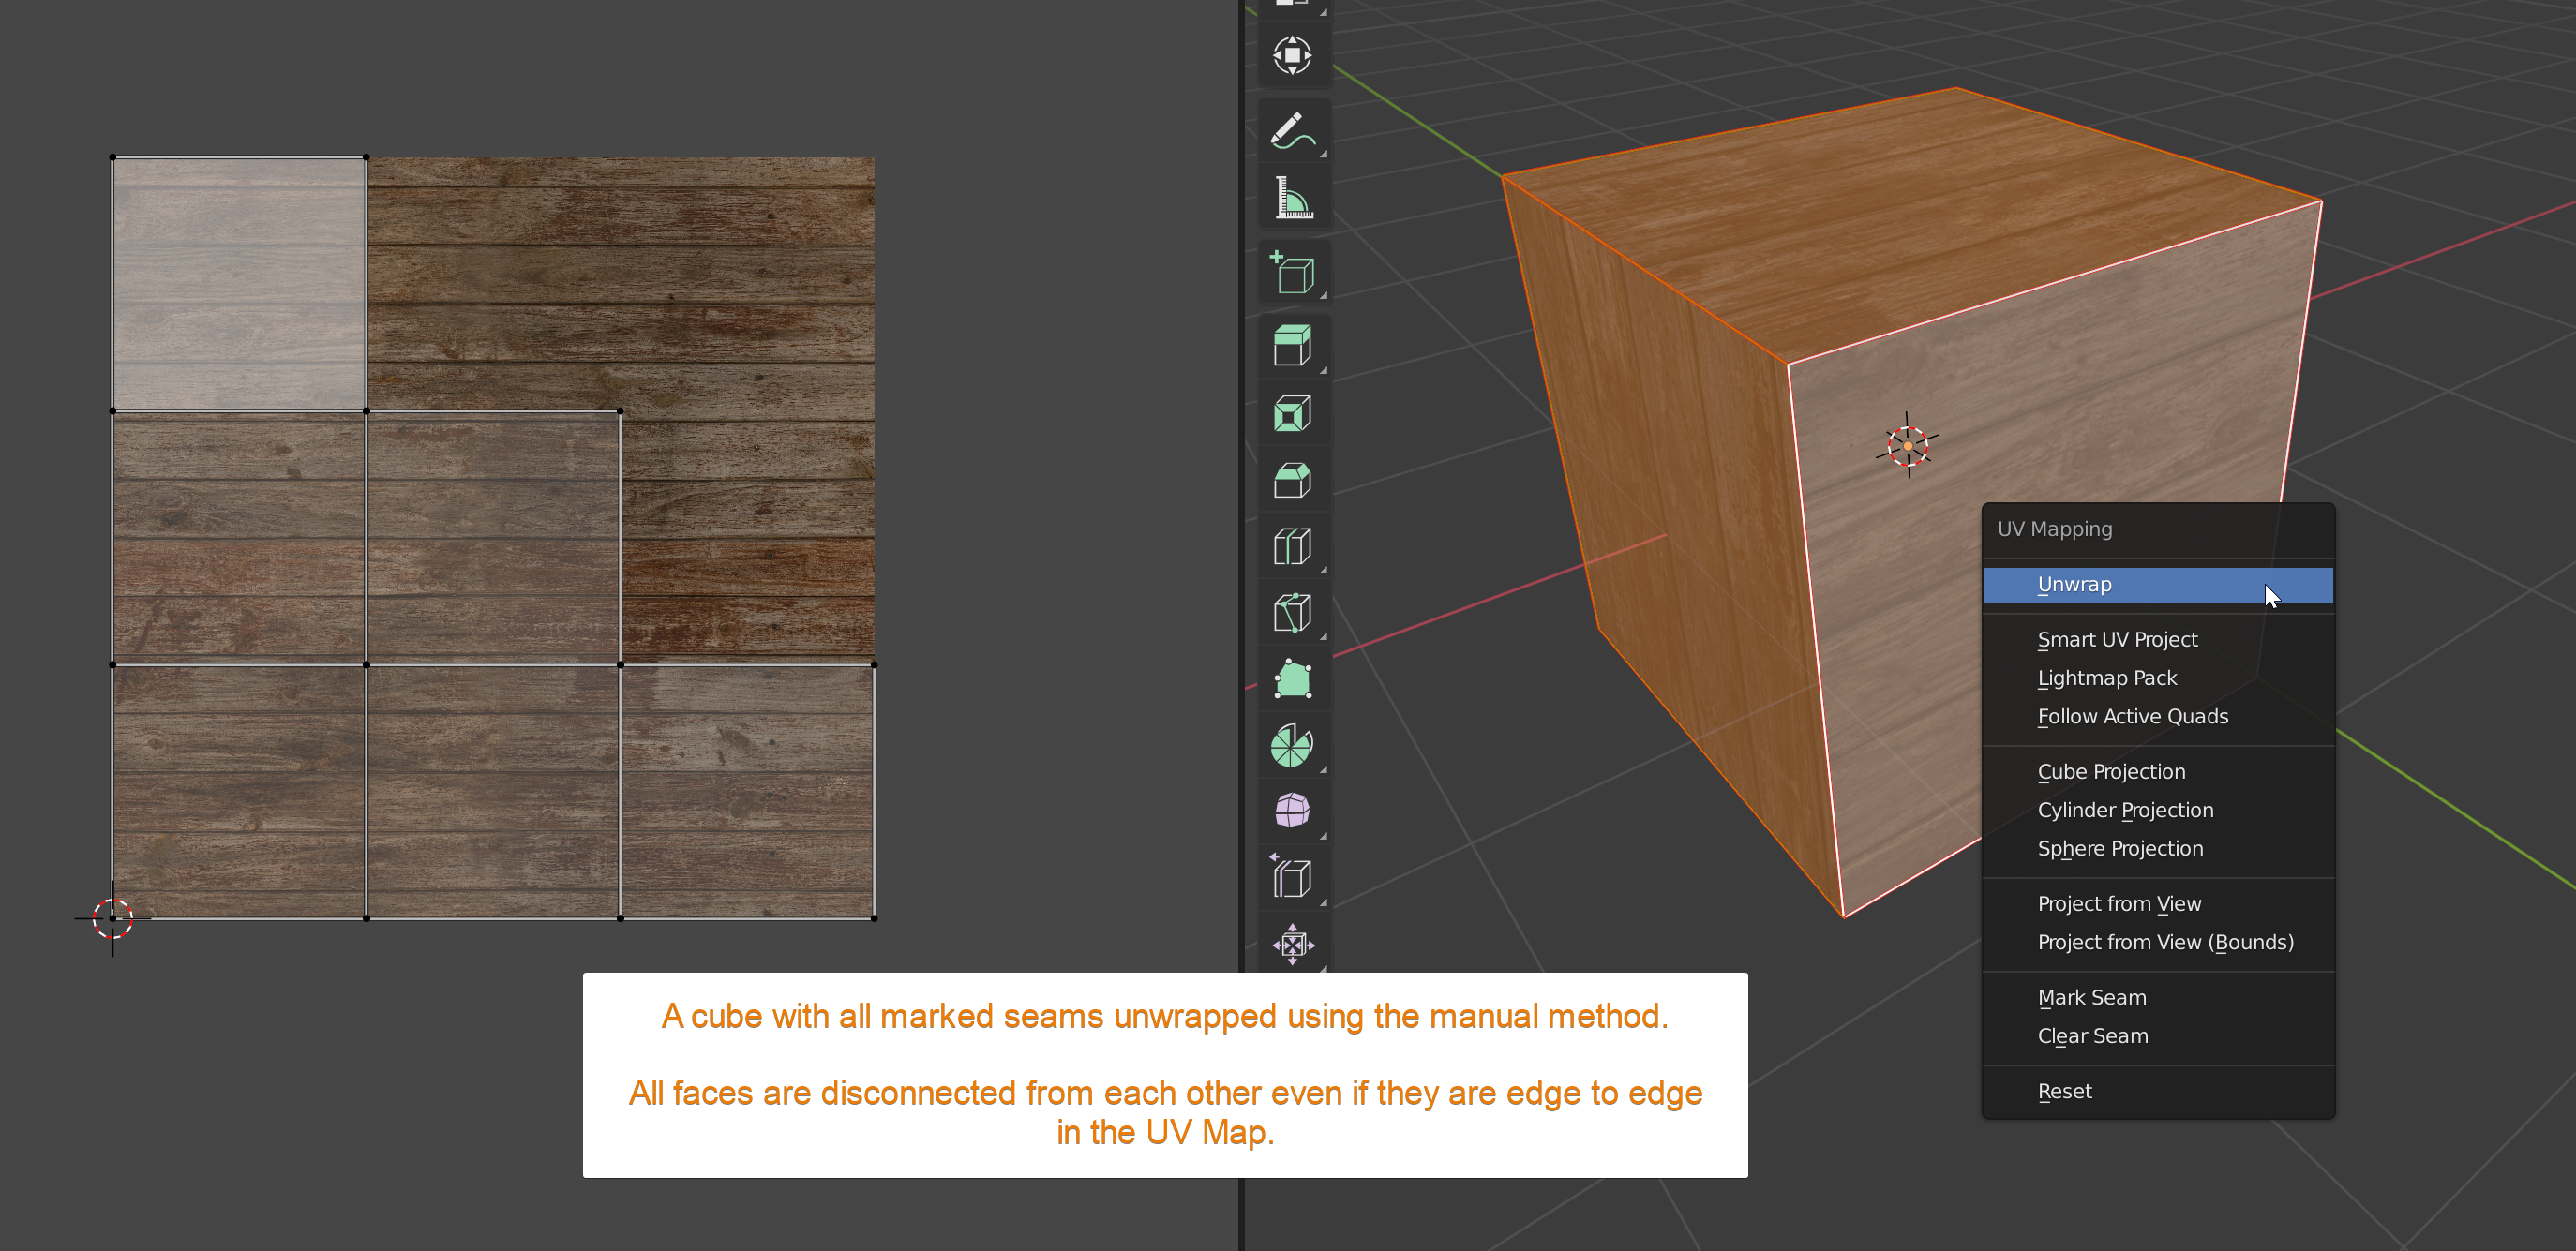
A seam is an edge in your 3D mesh that is “marked as a seam”. You mark a seam by selecting it in edit mode, hit “U” to bring up the unwrap menu and select “mark seam”. You can also clear a seam by using the “clear seam” option. The edge will get a red color showing we marked it.
A marked edge tells Blender that when we use the “unwrap” option from the unwrap menu the faces on either side of this edge should not stick together in the UV map. Instead, they will split apart as Blender lays out the UV Map with the goal to minimize stretching.
The goal is to place seams in a way so that when we run the unwrap operation Blender can lie out the UV map with minimal stretching. So why not just mark every edge as a seam? That brings us to the next seam type.
Another definition of a seam is when the texture is not seamlessly moving across an edge dividing two faces with a clear difference in texture. The cause could be a “marked seam” or by another unwrapping method.

I hope you can see the difference here. One definition is an edge, a 3D mesh element we marked, while the other results from a badly mapped texture.
The third definition is less common, but you may come across it. A seam may also refer to a clear seam in the texture image itself. This is more of a warning of bad terminology. Sometimes artists use the wrong word here.
For instance, if you have a wood plank texture, sometimes you can hear the line dividing two planks in the texture called a seam. The line dividing two planks in the texture is not actually a seam, but I have heard this terminology used many times. The takeaway is to know what is being referred to.
Let’s jump back to the first definition. Creating seams is a big part of UV mapping.
Now we will jump into the different unwrapping methods available in Blender. These are different algorithms that Blender uses to calculate the UV map for a given mesh object.
Press "U" in edit mode to bring up this menu. You can also go to the UV menu in the 3D viewport header while in edit mode.

Blender takes selected faces as input and spits out corresponding UV coordinates for us to map our texture. All methods are considered automatic except the first one that is labeled “unwrap”.
Unwrap is the only method that uses seams as its metric for where to cut the mesh. After having cut the seams Blender tries to lie out the UV map avoiding as much stretching as possible.
We have two operator options available. Most of them having a minor impact on the unwrap. The ones to keep in mind is “fill holes” that can help us unwrap meshes that are not watertight. The margin can also be good to keep in mind. We should have a few pixels between our UV islands to avoid any bleed over. Also, if you are texture painting, leave a large enough gap so you don’t have to paint the UV island edges at snail speed.
Next up is live unwrap. We can also find this feature in the UV editor if you go to the UV menu. These are two different features though even if they have the same name.
I never use this feature, but when I dove deeper into it, I found that it is not that well documented. I also found that it does not work very well together with other unwrap methods. However, by itself and the right circumstances, I think it can be a very useful tool. But since it works best on its own, I will cover it in full in the workflow section.
For now, I will just say that when activated in the 3D view it will do the unwrap operation on your entire mesh every time you add or clear a seam.
This is probably the most useful for hard surface modeling, architecture visualization, and mechanical objects. When using it, Blender will determine where to cut the mesh based on angle data.
When you have a hard surface, object it can be a good idea to start with a smart UV project and see what Blender gives you before starting a manual unwrap. Sometimes you don’t have to make any corrections depending on your situation, and sometimes you get a good start with a smart UV project.

There are a handful of parameters available, such as margin that lets you decide how far apart islands will be from each other.
Angle limit will let you decide what angle an edge needs to have before it is cut.
I also find that deselecting “Stretch to UV Bounds” often gives me a better result since the X and Y coordinates won’t stretch to fit the image. Instead, we keep the correct aspect according to the 3D mesh.
This is one that I almost never use. Lightmap is geared towards game assets that need light baked into them. Blender will take each face and unwrap them individually. The goal is to take up as much of the UV space as possible. Faces will be ordered by size from smallest to largest.

For 2.79 and earlier we could use this to make a UV map for multiple objects at once. There was an option to unwrap “selected mesh objects” when you had multiple objects selected and was in object mode for the active object.
In Blender 2.80 and later, we now have edit mode for multiple objects at once and this function has been removed as a result of it.
This is an interesting method for making square UV grids. You can select what you want to unwrap then click (activate) the face you want as a guide and unwrap using this method.

Follow active quad uses the active quad in UV space, not in 3D space. This is an important distinction. What you can do is to unwrap one face first, make it into a square or rectangle and then “follow active quad” with this face selected and the rest of your 3D view selection will be unwrapped accordingly.
These are meant to be used when unwrapping their respective primitive shape. Note here that these take the 3Dview angle into account when unwrapping. Most of the time, you will get a desired result if you first go into front orthographic view with number pad one before you start your unwrap.
Project from view will take a snapshot of the selected faces from your current view and project into 2D space. This depends on both the view and perspective/orthographic view. I have seen this used as the main unwrapping tool for hard surface objects, but I never use it myself.
It is easy to see what you are doing since you literally move your view around and snapshot your selection. But it is not very time efficient since you must make all these camera changes and selections to unwrap.
There is also a menu item called “project from view(bounds). This is basically the same thing except that the UV map will be scaled to fit the 1001 space.
This will stack all your selected faces on top of each other, every face filling the entire 1001 space. This is good to use together with follow active quad to unwrap the first quad that you then use as a guide.
It is also quick if you want the same mapping on every face.
A big part of unwrapping is making accurate selections. A common beginner mistake is to always unwrap your entire object all at once. The better approach is to select and unwrap each part in turn.
I will outline some selection types that I have found useful below, you can also check out this article for more selection tools and how they work.
Related content: How selecting works in Blender
When unwrapping we will spend most time in face and edge selection. We will use face selection to select areas we want to unwrap, and edge select to create seams.
Personally, I never have my selection tool set to anything other than box selection. This is the default and allows both for box selection and click selection.
Holding shift will add to your selection.
Holding ctrl will also add to selection but it will select a path from your active element to the element you clicked.
While selecting using ctrl, you can go to the operator panel and find many valuable settings.
You can tag the path if you are in edge select as a seam or any other marking available for edges. Unfortunately, we can only add one kind of tag at a time. We can also do other settings for instance, selecting every nth element.
Holding both shift and ctrl will fill a region.
Hold alt to select a full loop.
For face selection, I also find the “select similar” menu very underrated. Access it in edit mode with “Shift+G”. As its name suggest, it allows you to select based on several traits.
An example is when you want to select multiple faces on the same surface. You can use “select similar” and use co-planar.
Between your selection and unwrapping, if you are unsure about your current selection, take a quick look in wireframe mode before unwrapping to make sure that no extra elements are being selected during the unwrap. Use “Shift+Z” to enter wireframe mode.
A couple of things to watch out for when dealing with UV maps are modifiers and mirrored meshes. Let’s start with modifiers.
Related content: How modifiers work in Blender, an overview
If you have modifiers on your model that is not applied your UV Map may not give you the result you intend. The best example for this is the solidify modifier. The extra thickness added by this modifier will copy the textures pixels that live on the edges of the faces and the backside will copy the front facing UV coordinates.
Other modifiers, such as the array modifier and subdivision surface modifier work better. You will just have to double check.
Just one thing, if you find this article helpful, perhaps you will find my E-Book helpful as well. It has helped many people become better 3D artists faster.
Suggested content: Artisticrender's E-Book
Let's continue
When working with symmetric objects, you are likely to use a mirror modifier. In these cases, you have some different options depending on your end goal.
Sometimes, you may want a mirrored texture along with the mirrored mesh. In these cases, the UV Map can overlap. You should start the unwrapping process before applying the modifier.
Related content: Top 10 Blender modifiers and how they work
When you don’t want a mirrored texture, you can go one of two ways. You can apply the modifier first and unwrap the whole mesh. You can also unwrap half the mesh and flip the mirrored set after you have unwrapped and applied the modifier. If you want to do this, it is easiest to mirror the UV map across the X axis. Just select the part you want to mirror in the 3D viewport, move over to the UV Editor and hit S for scaling, follow that up with X and “-1” to flip on the X axis in the UV image editor.
In earlier versions of Blender, the UV and Image editor were the same, but since 2.80 they have been split into two different editors. While this leads us to have more different editors to learn, we will have fewer tools that clutter our workspace while unwrapping.
I think these two editors are good to separate from each other since they perform quite different tasks even if both are in 2D space.
In the UV image editor, we come across a few new terms, one of them being the 1001 UV space that we have touched on earlier.
Another one is the concept of a UV Island. In the 3D view we have vertices, faces and edges. A UV Island is a set of faces that is connected in the UV space but also not connected to any other part of the UV map. Just like an island.
In the UV editor, we mostly have the same selection tools as in the 3D view. We can toggle between box selection, circle, lasso and a simple click to select using the tools panel or the “w” hotkey. Most of the time, you will want the box select since it also seconds as the click to select tool.
In my Blender setup I have remapped the “W” key since I find myself almost only stay in box select mode and sometimes accidently hit the “W” key just slows down the workflow. Just like for the 3D view.
Apart from that I think “select linked” is the most powerful tool. This is mapped to “Ctrl+L” and if you have any element of a UV island selected, this tool will select the whole island. Often you will want to translate one or more whole islands.
We also have “Ctrl+I” This shortcut inverts the selection. Useful in both 3D view and the UV Editor. Instead of selecting a large portion of your UV map, select a smaller portion and invert to speed up the process. It can also be used together with “Ctrl+L” if you want to select a large subset of UV islands.
Just like selections, the UV editor has the same basic transformation tools as the 3D view. We can use G to grab and move, R to rotate and S to scale our selection.
We also have different pivot points that we can choose from in the header. Apart from the standard median point, we can scale individual origins for different UV island and also use the 2D cursor.
The 2D cursor can be used in such a way that if our goal is to lay out our UV map within the 1001 space, we can lay out the map from the bottom left corner and if the whole space is not filled up, we can scale from the cursor position to fit the UV map to the 1001 space.
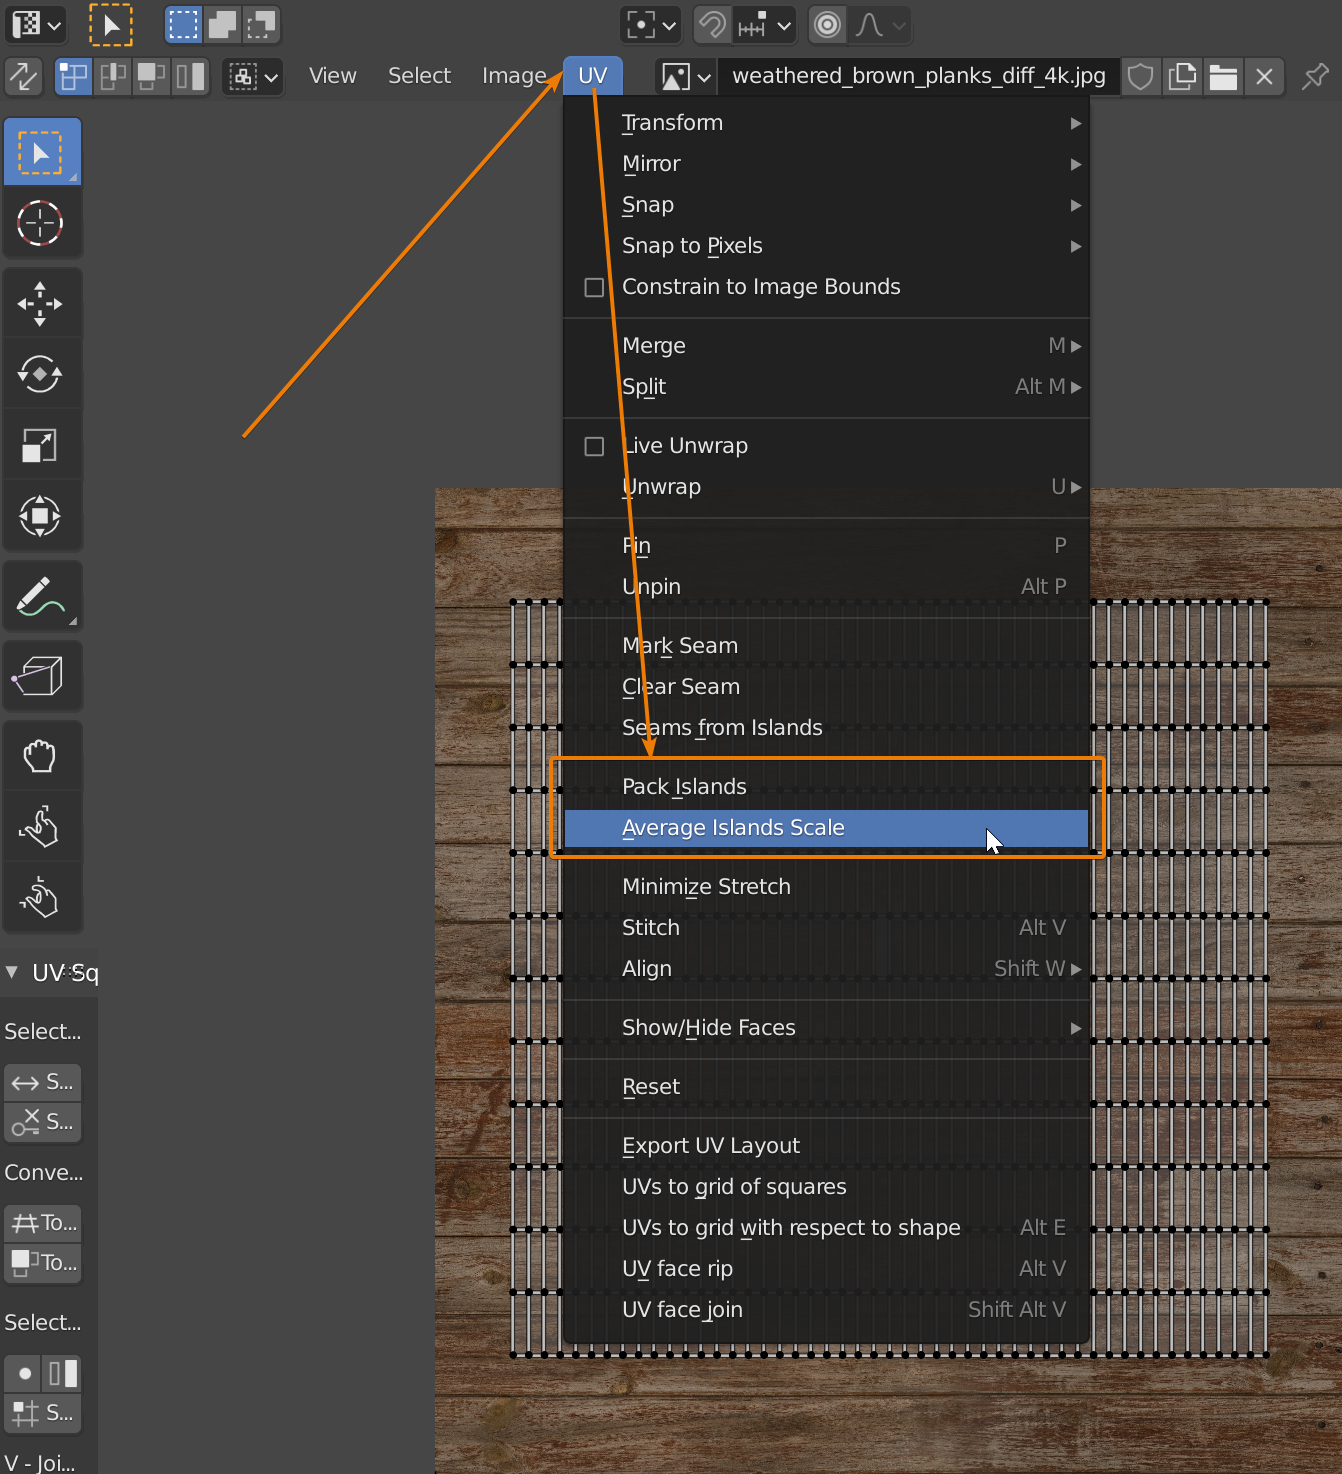
These are two very useful commands. You will find them in the UV menu from the header in the UV Editor.
Average island scale will take your selected faces and average the scale of them, so they match according to the 3D view. For instance, if one face is scaled way down in the UV editor compared to its size in 3D space it will get an appropriate scaling in relation to other selected parts of the mesh.
Sometimes though there might be areas of the model you want to give a smaller texture space to since we may not see them from more than a few angles. Just exclude these parts as you use this tool.
The pack islands command will rearrange all your UV Islands, so they fit within the 1001 space. However, the algorithm used for this is basic. For every UV island blender will use a box around each island and no other faces will occupy that space. So, if you have an L-shaped UV island it will take up a whole box worth of UV space. In such a case, this command may not be ideal.
With models that have mostly square or rectangular shaped UV islands, however this can be a very useful tool. We can also use it to create a starting point.
As an alternative, there is an excellent addon called UVPackmaster that will use a more advanced algorithm to pack the UV map. Keep in mind that this is a paid addon though. At the time of this writing, UVPackmaster 2 is the current version, and it is available for both Blender versions 2.79 and 2.80. You can read my UV Packmaster Pro 2 review here.
Related content: Blender add-on review: UV Packmaster Pro 2
In previous versions these operations had shortcuts, but they were removed during the 2.80 beta. Assign new hotkeys to these if you use them often.
To separate UVs, you can use the “Y” key. This will take your selected faces and disconnect it from the rest. You won’t notice at first that we separate the UVs. But hit ”G” and start moving the selection and you see that it had an effect.
Next tool is stitching. Access stitching with the “v” key. It is most useful when you have unwrapped individual pieces that you want to stitch together to create a larger UV island. The pieces may be easier to unwrap individually and then combined again using this tool. The tool can be unpredictable though, since it does not provide a lot of control. Instead, you kind of toggle between Blender's suggestions on how to stitch together your selected UV islands. Watch the header for more instructions on how the tool works.
We also have the weld operator. This tool works by selecting two or more vertices that you want to move to the same location. Select them, hit “shift+w” and select weld and the position of the selected vertices will be averaged and placed on top of each other.
There are more tools available like UV sculpting, alignment tools and so on, but I almost never use them. If you want to read up more on other specific tools, the Blender manual is a good place to continue.
This will have to conclude the UV Editing tools.
There are mainly two addons that I want to turn your attention to. Both are external add-ons. Let’s start with the first one.
It is called UV Squares and is a free add-on available here:
It has a few functions. “UVs to grid with respect to shape” is the most useful. It helps create square patterns from a skewed set of UVs. The shortcut is “alt+e” once we instal the addon.
The second one is a paid addon called UVPackmaster 2 Pro. It helps to pack UV islands quickly and efficiently. It is excellent when you need a UV Map that is contained within the 1001 space. Compared to the built-in pack islands feature, this is far more efficient and saves a lot of time and headaches when dealing with UV Maps. Read the review here:
Related content: Blender add-on review: UV Packmaster Pro 2
The best way to UV-unwrap a model is in most cases to use a combination of UV unwrapping tools. In the beginning, it's hard to realize that you have the option to unwrap a model a little piece at a time. Your unwrap command will affect only your current selection.
When we are using Cycles or Eevee as our renderer we need not worry too much how our UV Map looks. In the shader editor, we may combine UV Mapped images with box projected images and procedural textures left and right in a spaghetti bonanza with our nodes and noodles.
On the other hand, you may just have started out and the node editor is very foreign to you. You may work with a single principled shader and an image texture or two connected to it and that is fine.
To appreciate the full potential of this flexible workflow though we will need to know two nodes.
For UV mapping, we have two primary nodes. The UV Map node and the texture coordinate node. The texture coordinate node has a “UV” output that can be piped to the input of an image texture. It will use the “active for rendering” UV Map while the UV Map node will use whatever map we specified.
These nodes allow us to combine different image textures using different UV Maps in the same material. You can read more about the node editor in the “physically based rendering and blender materials” article and its follow-up practical example article, “physically based rendering, blender nodes, with brick texture example”.
There is also a complete beginners guide to material nodes here:
Related content: The complete beginners guide to Blender nodes, Eevee, Cycles and PBR
Let us continue.
For this workflow we will start with one or more seamless textures or set of textures for a PBR workflow. As an example, let’s also say that we have a house to Unwrap. Use the albedo/diffuse map of the PBR set or the single texture that we have and pipe it to the color input of the principled shader. Toggle lookdev mode in the 3D view.
We can start by selecting everything and using a smart UV project. From there we can switch to sync selection between the UV Editor and 3D view. Go into wireframe view and select the walls from a front orthographic angle.
We can toggle back to lookdev mode and scale and rotate the UV Map until the scaling and rotation looks right on our model.
Continue doing this for all the pieces on the house until everything is unwrapped. Some areas will need to be further adjusted. You can select these areas and use either smart UV project or a simple unwrap with the isolated selection.
With a house, we can also use the unwrap method. Just select one corner of the house and mark seam. Select the rest of the walls around and unwrap only those faces first. Then you can hit “ctrl+i” to invert the selection and use a smart UV project. This is also a good starting point.
To prepare a second UV Map for baking just add a second UV Map and smart UV project the entire model on to it. This UV Map will need to stay in the 1001 space and cannot overlap. You can then use this UV Map to bake the materials different properties to this second UV Map. Keep in mind that smart UV Project does not guarantee a non-overlapping UV Map ready for baking, but in most cases, it will be ready out of the box.
If you have problems with smart UV project and overlapping UVs, it is usually caused by n-gons that are wrapped around a large area with a hole or gap in the middle. Try to triangulate the mesh first for a quick fix or manually check your mesh for any troublesome areas.
When we are using different software for different parts of our workflow, we will most likely have to stick to the 1001 space.
Texture painting or baking are other scenarios when a non-overlapping UV Map is used. A common workflow is to use Blender for modelling and UV Unwrapping and then move to Substance painter to create the texture before moving back to shade in Cycles or Eevee.
In these cases, we can start just like when texturing internally by making a smart UV project. Sometimes, this may be good enough for us. What we must watch out for is angles going diagonally across the UV map since these can create artefacts when painting. Try to keep these angles to a minimum.
We also need to think about what kind of texture will be mapped to different surfaces. It is way easier if all the faces that will have a directional texture, like wood grains, are laid out in the same direction. If not, we may have to do extra adjustments in the external application to rotate the texture for different UV Islands. The same is true if we are painting. It is significantly easier to paint in the same direction than to switch around the canvas to get the right angle for longer strokes.
For organic meshes, it is common to have a UV Map in the 1001 space from the start. Most of the time, we have sculpted a high poly mesh in sculpt mode or possibly in another application like zbrush. Then we have made a re-topology that we now need to unwrap. We will then bake data from the high poly mesh to the low poly when the unwrap is complete. We do this so we can save all the detail we created during the sculpt pass to an image texture and use that on our low poly object to increase performance compared to using our high poly mesh directly.
This workflow can be different depending on the goals you have and the mesh you are working on. Following are some ideas that can be worth noting when unwrapping something like this.
For this kind of scenario, we will most likely only use the unwrap method, creating seams and unwrap parts as we go. If you are new to this kind of scenario, it can be a good idea to add a monkey object into your scene and look at the default UV Map to get an idea of how such a UV Map can look.
If you have a mirrored mesh from a mirror modifier you know after reading the modifier section that there are two ways we could go depending if we want a symmetrical texture or non-symmetrical.
The most likely scenario is that we will keep the mirror modifier so we can unwrap one side and have the other side mirrored. Create seams in the most hidden areas of the mesh and unwrap as we go, making seams all around loops to cut off different islands and so on.
For instance, if we have a head the ears can be separate islands and we can divide the head up where the hair or other features can help us hide seams.
As we continue around, we notice that some areas will get more tense than others and we may need to divide detailed areas up more to give more texture space for areas like the face.
A good feature to use during this process is stretching display. Hit “N” and go to the view panel, find the display section, followed by the overlay subsection. Check stretching and open the sub-sub-section (yeah, I know…subsubsub…). There you will find a drop-down and you can select the stretching type for Blender will display. Red will show that the area is very stretched or deformed and blue will show a balanced area with good relaxation.
In the UV menu, you will find “minimize stretch”. This can sometimes be useful to have Blender try to adjust the UVs automatically to combat the stretching.
A good balance is what we are aiming for. Try to hide seams in less visible areas, minimize stretching, and divide up the texture space according to your needs.
As stated earlier, the live unwrap is like its own workflow. It is best suited for more organic objects since it only uses the unwrap method and can’t really be combined with the other methods since it unwraps the entire model every time.
It can however be combined with multi-object editing and it can also make use of pinning. We do pinning in the UV Editor by selecting vertices edges or faces and hit “P”, to clear a pin hit “alt+p”. A pin will not be unwrapped again but will stay in place on an unwrap operation. However, you can still move the pinned elements manually in the UV Editor.
Pinning is not a live unwrap exclusive feature. It will work with the regular unwrap, but not for any of the other methods.
Using these features, you can move around the mesh and get an unwrap at the same time as you mark seams. Getting instant feedback on your seam placement. When done with an area, you can just in it to place and continue.
There is also a feature in the UV editor with the same name. Go to the UV menu, and you will see a live unwrap checkbox there. This is not the same feature.
This feature will instead use pinned vertices in the UV Editor as anchor points. If you have a UV Island with a handful of pinned vertices, then select two or more of them and transform using grab, scale and rotate, the UV island will bend and twist with the movement while letting the unselected pins stay in place. This can be very useful to manually adjust and fix stretching since you can add an extra pin in a tense area and scale it up or move and rotate it.
When texturing and shading an object, you might find it cumbersome to UV map every single part of a texture. In some cases, we may get away without a UV Map. Instead, we can use what Blender refers to as box projection. Sometimes called Triplanar projection.
Related content: Blender box mapping workflow, a quick look
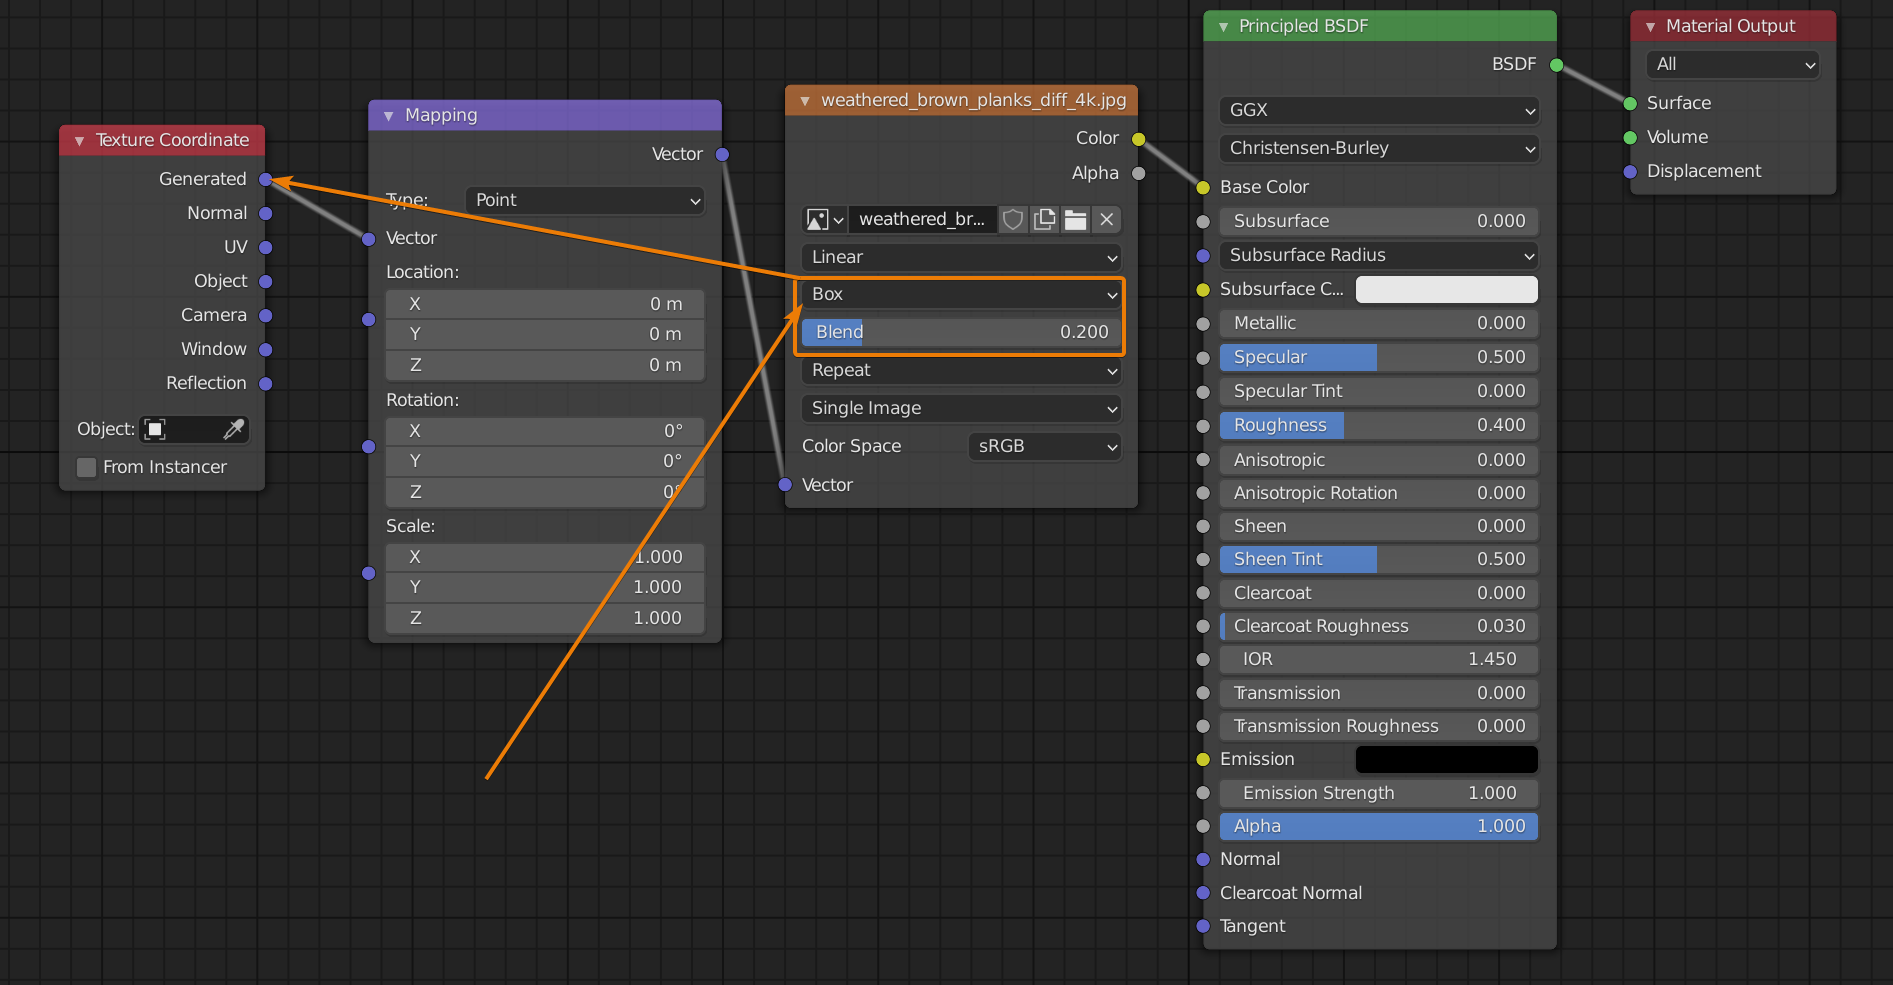
What it does is that it projects an image texture from six different angles. XYZ and their negative counterparts. To avoid seams where these projections meet, we also have a blend value to adjust the blending between these projections to smooth the edges.
To use Box projection, open the shader editor and add an image texture node, browse to an image you want to map to your object. Change the projection from flat to box, and you will also get a blend value to adjust. Connect the image texture node to your principled shader and see the result in the 3D viewport.
This technique has drawbacks. For instance, we are bound to fixed angles and we can’t rotate the projections individually.
Another upcoming concept is UDIMs. UDIMs are basically multi-dimensional UV Maps meaning that we can have overlapping textures without them really overlapping. It is more of an extension to the existing UV map system. Instead of being restricted to one square of non-overlapping UVs we add more spaces such as 1002 and 2001. These spaces are then mapped to other image textures to expand the texture space.
UDIMs are in most cases considered a feature that is best used in VFX, animation and other pre-rendered areas and should not be used for real time since it would use too much memory. However, we will see how this pans out in the future.
Update: UDIMs are here, and you can read the article on it here:
Related content: How UDIM works in Blender
We started by looking at what UV Unwrapping is and the surrounding concepts. Then we moved over to look over some tools and unwrapping techniques available to us. We covered both the 3D View and edit mode and the UV editor. We continued by discussing different workflows for different models and finally took a brief tour over some alternatives and the UDIM expansion of UV Mapping that is an upcoming feature in Blender.
I hope you found this useful and as always you are welcome with your feedback and questions in the comment section as well as contacting me directly through the link in the footer or header or wherever I have put the button these days.
I would appreciate it very much if you checked out the E-Book. I created it to help people to become familiar with Blenders different systems and learn how to be better 3D artists. Perhaps it can help you too.
Suggested content: Artisticrender's E-Book
Thanks for your time.
