


There are many times in Blender where we will need to rotate and flip textures, whether we're working with an image texture or a procedural shader. so how do we do it?
To Flip a texture in Blender:
To Rotate a texture in Blender:
In the rest of this article we'll go into more detail about the methods listed above and some examples of how each method may be used.
There are a few different methods available to rotate a texture in blender. We rotate and flip both the UV maps and we can use a mapping node on a specific material to rotate and flip the texture.
One Method we can use is to map our textures Coordinates through a mapping node and then use the rotation values to adjust the rotation of our texture
Using the Mapping node is good for when we don't want to rely on the UV Maps and can be handy when we're working with procedural materials.
Another Methods we can use is Rotating the UV coordinates, note that our textures must be using the UV coordinates for these changes to take place.
In general rotating and flipping with UV maps will allow us to later export these changes out of Blender, we can also individually adjust sections of the mesh that have a material instead of changing the rotation for the whole entire material.
While blender will usually map all textures using UV space this isn't always true so if our textures do not rotate with the UVs we will need to map them to the UV coordinates.
There are a couple ways we can go about rotating a texture, one being through UV maps and the second being the Mapping node.
In general the mapping node method is good for when we're working with Procedural Materials or not relying on UV maps for texture mapping.
The UV map method is good for when we're manually mapping or objects, or when we plan on exporting the object.
To rotate an image texture with a mapping node we will need the texture coordinate to map our texture by, as well as an image texture.
For this example we will use a Texture Coordinate node to get our coordinates, but as long as its a valid texture coordinate it can be used.
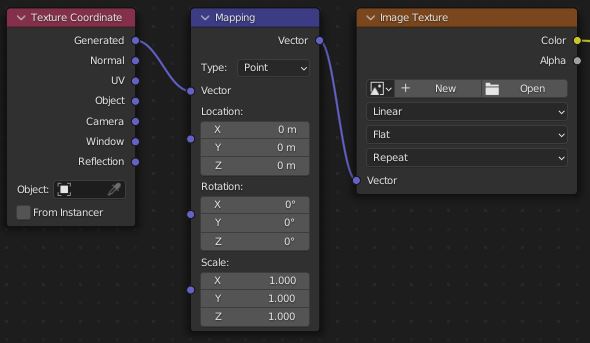
Next Connect the Mapping node like shown above.
We can now use the values above to rotate and flip the texture using the scale values, we can also translate our textures using the location values.
In general we will use the Z axis to rotate our texture but we may node to use one of the others if Z isn't resulting in the kind of rotation we want.
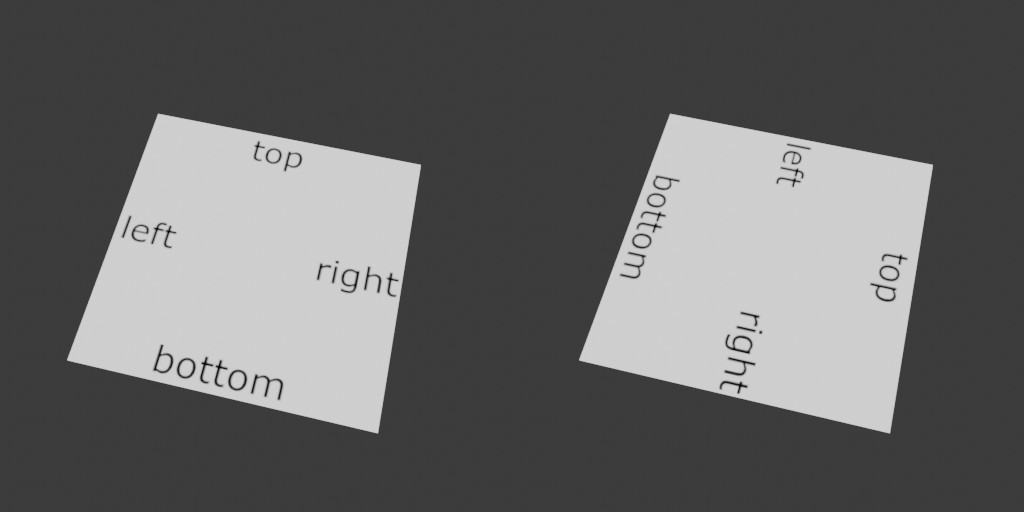
To rotate an image texture through the UVs we will first select the object, then set the object interaction mode to edit, select all of the faces of the object, or the faces we want to have the texture rotated on, then go to the UV Editing Workspace.
In the UV Editing Workspace make sure all of our faces are still selected, then go to UV > Transform > Rotate
we can then either use our cursor to rotate the UVs or type in an exact degree value to rotate the UVs by.
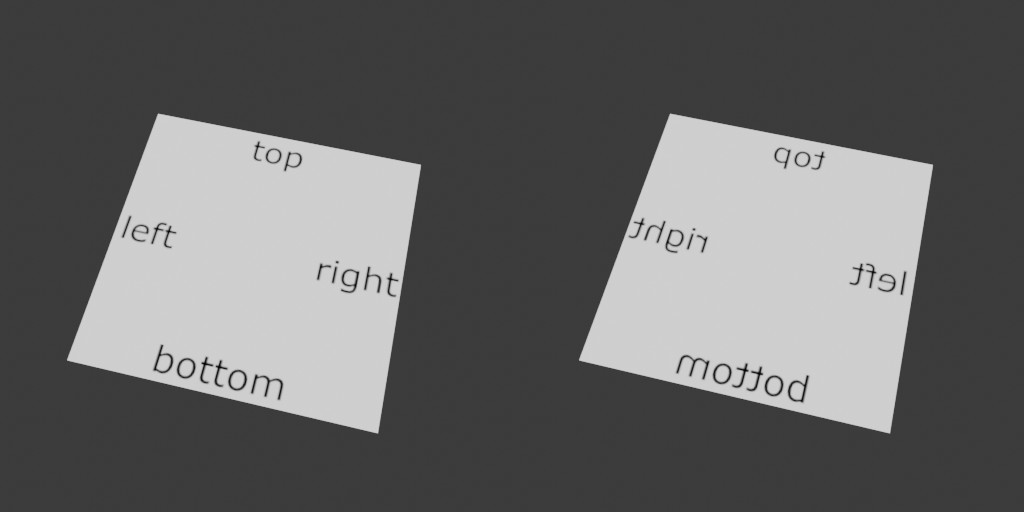
Flipping textures in Blender will mainly rely on us inverting the scale of either the texture coordinates or the UV maps.
In the scales of a very simple object like a plane we can also just flip the texture by flipping the plane, note that this may also flip the normals so make sure your geometries normals are facing the right way if you flip the geometry.
To scale an image texture with a mapping node we will need the texture coordinate to map our texture by, as well as an image texture.
For this example we will use a Texture Coordinate node to get our coordinates, but as long as its a valid texture coordinate it can be used.
Next Connect the Mapping node like shown above.
We can now use the values above to flip the texture using the scale values.
Depending on the orientation of our model as well as its scale the the axis to scale on to flip our texture will vary, try setting each one -1 individually until you find which one flips the texture in the direction you'd like.
To scale an image texture through the UVs we will first select the object, then set the object interaction mode to edit, select all of the faces of the object, or the faces we want to have the texture rotated on, then go to the UV Editing Workspace.
In the UV Editing Workspace make sure all of our faces are still selected, then go to UV > Transform > Scale
When scaling our UVs we can either tap the X or Y key to lock the scaling on that axis, we can then type our scale value in to scale on that axis, thi
To rotate the UVs coordinate of an object we will first need to select the object, set the Object Interaction Mode to Edit and select the faces we want to rotate the UV coordinates of.
Once we've done this we can go to the UV editing Workspace, making sure that all of our faces are selected, and then go to UV > Transform > Rotate.
When rotating our UVs we can either use the cursor and eyeball the rotation we want our UVs to have or we can type in the exact value we'd like.
If you're having trouble with getting the UV Maps working I recommend checking out this guide about some common UV problems.
Related content: 7 UV Mapping problems in Blender and how to solve them
Gradients at times can be a bit tricky to rotate, in general this is because of what point they rotate around, we can rotate them any other texture but we will usually need to apply some offset to the coordinates to get everything just right.

This is the node setup we will be using for the rotation, in this example the gradient has been added to a plane and when we rotate it by 90 degrees the gradient turns black.
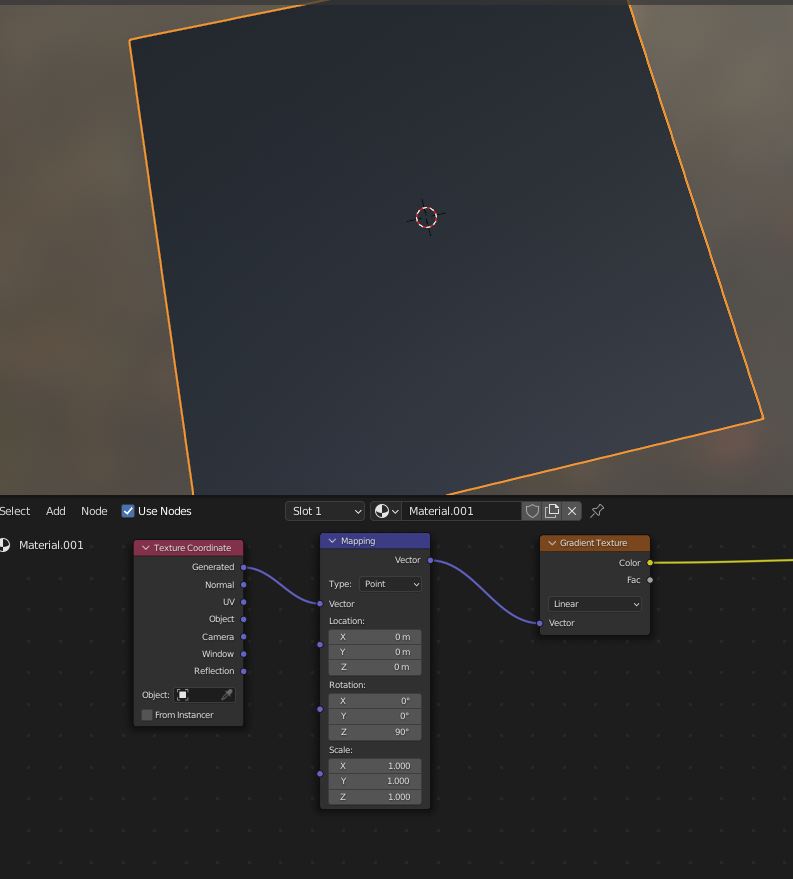
The fix for this is fairly simple, all we need to do is give the gradient a slight offset using the location values of the mapping node, in this example set the X location to 1 to realign the gradient with the object.

There are many cases where we will need to flip and rotate textures in Blender, as long as we are working with textures, materials and UVs we will most likely need to do this at some point.
In most cases the UV and mapping node methods should be able to achieve both flipping and rotating making them very useful to know about.
Thanks for your time.
