


When texturing a model in Blender we will often need to work with UV maps. Occasionally we may run into really confusing issues that can be a bit difficult to solve. Here are the common mistakes that we will cover in this article.
If you are new to UV mapping I suggest that you check out the ultimate UV mapping guide.
Related content: The definitive tutorial to UV mapping in Blender
Let's dive in!
The first problem we'll go over is our UV Maps not showing up. In short, check these things first.
The first solution is to make sure our Mode is Set to Edit Mode in the 3D viewport. We can do this by pressing Tab, or by going to the mode menu in the top left corner of the 3D viewport.
Then we'll want to make sure all the vertices/edges/faces we want to modify in the UV Editor are selected, in the example below I selected all the faces by pressing A in the 3D viewport or by going to the select menu and choose all.

The next thing we can do is make sure that show overlays is enabled in the UV Editor, we'll also want to make sure we're in the UV Editing Workspace, or have a window open with the editor type set to UV Editor.
In previous versions of Blender the UV editor and the Image editor were the same, since 2.8 and forward, the two editors has been separated into two different editors and you should use the UV editor with any later version.
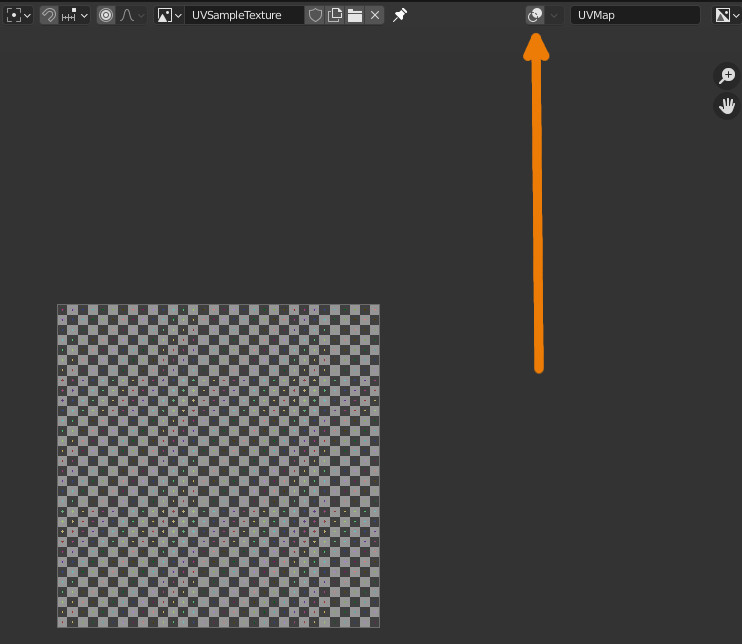
As you can see with Overlays disabled we won't be able to see or UV Maps, but when we enable it we'll be able to see our UV Maps.

On occasion Blender won't show our UV maps because there's no active image in the UV editor. If this happens it is most likely a bug. This can be fixed by going to the image drop down and either select the correct image or going to the file browser and adding it.
For a set of really great tools to help you work with UV maps, I can recommend Zen UV.
External content: Blendermarket - Zen UV
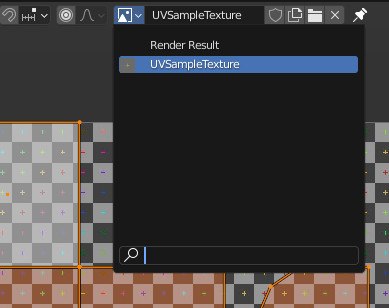
The next issue we may have is that the image texture we're mapping our UV map onto doesn't show up in the UV Editor.
First we need to understand that the image shown in the background in the UV editor is completely separate from the materials and shaders. It is stand-alone even if Blender tries to pick the correct image sometimes.
We can manually choose any image to have in the background at any time from the image selector in the header. As long as the image is loaded into the current blendfile.
Simply click the image icon to get a dropdown showing all images available in the blendfile Chanses are that you have already loaded the image into your blendfile because you added it to your material in an image texture node.
Related content: The complete beginners guide to Blender nodes, Eevee, Cycles and PBR
Click the folder icon to browse for an existing image on your hard drive or press the new button to create a new image to use as the background.
The image in the background doesn't have anything to do with the UV map either other than being used as reference. We can use the UV map with any image texture in the shader editor. In fact, it is quite likely that it will be used by multiple image textures.
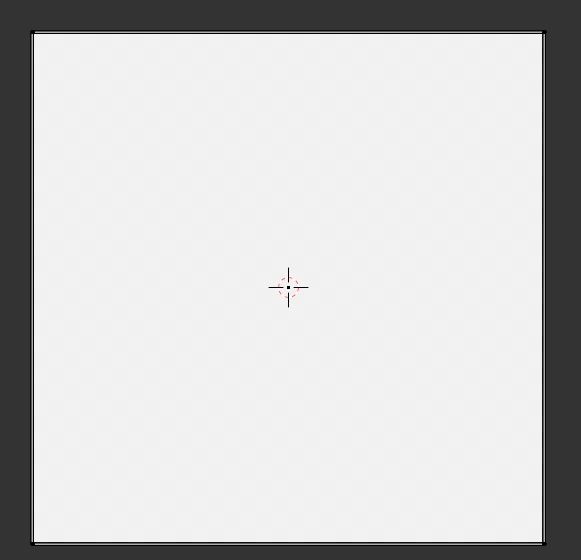
Another issue we could have is that the background is showing as white, there can be a couple reasons for this.
This first cause of these may be similar to the Image Texture not being visible, make sure you linked the correct Image in the UV Editor.
The second cause of this may be that we have many overlapping faces, while the UV Editor geometry is slightly transparent if we have too many overlapping faces it will cause the background to be completely covered.
In this example I've unwrapped an object with a large amount of faces and set all the faces to overlap, as you can see it results in a white background.
You will see this faint border around the edges indicating the edge of a UV mapped face. We can map every face on an object in this way by going to the UV map menu in the 3D viewport while in edit mode and choose reset.
The first solution to this is to pack our UVs so that they do not overlap or simply unwrap the UV map again. While this will work in cases where we didn't intend for our UVs to be overlapping we have now changed the UV map and we may or may not want that.
This is where the second solution comes in handy, Blender gives us the option to lower the opacity of the UVs. Go to the overlay menu and lower the UV opacity.
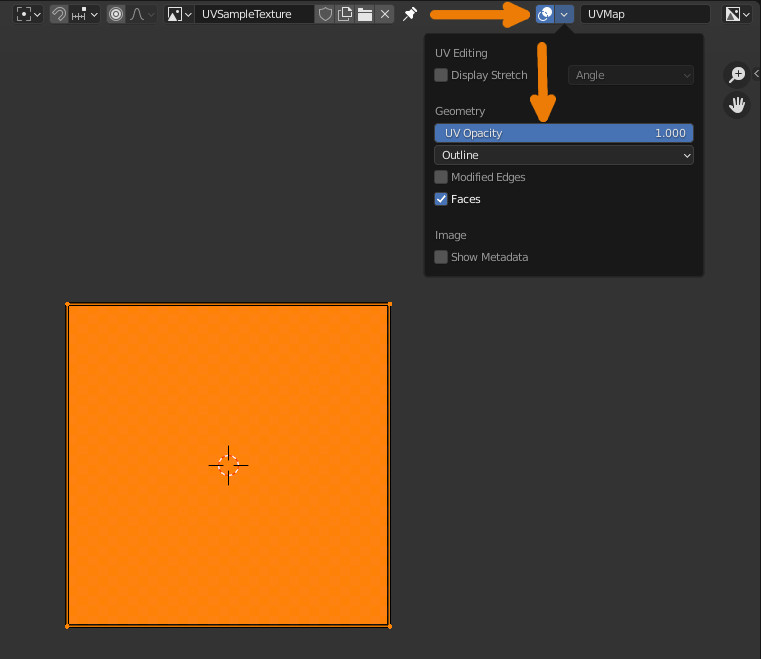
We can lower it just enough so that the background image is visible through all the faces
Keep in mind that we'll probably want to set this back to one when we're working with non overlapping UVs as otherwise it can quite difficult to actually see them.
We may also have issues without our UV maps being incorrectly portioned, in some cases this is simply a scale issue and in others we may just need to manually adjust the UV maps so that they are the correct proportion.

Before starting to UV unwrap, you should make sure that your scale is reset. You can do this by going to object mode in the 3D viewport, press Ctrl+A and choose scale. This is usually called to apply the scale.
You can read more about it here:
Related content: How and why do we apply scale in Blender?
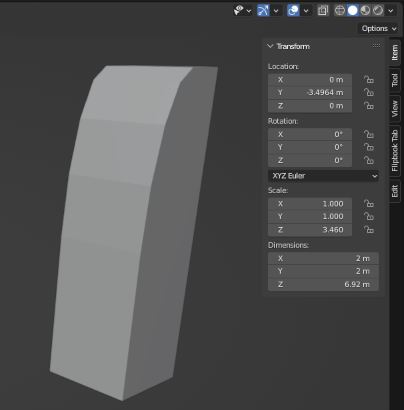
You can also check if the scale is correct by pressing N to open the right side tool panel in the 3D viewport while in object mode and in the item tab, make sure that the scale values in the transform section are all set too 1.0.
In this example we can see that the scale of the object is non uniform since the Z axis is set to a value other than 1.0.
This can also be the result of an incorrectly unwrapped model, for example we may need to add seams to the model so that it can be unwrapped correctly.
If you are looking for a tool to help you edit UV maps faster and easier Zen UV is a great add-on to take a look at.
External content: Blender market - Zen UV
Another issue we may run into is that our UV maps are overlapping, while this isn't always going to be an issue, if we are for baking a texture we won't want this.
Related content: How to bake textures in Blender

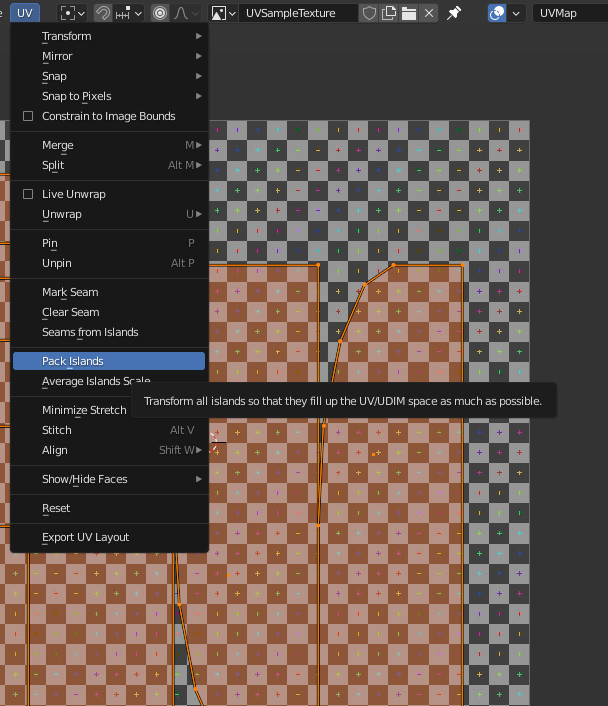
The most simple way to fix overlapping UV maps is to use UV map packing. You can find it by going to the UV menu and choose pack islands. Another way is to use the UV packmaster add-on. It is a paid add-on that you can find here:
External content: Blendermarket - UVpackmaster
We can also select individual UV islands and use the transformation tools to manually adjust the UVs until there is no more overlapping.
Sometimes our UVs will be so stretched that the texture just appears as a string of colors, in this case we will need to unwrap the faces with this issue since their uv data isn't set properly.
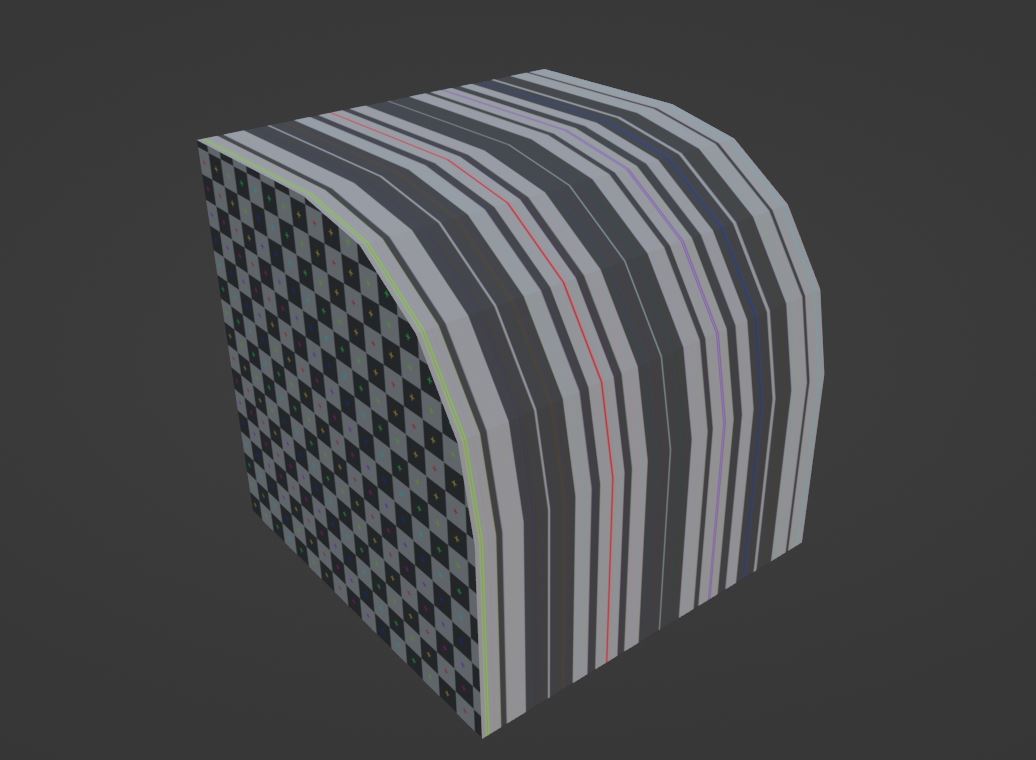
The best way to fix this is to unwrap the affected faces. Start by selecting the stretched faces in edit mode and see what the corresponding faces looks like in the UV editor. Most often they appear as a single thin line. If you can't see anything in the UV editor, press A to select everything while the mouse cursor is in the UV editor and press period to zoom the selection into view.
Next, unwrap these faces again by going to the UV menu in the 3D viewport or by pressing U and choosing an unwrap method. Most likely you would want to use the first option called "unwrap".
This should unwrap all the selected faces inside the UV image space.
Related content: How UDIM works in Blender
In this example the curved surface of this model doesn't have proper UVs, to fix that I used the UV Mapping Unwrap to generate working UVs for those faces.
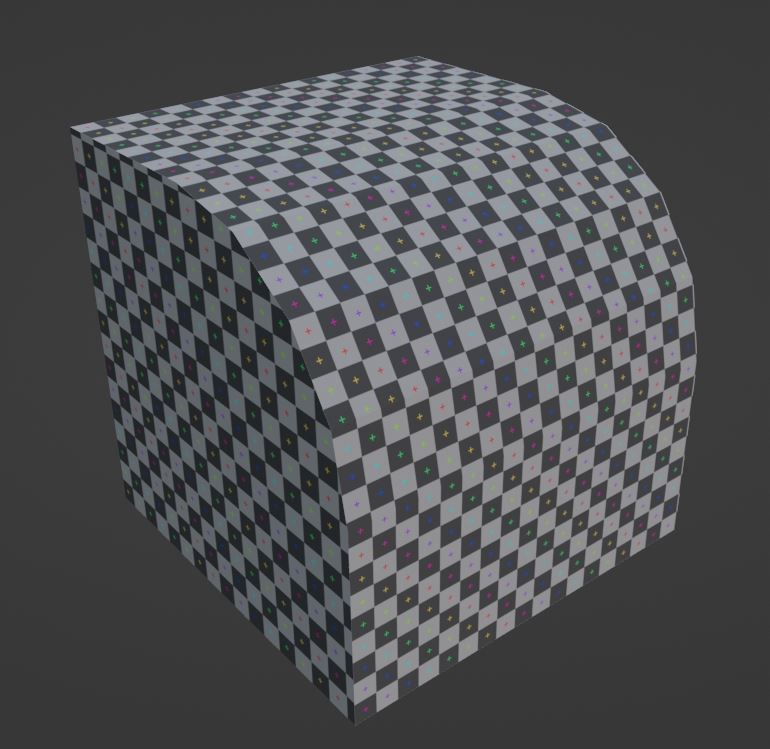
With the affected faces unwrapped we can see that the texture is now being mapped properly onto the curved surface.
Note that I've added the red seams to the model to tell Blender how to cut up the surface so that it can map it onto texture, to add seams to our model change the selection mode to edge, then select the edges you'd like to make a seam and then go to Edge > Mark Seam.
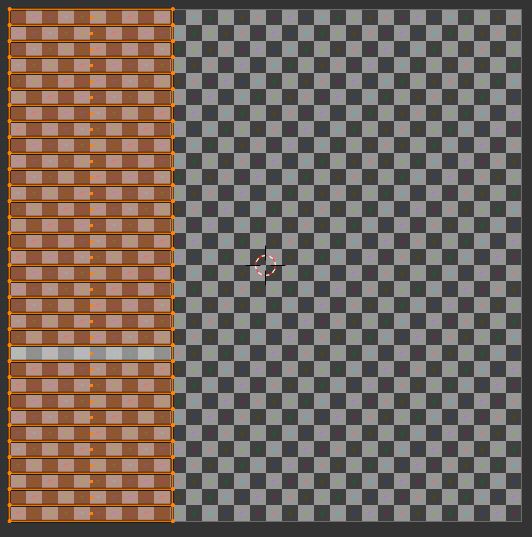
Finally we may want to straighten our UV Maps, for example if we were to unwrap a curved surface like a cylinder we may run into the issue where the UV Maps are somewhat distorted, blender does this to minimize stretching but when we're either trying to conserve UV Space or line up our texture seams this can become an issue.
First we'll want to straighten the edges of a quad in the UV editor, then we select all the faces in the UV editor we'd like to straighten, settings the straightened one to Active, and go over to the 3D View and navigate to UV > Follow Active Quad
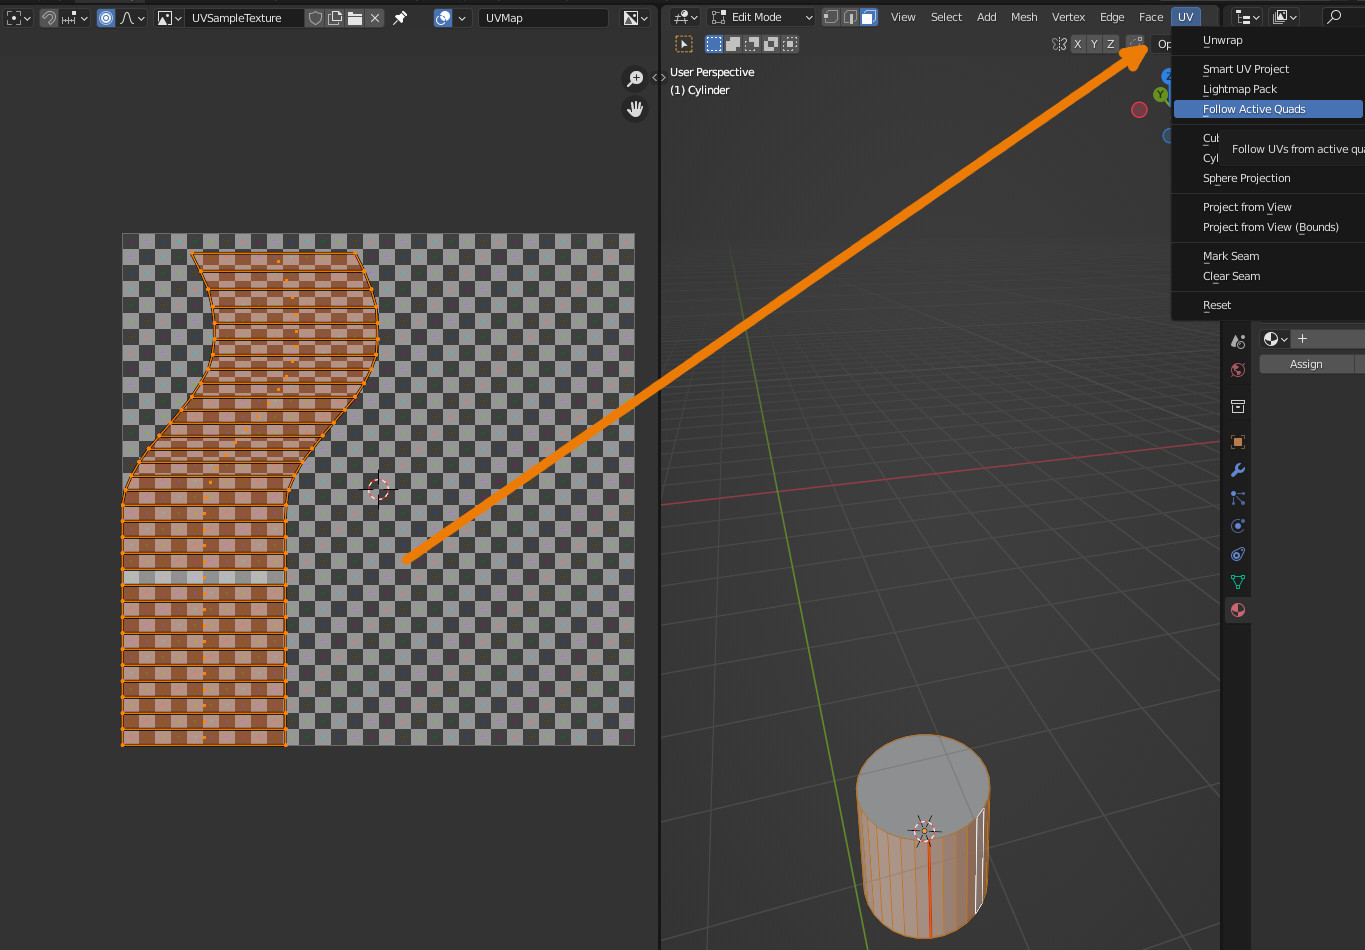
Now all of the quads in our UVs will be corrected, note that all of the selected UVs must be quads.
We can also use the UV squares add-on you can find out more about it here:
Related content: Artisticrender Blender add-on list - UV Squares
UV Maps can be a little complicated to work with at times, being able to quickly solve issues we are having can save us a lot of time since it may not be obvious at first what is wrong, and it can be a lot easier to narrow down the issue when we have a checklist of fixes to go through.
Thanks for your time.
