


UV unwrapping can be a daunting task when you first get into it. There are many things that can go wrong, and you need to know what you're going to use your UV map for. Here is a list of 10 tips that I have composed to help you on your journey to become a better UV unwrapped.
If you need a complete guide on how to UV unwrap in Blender, I suggest you read my guide on how to do just that.
Related content: The definitive tutorial to UV mapping in Blender
The first step is to plan your unwrapping. We need to know what we're going to use our UV map for. Are we going to use it for baking? Or are we going to use it in a shader? Perhaps we're going to export it to an external software that has specific requirements.
The most basic considerations we must make are if our UV map can overlap or not and that Texel density. Do we need an even resolution distribution, or do we prioritize and give distinct part of our texture space more area than others?
Is the 3D model we're working on going to be a hero asset that will require its own texture map, or can we unwrap it over a trim sheet or repeating seamless texture?
Do we have a memory budget for our project that limits us to how large textures we can have and do we take that into consideration when creating our UV Maps.
Those are some of the basic questions we may have to answer before committing to a UV map.
All primitive 3D models in a blender that we can add through the add menu have a UV map generated by default. We can use this to our advantage if we are working with simple objects. We may not have to unwrap these simpler shapes at all, but we can rely on the generated UV map.
If you happen to not get a generated UV map, you can open the operator panel in the lower left corner of the 3D viewport and check generate UVs.
We can find the average island scale and pack islands operators in the UV editor. When you have an object selected and you are in edit mode, you will have the UV menu in the header to the UV editor. Here you will find these operators halfway down the menu.
The average island scale operator will change the size of all UV islands in your UV map so that they have the same scale as in the 3D viewport and your 3D model.
The pack island's operator will do its best to pack all your UV islands into the texture space so that it won't repeat, which is the case when UV islands are placed outside the 1001 space. It will also move your UV islands so that they do not overlap inside the 1001 space.
By the way, the 1001 space is the space that is taken up by the texture. When there is no background texture shown in the UV editor, it will show up gray grid area.
For beginners it is common to start your UV wrapping career by always UV unwrapping your complete model. You press A, then you press U and choose to unwrap in edit mode.
In most cases, this is a mistake. You should unwrap your model in stages. The unwrap algorithms in blender will only unwrap the currently selected faces in edit mode. Different algorithms that we find in the unwrap menu are good for different geometry.
So instead of unwrapping everything at once every time, divide your model and unwrap different pieces by themselves. Then select new pieces and unwrap them separately. Perhaps with another algorithm. Continue like this until your complete model is unwrapped, using the best possible algorithm for each part of the model.
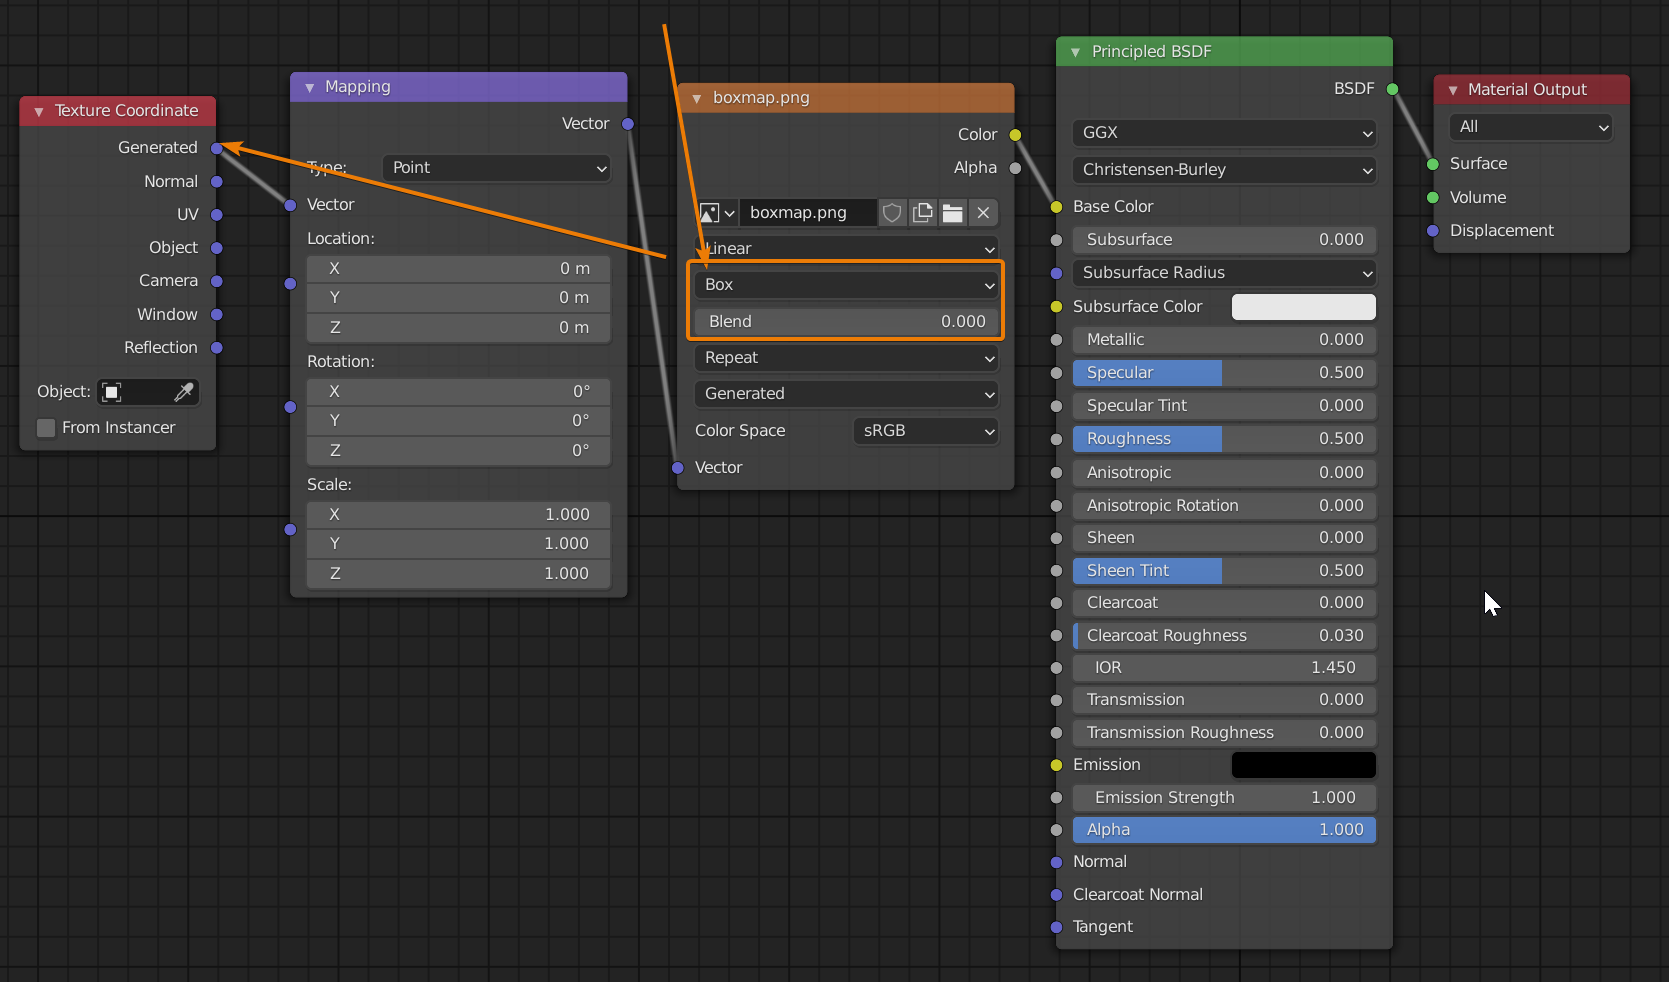
Consider if you need a UV map at all. Sometimes we can use an alternative method called box mapping. Box mapping will project a texture from all six sides of the model, just like a box.
At the edges where these six projections meet, we can blend between each projection to have a nice transition.
You can read more in my box mapping guide you can find here.
Related content: Blender box mapping workflow, a quick look
But basically, we do this in the shader. When you add an image texture node into your material, you can set this to box instead of flat. You can then connect a texture coordinate node and use the generated or object coordinates. You can see an example in the image below.
When you UV wrapping, there are two add-ons that I think can improve your productivity immensely. These are UV squares and Packmaster Pro.
UV squares is a free add-on that has a few operators. The most useful operator is to align your UV map into a grid. This operator is mapped to Alt+E in the UV editor. And it will try to align your selected UV map into a grid.
You can find it here.
Related content: UV Squares
The UV packmaster pro add on is a little more involved. It does not create a UV map for you or help you with the UV map creation itself. But what it does is that it packs your UV map into the 1001 space efficiently both in terms of how fast it is but also how much tightly it can pack your UVs to maximize Texel density.
You can read my review here.
Related content: Blender add-on review: UV Packmaster Pro 2
You can export UV layout if you go to the UV menu in the UV editor. Close to the bottom you will find export UV layout. You can save the UV layout in any resolution and there are a few file formats including PNG you can use.
This can be especially useful if you intend to take your paint a model in an external program.
In the UV editor, we can only see the faces that are currently selected in the 3D viewport while in edit mode. But there is a way that we can see all faces in the UV editor, even if they are not selected.
In the top left corner of the UV editor, you will find an icon with two arrows pointing diagonally. This toggles between UV sync selection and non-sync selection.
Sync selection, which is the default, is helpful when we are unwrapping separate parts of our mesh. But working with an un-synced selection can be helpful when we need to troubleshoot our UV map. For instance, if we want to find out what face a certain piece of the UV map belongs to, we can use the non-sync selection so that we can select in the UV editor instead of having to always select in the 3D viewport.
When creating your UV map and picking the faces to unwrap at the moment, you can use the select similar menu. You can access it with Shift+G in the 3D viewport.
Depending on our selection mode in edit mode either vertex select add select or face select you will get a different menu. For instance, with face select, we can use coplanar to select multiple faces on the same flat surface.
Many of the select similar menu operators can be helpful for us too quickly make the correct selections for UV mapping.
The correct face attributes can be found in the options menu in the top right corner of the 3D viewport. You can also find it in the first tab in the properties panel called active tools and workspace settings.
This checkbox will help Blender to expand the UV map as you are modeling. It is not perfect. For instance, if you are extruding separate faces from a grid you may run into trouble where the UV map won't be correctly generated but most times it will also expand the UV map correctly.
These are some of my tips for UV mapping in blender if you need a complete guide on how to unwrap you can read my definite guide to unwrapping in Blender.
Related content: The definitive tutorial to UV mapping in Blender
Thanks for your time.
