


When it comes to rendering large and intensive scenes in Blender, memory optimization becomes critical. I have lost count of how many times Blender crashed for me thanks to using too much memory during rendering. Many times, the statement less is more, is something to really keep in mind.
These are the primary ways in which we can reduce memory usage in Blender.
There are a lot of parameters that dictate memory usage. In this article we will take a deep dive in RAM usage for Blender users and what we can do to be more efficient with our RAM so that we may render those large projects that otherwise leave us with a crash or out of memory error.

In a computer, the operating system is responsible for managing memory. It allocates memory for applications upon request and free memory when it is no longer needed based on what the user is currently doing and what different processes are running. Both in the foreground and in the background.
For instance, the operating system knows what application is currently being used actively and so it prioritizes memory for it along with other resources such as CPU and disk access depending on what it needs.
In the meantime, other applications that are minimized or has not been active for a long time gets less and less priority. At some point the operating system can even start to move data from RAM to the hard drive for later if applications are open for longer periods in the background but isn't vital enough to store in the faster RAM.
Related content: Will Blender run on a 32-bit computer?
On Windows this space on the hard drive is called the swap file while on MacOS and Linux, this isn't a file. Instead, it is a dedicated part of the hard drive called a swap partition.
So, what does this have to do with rendering in Blender?
The most common cause for Blender to not be able to complete a render is that it runs out of available RAM. This can be system RAM, or it can be your VRAM that is handled by your graphics card (GPU).
In most cases, if we have a dedicated graphics card, we can use it to render our scenes in Blender. Either with Cuda or Optix if we have an Nvidia card, or with OpenCL with AMD cards. If not, we can render with CPU.
No matter what compute device we choose to use, we still need to fit the data needed for rendering in the available RAM. If not, Blender crashes.
There are other reasons why Blender may crash during rendering, such as a bug in Blender or a graphics driver that isn't co-operating. If this is the case for you, you can read my article on common render problems to get some guidance on what driver to use for your graphics card.
Related content: Common render problems in Blender
These days, if we use a GPU to render, Blender can use both the GPUs VRAM and the system RAM when the VRAM becomes full. So, deciding between CPU and GPU based on the available VRAM and the size of a scene has become less of an issue.
However, we are still limited by the total amount of available memory and so Blender may still crash, so what can we do?
From a birds-eye view there are two things we can do. We can free up more memory and we can reduce the amount of memory used by Blender during rendering.
In many cases, we start in the second category. By reducing memory used in a scene. This is usually where we can gain most because many scenes are overwhelmingly unoptimized.
Here is a list of the primary things that can have a significant impact in reducing memory usage for our scenes.
Some settings and features that has little to no memory impact on the other hand are things like number of light paths and samples. Also, the tile size is something that gets brought up as optimizations.
These are all valuable settings when we want to optimize the use of the CPU and GPU and improve render time. But they have almost no impact on memory usage.
We must distinguish between feature that impact memory vs CPU or GPU computations.
Let's look at each of the primary ways to reduce memory used by our scene before we move on to how we can free up memory for use in the scene in other areas.
Our geometry uses a lot of RAM. When we experience problem with rendering thanks to the lack of RAM, reducing geometry is one of the most straight forward ways to improve the situation.
There are several ways we can reduce the amount of geometry in a Blender scene. Here are the ones we will cover.
Let's start by looking at the subdivision surface modifier. This modifier quadruples the amount of geometry for every level of subdivisions we add.
Four times as much data uses up for times as much memory and starting to look through objects where you have a subdivision and decreasing it as much as possible can be enough to save a scene that isn't rendering.
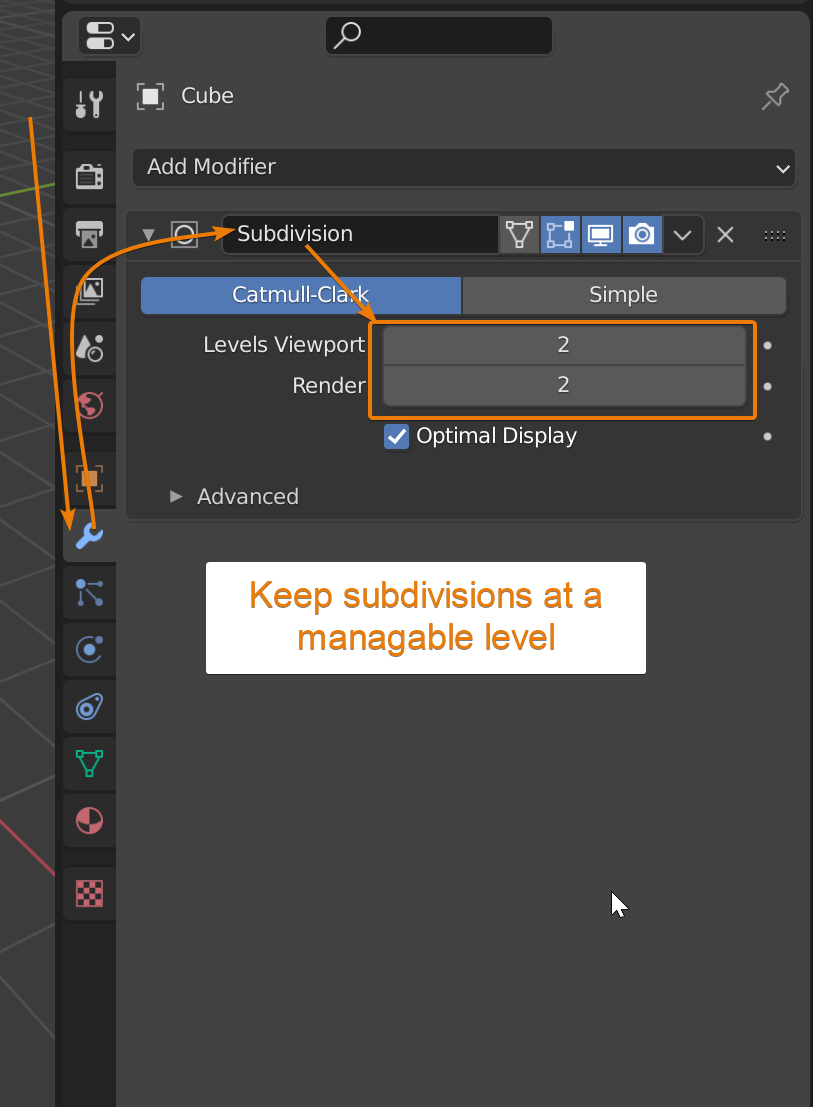
Personally, I try to stick to subdivision levels of 1-3. What you need to keep in mind is that you are far more involved in your project than anybody else. Nobody else see your scene at the same detailed level.
It is rare that people viewing your art complain about an extra level of subdivision if you yourself can barely see the difference. In these cases, the extra geometry is simply not worth the extra memory usage.
The same goes for the multi-resolution modifier. You can stick to 1 level lower than you think you need in most cases.
Any object, vertex, edge or face we can remove is an element we don't need to load into memory.
In many projects we render a lot more objects than we need. For instance, in landscape scenes, we often keep a lot more landscape around that isn't in view of the camera.
Some of these objects may be needed because they contribute to reflections or shadows in the cameras view. But everything that isn't contributing can simply be removed.
We can also intelligently divide the scene into multiple render layers, rendering them separately and combine them again in the compositor. Just keep in mind that elements that has an influence on each other need to be rendered on the same layer.
Related content: How view layers can help you render large scenes with less memory in Blender
Another example is if we are rendering a huge object, such as a skyscraper, castle or mountain, we could potentially remove geometry from the backside, only rendering the portion that actually face the camera.
If you are making multiple shots or animations, you can keep a major scene file that you copy and remove anything you don't need for that particular shot. Then do the same for each shot before finally editing them together in the VSE or an external video editor.
Related content: How to animate the camera in Blender?
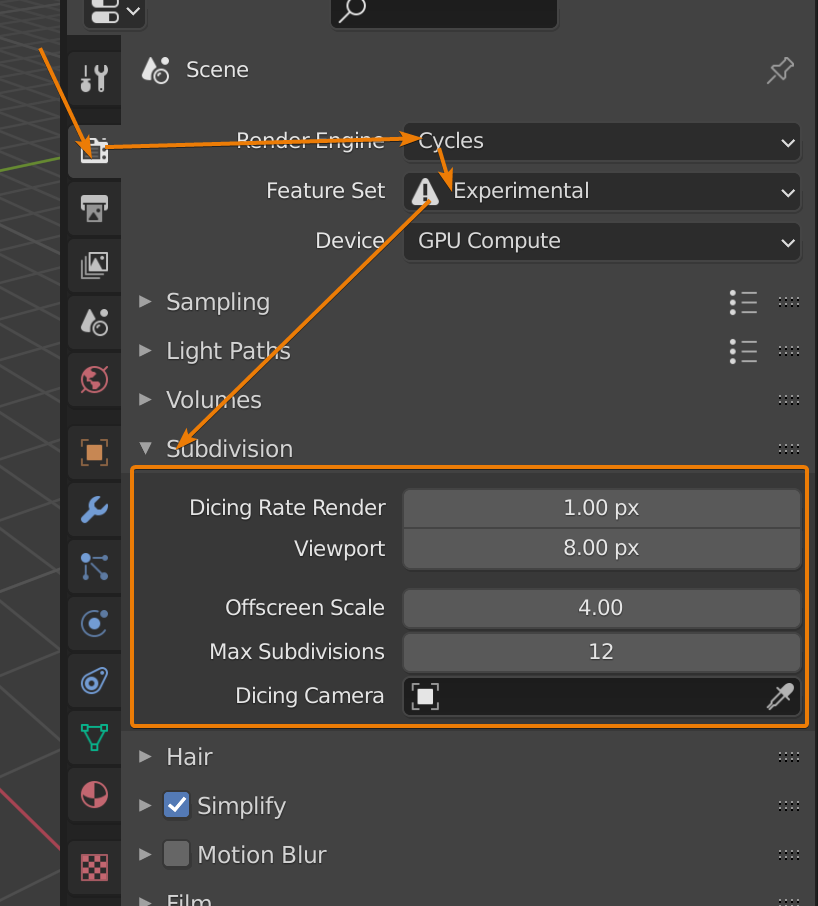
Adaptive subdivision is an experimental feature available in Cycles. Even if it is still considered experimental, it has been around for a long time. Personally, I find it to be stable enough to be used in everyday modeling.
Related content: How to use adaptive subdivision surface in Blender
Instead of giving an object a fixed subdivbision, Blender subdivide the object depending on the objects distance from the camera.
Geometry further away get less subdivisions while objects closer to the camera get more dense geometry.
The downside is that it can be challenging to tweak the adaptive subdivision to fit the scene perfectly. With its default settings it tends to add very much geometry for very fine detailed meshes.
This may lead to the opposite effect, using more geometry and memory than initially. So, it is important to tweak and test the settings before committing to a full-scale render.
Another downside is that we can only view the result in rendered mode as the subdivision happens at render time. But we can view the result in rendered preview mode.
Related content: Blender viewport shading guide
To setup adaptive subdivision for an object in Blender follow these steps:

It is common to use adaptive subdivision together with shader displacement. You can read more about displacement and how to set it up here:
Related content: How to use displacement in Blender
The primary settings to keep in mind when tweaking the adaptive subdivision are the dicing rate render and max subdivisions.
A lower dicing rate will cause more geometry while the max subdivisions set the max allowed subdivisions overall.
Very often we are taught that to duplicate an object, use Shift+D. This command duplicates both the object and the mesh, making a completely new copy in memory.
If we intend to not change the duplicate, but keep it just as the original, we can save a lot of memory by using alt+d to link the data instead.
With alt+d we create a new object, but we let it point to the original mesh data inside the original object. Now we have two objects that look the same with minimal RAM footprint.
Here we have two options. Removing textures that are not needed or use a lower resolution texture if possible. We will start by looking at ways we can remove certain texture types and replace them with something else. Then we will look at a few ways to quickly manage texture sizes.
Related content: The complete beginners guide to Blender nodes, Eevee, Cycles and PBR
When working with PBR materials we most often have these texture maps:
The easiest image texture to remove is the roughness. But this map is also the most creative map so, depending on how we use it we may or may not have an easy time removing it to save memory.
For instance, if we are using overlays with the roughness and play of light is a big part of our scene, we may just not want to replace it.
In many cases though we can use one of the red, green, or blue channels of the diffuse texture instead of a separate image texture map for roughness.
This is what it could look like.
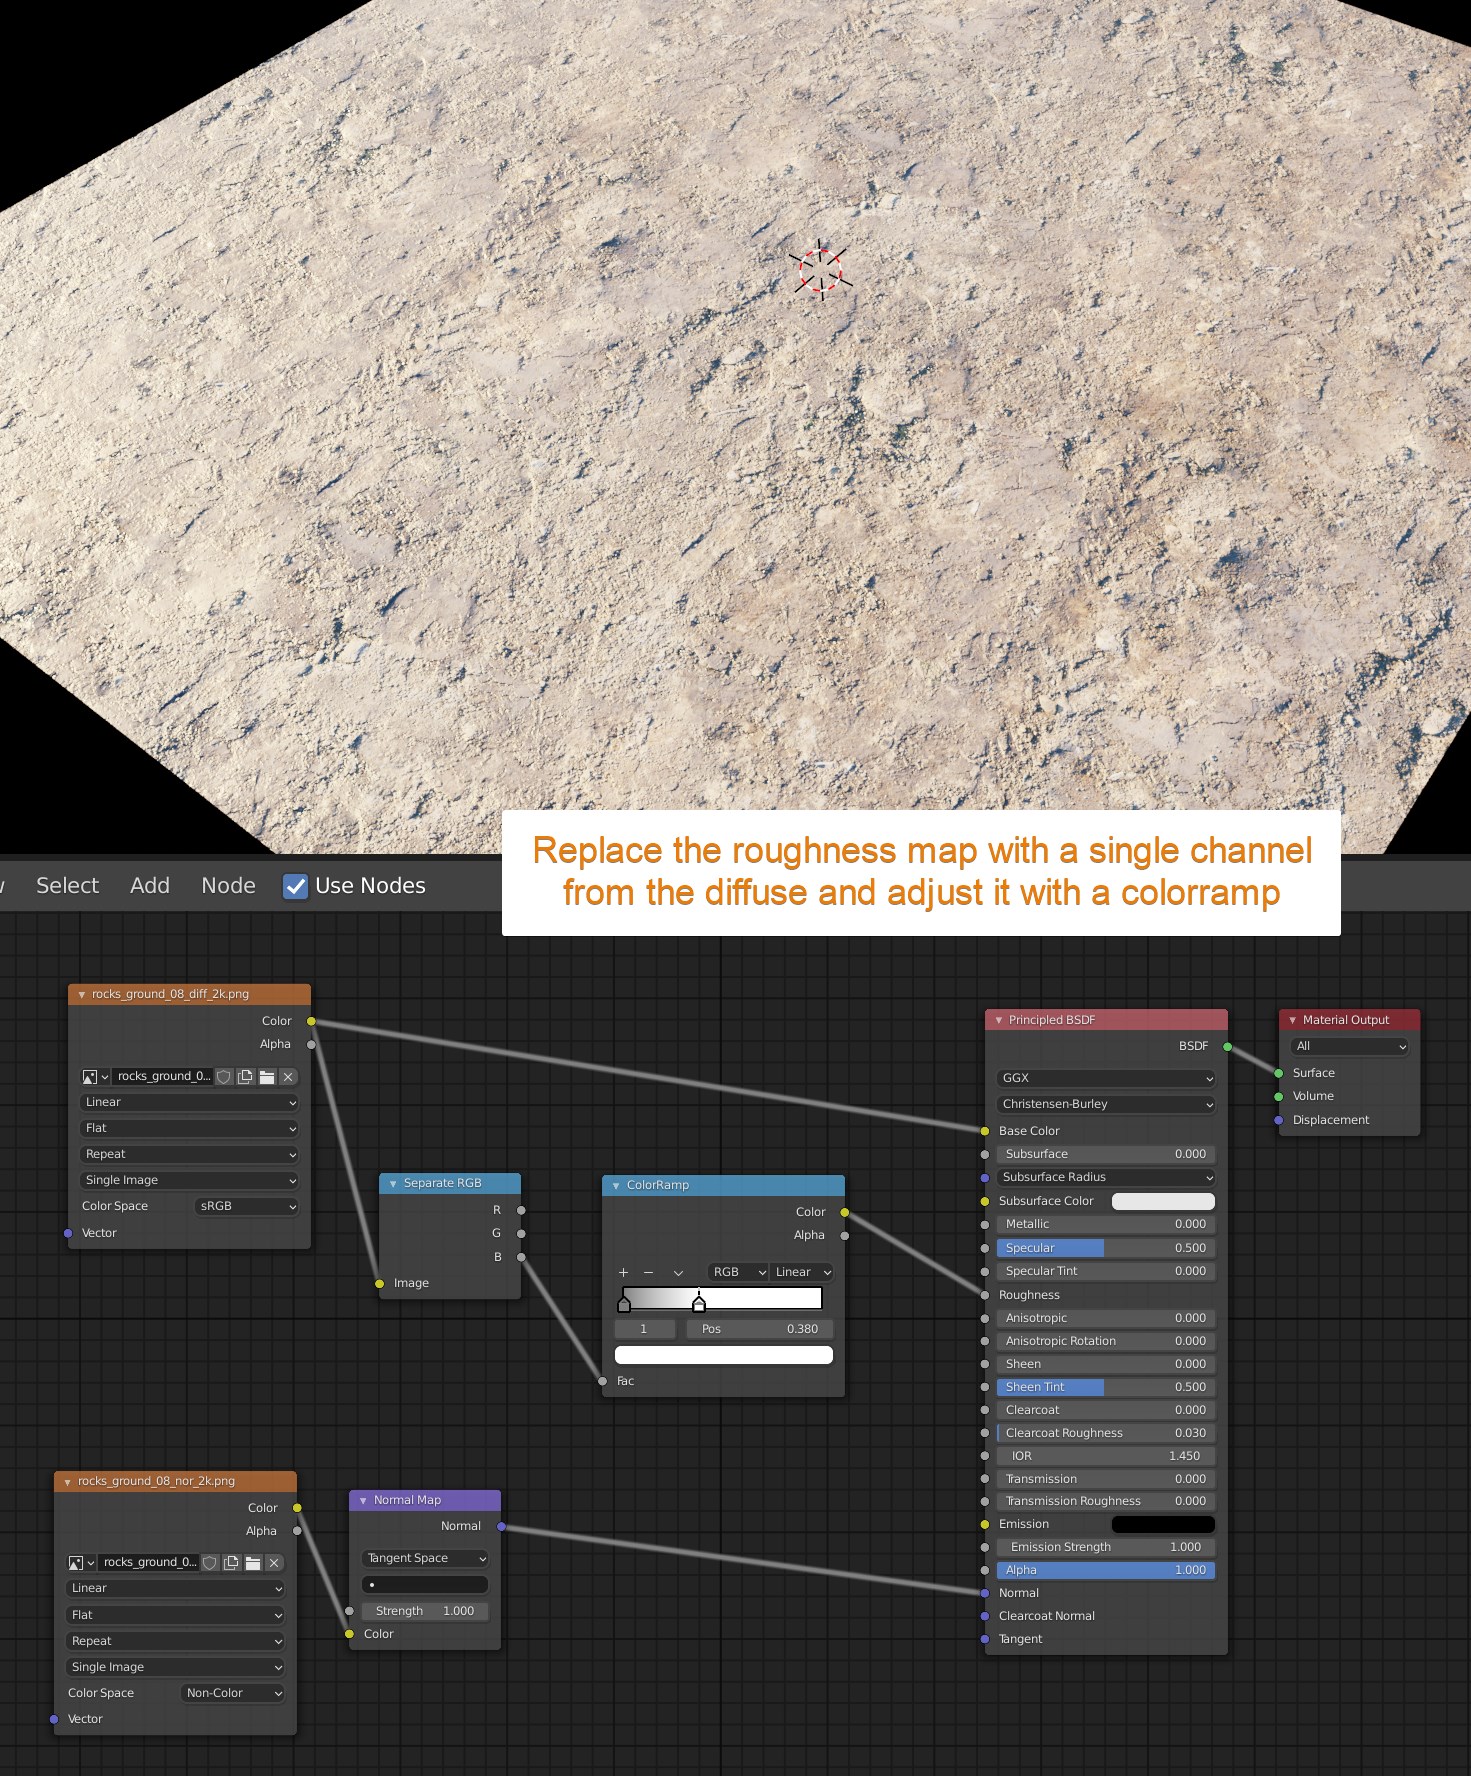
In this case we get a pattern that matches the diffuse texture while not losing much of the original roughness texture. This is also a very rough surface to begin with, just like most surfaces we encounter.
In these cases we rarely see a difference between an accurate roughness map and this method.
Sometimes we can also replace the normal map with a bump node with input from the diffuse texture or one of the single channels as well. But in general, we get a much finer and more even detail with this method than a normal map. So the method is much more limited.
This is how to set it up.
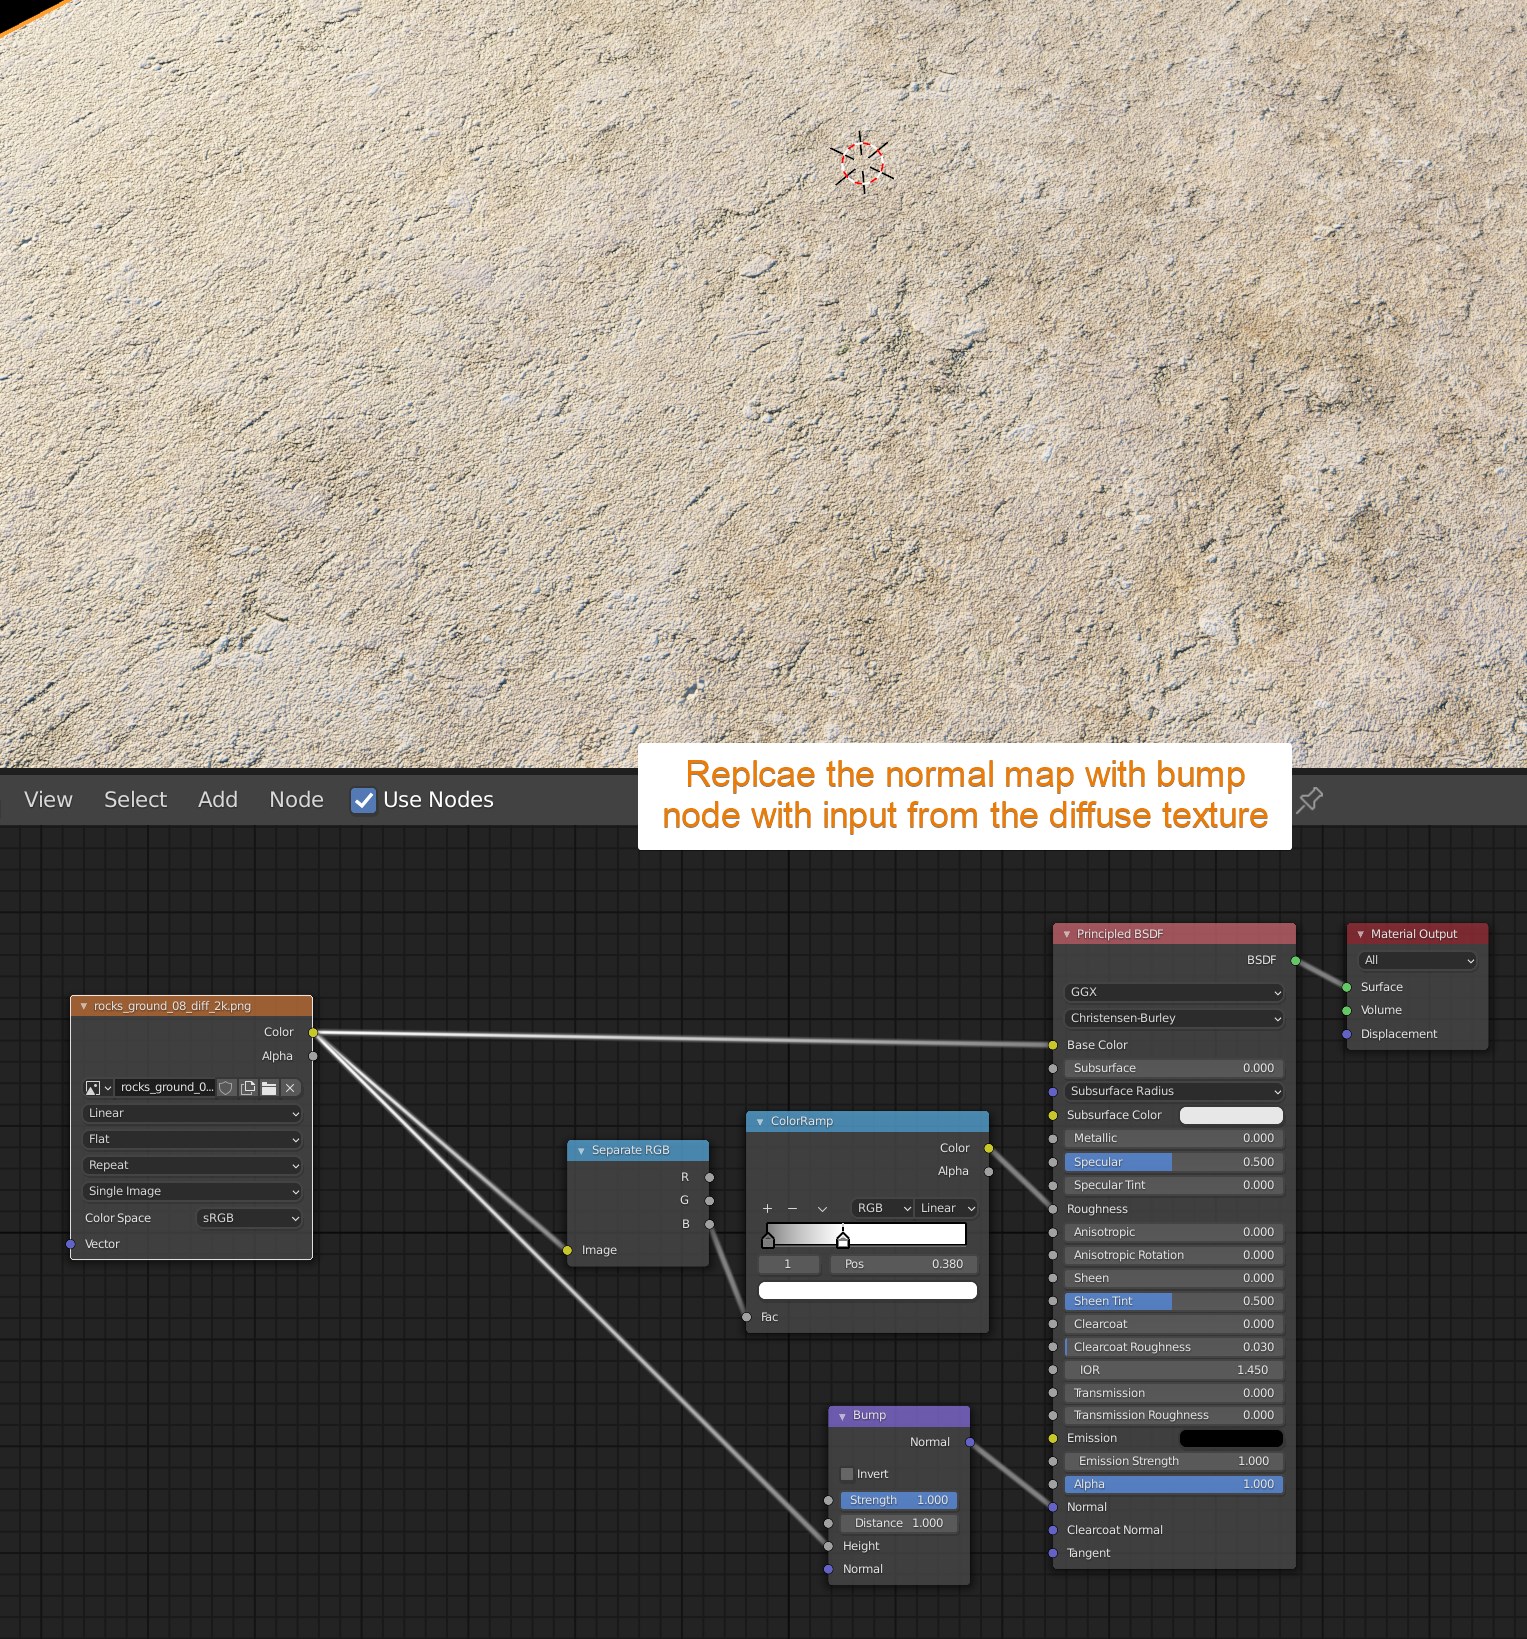
For instance, if this surface was covered with grass, this may be enough to give us a realistic enough ground plane.
The second way we can reduce memory used by a material is to use lower resolution textures. Simply bring your image texture into a 2D photo image editor like photoshop, affinity photo or gimp and reduce the size.
Computers store data in increments to the power of two. So, the most efficient textures to store are sizes like 512, 1024, 2048 4096 and so on.
A texture with the size of 2048 by 2048 takes only a quarter of the memory compared to a 4096 by 4096 texture.
We can also reduce the size of all textures in Blender simultaneously by using the simplify options. We cover this later in this article.
Another substantial source of memory usage is particle systems that we use to distribute objects.
The most common use of particle systems is to distribute a collection of objects across a surface. But there are other uses as well, and depending on your situation you may have different flexibility with how much RAM you can save by optimizing it.
But for the common cases when we distribute objects across a surface, such as grass, greenery, or rocks on the ground or debris in an old house we can use child particles and limit the area we distribute the particles across.
Related content: Ditch particles, use the scatter objects add-on in Blender
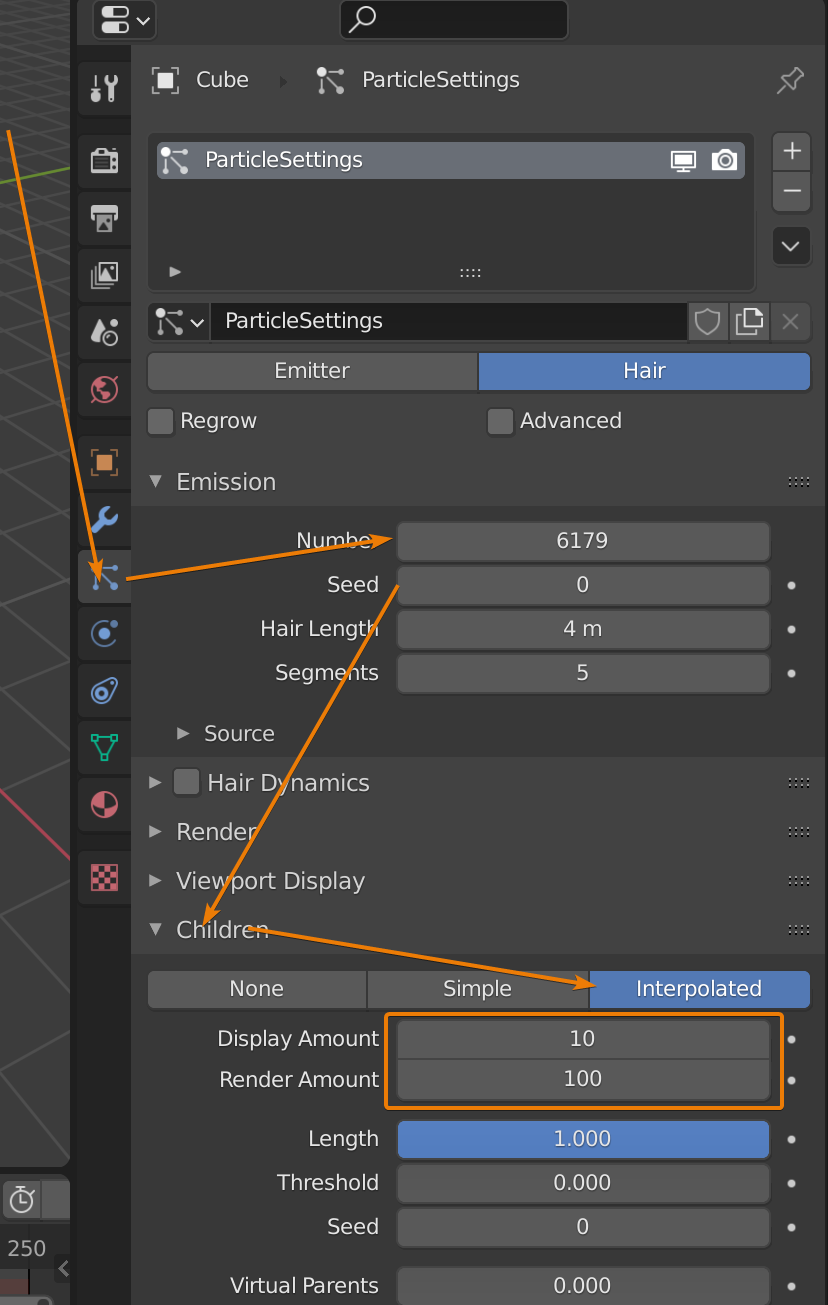
There are two types of child particles distributions. Simple and interpolated. Essentially, they are two different mathematical ways to distribute particles with different settings.
The simple child distribution uses the parent particles position as a starting point when emitting while the interpolated child particles emit between parents and can also themselves become virtual parents.
You can read more about child particles in the Blender manual here.
External content: Blender child particles
Personally, I tend to use the interpolated child particles most of the time as it gives more options and a more even distribution.
Before you turn child particles on, reduce your number of particles to one tenth or one hundredths of the original amount so that you avoid Blender freezing for too long and potentially crashing.
The default setting is to emit 10 particles per parent in the viewport and 100 in the final render creating a much denser distribution. You can change these values in the particle system child settings.
Once child particles are setup, we can also create a vertex group if we have some vertex density across our surface. Go to weight paint and paint the area that is in view of the camera.
Then in the particle system settings, find the vertex groups section and the density parameter and select your vertex group here.
This will limit the distribution of particles to only the painted area so that we don't have to emit unnecessary particles that don't contribute to the scene.
The simplify settings are excellent when we need a quick fix to a heavy scene. We can use the simplify settings to globally reduce memory usage in a few different ways. The simplify settings can be found in the render settings. To enable them tick the checkbox on the simplify section.
The simplify options are slightly different between Eevee and Cycles. But generally, they are the same. I cover the simplify section for Cycles as part of this article here, but we will cover it in this article as well:
Related content: Blender: A Cycles render settings guide
Here are the settings.
We can set a max subdivision for all objects in the entire scene. This is a quick way to reduce geometry to a manageable level if you know you have many objects with too much geometry.
The child particles slider is a percentage value from 0 to 1. Decreasing the slider to 0.5 will remove 50% of the child particles for all particle systems in the scene for example.
Texture limit allow us to set a maximum texture size through the entire scene. Any texture larger than this number will be downsized automatically. This however, is only available in Cycles.
The AO bounces isn't really applicable to memory optimization but if you want to know more about it you can read the article linked above.
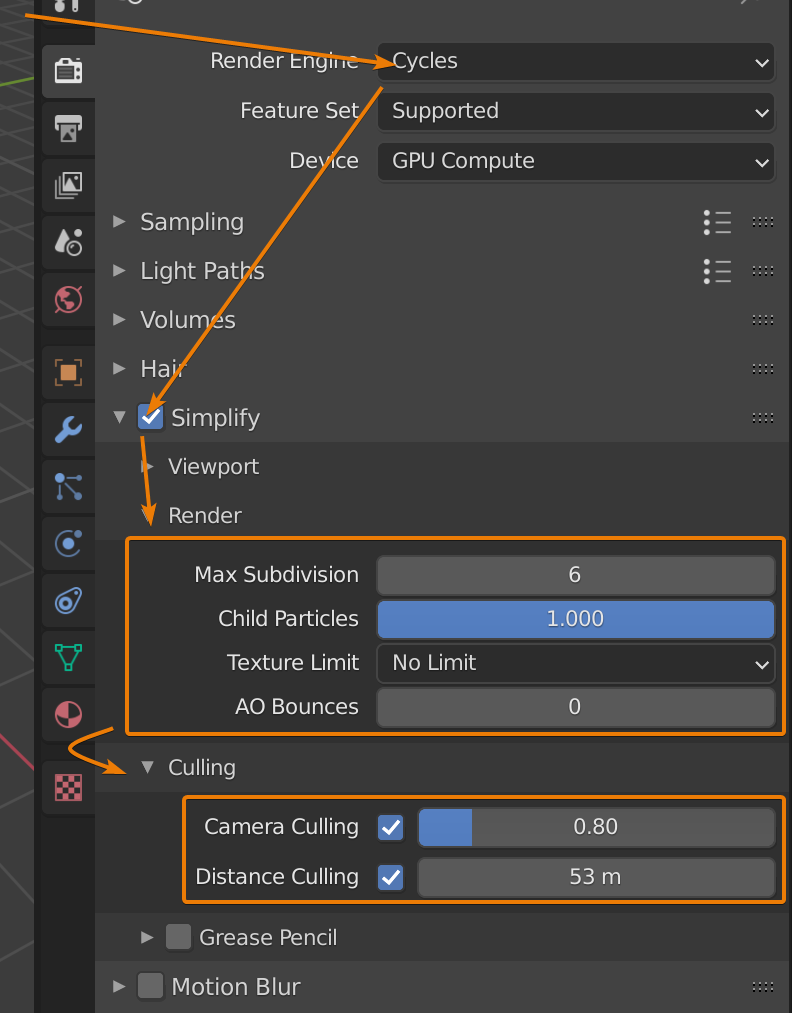
For Cycles we also have culling in the simplify settings. These are two checkboxes. Camera culling and distance culling.
Distance culling will take objects that are further than the distance specified away from the camera and not render them in the scene.
The Camera culling will disable objects outside the camera's visibility to the left, right as well as above and below. The distance is decided by the slider next to the camera culling option.
For an object to be considered for camera or distance culling though, we need to enable culling for all objects that we want to be affected.
We can do this on an object-by-object basis by selecting an object, go to the object properties and find the visibility section.
Here we find the culling subsection with two checkboxes. One for camera cull and one for distance cull.
To enable these checkboxes for multiple objects, we can select all objects we want to cull, then select one object last to become the active object.
After that, enable culling, right click each checkbox, and choose "Copy to selected". This will copy the specific setting from the active object to all selected objects.
If we are still struggling to get our scene down in size, we can try to render from the command line. This way, we don't need the scene open in the interface while rendering, saving us memory during render time.
To render from the command line, on Windows, browse for your Blender installation folder from the command prompt and write the following command:
blender.exe -b c:\path\to\blendfile.blend -f 1This will render the first frame in this blend file with the settings used from the blend file in question.
To render an animation, use the -a flag instead of -f. No parameter is needed.
You can find more command line options in the Blender manual here:
External content: Blender command line rendering options
The last option we will explore is simply to make sure that the system uses as little ram as possible elsewhere. We can do this by opening the task manager on Windows with Ctrl+Alt+Delete or Ctrl+Shift+ESC.
Sort your open applications by memory usage and see what software is using up the most RAM. Blender is likely one of them. If there are others like your web browser or other open applications, you can close them to free up memory during rendering.
There are quite a few considerations we can keep in mind as we create our scenes. Not only artistic, but also technical that can help us not only improve the memory usage, but also give us a smoother work experience along the way.
In this article we covered a handful of ways we can use to improve our use of memory and potentially render scenes that we previously was not able to.
Thanks for your time
