


The most common use of a particle system in Blender is to scatter objects across a surface. Many times, this is vegetation or debris that we scatter in our scene using a hair particle system.
Once the particle system is set up, there are a lot of parameters available to control the particle system. In the rest of this article, we will investigate what settings are important and how our emitter should be set up for the best possible control and experience.
Using a hair particle system is the most common way to distribute particles across a surface in Blender. We get a lot of control over where particles go.
We can add as many particle systems as we need, and we can have multiple objects withing each particle system through collection instances.
But the most important part to understand as you use particle system in Blender is to know what settings are important and how those work.
To start, always check advanced in your particle system. This gives us access to rotation parameters. From there, the sections we will focus on are these.
In the emission section, we control how many particles we want to have and a couple of basic parameters that tell particles are being placed on the emitter.
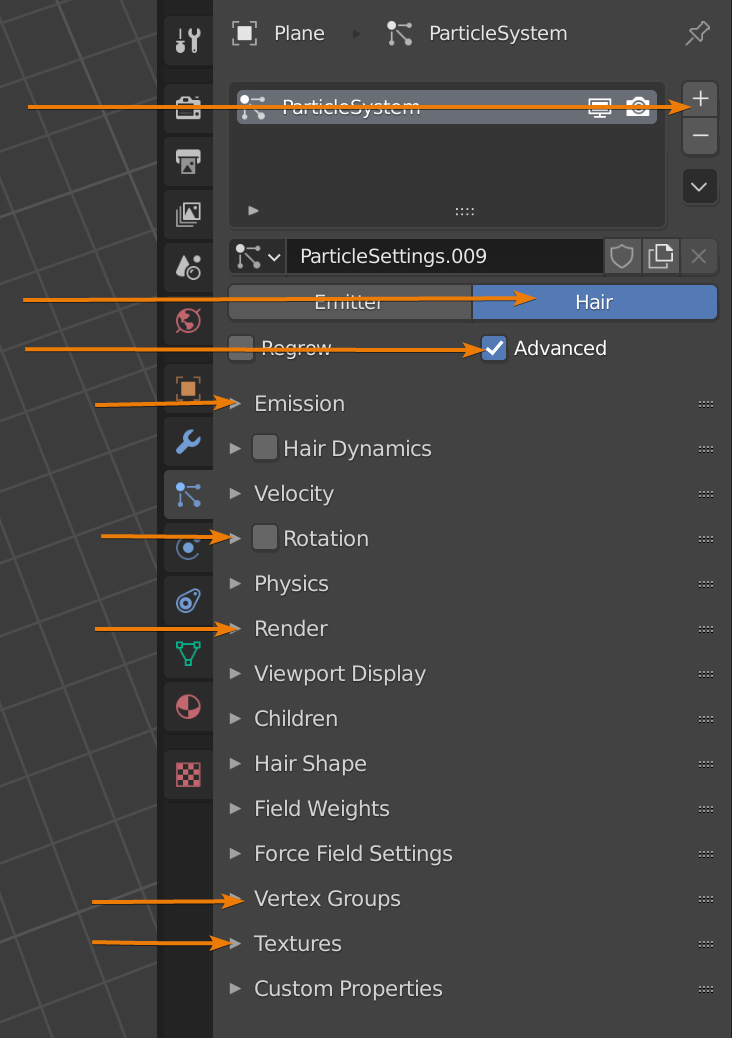
With the rotation section, we control the rotation of the individual particles.
In the render section, we have settings that connect our particle system with the object or group of objects we want to distribute with the particle system. We can also control the size of particles here.
In the vertex group section, we can select a vertex group that we have weight painted to tell how large particles should be in various places or where they should appear on the emitter.
This allows us to paint the exact spots where we want our particles.
If we don't want to paint manually, we can turn to the texture section and use an underlying texture that can drive the size and placement of particles procedurally.
To change the number of particles in our particle system, expand the emission section and change the "number" parameter. By default, this is one thousand.
For a nature scene, you are likely to have particles in the 10-100k range at least. It depends on what kind of environment you are creating and how you set up your particles.
Related content: How to create grass in Blender: The ultimate guide
We can also use the seed value just below the numbers setting to change the random distribution of particles.
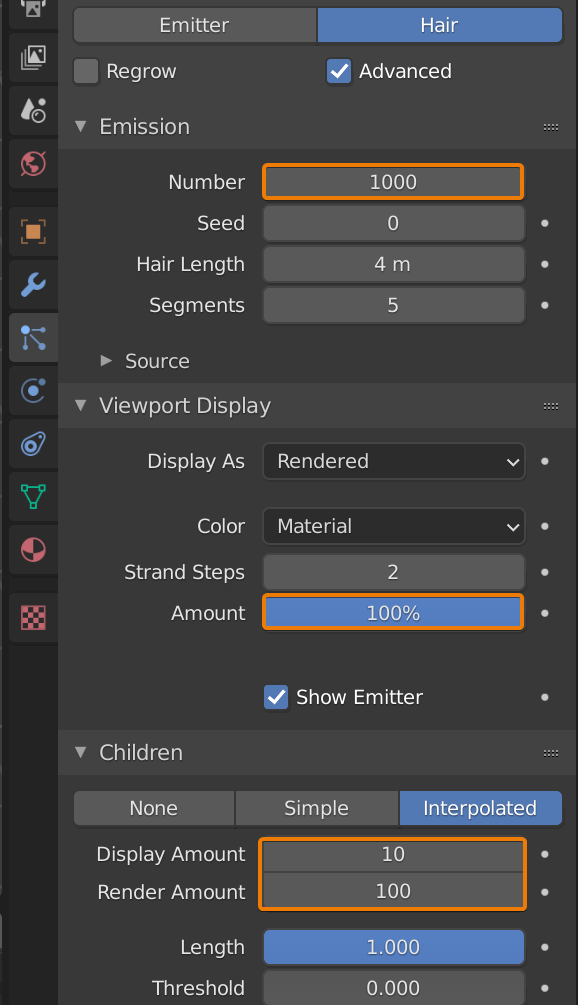
This is the only setting we need for the number of particles emitted. But we can also use children by going to the children section and turn on simple and interpolated. Personally, I find interpolated to give a better distribution.
For the longest time, I thought child particles were more performance efficient than just increasing the number of particles. But this is not true. If the total amount of particles is the same, the performance will be the same.
However, using children with interpolated can give a slightly more interesting distribution.
When using children keep in mind that there are two amount values. One for display and one for render. By default, there will be ten times as many children when you render than when you preview in the 3D viewport.
We can control the number of particles shown in the 3D viewport without using children by opening the viewport display section and decrease the amount and percentage value to increase viewport performance.
In the emission section, we have a subsection called source. Here we can set the underlying distribution of particles, or from what source we distribute the particles. By default, we distribute particles across the faces of our emitter.
When creating random distributions, we rarely need to change settings here. But let's say that we are trying to generate a city using a particle system, and each building is a particle. Then we need to have the particles distributed in a pattern following the streets.
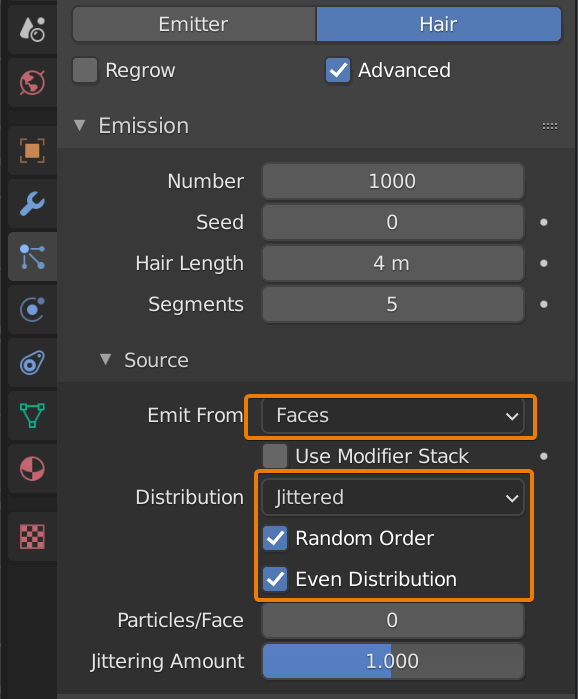
In those cases, we can create a separate object that we use as an emitter and line it up with the street. Then we can use vertices as the "emit from" in the source sub-section and set the number of particles to the same number as vertices on the emit object and disable random order.
This will allow to have one particle per vertex and exactly one particle per vertex.
So now we have a simple way of distributing particles in any order we want, as long as we create the emitter mesh to hold the particle system.
To control the rotation of particles, we use the settings in the rotation section. If you don't see it, check advanced just below where you select hair as the particle system type.
Check the checkbox in this section header to enable the settings.
Normally what we want is to distribute particles from the normal-tangent orientation axis. This is the direction that each face in the emitter is pointing.
So, the particle inherits the orientation of the face it is emitted from.
What you need to know here is that for your particle object, you need to rotate it so that whatever is supposed to point up is pointing in the global positive Y direction and apply the scale and rotation of the object using Ctrl+A and choose rotation and scale.
Related content: How and why do we apply scale in Blender?
The particle system in Blender considers the positive Y direction to be up when we use an object as a particle.

Once the object is facing the right direction and we apply the scale and rotation, we can use the randomize option in the rotation section to randomly change the direction we point the particles.
With the phase setting and phase random, we can change the rotation of each particle around its own axis.
There are multiple parameters that can change the size of our particles. For instance, the hair length parameter in the emission section or the normal setting in the velocity section.
Personally, I leave these settings as is.
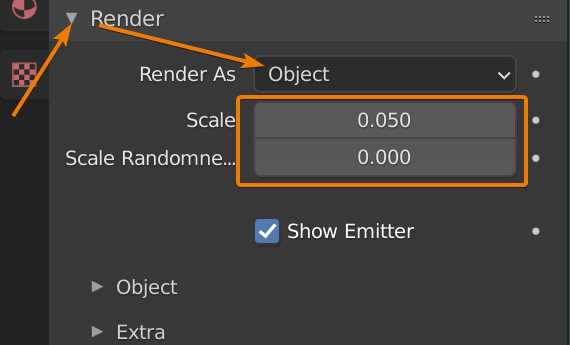
Instead, use the scale and random scale in the render section. This is just a preference, but it is convenient to have both a scale and random scale value accessible at the same place.
The reason for this many settings changing the same thing is that this kind of particle system is primarily meant for creating hair and it is built from the original emitter particle system, leaving some overlap between the particle system types.
So, we are really using an emitter particle system type that was rebuilt for hair particles, but then we use that to distribute objects instead. Therefore, some remnants are left at every stage of this development.
Instead of using a single object, we may want to use a collection of objects as particles. We can do this in the render section.
Instead of setting "render as" to object, change it to collection and in the source sub-section, select the collection in the "instance collection" slot.
This way we can have multiple objects distributed with the same particle system.
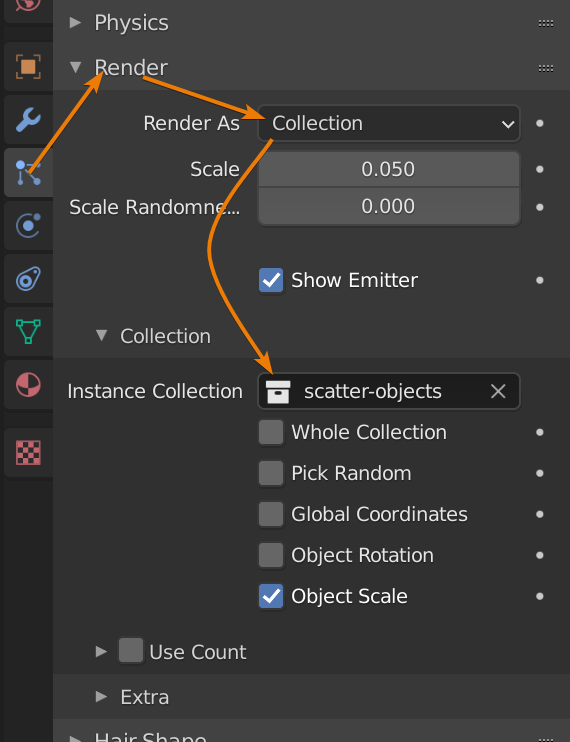
You can also check "whole collection" if you want the entire collection as a single object with the particle system. This way the complete collection will spawn as the particle every time.
If you want to have control over the ration between objects in the collection, you can check "use count".
For instance, if one object has a count of one and another a count of two, the object with a count of two will spawn twice as often.
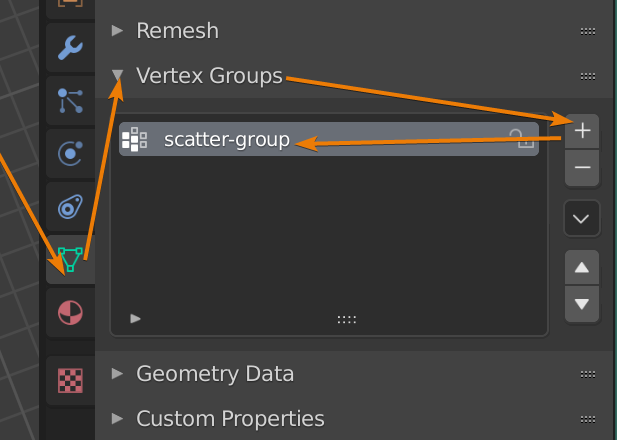
To use a vertex group with your particle system, expand the vertex group section in the particle system settings. Select the parameter you want to be affected by the vertex group and select the group for that parameter.
You can invert the effect of the vertex group by clicking the double arrow icon next to the vertex group slot.

Most often we use density, but also length. The density can be thought of as where on the emitter the particles go, and the length can be thought of as a multiplier for the size or scale of particles.
If you don't have a vertex group ready for use, we can create one and paint it however we like.
The data a vertex group contains is associated with the vertices on the emitter, so it is on the emitter we create the vertex group. Also, the mesh needs to be dense enough so that we have enough vertices to actually give a weight.
To paint a simple vertex group, follow these steps.
You can change the weight, radius, and strength in the 3D viewport header.
The radius is the size of the brush. The weight is what weight you want to give the area that you paint, and the strength tells how strongly we want to add this weight.
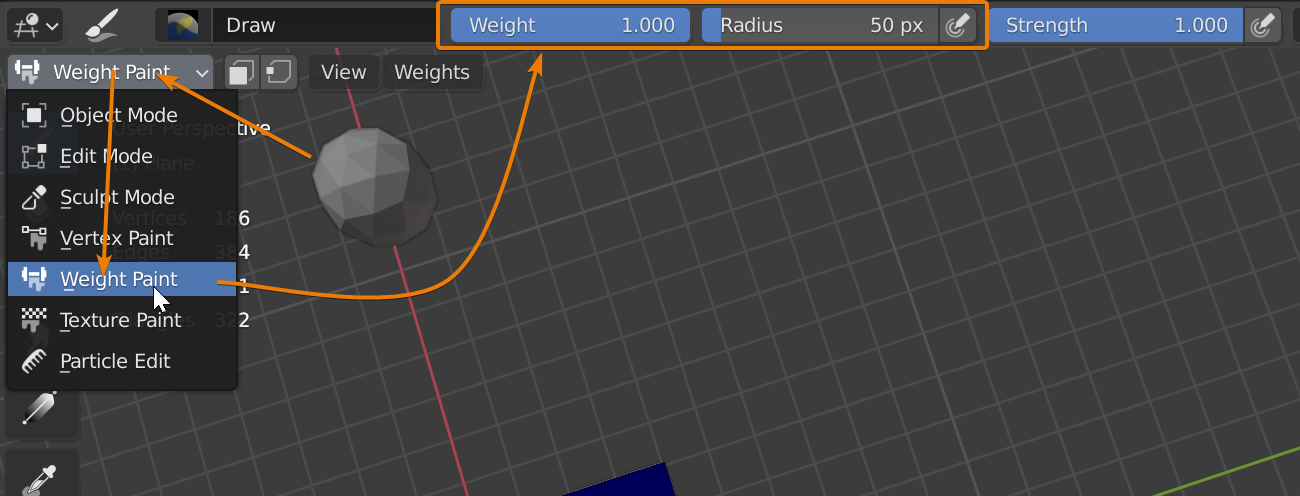
It is slightly confusing, so just make sure that the strength is one and change the weight and radius as you paint.
Once you are happy with your weight paint, go back to object mode and select the vertex group in the vertex group section in your particle settings to see the effect.
You can select the vertex group and still paint to see the particle system update in real-time. But this can become quite resource intense, so be careful if you have many or complex particle.
If we want to distribute particles in a certain pattern, we can use a texture to tell where particles go on the emitter.
Expand the textures section in your particle system settings and press new. The first slot will get populated by a texture. Double click it to rename it then click the texture tab in the properties panel or the icon in the bottom right corner of this section that looks like two sliders.
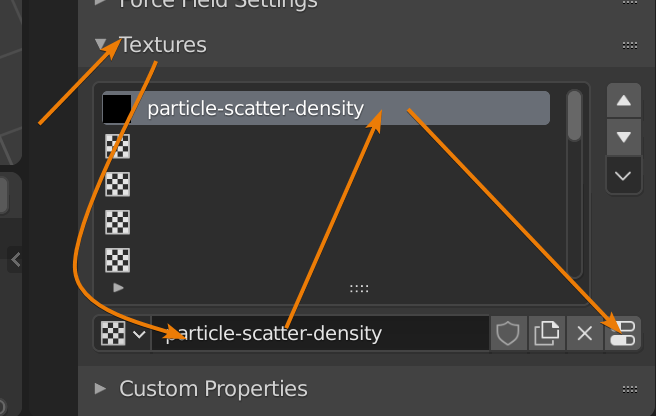
At the top of the texture tab, make sure that the texture type is particle system and that the correct texture is selected. If not, you are changing settings for the wrong texture.
By default, a texture type of image or movie is selected. If you have an image texture you want to use as a base, you can open it in the image section.
If you opted for an image texture, you may also want to go to the mapping section and select UV as the coordinates and select a UV Map.
Related content: The definitive tutorial to UV mapping in Blender
If you instead want to use a procedural texture, select the texture type from the drop-down above the preview.

For instance, you can use a cloud's texture, distorted noise or Voronoi to name a few. Each has their own settings to play with so that you can tweak the texture as you want.
Each texture type has a section named after the texture that has parameters that influence the algorithm, creating the texture and the color section that help you control brightness and contrast or use a color ramp to adjust the texture.
A value of one or white in the texture means full effect, while black means no effect.
To have the texture affect the particle system, expand the influence section. Check the parameters you want the texture to influence. For placing particles, select density and for the size, select size.
For example, if we use density, no particles will be placed where the texture is black, and the full number of particles will be placed where the texture is white. The gray in between will act as a falloff.
As we learned earlier, we can use multiple objects with the same particle system. The problem is that all particles in the particle system will share the same distribution.
If we want to create a nature scene, all the different objects won't have the same distribution. Some are bunched up in the shade while others are spread in dryer areas or more wet areas of the terrain. So, if we are emitting multiple groups of objects that have different distributions, we need to set up multiple particle systems on the same object.
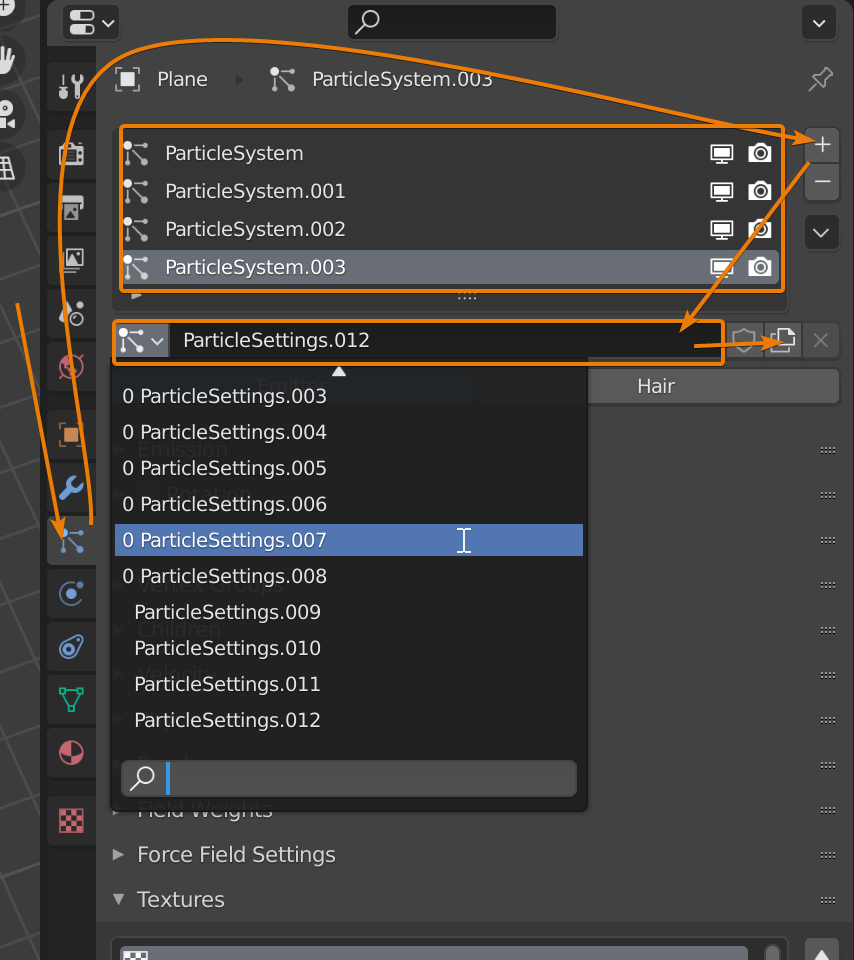
At the top of the particle system settings, click the plus icon to add another particle system to the list.
We can have as many particle systems as we want. You can control visibility in the viewport or for the final render by toggling the monitor icon for the viewport or the camera icon for the final render.
When we add a particle system, we also add a new set of particle system settings. In Blender there is a difference between the particle system and the settings used in it.
We could say that we have a particle system slot that is populated by a set of particle system settings.
We can have all our particle systems share the same settings, or we can either create completely new settings or duplicate settings from another particle system and use them as a template.
Just below the list of particle systems, there is a drop-down with particle settings.
You can select settings for another particle system and duplicate it using the icon that looks like two paper sheets on the right side of the drop-down.
This way you get a copy of the settings from your existing particle system so that you don't have to set it up completely from scratch.
But keep in mind that if you select other particles settings, any changes you make will affect all particle systems with these settings if they are not duplicated first.
When working with particle systems it is common that we run into problems with particles not behaving as we expect. Here are a few common problems and their solutions.
Emitter is hidden
A frequent problem is that the emitter is hidden. If this is the case, there is a setting in the render section of your particle system called "show emitter". Make sure that this is checked.
Particles are offset from the emitter
The particle system will match the particle position with the object's origin point. So, if the origin point is offset from the mesh in the object you use as a particle, the same will happen for the particle.
To move the origin, it is easiest to place the 3D cursor where the origin should be and then set the origin from the right click context menu to 3D cursor.
Related content: How to use the 3D cursor in Blender
Related content: How to center objects, origins and pivot points in Blender
Particles are rotated the wrong way
If particles are completely upside down, check and make sure that your normals are pointing the right direction. You can do this in edit mode. Go to the overlay menu in the top right corner of the 3D viewport and close to the bottom you will find the normals section.
Related content: How to use 3D viewport overlays in Blender 3D
Select the face normals and increase the size until you see lines coming out of each face. This line is pointing in the normal direction, showing what is the front side of the face.
If the line is pointing the wrong direction, you can flip the normals with Alt+N and choose flip. You can also choose to recalculate normals to have Blender recalculate the normals for you. The shortcut for this is Shit+N
Other rotation problems can occur if your particle object isn't pointing the right direction. The particle system considers the positive Y axis to be up when we use it as a particle. Rotate your object correctly and apply the rotation and scale with Ctrl+A and choose rotation and scale in object mode.
We have discussed the various parts of a hair particle system that we used to scatter or distribute objects across an emitter. This is the most common way to distribute objects in Blender.
In version 2.92 there are also now geometry nodes that we can use for a similar purpose, but that is a whole other workflow. For simpler distribution of particles, you can also try the scatter object add-on built into Blender.
Related content: Ditch particles, use the scatter objects add-on in Blender
Thanks for your time.
