


A straightforward way to create a simple animation from your scene in Blender is to move the camera through it. This way we need only worry about animating a single object, the camera.
To animate the camera in Blender, follow these steps:
These are the basics of animating the camera. Let's look at some ways we can improve our basic setup and learn how we can animate the camera in different scenarios.
Related content: How to move the camera in Blender
Let's go over the animation steps laid out in the introduction in a little bit more detail. Also, you can watch the video below for a quick demo on the basics of animating the camera.
First, what is a keyframe? A keyframe is a frame that we give a specific value for a specific property. In the steps above we set a location and rotation for our camera object for a certain frame.
Any frame can be a keyframe for any value. The magic happens when we create a second keyframe.
The value we keyframe will be interpreted for any frame in between those two keyframes. Slightly changing value for each frame and as we playback. We jump through each frame changing the values ever so lightly until we end up at the correct value when we land on the next keyframe.
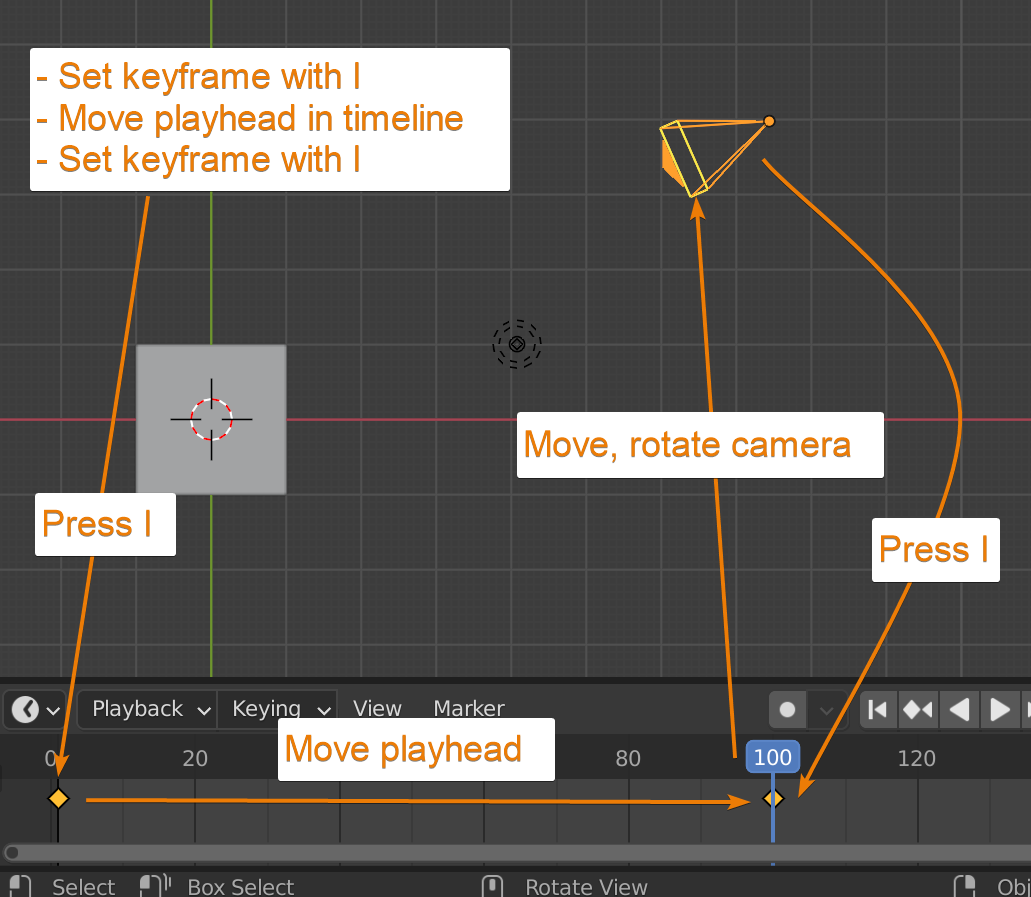
We can either press "I" to open the "Insert keyframe menu" in the 3D viewport with our object selected to get a list of common values for our object to keyframe. Or we can animate almost any value in Blender by hovering the mouse over it and press "I" to keyframe the current value for the current frame.
In case of the camera, we use the location and rotation properties that is shortened as LocRot in the Insert keyframe menu.
Once we have the first keyframe set we need to move to a new frame later in the animation and change the keyframed value to something new. Then insert a new keyframe for our property.
As we create more keyframes, a dot for each keyframe will appear in the timeline. These dots are yellow when selected and white while deselected.
Related content: 5 cool camera tricks in Blender 2.80
We can manipulate them to change the position of our keyframes using similar commands as when working in the 3D viewport. Here are a few shortcuts.
| Timeline command | Shortcut |
|---|---|
| Box select | Click and drag across keyframes |
| Select/deselect all | A or Alt+A |
| Move selected keyframes | G |
| Change frame | Click and drag playhead |
| Play animation | Space or Shift+Space |
To get a view of the animation, press zero on your numpad or the camera icon in the top right corner of the 3D viewport to go into the cameras point of view before you play the animation.
Another way we can animate the camera using keyframes is by turning on auto keyframe. In the timeline there is a circle icon close to your play controls.
We can change values, like move and rotate the camera, and Blender will automatically insert keyframes whenever a value changes on the current frame.
Related content: Blender shape key basics guide
Just be careful not to play the animation and move something at the same time when auto key is active, or you will insert a lot of keyframes at once.
In the introduction, we briefly touched on the fact that we can animate both the rotation and the location of the camera. However, you may have noticed that the camera will rotate the shortest path between keyframes.
If we want a specific rotation of the camera as we animate it through the scene, we can setup a target for the camera to look at. We can then either animate the target or leave it in place if we want the camera to look at a fixed point.
To setup the camera so that it always looks at a certain object follow these steps:
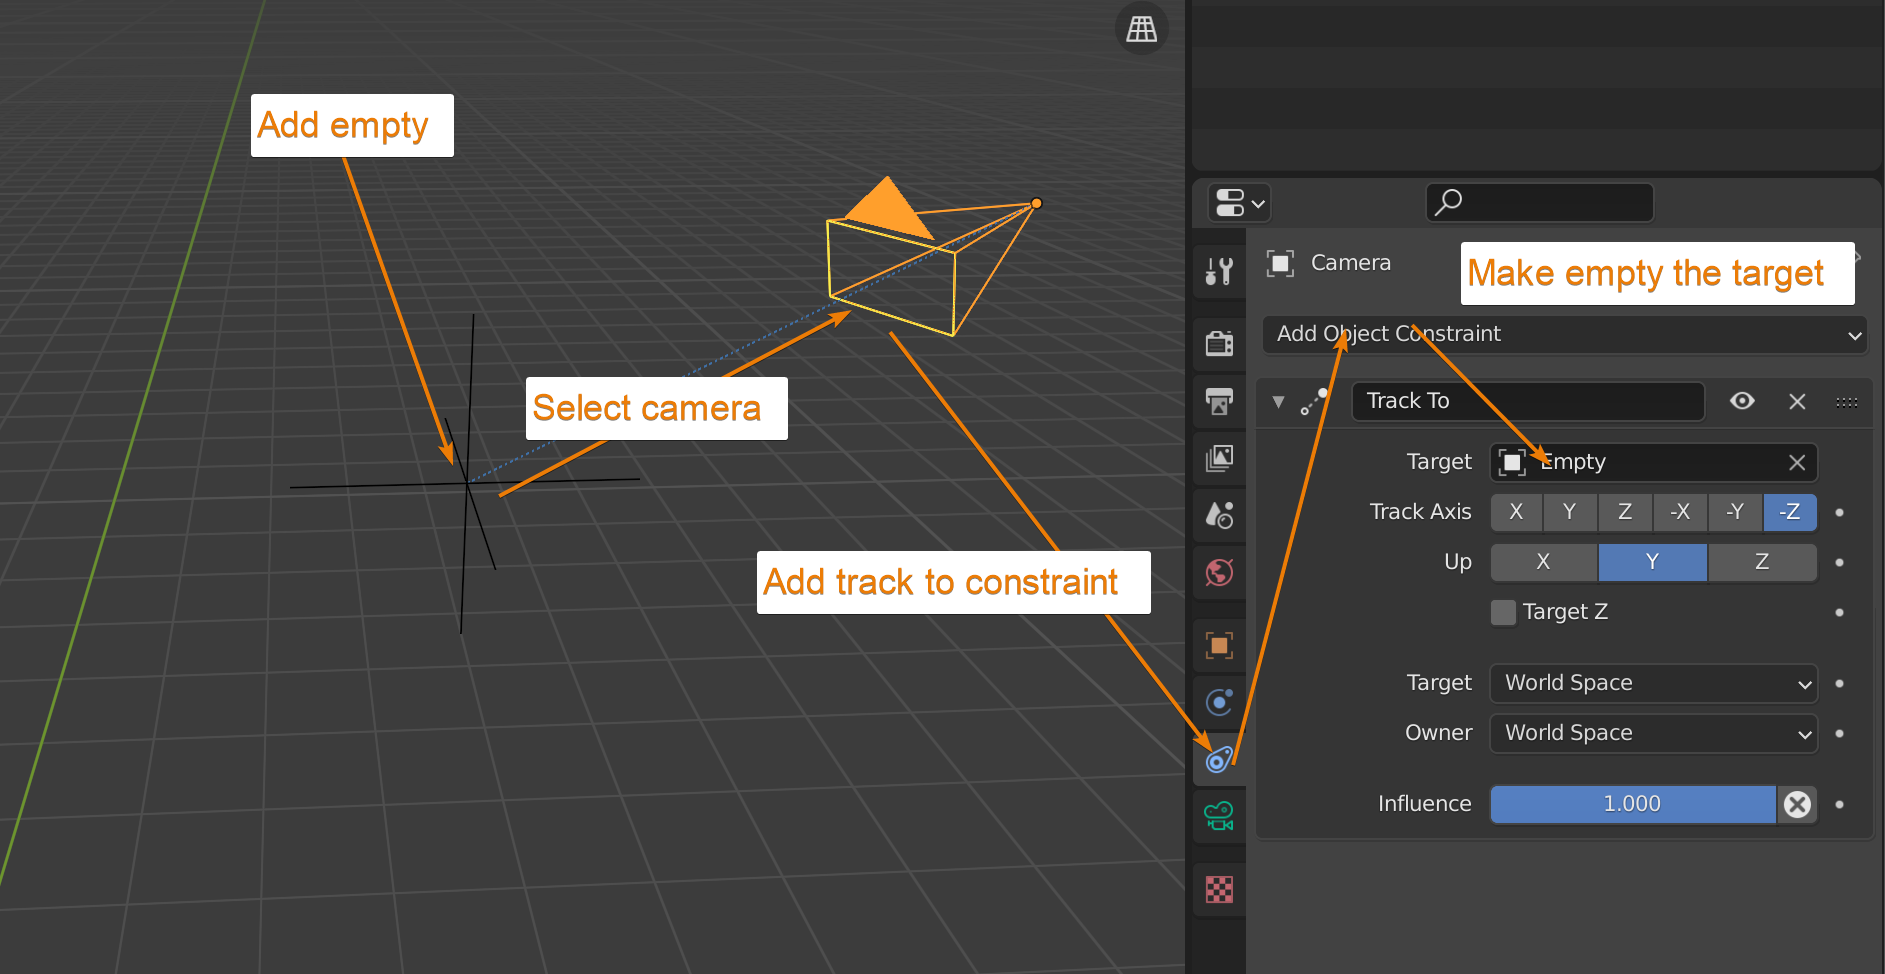
With this setup we can now animate the position of the tracked object and the position of the camera. The rotation for the camera will be automatically calculated and adjusted to always point at the target object.
Instead of setting up keyframes along predefined positions, we can tell the camera to follow a path and animate a single value that decides how far along the path the camera moved. Follow these steps:
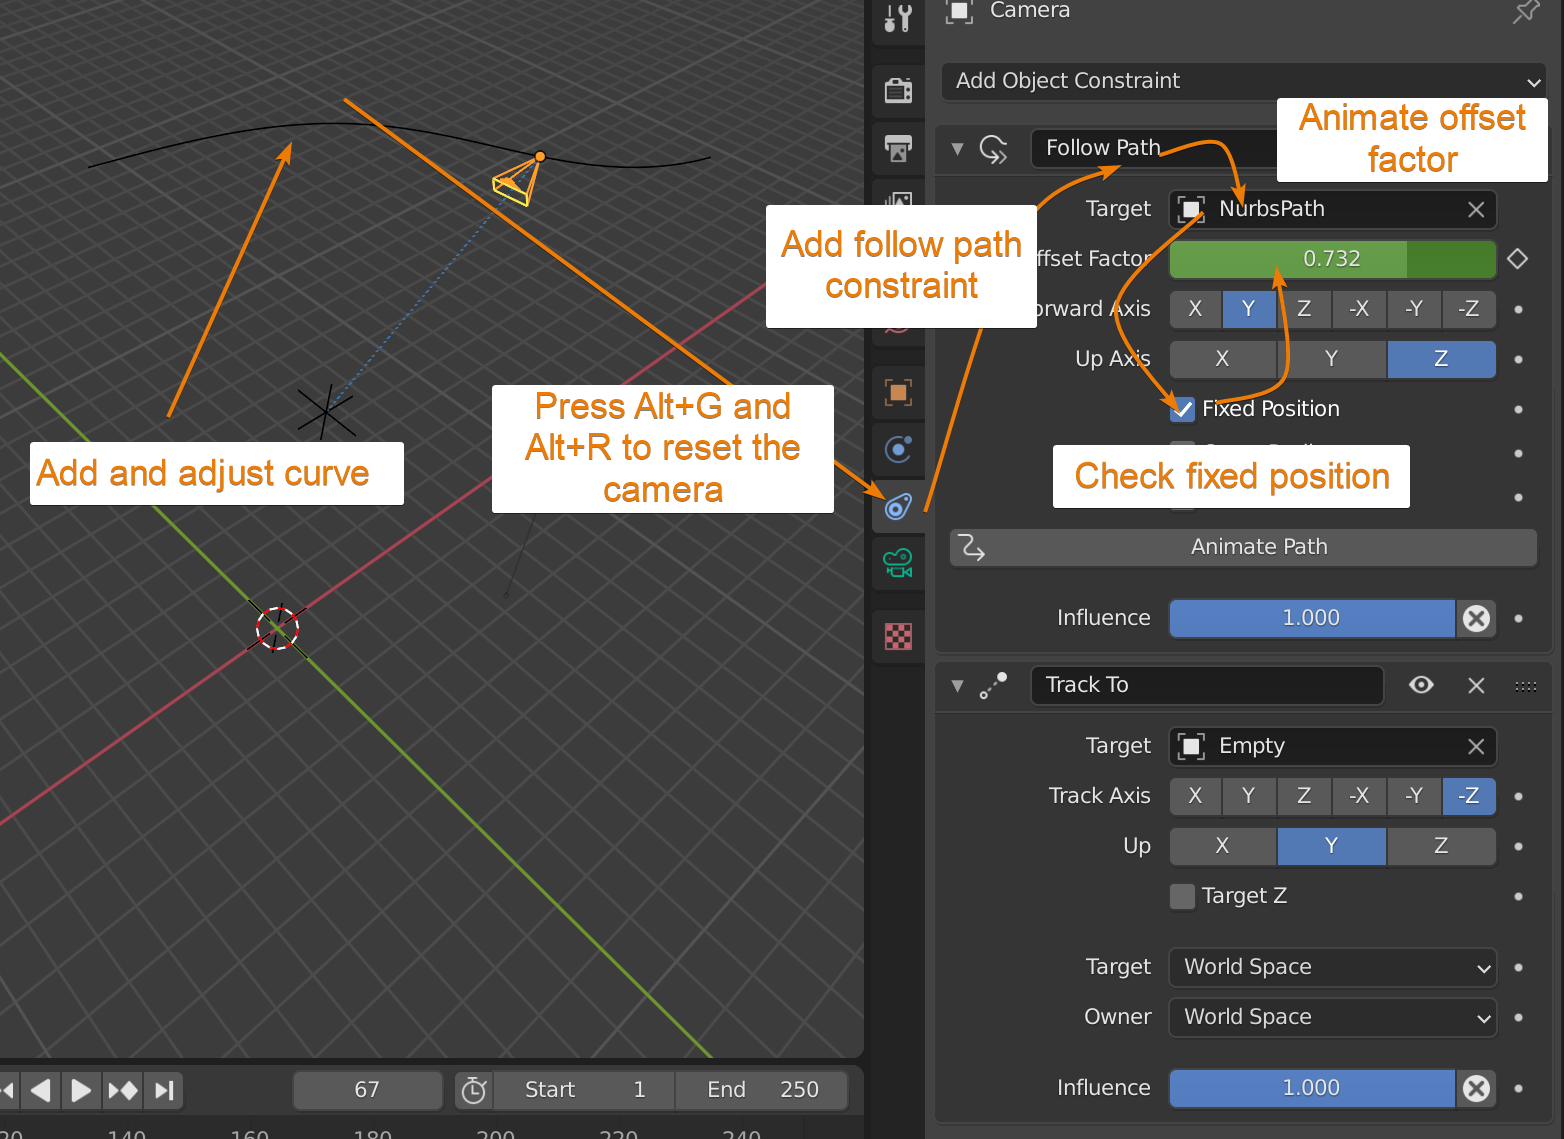
If you are combining animation along a path with a track to constraint as described above, make sure that the track to constraint is below the follow path constraint in the constraint stack.
If you have a problem where the camera won't line up with the curve correctly you can try to rest the location and rotation of the camera by pressing Alt+G and Alt+R.
By default, Blender will create a Bezier curve interpolation between keyframe. This means that the animation will ease out and ease in when getting closer to a keyframe to create softer transitions.
Sometimes though, we want a consistent motion. For example, we may want to have a consistent movement forward and towards the end we want the animation to fade to black instead of easing in to the next keyframe before the scene ends.
We can make the interpolation between keyframes and thereby the speed consistent by changing the default Bezier interpolation between keyframes to a linear interpolation. Follow these steps:
There are a couple of ways we can switch cameras during animation.
We can fake the camera switch by placing two key frames on adjacent frames. This way the camera will instantly jump from the first to the second position and appear to have no transition.
This technique can be used on simpler animations. But if we have multiple camera switches, we may want to setup a new camera for each shot, animate and render them separately and then combine them in the video sequence editor or in an external video editor.
This way we can also have different camera settings for each angle or shot. We can then use the VSE (Video sequence editor) or an external video editor to edit the footage together.
To create multiple shots within the same scene using multiple cameras we need to set them all up, but our scene only has one active camera. This means that as we setup each camera animation we need to switch the active camera to the one we are currently animating.
We can do this in the properties panel. Find the scene tab and go to the scene section. Change the camera to the one you intend to animate.
Animate each camera following the instructions in this article.
Once all cameras are setup, we can render each camera by changing the active camera and render the animation for each in turn.
Between each rendering we need to consider a few things. these are the most important:
When rendering animations, Blender save the result to disk either as a movie file or as an image sequence. These files are named after the rendered frame number to the same folder by default. So, if we don't move or rename files between rendering each camera, we run the risk of overwriting the previous render.
To change the output folder for animations, go to the output properties tab in the properties panel. Find the output section and change the folder located at the top.
Here we can also change the file format. If an image file format is set, each frame is stored as an image and a movie format will create a single movie file.
If we want to save all camera animations in the same folder, use your file browser to rename the rendered files before you render the next camera.
All shots may not be the same length, in this case you can also change the frame range between each camera render. You can do this in the output tab as well. Just this time go to the dimensions section and find the frame start and end values.
Next bring in the footage into your favorite video editor and edit the shots together.
In this article we covered how we can animate the camera in various ways to create some simple animations.
We also looked at some considerations we need to take into account if we want to animate multiple cameras.
Thanks for your time.
