


Sometimes a scene overflows with geometry thanks to poor use of the subdivision's surface modifier. It's hard to control and can become a performance hog as we work on an increasingly complex scene.
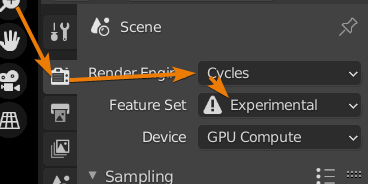
Adaptive subdivision surface dynamically changes the subdivision level of objects based on the distance from the camera. We can use it in Blender with Cycles by turning on the experimental feature set and enabling adaptive subdivision on the subdivision surface modifier.
Let's dive into how we can use and set it up. What benefits there are and when to avoid it.
Adaptive subdivision surface is a Cycles only feature that has been part of the experimental feature set for years. In my experience though, it is rock solid, and I have experienced few issues with it.
Here are the steps to set up adaptive subdivision surface.
We have now activated adaptive subdivision surface on the object with the modifier attached, and it will subdivide according to the distance from the camera.
On the modifier there is a new setting called dicing scale. A higher dicing scale will give a lower resolution.
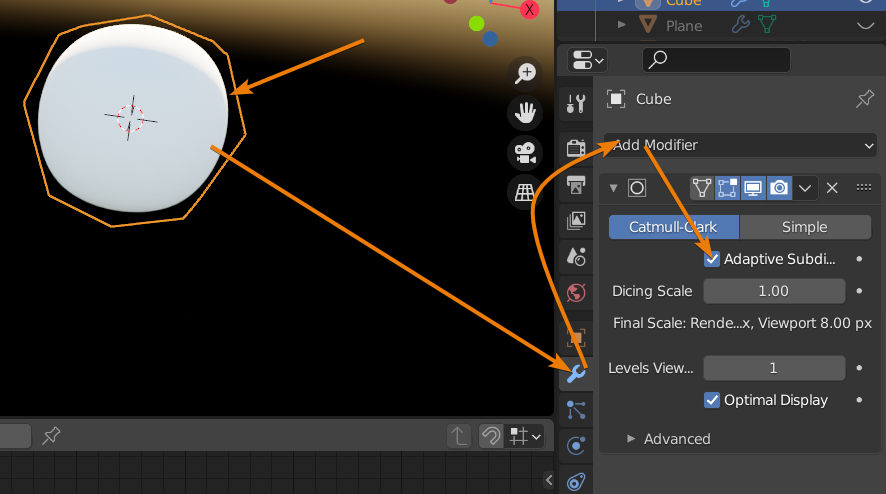
Notice also how the dicing scale is different in viewport and for rendering. There are additional settings. In the render settings tab, go to the subdivision section.
Related content: Blender: A Cycles render settings guide
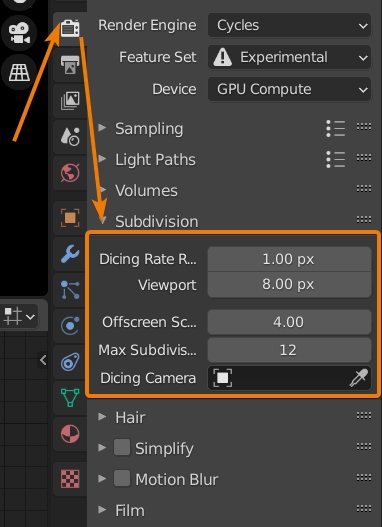
We have a dicing rate for render and viewport. If you want to have the same resolution in the viewport as in the final render, set these parameters to the same value.
The offscreen scale is a multiplier of the dicing rate for any object that is outside the camera view. A lower value will give more detailed reflections and shadows on anything that is within the camera's field of view.
We can set this to a higher number if we don't depend on objects outside the camera's view to create effects.
The max subdivision is there to give us a roof that we can't go beyond. When geometry has been subdivided this number of times, it can't be subdivided further, even if the dicing scale would allow for more subdivisions.
The dicing camera is the camera used as a reference for continued tessellation when creating animations. You can set this to another camera while your primary camera moves through the scene to avoid the subdivision or tessellation to change between frames.
To learn how much tessellation is going on with our adaptive subdivision surface set up, we can test it using a simple material using the wireframe node like this.

Blender will interpret this setup like this. They are essentially the same.
Related content: The complete beginners guide to Blender nodes, Eevee, Cycles and PBR

The resulting output looks like this on a cube with adaptive subdivision surface.

You can see that adaptive subdivision uses a lot of geometry. This is with the default viewport dicing scale of 8. Let's look at how the subdivision change over distance from the camera using planes.

With the camera on the left side, you can clearly see how the subdivision gradually decrease as we move further away from the camera.
To see this effect from an outside perspective like this, first enter the camera by pressing number pad zero. Then go into rendered preview mode and Blender will calculate the geometry.
Now you can move the viewport camera away from the initial position and the adaptive subdivisions won't be recalculated until you exit and re-enter rendered viewport mode.
Now you can tweak the dicing scale, move in and out of rendered viewport mode until you set it to a level that suites your needs.
A very common use of adaptive subdivision surface is to combine it with shader level displacement to create highly detailed geometry.
Related content: How to use displacement in Blender
Here is a simple example suing a noise texture as displacement.
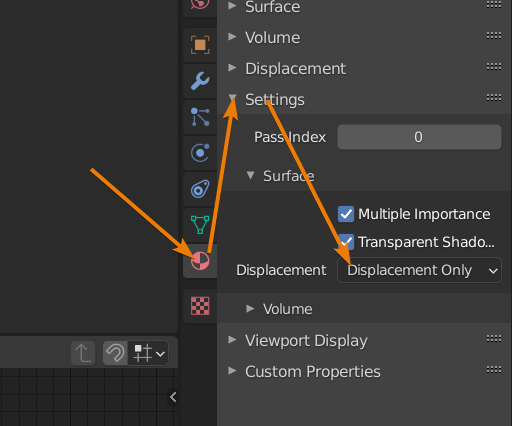
First, we need to enable displacement in the Cycles shader. We do this on a per-material basis.
Select your object, go to the material tab and select the material you want to use displacement on. Then go to the settings section and find Displacement.
By default, it is set to bump only. Change it to displacement only.
Now we can use the displacement socket on the material output node as actual displacement and together with the adaptive subdivision surface we get very fine detail.

Using a regular cube with the node setup above and adaptive subdivision, we get this result.

I used the sky texture to light the scene and set transparent background. No denoising and 600 samples to preserve more detail.
On surfaces such as a forest floor where we may need a lot of detail close to the camera, adaptive subdivision together with shader level displacement make a great team.
We get the detailed close up while we don't have to spend computer resources on geometry further away that we can't see that clearly, anyway.
Related content: Memory optimization for rendering in Blender
It is a very elegant solution where we direct resources to where we need them.
The downside is that it is only at render time we calculate the adaptive subdivision. We can't see a preview in any other mode than in rendered preview and the final render.
Being without a proper and flexible preview is always a downside, since it makes it harder for us to know what we are doing.
This is also why we need to set up a material to test the tessellation so that we can dial it in correctly.
We have learned how to set up and use adaptive subdivision surface. It allows us to use a lot of geometry and add very fine details together with shader level displacement. Also known as micro-displacement.
It is also more efficient than using regular subdivisions, but we need to be careful so that we don't abuse it or it may backfire on us and actually become taxing on our resources.
Thanks for your time.
