


The light coming from the sky is often one of the primary light sources. In Blender terminology, we rarely hear the word skybox. Instead, we use phrases like world material or environment, but they are all the same thing.
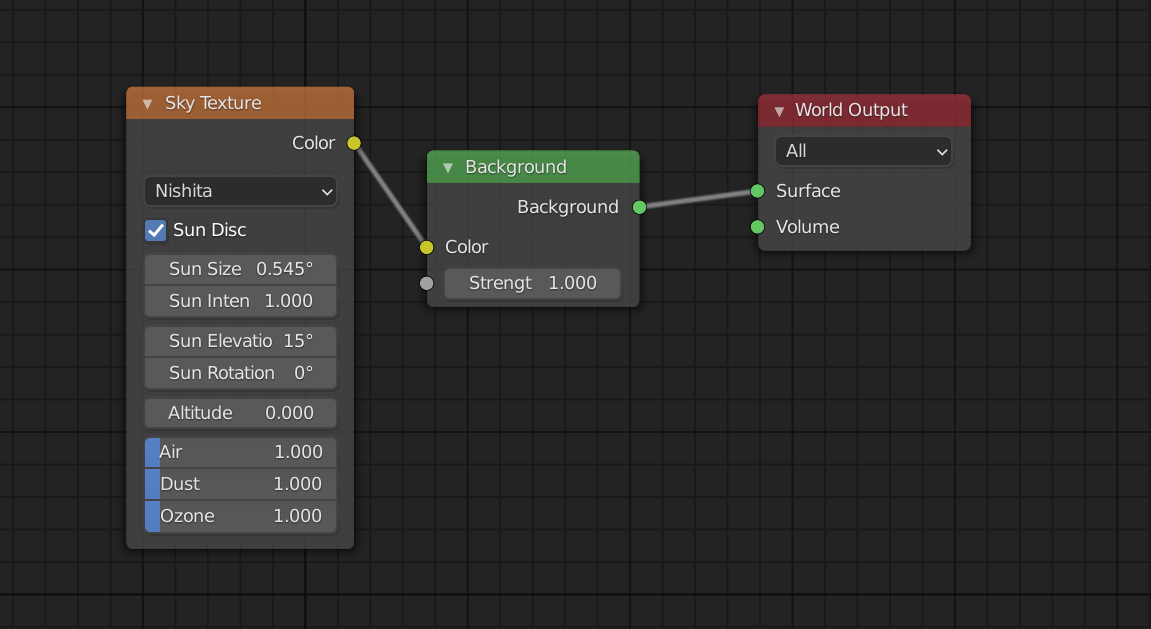
To set up a sky texture, go to the world material tab, expand the surface section and press the yellow dot next to color. Choose sky texture from the list. For Eevee, change the sky type from Nishita to Hosek/Wilkie or Preetham as Nishita isn't supported in Eevee.
In the rest of this article we look at adding a sky texture through the node editor, how to configure it and animate it. We will also briefly cover adding an hdri image as an option.
Related content: Blender: lighting basics tutorial
In the introduction we looked at how to quickly add a sky texture to light our scene through the properties panel. The interface in the properties panel has the same data as the node editor. only presented in a different way. Normally, we use the node editor instead, since it gives us much more control and a better overview.
To set up the sky texture in Blender's node editor, follow these steps:
Related content: The complete beginners guide to Blender nodes, Eevee, Cycles and PBR
Related content: Blender viewport shading guide
If we don’t want to use the node editor we can use the properties panel to setup a sky texture as well, just like we did in the introduction. Follow these steps:
It is a different interface, but the result is the same.
I would encourage you to use the node editor since that is what you will use most of the time if you dive into learning how to set up and use materials.
We have three kinds of sky textures.
Each of these are mathematically generated sky textures that use different algorithms. Each type has it's own settings we can use to change the look of the sky.
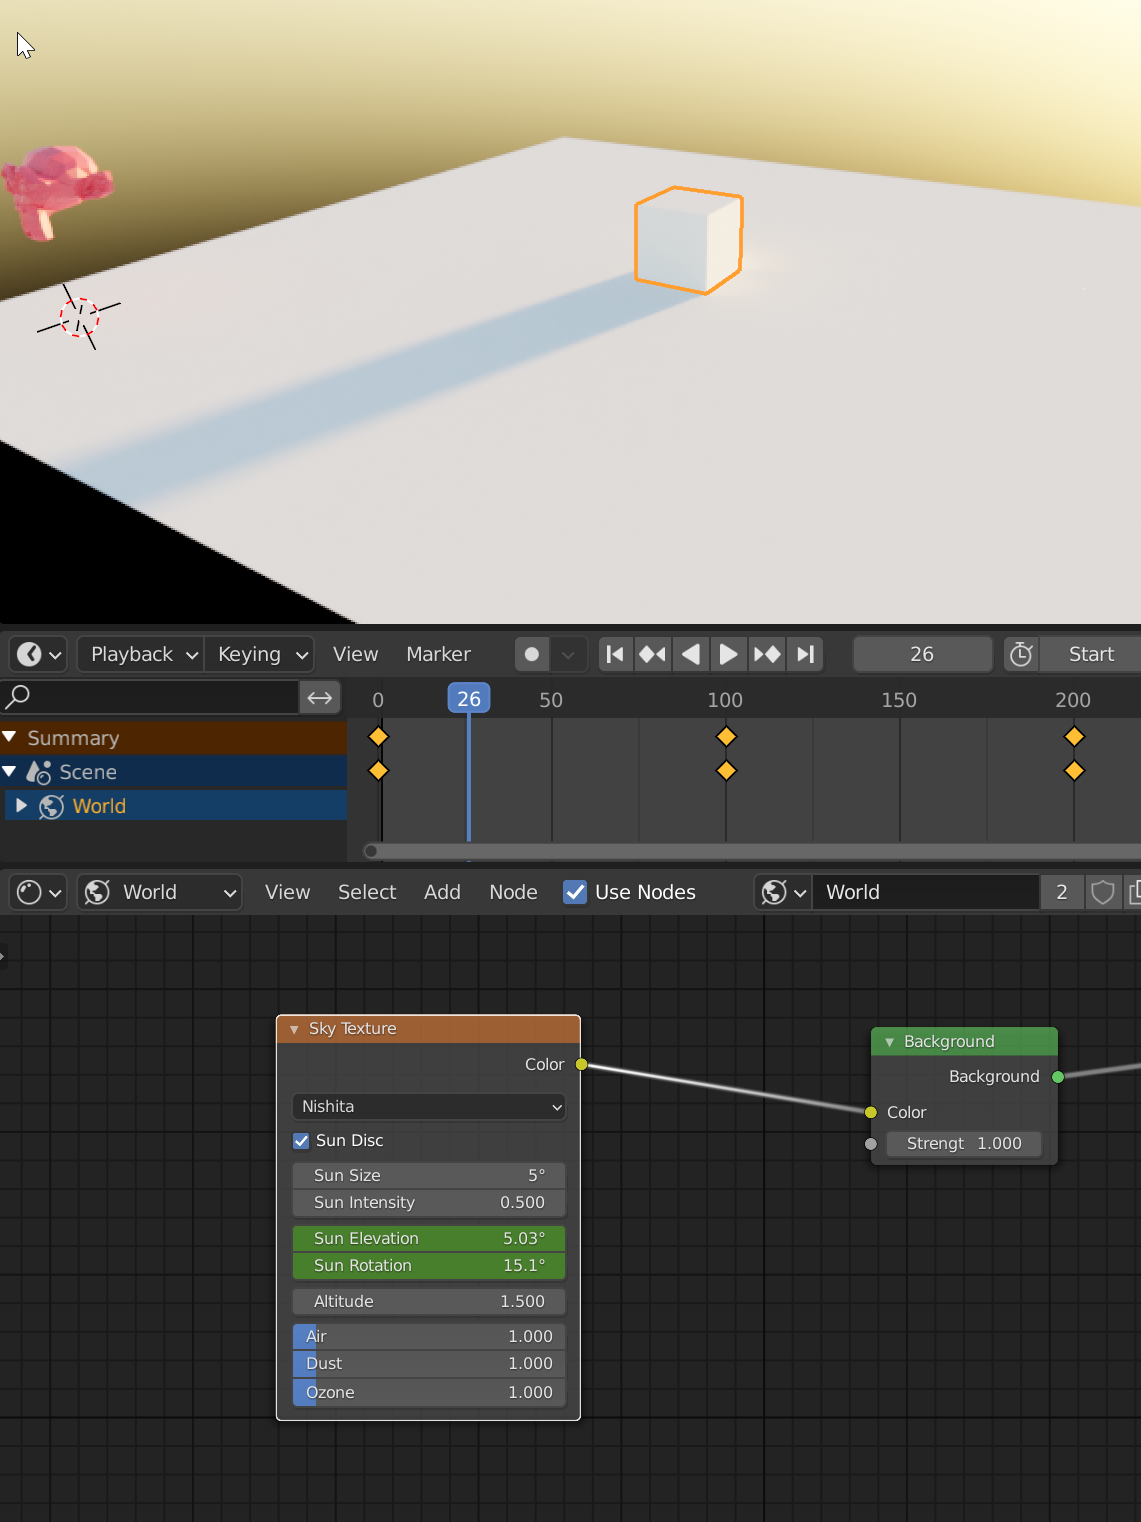
Nishita is the only sky texture that only has numerical parameters. The other kinds have a vector input we change by draging the interface to change the position of the sun. While these vectors can be animated, Nishita is easier and more precise.
The Nishita sky texture has no inputs. We can control the parameters by using drivers but not with other shader inputs.
The first setting is Sun Disc. This toggles the direct sunlight on or off. Effectively also removing Sun size and Sun intensity. But we can still use sun elevation and sun rotation. The result is an overcast sky eliminating any sharp shadows from the sun.
While the sun disc is active, the sun size will soften the shadows the bigger the value, while the intensity will intensify the contrast between light and shadow. So if you don't want to turn off the sun direct light completely, you can increase the size and decrease the intensity for a softer look. Something that is often desirable.
The rotation and elevation control the sun position in the sky by rotating it and adjusting the height. This also have an effect on the color of the rest of the sky.
The rest of the parameters have to do with the atmosphere rather than the sun itself. The altitude changes how high above the earth surface our scene is perceived to be.
With a higher altitude value we go from a warm indirect light to a much cooler blue indirect light from the atmosphere, just like if we were approaching space and the ground has less of an effect.
Dust will darken the lower part of the atmosphere, making it appear more and more as if there is a layer of dust in the air as we increase the value.
And last, with Ozone, the higher the value, the more saturated the blue sky will be. With a high altitude and Ozone value you will get an almost complete blue skybox.
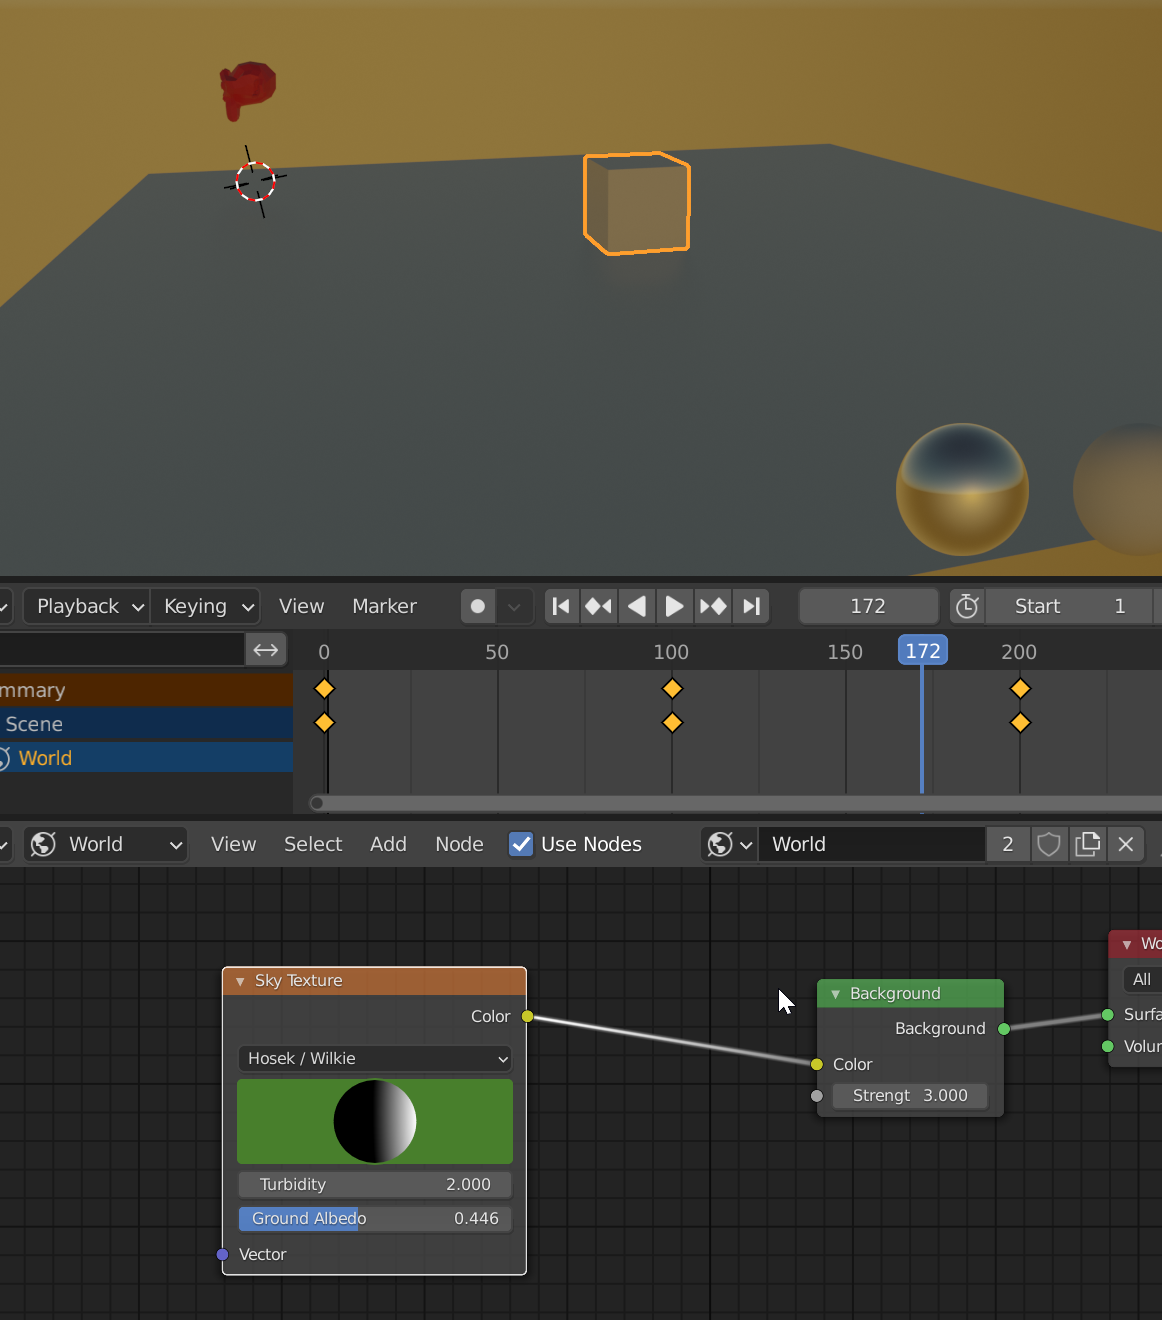
Hosek-Wilkie is supported in both Cycles and Eevee. It has three settings.
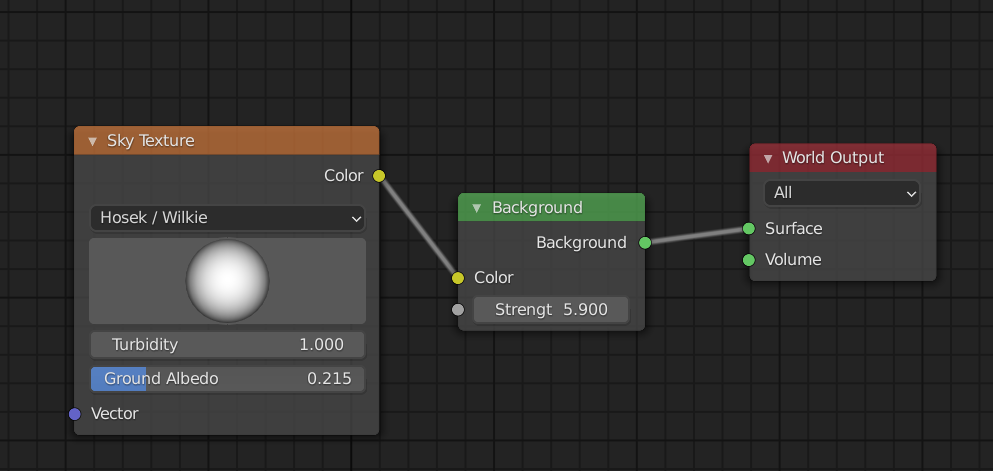
We can click and drag the orb interface to change the direction of the light.
Both Hosek-Wilkie and Preetham have a lot fewer settings than Nishita. But both use the term turbidity. Turbidity is a term describing how transparent something is. So, my understanding is that turbidity is a way to tell how many particles and how much smog there is in the air. But they implemented it differently. In Hosek-Wilkie there is a color shift from a more light blue and white to a green-brown ish color across the sky dome.
To decide what value to use, I usually think of what feeling I want to convey for the scene. A higher turbidity would give more of a sickly atmosphere telling the viewer that something is not right. Perhaps for an urban scene with high pollution.
A low turbidity may convey a more fresh and free feeling.
The ground albedo changes the tone of the ground to a more pastel while keeping the underlying color from the turbidity. It can often give a more cartoony and light feeling.
For preetham we also have the vector input tool to change the direction of the light. Preetham is much like the Hosek-Wilkie sky texture with a high ground albedo value. It has a kind of pastel feeling to it. But be careful with edge values in both the vector rotation widget and the turbidity.
With a turbidity lower than 2 you can get some quite weird results. For instance, at 1.6 I get no light at all for my testings and a value of 1 seem to flip the world upside down. So keep it above 2.
Also, rotating the vector input too much will give you highly saturated colors either intense blues or yellows. This can be good to keep in mind if you intend to animate since you could cross a value that destroys the colors for a frame or so. It could be better to stick with Nishita or Hosek-Wilkie.
Personally I rarely use Preetham, but occasionally it can be useful in Eevee since it is supported there.
One benefit with the sky texture over a hdri image is that we can animate the parameters. By animating the sky texture we can create a time lapse, making the sky change over time. The easiest sky type to animate is the Nishita sky texture because here we only deal with parameters and not the vector. The downside being that it is only available in Cycles.
With Nishita, the easiest way to get started is to animate the sun elevation and rotation values. Make sure that you have a 3D viewport, the shader editor and a timeline editor available in your interface and follow these steps.
If you now play the animation, it is likely that you won't see what happens because Cycles can't render the frames in real-time. Instead, we need to render a scene. Press Alt+F12 to render an animation from the camera.
Related content: How to move the camera in Blender
Related content: How to render in Blender
The finished animation is stored in c:\tmp\ by default.
With Preetham or Hosek-Wilkie we can animate the sky by moving the orb.
To preview the animation, switch to Eevee and press play in the timeline editor.
To set up an hdri as the world material in Blender, follow these steps:
In Eevee, we consider the light coming from the environment indirect, and therefore does not cast shadow. For any shadows to appear we need to bake the lighting using an irradiance volume.
Related content: Eevee lighting interiors
You can find free hdri images to light your scene here:
External content: HDRIHaven.com
This is a common error for beginners.
There are three types of sky texture modes on the sky texture node in Blender. The default, Nishita, is not supported in Eevee and instead produce a white sky. To solve this, switch from Nishita to Hosek/Wilkie or Preetham instead or switch your render engine to Cycles. All sky texture types are supported in Cycles.
We have now covered how to set up and configure a sky texture in Blender. We looked at most settings for the sky texture types and also covered how to set up an hdri as an alternative.
Together with emission shaders and light objects, the world material covers all our ways to light. Sky textures is then one part of how we can use the world material or skybox. Just like with texture nodes, we can further expand how the world material should behave with additional nodes.
Related content: Blender: lighting basics tutorial
Thanks for your time.
