


Emission Shaders in Blender are a great way to add more detail and realism to your projects and renders. This article would be helpful for those exploring emission shaders for the first time, and can also be very helpful for more experienced users to understand more about the emission shaders and different ways they could be used to add more interest to your scene.
An emission shader is a shader that you can add to objects and materials to make them emit light. You can add emission to an object through the Material Properties of the object or by accessing the Node Editor through the Shading Workspace, and adding an Emission Shader.
Continue reading to learn more about how to use an emission shader, as well as diferent ways you could use the emission shader in your scene to create lighting patterns and more realistic lighting.
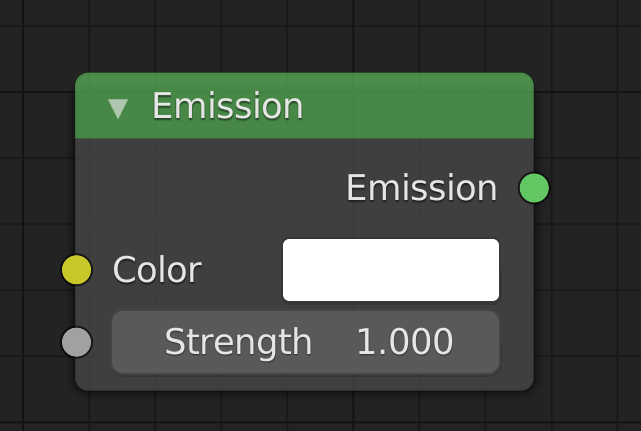
An emission shader is a material component that allow the material to emits light. It can be used as a light source together with or as an alternative for lamp objects and the world material in Blender.
Related content: Setup a skybox using the sky texture in Blender
When connecting an emission shader to a mesh object, the following options are adjustable:
Related content: Blender: lighting basics tutorial
There are 2 ways that you could add an emission shader in Blender. The first way is through the Material Properties panel interface, and the second is through the Node Editor.
Follow the below steps to add an emission shader through the Material Properties panel.
Note: Ensure that you are viewing your object in Lookdev or Render mode so you can see your changes.
The below is a step-by-step for adding an emission shader through the Node Editor.
Related content: The complete beginners guide to Blender nodes, Eevee, Cycles and PBR
If you decide to add a color input from another nodes output and connect it to the surface color of a material output, the node will produce an emission output with a strength set to 1. This is a handy feature that allow you to view the output of any node with a color or value output as it is applied to the object.
Here is an example:

This setup will give you a preview of the noise textures output. There is also a shorthand. If you connect the fac output from the noise texture directly to the surface input of the material output node, Blender will recognize that you want to preview the fac output and add an emission shader with the strength set to 1 behind the scenes.
Also, if you have the node wrangler add-on enabled, you can add a viewer node by holding Ctrl+Shift and selecting a node. The viewer node is the same as an emission shader, and this method could make it easier for you to view your changes in more detail.
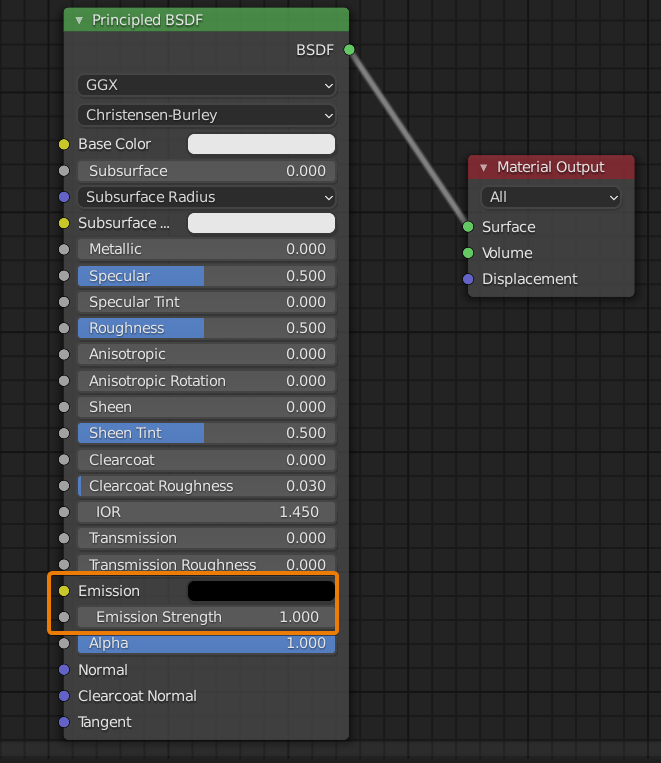
Another method to add emission to your object is through the emission property of a Principled BSDF shader.
Under the Principled BSDF node, there are many different settings that you can change to adjust the material properties. If you look far down you will find ‘Emission’. You can also change the color to whatever color light you would like the object to emit. You can also change the strength of the Emission, by adjusting the slider underneath called ‘ Emission strength’.
In the node editor, you could also set up the emission shader with an image texture. Using this method we can create various light patterns and light color variations.
Follow these steps:
Related content: 30 Blender addons (install, manage, free and paid)

A related technique to add lighting patterns is IES with light objects. You can read the article below to find further information on how you can use this technique along with emission shaders to create more interesting lighting patterns for your scenes.
Related content: How to create your own IES light and use them in Blender
Emission works out of the box in Cycles. As long as you have a shader with emission either through the emission shader or the emission features from the principled BSDF node, the emission does not require any extra settings.
A couple of things to keep in mind though. If you use emission shaders together with lamps, the amount of noise in your image will double.
Related content: Blender: A Cycles render settings guide
The second thing to keep in mind is that a ray-traced render engine such as Cycles does not have any bloom effect by default. This is a post processing effect. Normally we get bloom when taking a photo nd it is a pleasing effect even if it is a defect from the camera. Since a ray-traced engine does not simulate this effect we need to add it in post-production if we want it.
Once your image is rendered in Cycles, you can switch to the Compositing workspace and check ‘Use Nodes’ at the top. You will then be able to see the ‘Render Layers’ and ‘Composite’ nodes. Use Shift+A to add a node called ‘Glare’ and place it in between the 2 current nodes.
Setting the Glare node to ‘Fog Glow’ is often the best choice to achieve the bloom appearance, but you can experiment with the different options and settings to see which best achieves the look you are going for.
For more information on the bloom effect and how to achieve this look in Cycles, you can have a look at the article below.
Related content: How to use bloom with Cycles in Blender
In Eevee, emission materials are considered as indirect light. This means that they need to be baked with an irradiance volume.
The node set up in Eevee is the same as when using Cycles. However, in Eevee, it is difficult to achieve even lighting, and therefore it may be best to avoid emission shaders and to use light objects instead.
If you are still interested in using emission shaders in Eevee, you can read more in the article below.
Related content: Eevee lighting interiors
Emission shaders are a great and easy way to add more detail and realism to your scene. They can be used to replace light objects and the world material as a light source to add extra depth to your project.
Thank you for your time.
