Blenders node editor, or shader editor as it is now called is a powerful tool to create any kind of material. Sometimes when we are working with materials we would like to save a set of nodes that we can reuse over and over again. This is where node groups come into play.
How to set up a node group? To set up a nodegroup, select the nodes you want to group and hit "Ctrl+G". You will enter the node group and you may toggle in and out of selected nodegroups with tab. You can drag any input or output that you want access to outside the nodegroup to the input or output node. To create an instance of your nodegroup, hit "shift+A" and find your groups under the "groups" submenu.
In the rest of this article we will take a deeper dive into how nodegroups work. What benefits they bring and how we can work with them to make the most out of their capabilities.
Node groups are a fundamental part of Blenders node systems. All node systems can use node groups. Be it shader nodes with Cycles and Eevee, animation nodes or the particle nodes that are coming.
Chances are that the particle nodes are already here when you read this, and node groups are still relevant. Anyway, we will be talking about shader nodes in this article since it is the most common. But it applies to any kind of node system inside Blender.
Nodegroups are how we group nodes together and create a new custom node that we can use in our node graphs. It is like a node graph in a node graph or a meta node.
The benefit is that we can create any kind of node setup that performs any task and create instances or copies of it. The node groups that we create can be setup with support for inputs and outputs that we have full control over.
We can use node groups for a lot of tasks. But at it's core it comes down to being able to take a subset of nodes, group them together and duplicate them over and over. Here are the places we can use nodegroups.
We can also save node groups that we often use added to the startup file. This way we have access to our own custom nodegroups whenever we start a new project.
To follow along you can open Blender and go to the shading workspace or open a shader editor. Any way you want.
To demonstrate how this works I have created a default material and added a handful of nodes.
If you want to learn more about individual nodes, check out the Cycles Encyclopedia. It has a detailed description of each node available and you can find it in my resource collection.
This is what our starting nodegraph looks like.
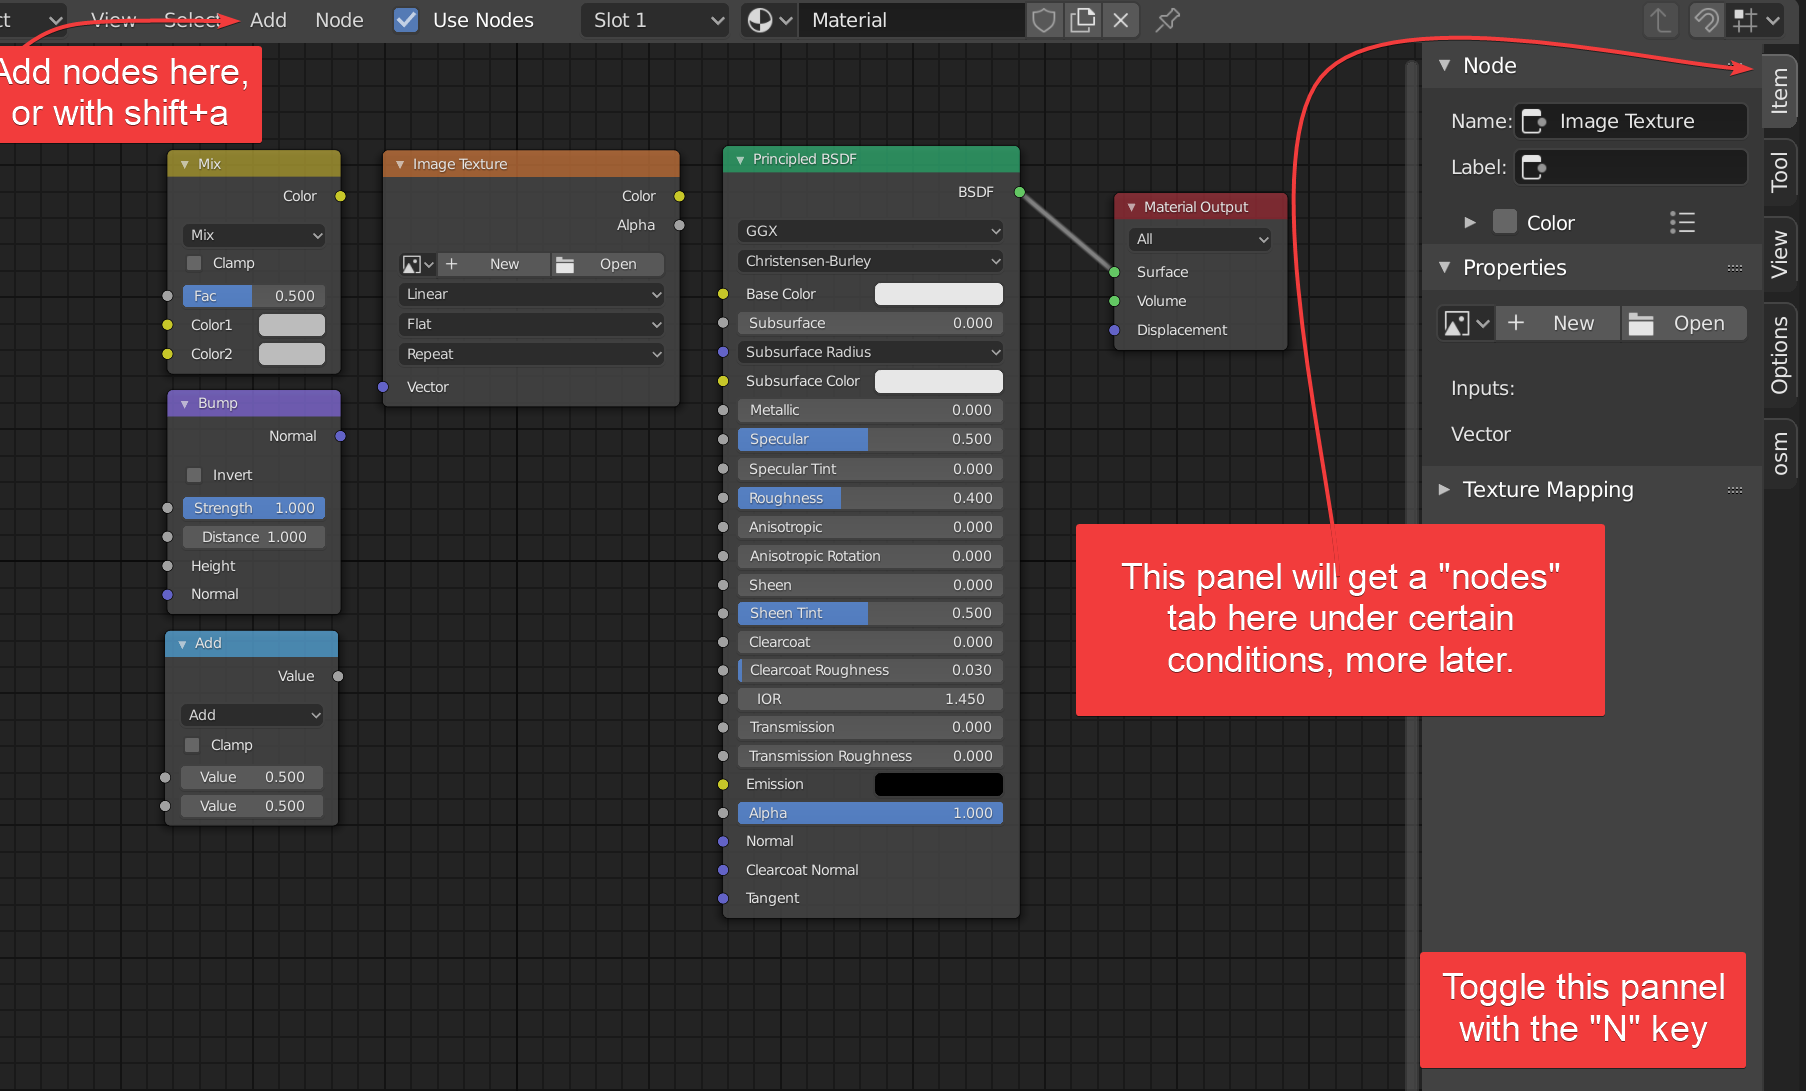
To create a node group I select the nodes I want to go into the nodegroup. Then I can create a group in 3 ways.
After creating the group we will jump into the group automatically. To move in and out of the group press Tab. If we have a group node selected Tab will toggle us in and out of it.
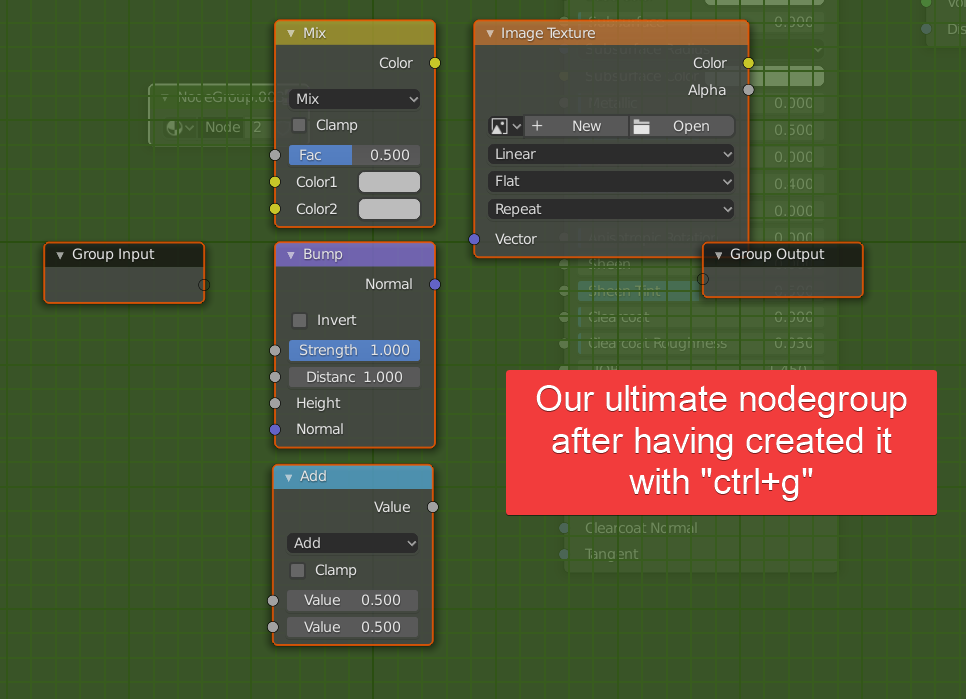
After we created the group you will see that we get two more nodes. One "group input" and one "group output". Here we connect any input or output to create connection points for other nodes. This is how the nodegroup communicates with the outside world.
Keep in mind that there are only inputs and outputs that can communicate outside the group. Any parameter that does not have an input or output socket can't be set outside the group.
For example, we can't change what image to use in the image texture node from outside the group. Same with the blend mode of the mixRGB node etc.
Let's take a look at the input and output options now. To create an input or output. Make a connection between the transparent socket and the desired socket of any node.
After the socket connects we will have access to a new tab on the right side panel. Toggle it with "n" and find the "node" tab. Note that we need at least one input or output connection for the node tab to appear.
You can add inputs by clicking the plus button in the panel interface. However, this way we can only create single value entries to the lists. To add a color or vector slot, we need to drag and drop a connection to either the output or the input node.
On rare occasions you might want to have a non-matching input or output. For instance, you want a purple vector slot on the input side of the node. Then you want it to directly connect to a yellow color input inside the nodegroup.
In that case you can just drag and drop any input or output to it's corresponding node and disconnect. The socket will then remain in the corresponding input or output node.
If you connect vectors and colors together, keep in mind that vectors can hold values that are negative. Colors generally stay as a positive value and mostly between 0 and 1 with HDRIs as the exception.
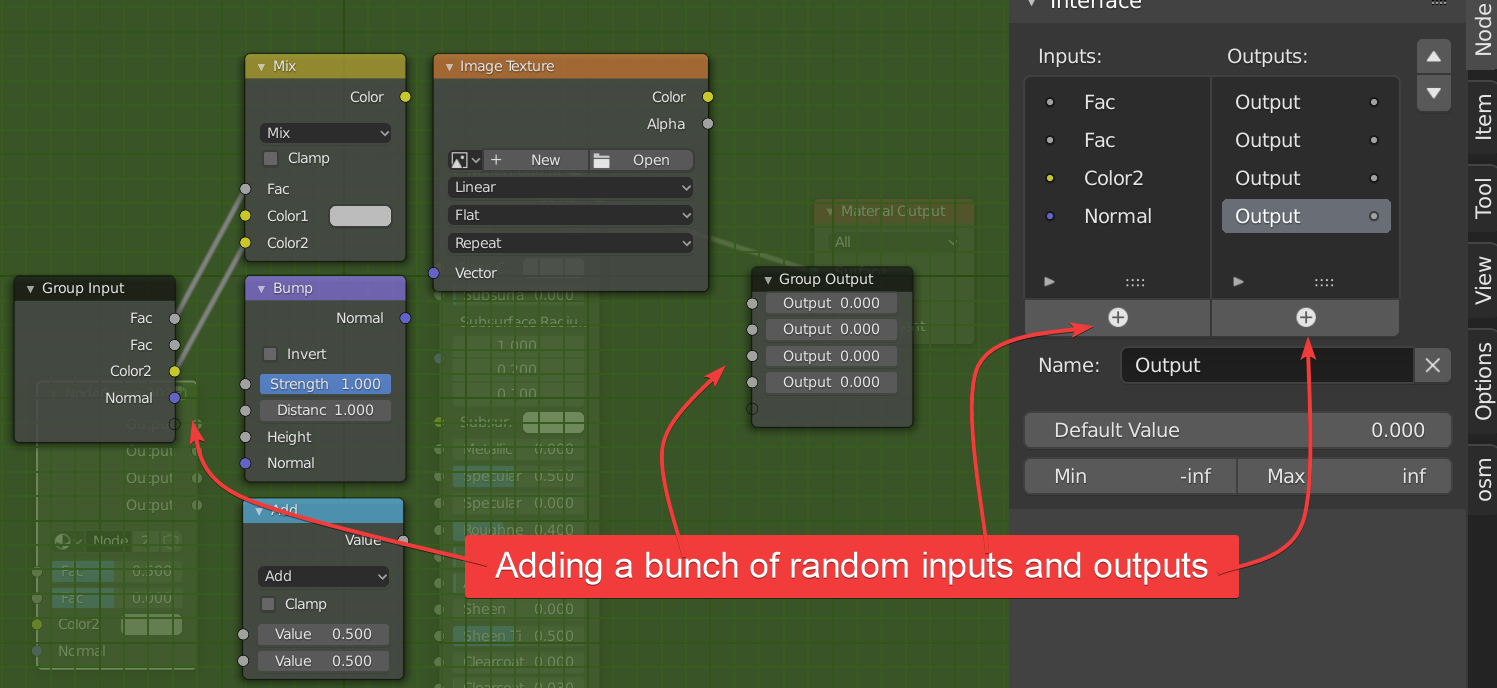
On the right side panel we can also name any socket, set a default value and a max or min in the case of vectors and fac sockets.
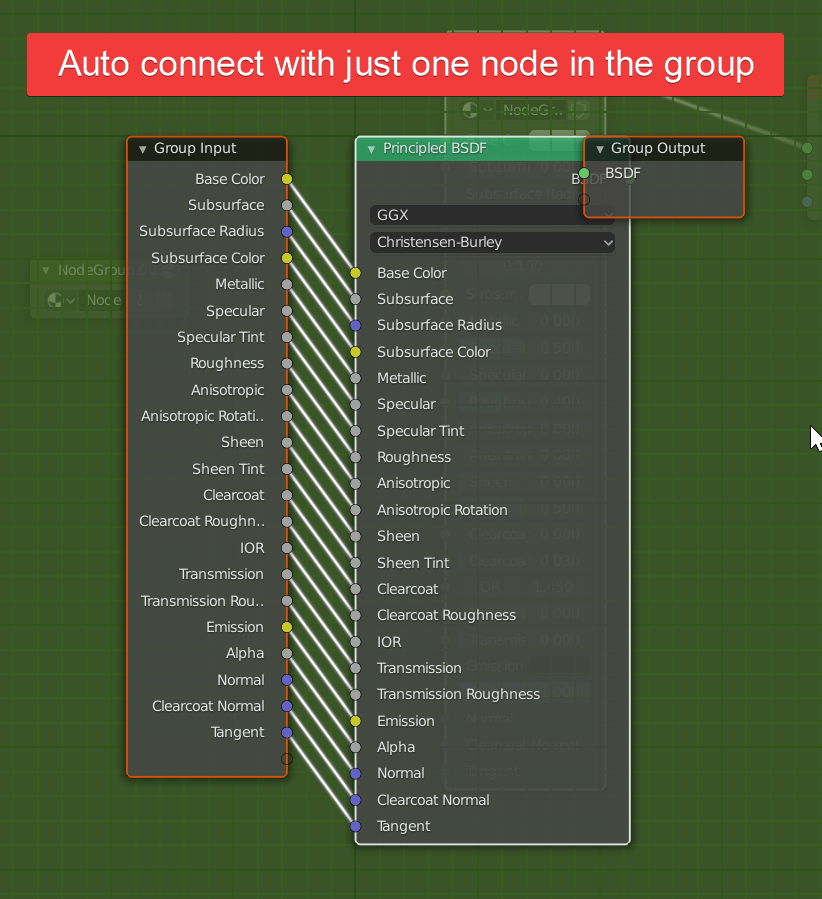
If we create a node group with only one node, all the inputs and outputs will be automatically connected for us. We can try this by selecting the principled BSDF and hit Ctrl+g.
You can also ungroup a group. This is oddly enough available as a command in the add menu. Ungrouping a group does not remove a group from the blender file. Instead, it takes the currently selected node group and moves the nodes inside it out to the parent node group or node graph.
That brings us to the next section. Nesting.
We can add a nodegroup into another. We call this nesting or nested nodegroups.
When you are inside a nodegroup, you can add another node group inside it just like you would any other node.
Keep in mind that you can not add a nodegroup to itself. You can also not add the parent node group into the child node inside it.
This is by design so that we can't create an endless loop inside our material.
To navigate multiple layers of node groups can be tricky at first. What you need to keep in mind is that you will tab in and out of the selected node group.
So if you select a node group inside another you will tab in and out of the inner node group.
To back out of the parent node it is not enough to deselect the child node. You will still toggle in and out of the child. You need to select any other node inside the parent node before you can traverse another level.
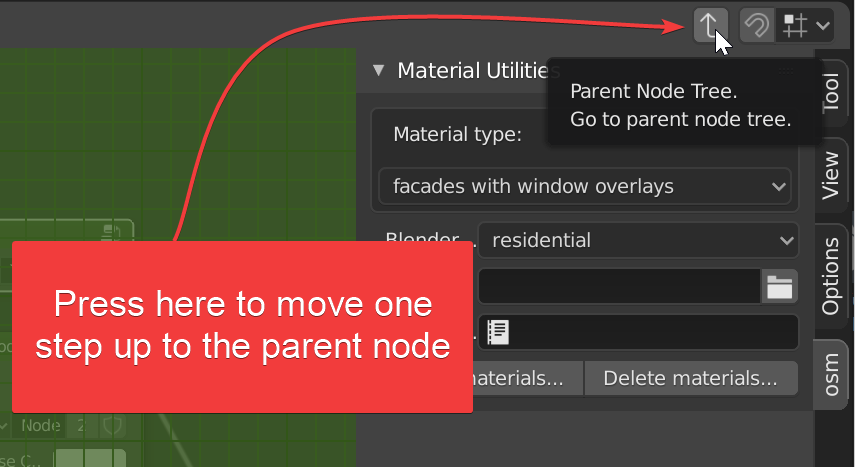
You can also press the button in the image below to move one step up
Naming node groups and regular nodes for that matter is a bit confusing in Blender. If we select a node group we can go to the right side properties panel and press the "item" tab. Here we will have 3 naming fields.
We can set the name of the group that we add to our node graphs. Meaning the parent node. Then we can set individual names for each node that we bring into a node graph. To each instance of the nodegroup if you will. So far so good.
Then there is a third name parameter that is a unique identifier for the node group instance. This is something only the programmer would use but it is in the interface.
If you are not confused yet, here is what you do. In the "properties" section, you name the parent node that you can then add multiple instances of.
Under the "node" section you name the node instance with the "label" parameter and the "name" field is the unique identifier for that instance of the node. Just don't bother with the name field. Blender will name it for you.

Why so much explaining around such a simple thing you might ask. I just want this explanation to serve as a reminder that whenever you get stuck somewhere in Blender, it might not be you.
It could be the case that you are not as bad at understanding stuff as you might think sometimes. Sometimes it is poor design that is at fault.
Moving right along.
To be certain that a node group will be saved when we save the blend file we need to press the child icon on the nodegroup.

The number on the nodegroup shows how many current places in the file the nodegroup is used. If there is no number it is not currently used and Blender will delete it if the file is closed.
That is when we need to press the shield icon. It makes sure that Blender does not delete our node group even if it is not being used in the file.
It enables us to have a blend file as a library of node groups or keep the node group in the startup file.
To append or link in a node group go to "file" then choose "link" or "append". Browse for the blend file where you stored your node groups.
Double click the blend file and go to the "NodeTree" folder inside. Here all the node groups contained in the file will be listed.
Choose one or more and hit append/link and the node group will be added to your current blend file.
What is the node editor?
The node editor was renamed to shader editor in Blender 2.8x. This means that for any nodesystem that is not shader based will have its own node editor added.
This is why we will have multiple node editors in later versions of Blender, each one having a nodesystem for a different purpouse.
Where can I find nodegroups made by others?
There are multiple ways. I would check out pre-made material libraries geared towards Blender. You can find some on the resource pages.
Are blenders nodegroups compatible with other software?
No
