


Color correction and grading can really help bring a render together. The Blenders compositor comes with a few nodes we can use for color correction and grading in Blender.
To color correct and grade our renders we use the compositor. Within the compositor we have multiple nodes at our disposal, such as the color balance node and RGB Curves.
In the rest of this article, we'll go over more detail about the difference between color correction and color grading. We'll also go into more details about the compositing setup and the nodes available for color correction and grading.

Color corrections goal is to adjust the look of our render to give it a more realistic or natural look. Basically, we would use color correction to fix some of the short comings of the way we create our renders.
Color grading on the other hand is a more artistic process. Sometimes this can be using color theory to add complimentary colors to our render. We could also use colors to set the tone of a render.
Though we've gone over color correction and grading separately they are commonly used in combination. We can use color correction to get the most out of our renders and then use color grading to give our renders whatever kind of look we want.
To Setup color correction in the Blender compositor:
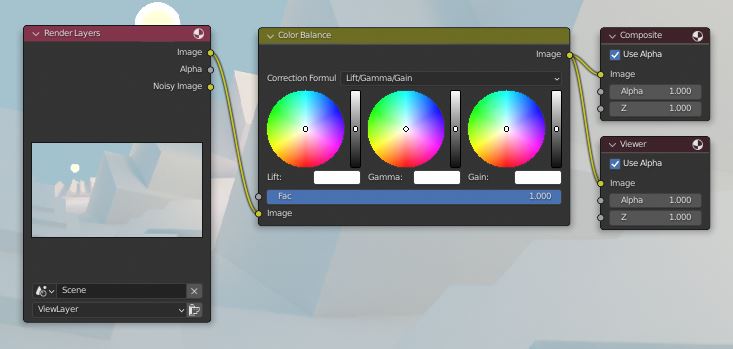
The color balance node is great because it allows us to both adjust the intensity of the different ranges of the image as well as the colors.
So what exactly do the Lift/Gamma/Gain values do? Lift adjusts the intensity and color of the shadows. Gamma affects the midtones and Gain effects the highlights.
A useful tool for color correcting that we have available to use in Blender is the color histogram. Especially when color balancing it can help us get the fullest range of colors in our image. The histogram shows us to see the graph and if any colors are clipping out of it.
To access the histogram we'll go ahead and create a new window in the compositing workspace.
While in the compositing workspace drag your cursor to a corner you want to drag a new window from. Your cursor should turn to a plus icon. Now hold the left mouse button and drag out a new window and set the editor type to Image Editor.
For the image select the Viewer Node output. Press N to bring up the side panel and go to Scopes.
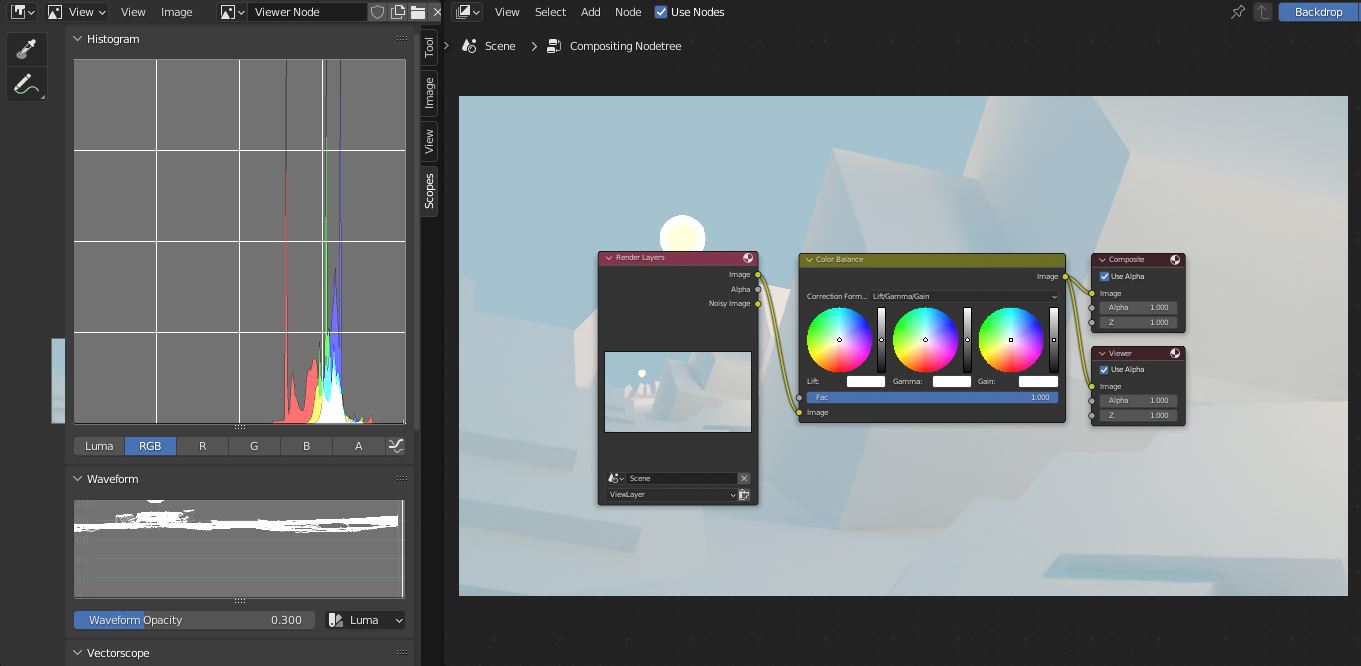
Here we'll find the histogram as well as a few other helpful tools. All of these an be used to fine tune our image but mainly we can use the histogram.
The histogram show us how light or dark the pixels in our image are. If there is a high spike in the histogram, a lot of pixels have the corresponding lightness. So, if there is a high bar close to the right side of the historgram, it means that we have a lot of bright pixels in the image.
Likewise. higher bars closer to the left side of the histogram means that we have dark pixels.
As a general rule, we want the lightest pixels in the image to just barely touch the left side of the histogram border. Any pixel that goes outside the histogram on the light side is said to be over exposed. Those pixels are simply white.
Then we also want the darkest most pixels to touch the left side of the histogram. This in turn, means that we are touching on the blacks.
Now, take this with a grain of salt. It is just a general rule that we should have pxiels toching both ends of the histogram. We should also look at what the image looks like and if we like the result.
But this is a good general rule to follow as a starting point. It allow us to check so that we are not over or under exposing, but we are still utilizing the full dynamic range available to us.
The easiest node to use when setting up the blacks and whites in our image is probably to use the RGB curves node and pushing the top right node in the curve to the left to increase the whites and push the bottom right node to the right to increase the blacks.
Let's take a look at it.
To setup the RGB curves and color correction nodes in Blender:
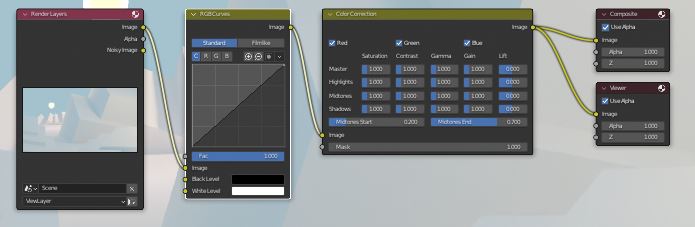
The RGB curves node is good for adjusting the the colors of the image while the color correct node is good for fine tuning the values of the render.
Looking at the RGB curves node it can be a bit unintuitive so how do we use it? On the curves graph we have 4 options, Contrast, Red, Green, Blue. The curve for each of these going from left to right represents the darkest parts of the image to the brightest parts of the image.
For example, if we go to the red curve and add a node to the far right of the graph and drag it up the highlights of the image will be much more red. If we did the same at the far left of the graph the shadows would be much more red.
The RGB curves node also includes a Black and White Level input. These can be a bit confusing as they sort of work opposite to how we'd expect.
For black levels increasing the value of the color makes the image darker. The White level makes the image brighter when decreasing the value. The color we chose will also be inverted in the image. If we wanted to make one of these levels more blue we'd need to make the levels color more red.
Instead of using these level values we can use the color correct node. This node allows for better adjustment of the values in our image.
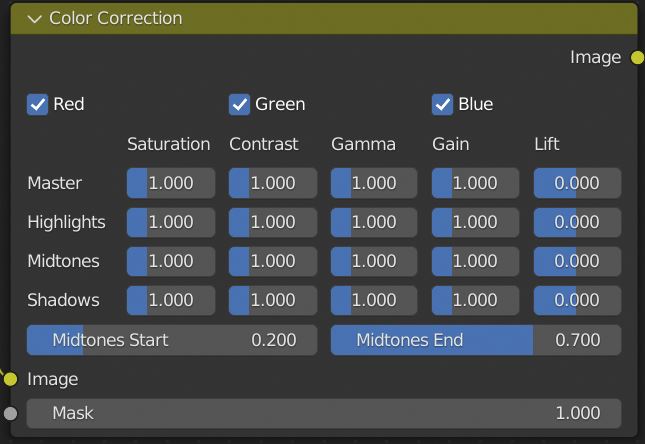
The color correct node can also do some color adjustment but isn't nearly as versatile as RGB Curves. Color Correct allows for way more fine tuning of the values of the image which the Curves node lacks in. Basically, we can fine tune the intensity of the shadows and highlights in our render.
Highlights are the brightest parts of the image. Midtones are the middle values which we can define the range of. Shadows are the darkest parts of the image. Gamma Adjusts the Darkest parts of whichever range we adjust. Gain adjusts the middle values, and lift adjusts the brightest values.
As you can image this allows us to very precisely tune the values of our image.
As a Alternative to or in combination with RGB Curves we could use the hue correct node to adjust the colors of our image.
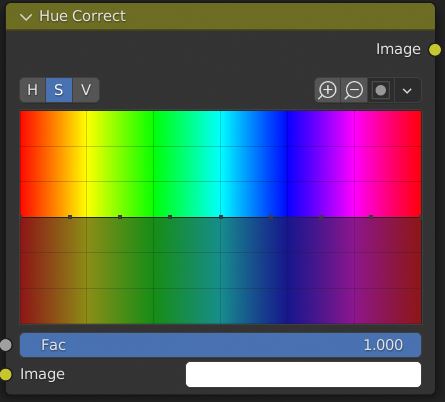
The hue correct node is fairly intuitive, essentially we have access to 3 graphs, they are Hue, Saturation, Value.
For each of these graphs we have a full range of available colors that we an then adjust the HSV values of, so if we dragged up a point on the saturation graph in the blue range the saturation of those blues would be higher.
When Color Correcting in Blender the color balance node is usually going to be the quickest and easiest way to get the look we want. It can do both color correction and grading and isn't too complex.
We also have another nodes such as the color correction, hue correct, and RGB Curves node available to use when color correcting giving us quite a few options for getting our renders to look exactly the way we want.
Thank you for your time.
