


When working in Blender, we often rely on external data. Primarily in the form of textures and image files. If we need a Blender project to be self-contained packing these external files is how we achieve this.
Pack external data or files means that we take the external files our blend file depend on and copy them into the blend file so that it doesn't have to rely on external files. To do this, go to File->External data->Automatically pack into .blend and press Ctrl+S to save your file.
In this article we will explore what happens under the hood as we pack files. How to pack individual files and how to unpack them and a few other scenarios and tips regarding packaging of external files.
Blender can take all or a selection of external files that a blend file depends on and move them inside the blend file. This is what we call pack external data or pack external files.
When we say external files, we really only talk about images. It can be textures or texture maps, hdri images and reference images etc. Any kind of image really.
Related content: How to import images into Blender
This feature is useful when we want a blend-file to be self-contained. A blend file that uses external images and for one reason or another can't find these external images anymore will display a solid pink color instead of the image texture to let the artist know that the image file is missing.
Related content: Pink textures in Blender and how to avoid them
So, in a scenario where we want to share a blend file with someone else, it can be beneficial to back external data in order to be able to send them the complete project as a single blend file and have every dependencies baked into the file so that the recipient can open the blend file without having the problem of missing textures.
There are cases when we want to avoid packing external data. For instance, packing a lot of images into a blend file can often cause exceptionally large file sizes. We may not be able to transfer the file or manage the file properly thanks to the huge size.
Also, as we pack external files, blender copies the files into the blend file making it take up more space than simply sourcing the images from their original locations.
But the most important thing to keep in mind is to be consistent with how you manage files. If you sometimes pack and sometimes don't and store files in various locations, it can quickly become a headache to work.
To pack and unpack all images and textures a blend file needs you can go to file->External data and choose "pack all into .blend" or "unpack all into files"
If you choose to unpack, you get a few options.

If you then select any of the "current directory" alternatives, Blender will create a folder called "textures" in your current folder and store the textures there.
The difference between these two options is that the "use files in current directory" will only create the packed file if it is not already there while "write files to current directory" will overwrite any existing files with the unpacked file.
Use and write files in original location will look at the file path the file was originally packed from and use that filepath to place the unpacked file. The write option will overwrite while the create option will only create the file if it isn't already at the location.
The disable auto-pack, keep all packed files will do just that. Automatically packing of files will be turned off but no unpacking is made of the already packed files.
Remove pack will remove the packed files from the blendfile.
We can also pack individual files instead of turning on and off the auto pack feature if we have specific packing requirements.
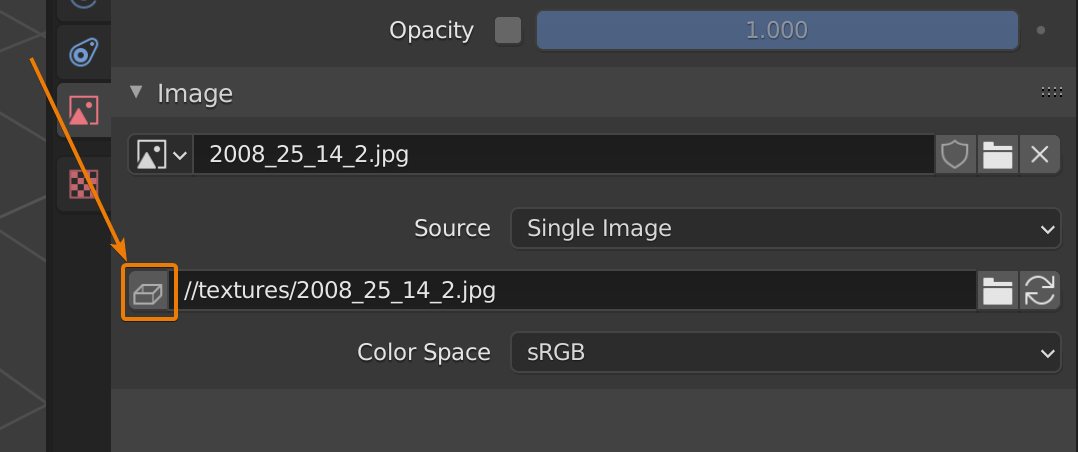
We can do this in the properties panel where we have an image input slot. In this example below I used an empty with a background image attached. While the image file used isn't packed an icon will show that allow us to pack this one image into the blendfile.
Related content: How to set up background reference images in Blender
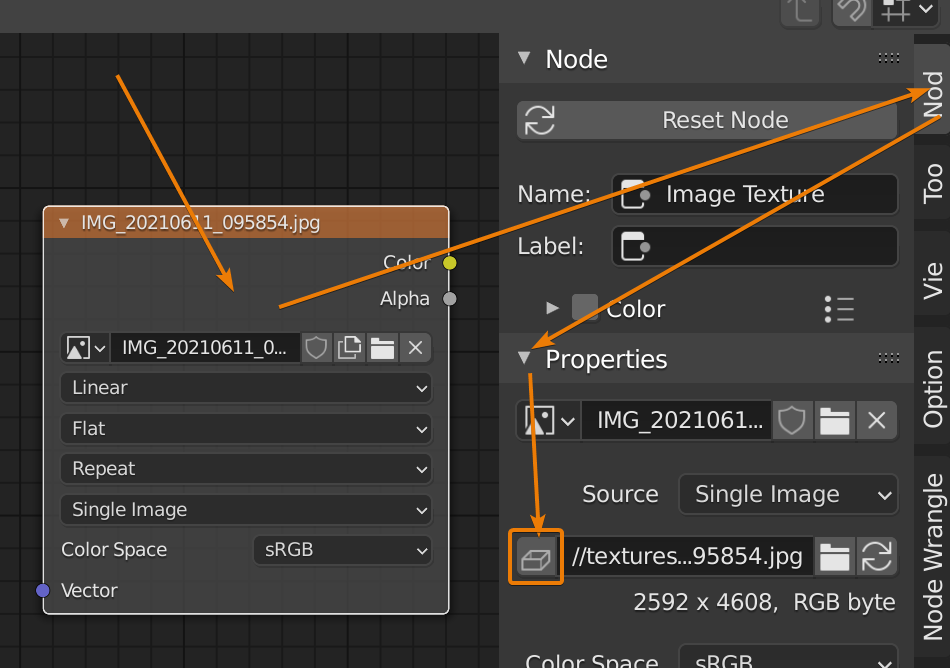
In the shader editor, if we want to pack a file, select the node that contains it and go to the node tab in the right sidebar. Bring it up with the N hotkey if it isn't there. Then go to properties and find the image slot with the little box icon. Click it to pack the individual texture file.
In short, we use relative file paths when the external files is located in the same folder or a subfolder of the .blend file. If the external file is located in a different location, such as an asset library on the hard drive, we use an absolute file path.
A relative file path is starting its path from the location of the blend file. So, if we move the blend file or the file we are trying to locate individually, we won't be able to source the file correctly. But if we move the blend file and the external file together, we can still find the external file from the blend file.
The relative location between them has not changed.
On the other hand, if we source or external files from an asset library, we can't move the blend file and the asset file together in relation to each other. In these cases, we use an absolute path. An absolute path starts from the location of the hard drive. On Windows This could for instance be C:. On Mac and Linux we start from / (a single forward slash). The highest point in the filesystem.
With an absolute file path, we can move the blend file and still find the externally sourced files since we always start from the highest point in the filesystem and the location of the blend file does not matter.
In this article we looked at what packing is and how it works. What the difference is between a relative and an absolute file path and we learned how to recognize them.
The file->Pack external data menu is the most important menu to remember when working with packed files.
Thanks for your time.
