


FBX is one of the most common file formats used to move 3D models and assets between different applications. When using Blender together with other software there are many cases where we will need to import and export FBX files. Whether that be for exporting a model to a game engine or other some other 3D applications. So how do we do it?
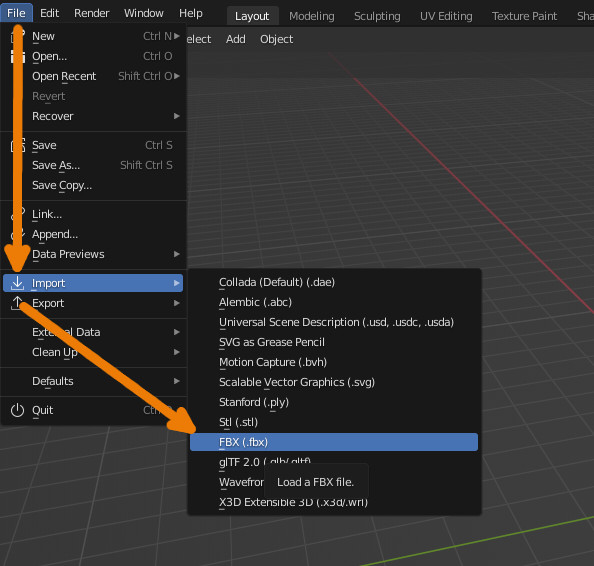
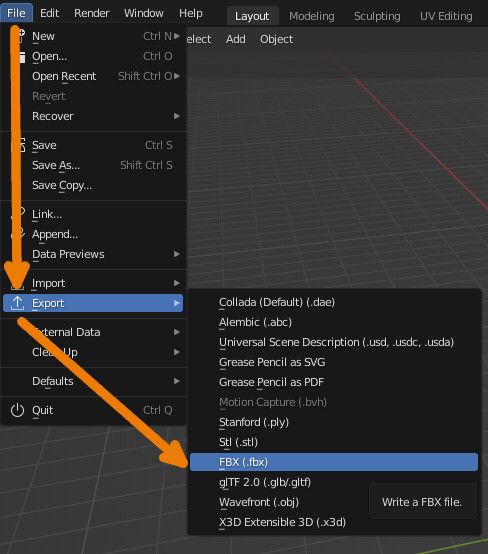
To import or export an FBX in Blender, go to the file menu and find import or export then choose FBX from the respective menu.
In many cases the default settings works just fine. But there are a lot of export and import settings we can adjust to make the most of our FBX import and exports. In the rest of this article, we'll go into more detail about what an FBX file is, what they are commonly used for, and a more in-depth guide about importing and exporting.
FBX is a universal file format that is supported by a large variety of 3D modeling tools and related software suites such as game engines and CAD software. The format can store a large number of objects related to 3D scenes. In Blenders exporter and importer these object types are supported.
According to Wikipedia, FBX also known as filmbox was developed in 2006 by Kaydara. The format is proprietary and currently owned by Autodesk.
External content: Wikipedia - FBX
The format itself can either be stored as ASCII or Binary, it is commonly used for Exporting models to Unity and Unreal Engine as well as being the main format used by Autodesk.
Blender's FBX importer and exporter was developed without the use of the FBX SDK and is written in python.
Blender has a built in FBX importer that is enabled by default.
To Import a FBX file
Now you may have noticed there are many settings available when we're importing an FBX file, so what does each one do? Let's cover each section in turn.
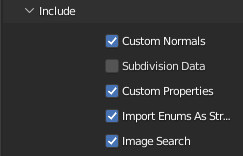
Custom Normals
If the FBX model has custom normals blender will attempt to import them, if it cannot find them or import them it will just recalculate the normals.
Subdivision Data
If the FBX model has information about Subdivision Surface modifiers Blender will import them.
Custom Properties
If our model has Custom Properties, this option will Import them.
Import Enums as Strings
If the FBX model has Enums this will convert them to strings.
Image Search
If the FBX model is in a folder that has sub folders this will search through them for any images that the model uses, blender warns that this may be slow.
Scale
The FBX file will be scaled using this number as the factor, this is helpful if our model is imported at the wrong scale.
Decal Offset
If the FBX model has any alpha meshes they will be displaced by this value.
Apply Transform
if the FBX model has any Transform offsets this will apply them.
Use Pre/Post Rotation
This will use the Pre/Post Rotation from the FBX file's transforms.
Manual Orientation
This allows us to change the forward and up direction manually, use this if your model is imported with the wrong orientation.
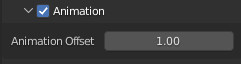
Animation Offset
Any animations on the FBX file will be offset by this value, use this if your animations are starting at the wrong time.
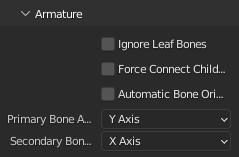
Ignore Leaf Bones
This will Ignore the last bone on the end of a bone chain, if the FBX file imports with extra bones on the end bone chains that you don't want, enable this option.
Force Connect Children
This will connect the parent and children bones even if their positions don't match.
Automatic Bone Orientation
This will try to align the rotation of bones in the FBX file, use this if the armature imports with bones facing the wrong way.
Primary Bone Axis
This will set the orientation of the primary bone axis.
Secondary Bone Axis
This will set the orientation of the secondary bone axis.
Next, we'll also likely want to be able to Export FBX, Blender also comes with a built in FBX Exporter, this is again enabled by default.
To Export an FBX file
The FBX Exporter also comes with many options to configure our export, so what does each one do?
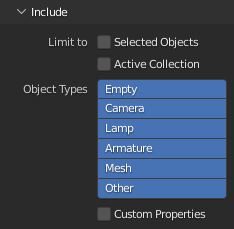
Limit to
We can limit to both selection and active collection, selection will simply just export only the selected objects, active collection export any objects in the collections that are set to active.
Object Types
This specifies the object types that will be included in the export, for example we can select mesh and then only the meshes in our scene will be exported.
Custom Properties
If we've assigned any Custom Properties to our objects this setting can be used to export them.
Scale
This will allow us to manually change the scale of our object on export, sometimes the scales of objects will be off by 10-100 units making our objects too large or small in the software we import our model into, this will allow us to fix that.
Apply Scaling
this will set any scaling changes applied to the object, for example the above scale change would just show as the object being scaled by whatever factor you've entered, by applying it that will set it as the default scale, so instead of the object showing as being at a scale factor of 100 it would show as 1
Forward
This allows us to orient our model incase it is incorrectly orientated in the software we import to
Up
This will change the up direction, use this combined with forward to fix any orientation issues on export.
Apply Unit
This will take into account Blender's units, if disabled the units will be used as is.
Use Space Transform
This will apply all global space transforms to our models, if this is disabled, they will not be changed.
Apply Transform
This will apply any position, rotation, or scale modifications we've made to our models, so if your object is rotated on 90 degrees on the x axis, the object will retain that rotation, but the rotation will be applied so the objects rotation will show as 0.
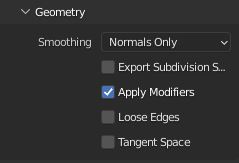
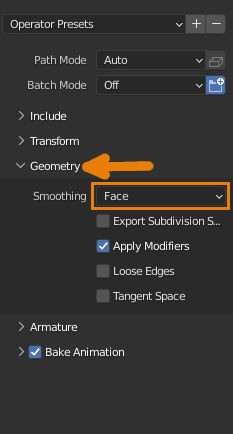
Smoothing
Only use this if the importer understands split normals.
This will export smoothing per face.
This will export smoothing per edge.
Export Subdivision Surface
This will maintain the subdivsion surface modifiers on your model.
Apply Modifiers
this will apply any modifiers on your model.
Loose Edges
This will enable and disable exporting of loose edges.
Tangent Space
This will add Binormal and Tangent Vectors, this will only work correctly with meshes that only contain Tris and Quads.
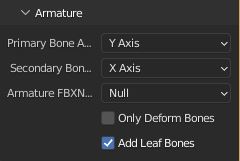
Primary Bone Axis
This will set the orientation of the primary bone axis.
Secondary Bone Axis
This will set the orientation of the secondary bone axis.
Armature FBXNode Type
This is the type of node used to represent Blender's armatures, only use the other options if you experience issues with Null as other options may not re import into blender correctly.
Only Deform Bones
This will export only bones that are used for deforming our model, for example bones used for controlling an IK rig that don't directly deform mesh will not be exported.
Add Leaf Bones
This will add bones onto the end of the bone chains, use this if you plan on working on your armature outside of blender.

Key all bones
This will force Blender to export at least one keyframe for each bone, this can sometimes be required when exporting to applications such as Unreal Engine.
NLA Strips
This will export all the NLA strips as separate animations.
All Actions
This will export each action as a separate animation.
Force Start/End Keying
This will force blender to add a keyframe to the start and end of animations.
Sampling Rate
This is the rate at which the animations are sampled, think of this as the number of frames skipped when an animation is being sampled, this will not speed up the animation but will interpolate for the frames that are skipped.
Simplify
This will simplify the animations, the value decides how much the animation is simplified.
While many FBX Export guides will suggest that you always turn of leaf bones this actually will vary depending on how you're going to use the exported rig.
For example if we plan on using Unity's IK system but are missing bones on the ends of our armature this is what leaf bones solves.
If we don't plan on adjusting our animations or poses outside of blender then that would be the best case for disabling them.
You may also need to configure the scale settings, or use apply transforms as well as the orientation settings.
If we are exporting a static object to Unreal Engine the standard settings should work fairly well, though sometimes Unreal Engine will throw errors about the normals of the object, we can fix this by changing the smoothing to Face.
We may also need to configure the scale of the object, for static objects simply applying the scale should fix any scaling but we can also manually adjust the scale using the scale option.
Unity also works well with the default export settings, our files will usually be automatically scaled by unity so that they are the correct scale, these aren't applied by default though so if that's an issue you can use the scale settings apply them.
Once last feature I'd like to cover is adding Presents to the FBX Importer and Exporter, if we're doing a lot of work with FBX files this can save us from having to manually reconfigure our imports and exports each time.
To Add a Present to the FBX Importer or Exporter
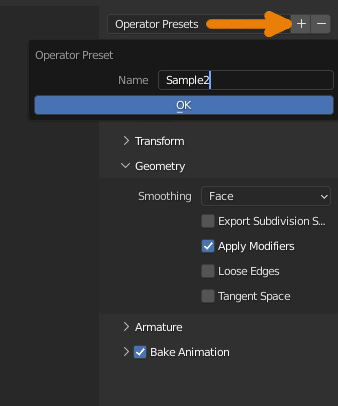
Now you can click on the Operator Presents drop down and access any of the presents you have set to quickly configure the importer or exporter.

FBX can be a very versatile format that is used in many different cases, knowing how each settings affects our exports can save us a lot of time and headache, especially when we need to bring our models into game engines which exposes a lot of issues we wouldn't normally see in Blender.
Thank you for your time.
