


Whenever we're doing any sort of 3D rendering in Blender, we'll need to use cameras. One detail about cameras that can be a bit confusing is the active camera system.
To change the active camera in Blender:
In the rest of this article, we'll go into more depth about changing the active camera as well as a few different methods. We'll also go into how to tell when a camera is active. Finally, we'll go over how to change the active camera during an animation.
There are a few ways we can check which camera is currently active in our scene. This first one we'll go over is by checking the scene properties.
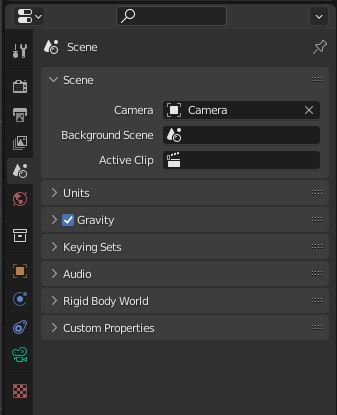
Go to the properties window > scene properties and under the scene tab there is a camera field. When we have an active camera in the scene this is where it will be shown. This will also update with the current marker.
This is probably the quickest way to tell. It will also work even if we have our cameras hidden in the scene.
Another way of checking which camera is active is by looking at the camera object. Each camera will have a triangle above it. Usually we use the triangle for orientating the camera but it can also shows when a camera is active.
When the triangle above the camera is solid it is active and when it's just a wireframe its not. This method is good if we just want to quickly glance at the scene and tell if a camera is active. Obviously this might not be as useful if our cameras are hidden.

We can also snap our view to the active camera by pressing 0 on the numpad. If we wanted to keep our view focused on this camera we could select it while in the camera view and then press delete on the numpad.
Note that the view will snap to a camera even if it is hidden in the scene hierarchy. Even though we can scene the camera borders in the view when a camera is hidden we won't be able to select it in the scene view.
There are a few ways we can go about setting a camera as active. The most basic way to setup an active camera is just to add a camera to a scene with no cameras. As long as we have one camera in our scene even if we haven't set it to active Blender will just set that camera to active when we render.
We can also set a camera to active by going to the scene properties. Under scene click on the camera field and select the camera we want to make active from the dropdown. We can also search by name if we start typing while we have the dropdown visible.
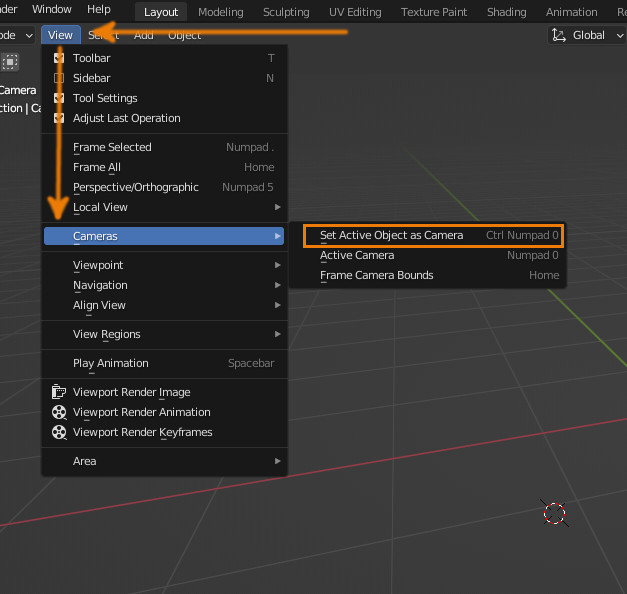
Another way of setting a camera to active allows us to set the select camera to active. To do this first select the camera we want to make the active camera and in View > Cameras click on Set Active Object as Camera.
A common issue we might have when trying to change the active camera is we try to just disable the rendering or visibility of camera in the scene hierarchy. Note that neither of these effect the ability of a camera to render.
When a camera is set to active it will render regardless of whether it has rendering enabled or disabled. Another quick note about changing the visibility of a camera is that the camera will center on the active camera when we press 0 on the numpad even if the camera is hidden.
When setting up an animation we may need to get quite a few different camera angles. While we could animate the camera to jump around, we can also use multiple cameras.
You may notice in the scene properties that the camera selector doesn't have an option for keyframes. To change the active camera during an animation we'll need to use markers.
To change cameras with markers, go to the layout workspace or just any workspace with the timeline open. First drag the playhead to the start of the animation select marker > add marker.
In the scene view select the camera you want to be active right now and back in the timeline select marker > bind camera to marker. Now drag the playhead to the frame where we want to change the active camera and add another marker and bind the new camera to it.

We can repeat this as many times as we want to keep changing the active camera.
Something to keep in mind is that we could achieve pretty much all the same effects with just one camera. The problem with using one camera is that if we need to change and keyframe properties of the camera it will make configuration much more tedious.
The ability to use multiple cameras gives us way more flexibility and makes the process of getting multiple shots much easier. Especially if we want to use different modifiers across multiple cameras.
This video also serves as a great guide on changing the active camera in an animation:
With what we've gone over in this article we should now be able to make use of all the aspects of changing the active camera as well as figuring out which camera in our scene is active.
While we can do a lot by just using one camera being able to change the active camera is so much more convenient. We also know a few quick ways to change the active camera even if we don't plan on animating it.
Thank you for your time.
