


Pixel art is a popular artform and being able to convert your renders to a pixelated version can be a cool feature.
To pixelate an image or render in Blender using the compositor follow these steps:
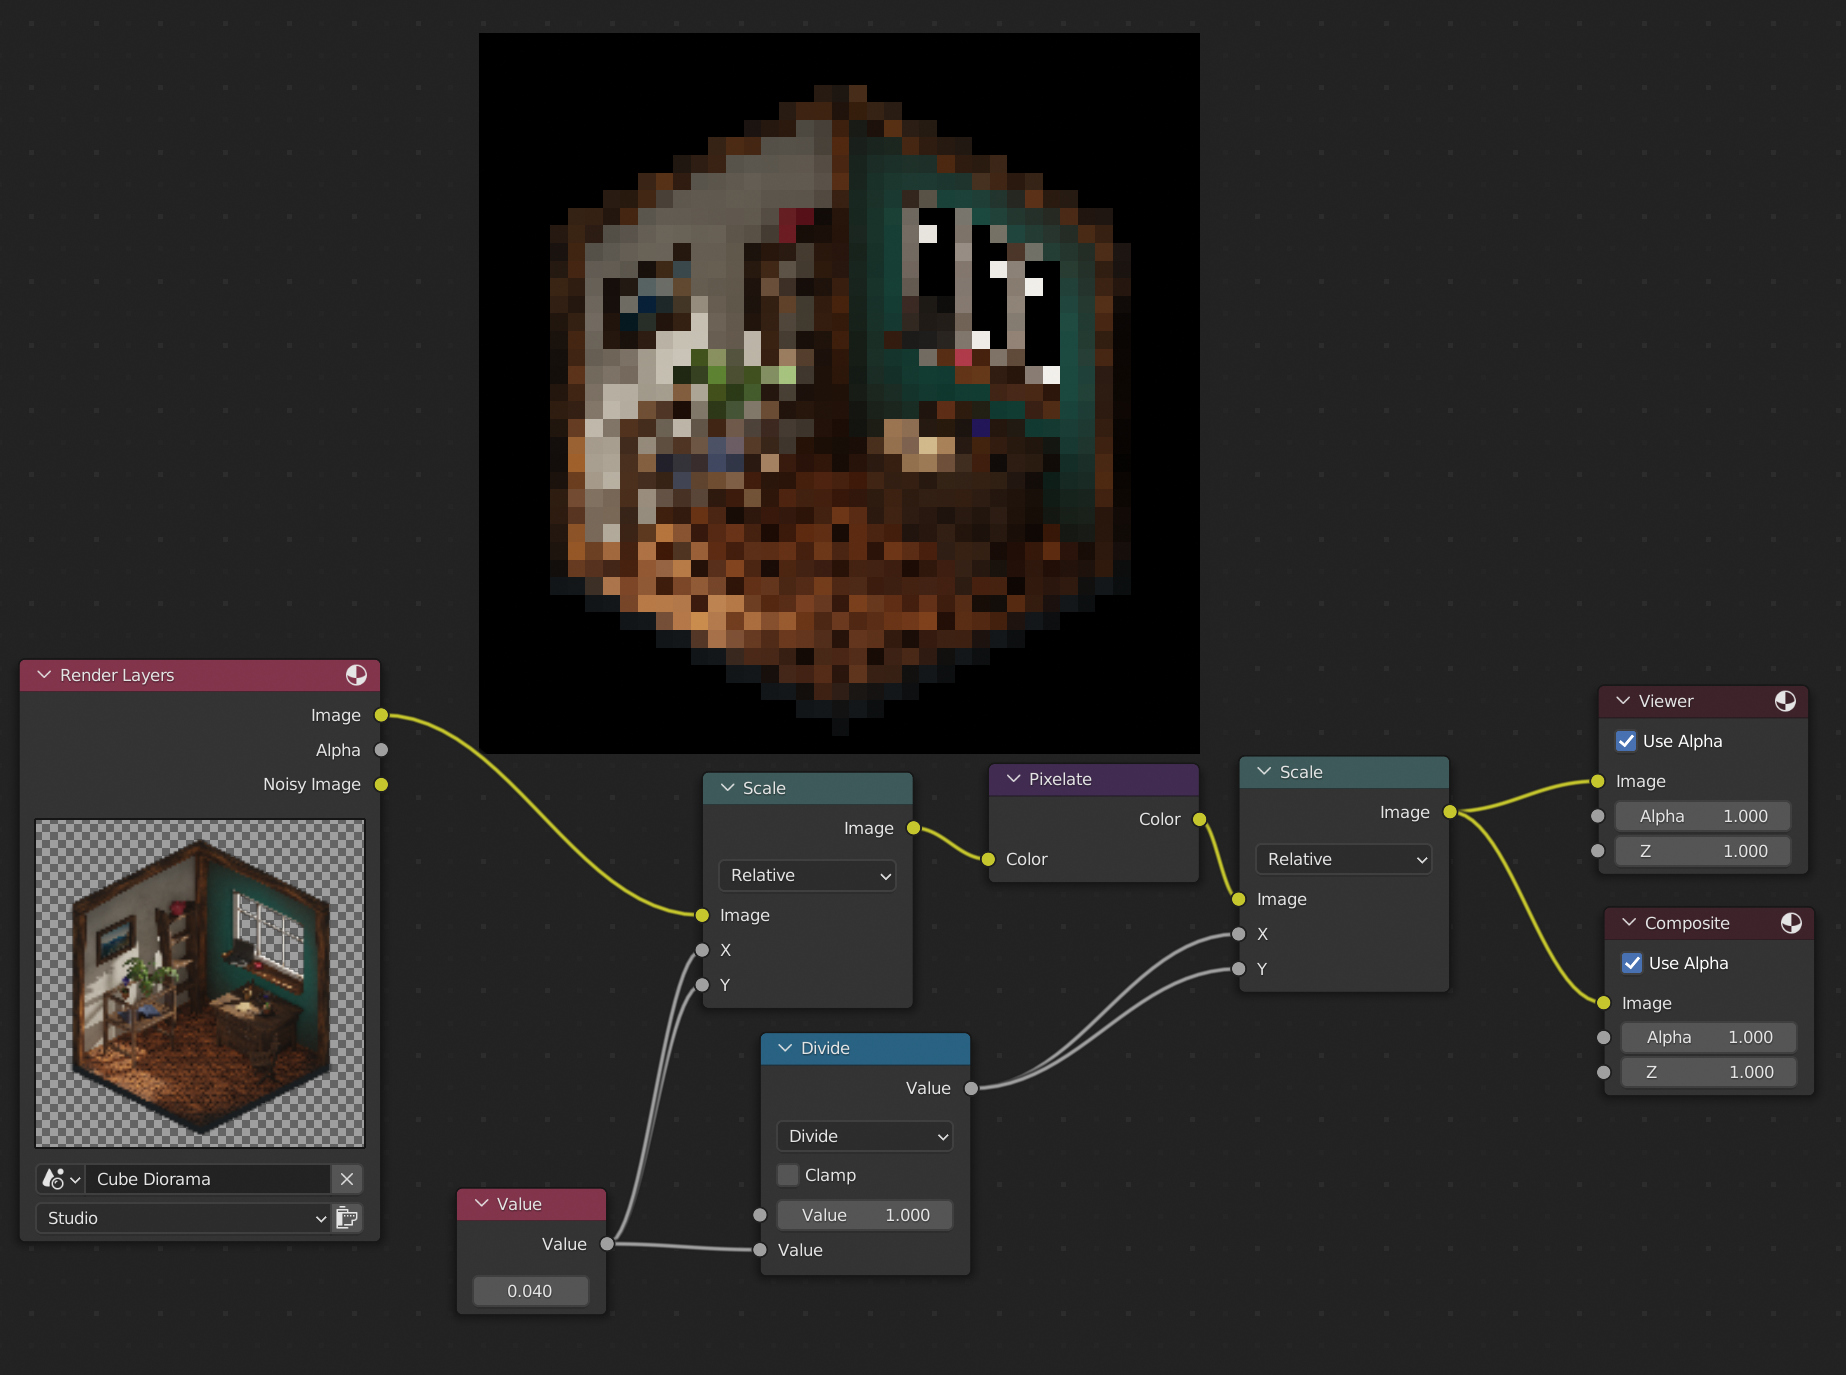
In the image below you can see the full node setup. Click the image to open it in full resolution.
Let's dive in and see what is actually happening in this node setup.
We can pixelate any image by bringing in an image node and browse our hard drive for the image we want to pixelate. But in this case I used the Cube Diorama from Blender.org.
External content: Blender.org demo files
I modified the scene and rendered it against a transparent background. But any kind of background will do.
Related content: How to use alpha transparent textures in Blender
Next we input our render layer or image into a scale node. While set to relative this nodes scales the image to a percentage of the original image. Today we are dealing with quite large images. In this case I rendered in 2048 by 2048. We then scale that down to 4% of the original size to get a good amount of pixelation.
To get a good amount of pixelation I found that a value between 0.01 and 0.2 is a reasonable range.
But if we output the image from the first scale value we will see that our image will be scaled down but the original size of the image itself will be maintained.
To solve this we need to scale the now small image back up. But if we do so with a second scale node, the details of the original image is maintained.
Therefore we need to add the pixelate node that stores the scaled down version of our image. We can then scale this back up using a second scale node.
However to maintain the original size it is important that we scale up to the correct value or the original size and the pixelated image size won't match.
Therefore we need to make sure that there is a relationship maintained between the x and y input of the first scale node and the second.
The relationship is such that when we for example scale down to 0.2 we need to multiply by 5 to get back to a scale of 1 which is our original scale. This means that to get back to the original size we need to find a number that when multiplied by the input value into the first node will become 1.
We can do this by dividing 1 by the input value of the first node to get the scale value for the second node.
The value node then simply decides how much pixelation we want and the value input into the second scale node is automatically adjusted to match the original scale.
We could also use power and set the exponent to -1. Any value raised to the power of -1 means the same thing as 1 divided by the base of that expression.
To save our pixelated image we can go to the image editor or press F11 to bring up the render result. Go to image->Save or save as.
However when we save our image we will save it in the original resolution. So if we rendered at 2048 by 2048 this is the resolution we will output even if we pixelated our image.
If we simply render an image and want to directly output it in a pixelated format that also has the lower resolution so that it can perform as good as it can. For example in a game using pixel art, we will run into trouble.
The way the render engine works will create a blurry result if any at all. However there is a simple workaround we can apply to the node setup we have above.
At the end of the node tree add another scale note and set it to render size. Then go to the output setting and change the output resolution to your desired resolution. The best is if this is the same resolution as the one you use in your first scale node so that the output match the downscaled version exactly.
To do this we can keep the original resolution and set the resolution percentage. For example, if our value node in the compositor is set to 0.04, that will result in a downscale to 4% of the original resolution.
Therefore we can simply change the resolution percentage to 4 in this case to match the value in the compositor.
Next we plug the last scale node into the viewer node and go to the image editor or press F11.
In the image selector at the top of the image editor, chose the viewer node. Press N to bring up the right side properties panel and go to the image tab. Make sure that the image output resolution of the viewer node is correct. You can see it in the image section.
Next go to image->Save and save your image.
Keep in mind that it is important that we use the viewer node in the image editor instead of the rendered result. The rendered result won't change it's resolution without first rendering a second time. Something that we cannot do since we need the high resolution image in the compositor.
If we for some reason needed to use the render result instead, we would have to save the high resolution render result to disk first and bring it back in using an image node.
If we want to bring our pixelated image in as a texture follow these steps:
For a more complete guide on setting up shaders and textures you can start with this article.
Related content: The complete beginners guide to Blender nodes, Eevee, Cycles and PBR
In this article we learned how to pixelate an image using the compositor in Blender. We took a look at the basic math behind scaling correctly to get the desired result.
We also learned that the image is still saved in the rendered resolution and if we need to have a lower resolution image with the pixelated result we can use an additional scale node and use it together with the viewer node to save the lower resolution result.
Thanks for your time.
