


Grid snapping can be quite useful when we want to align objects and geometry precisely. For example, when we're working with modular objects. Depending on what sort of snapping we want it can be a little unclear how to achieve it in Blender. So how do we snap objects to the grid in Blender?
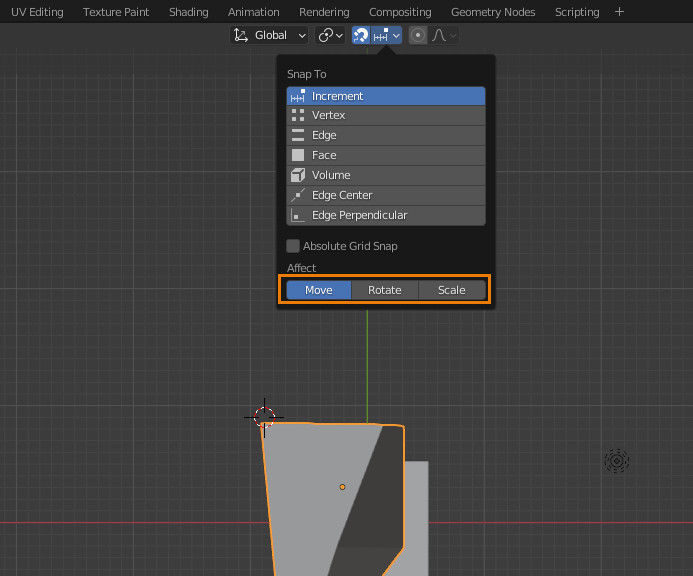
To snap objects to grid in Blender, turn on snapping by clicking the magnet icon in the viewport header. Next, click on the snapping dropdown just to the right of the snap toggle button and check "Absolute Grid Snap".
In the rest of this article, we go into all the details of both relative and absolute grid snapping. This includes the difference between object and edit mode snapping. We'll also cover some different uses for snapping and troubleshooting some common issues.
Grid snapping in object and edit mode are fairly similar. On top of that though we also have the ability to snap to faces, edges, and vertices in edit mode as well as object mode. One difference in edit mode is that we also have the extra option of enabling and disabling project onto self.
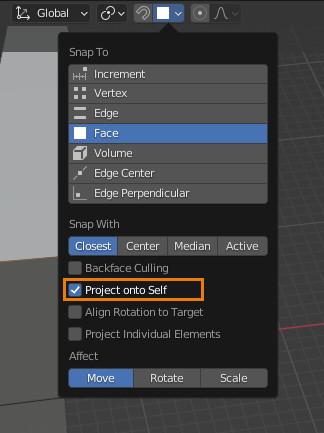
Project onto self allows us to snap our selection to the geometry of the active object. Note that this option isn't available for increment snapping. To actually access these options, we just need to click on the snapping dropdown. The dropdown can be found next to the magnet icon at the top center of the window.
When we enter orthographic view we can get a much better angle of the grid that we are aligning our objects to. To toggle orthographic view press 5 on the numpad. To enter front ortho view press numpad 1, 7 for top, and 3 for right. numpad 9 will flip the current view direction to get the rest of the directions.
We can also hold Ctrl while using any of these numpad numbers to directly go into the opposite view direction. Finally, we can split our view into 4 different windows by pressing Ctrl + Alt + Q, this will give us 3 different orthographic perspectives and 1 window for moving around our scene.
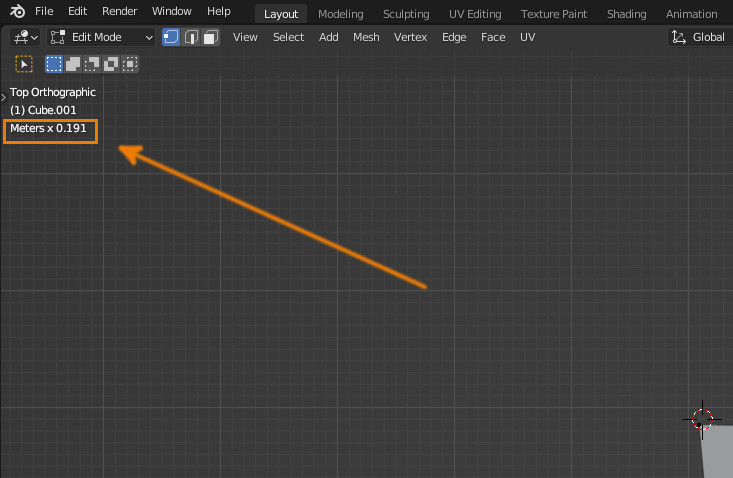
Note that when in one of these orthographic view directions we can actually see what the grid snapping size is at the top right of the window. If we've changed the grid size it will show that at the top right. We can use this to figure out the snapping increment.
Absolute grid snapping both rounds the values we're transforming the object by and the values that are transformation is being applied to by the snapping increment. So when moving an object both the values we move it by and the object's current position will be rounded.
With relative snapping only the values we're transforming the object by are rounded. When moving an object the values we move the object by are rounded but the position will not be rounded.
In more practical terms, with relative snapping an object will move using the snapping increment. In relative snapping, the object will not realign with the grid. When moving an object is absolute snapping the object will move by the snapping increment. The object will also snap to the grid if its misaligned.
When in edit mode we can use vertex, edge, and face snapping to align the different parts of our geometry. This can be used to align more than just one vertex, edge, or face as well. When we select a chunk of geometry with any of these snapping modes enabled the selection will be aligned by the active.
When in the snapping dropdown we can also enable snapping for both rotation and scale. It also behaves exactly how we'd expect with relative and absolute snapping.
While it can be a bit weird to use we can also snap objects to faces, edges, and vertices. In the case that we want to snap one object to the surface of another, we can just use face snapping as surface snapping. We'll also need to make sure that the face snapping is set to closest.
We can also change the size of the grid by going to the overlays dropdown or the two circles at the top right of the window. At the top of the dropdown, there is a scale value that controls the grid size. When we change this value we should be able to see the grid shifting.
Now when we use snapping we should see our selection snapping to the new grid size. Note that as well as that Unit scale will change the grid size.
When we're working on a large project that is heavily dependent on snapping never being misaligned here's a few things that could throw off that alignment. Do not change the grid size or if we need to make sure to note the original grid size. Changing the unit scale also changes the grid size.
One common issue we'll have with grid snapping is that objects that have been snapped don't line up. This is usually caused by mixing up relative and absolute snapping or, having unaligned relative grids.
Now if we've aligned the bulk of are objects with the absolute grid we can just enable absolute snapping and that will fix this.
In the case that we've aligned most of our objects to a relative grid what we'll want to do is match the misaligned objects offset to the aligned objects offset from the grid. To quickly align an object to a relative grid is to select an aligned object.
Press Shift + S and select cursor to selected, then select the misaligned object and again press Shift + S and select selection to cursor. Now we can move our object with relative grid snapping enabled and the object will stay aligned.
Another way of aligning objects with a relative grid is to figure out the relative grid offset from the absolute grid. Since the default grid increment is 1 we'll just go by that. In this case, all we'll need to do is copy the decimal values for the x, y, and z-axis.
To figure out the grid increment if we've changed the grid size or unit scale go into front ortho view by pressing numpad 1 and the top right will show the increment size. Now all we have to do is divide the aligned object's x, y, and z by the increment and then just use those values as our offset.
All we have to do now is replace the misaligned selection's decimal points with the relative grid decimal points. Now the selection will be aligned with the relative grid. When we have relative grid snapping enabled we can move our selection and it will stay aligned.
With that, we should have a pretty good grasp on everything related to grid snapping in Blender. While it may seem like a fairly simple topic hopefully you'll have learned some new info or something handy from this in-depth discussion.
Thank you for your time.
