


If you're interested in 3D animation and want to bring your characters to life, armatures are an essential tool to master. Armatures consist of interconnected bones that form a hierarchy, allowing you to control the movement and deformation of your character models.
In this article, we will dive into the world of armatures, exploring how they work and providing practical tips and techniques for working with them. By understanding the basics of armatures, you'll gain the knowledge and skills needed to create captivating animations in no time.
To add an armature in Blender, press Shift+A > Armature.
To add a bone to an armature, switch to edit mode and press Shift+A. Alternatively, to add a bone that is connected to previous bones, extrude using the extrude tool or press E.
To link an armature to a mesh, select both the mesh and the armature, and ensure that the armature is the active object. Press Ctrl+P > Armature Deform with Automatic Weights. You can now adjust the armature in pose mode and see the effects on the mesh.
Let's now go into some more detail about the purpose of armatures and how exactly to use them with our meshes.
An armature consists of interconnected bones that form a system, mimicking the structure of a real skeleton. Each bone is essentially a segment with a specific location and rotation in 3D space. By manipulating these bones, you can control the deformation and movement of your character mesh.
Armatures enable you to create intricate animations, including walking, running, or performing complex actions, by defining how the bones interact with one another.
Using armatures in Blender offers several advantages over manually adjusting the mesh for character animation. For example, while animating, rather than individually manipulating each vertex of a mesh, armatures allow you to control the entire character with the system of bones. This approach saves time and effort, as you can focus on animating the bones rather than tediously adjusting vertices.
Moreover, armatures allow for non-destructive animation. This means that you can pose your characters and objects, and yet still go back to the original shape of the mesh at any point.
Adding an armature is as easy as it gets: In object mode, go to Add > Armature, or press Shift+A and select armature from the from the list. Note that you can't add an armature while in edit mode with a mesh selected, as meshes and armatures behave very differently and hence aren't combined into a single object.
But what exactly is this 'bone' that we are looking at now?
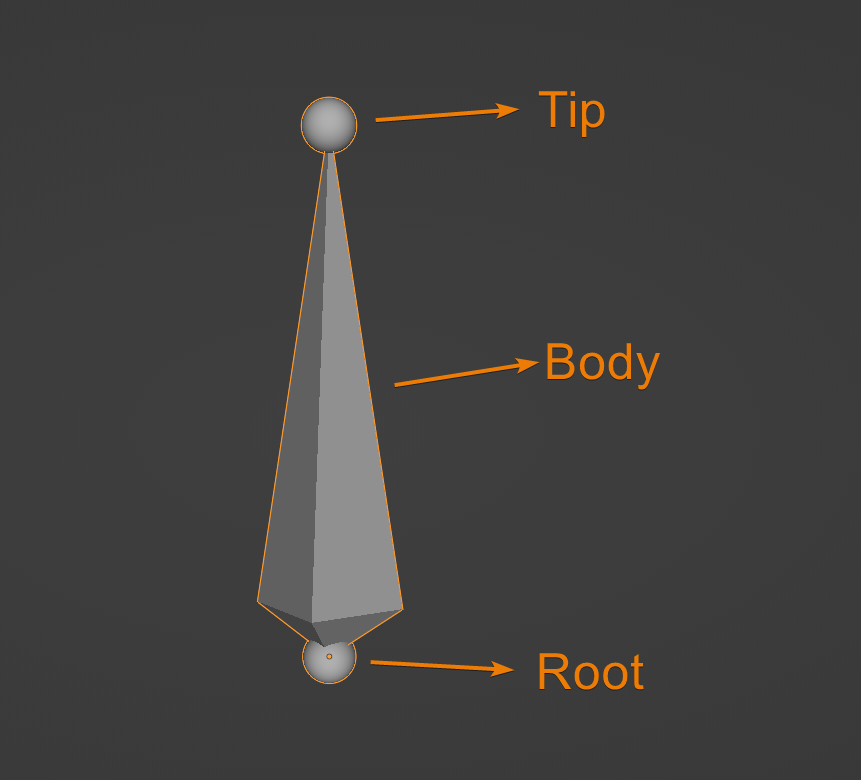
In Blender, a bone is formed of three main parts, as shown above. As with all Blender objects, the bone is created with it's origin at the location of the 3D cursor.
This origin is at the bottom joint of the bone, also known as the 'root'. The joint at the top of the bone is hence called the 'tip'. Joining these two is the 'body' of the bone.
The standard bone has a height of 1 meter between the center of the root and the center of the tip.
While a regular mesh has many different modes, armatures only have three main object interaction modes: Object mode, edit mode, and pose mode. You can switch between these three modes using the dropdown at the top left of the 3D viewport. You can also toggle between the currently selected mode and edit mode by using the Tab key.
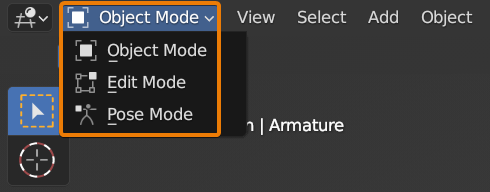
Object mode allows you to select the entire armature, including any bones you may have added in edit mode, and transform it just like you would move, rotate, or scale any other object in Blender.
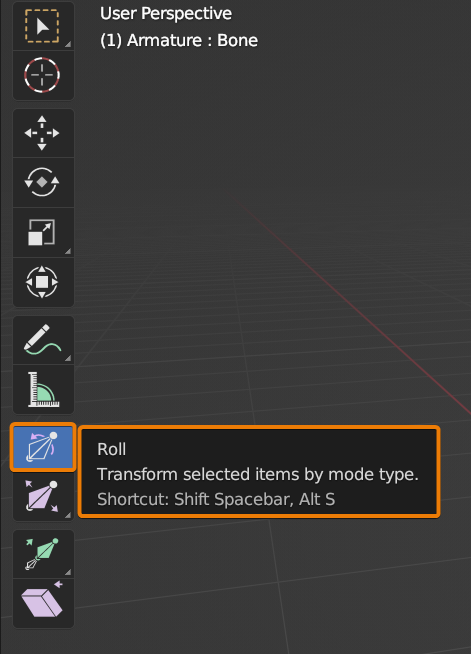
Edit mode allows you to manipulate each bone and each part of a bone in the whole armature. For example, you can select either the tip or the root of a bone and press G to move it around. Selecting and moving the body results in the entire bone moving along with it. Similarly, you can select and rotate the body by pressing R.
You'll notice that you can't rotate the bone around the Z-axis (or whatever the longer axis of the bone is). Instead, the Roll tool can be found in the toolbar and used for this exact purpose.
Pose Mode is a specific mode in Blender that allows you to manipulate and animate the bones within an armature. Once you have created an armature and bound it to a mesh, you can switch to Pose Mode to pose and animate the character.
In Pose Mode, you can select individual bones of the armature and adjust their positions, rotations, and scales to create various poses for your character. This mode is especially useful for creating keyframes and defining specific poses at different points in time during the animation, all while the original shape of the armature is preserved in edit mode.
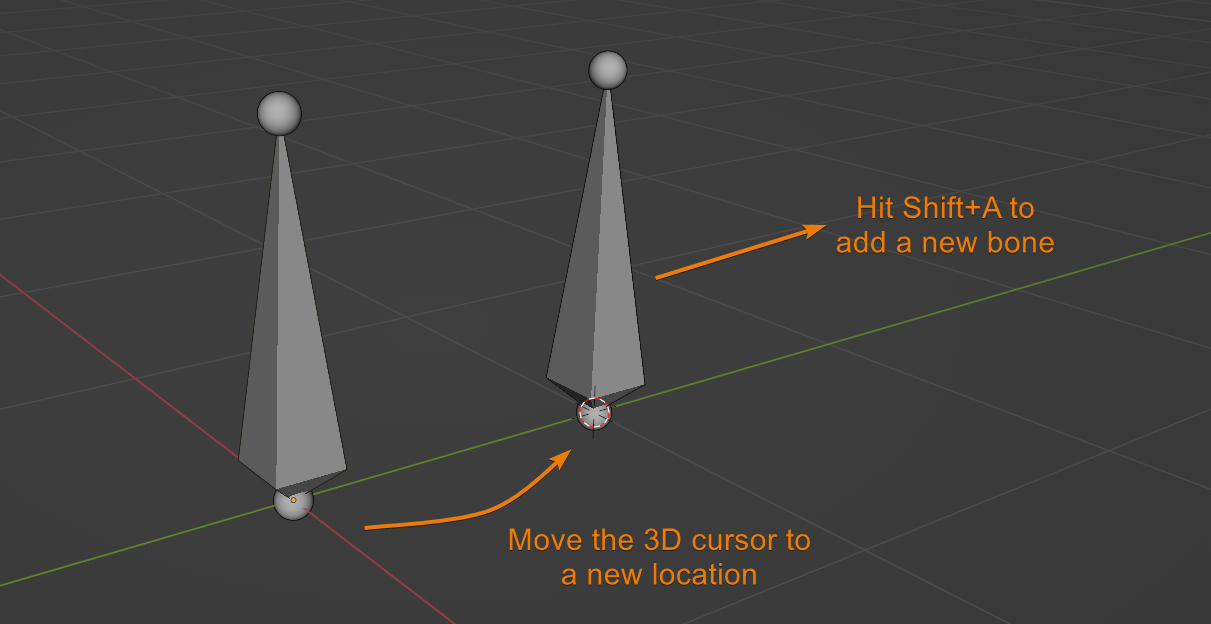
More bones can be added within the same armature in two main ways.
To simply add another bone that is not necessarily connected to the initial bone, select the armature and head to edit mode. Next, press Shift+A to add the new bone, which is once more created with the root at the 3D cursor. If your 3D cursor is still in the same position as the first bone, the second one will be created in the exact same location and hence won't be visible unless moved.
Now let's say you want to connect this new bone to the first bone, such that moving one also influences the other. To do this, head to edit mode and select the new bone, then shift + select the first bone. Use Ctrl+P and select 'connected' to parent the new to the old bone.
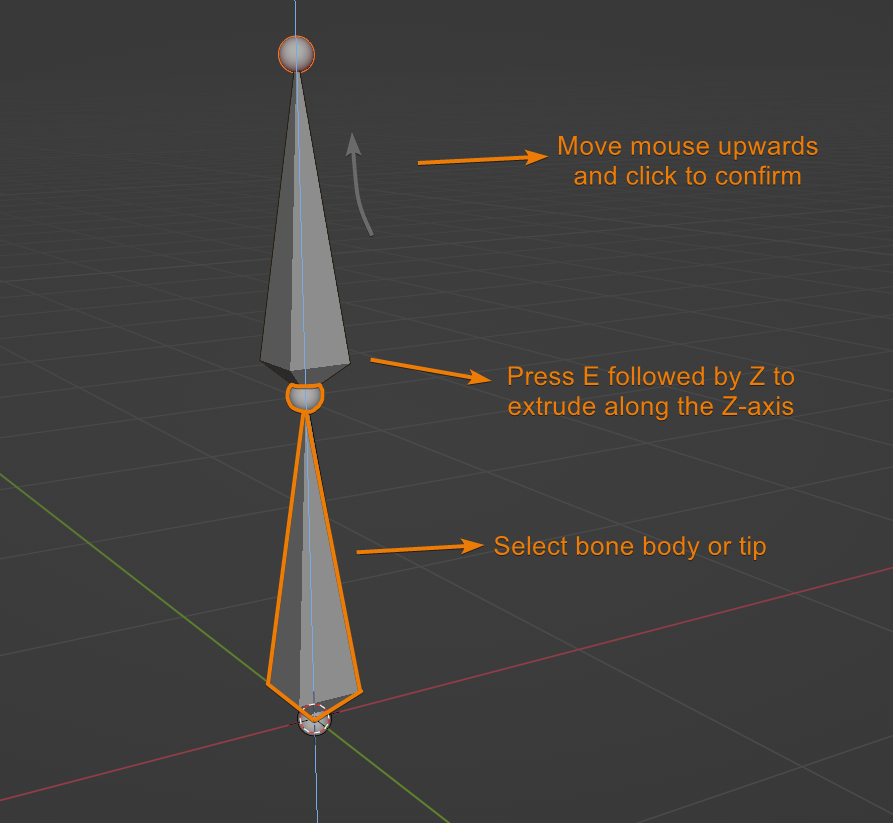
On the other hand, it is also possible to extrude the armature: This creates a new bone that is already joint to the rest of the armature.
To extrude upwards from the tip of the bone, select either the body or the tip and press E to extrude, then move the cursor and click to confirm the extrusion. To extrude along a certain axis, press E followed immediately by X, Y, or Z to restrict the movement to one or more axes.
You can also extrude from the 'bottom' of the bone by selecting to extrude the root rather than the body.
Naming bones in an armature can be quite helpful in order to stay organized, and this gets even more useful as the armature gets more and more complicated.
Right after adding a new bone by pressing Shift+A in edit mode, an operator panel pops up at the bottom-left corner of the 3D viewport. This panel only has one input: The name of your bone. Here the name can be changed to any value.
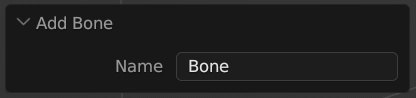
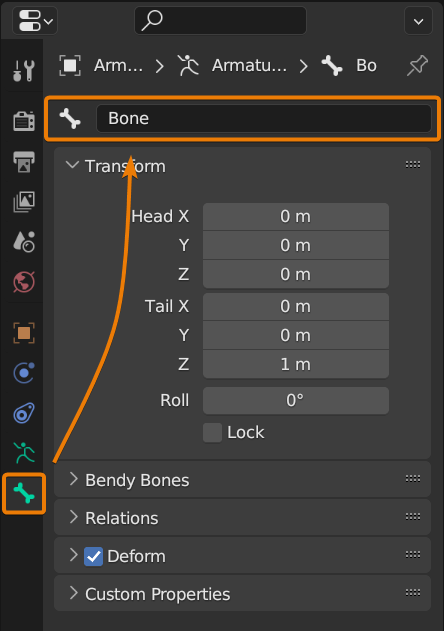
Do note that this panel goes away if you make any clicks right after adding the bone. If this is the case, or if the name needs changing at a later point in time, the name can also be changed by selecting the bone in edit mode and heading to the Bone Properties tab, denoted by a small green bone icon. At the top of this panel an input field is found, where the name can be changed.
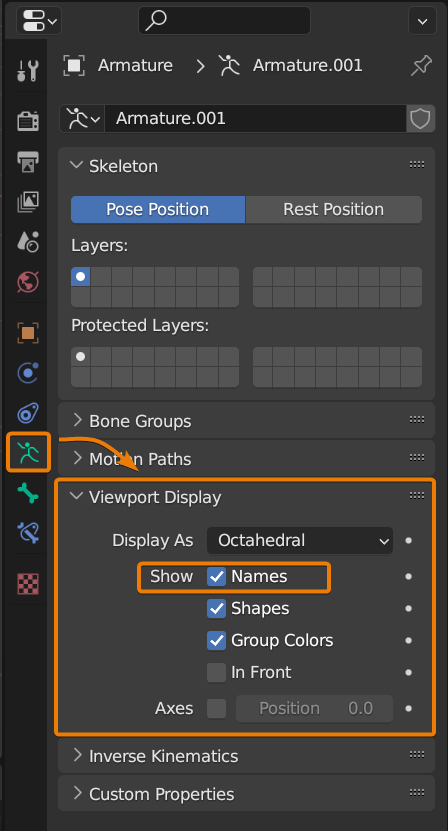
It can get a bit annoying to have to click on every bone and read the name in the bone properties tab to make sure that the right one is selected. To help with this, you can show the names of each bone in the 3D viewport as well.
To show the names of bones in the viewport, select the armature and head to the Armature Data Properties panel shown as a small green stickman. Under Viewport Display, enable 'Show Names'.
Linking armatures and bones to the mesh is a crucial step in creating a functional character rig in Blender. By establishing this connection, you enable the armature to control the movements and deformations of the mesh during animations. To link armatures and bones to the mesh, follow these steps:
It's important to note that the initial binding is often not perfect, and further adjustments may be required to fine-tune the deformation of the mesh. This can be done through weight painting, where you manually adjust the influence of each bone on the vertices of the mesh.
An easy way to ensure that simple rigs work well without weight painting, make sure the joints of the armature are positioned at the exact locations on the mesh where you want pivot points. To do so, enable grid snapping and align the joints of the armature with precision to the desired locations on the mesh. This helps maintain accurate joint positioning, ensuring smooth and accurate deformations during animation.
In this article we've gone over the basics of armatures and how to get started rigging your meshes for convenient and efficient posing as well as animating. A great way to learn more is to start playing around with armatures and get a true 'feel' of the workflow.
Thanks for reading!
