


Speeding up your workflow is essential when working on large projects, and Blender's many tools and settings truly help you to do so. One of these settings is backface culling, so let's see what it is and how it works!
Backface culling automatically hides faces when they are viewed from their back side. To enable backface culling for the viewport, click on the Viewport Shading dropdown in the header of the 3D viewport, and find backface culling underneath the Options section. Select the box to enable it.
For material backface culling, go to the material tab in the properties panel and in the settings section enable backface culling for the material.
Let's now go into more detail on what backface culling is and when you should be using it.

Essentially, backface culling is a way to hide only the back faces of a mesh, while the front of the mesh remains visible. This feature can be used in the 3D viewport for when you are working with your object, but can also be enabled for a material in its material settings such that it is applied for the material view and final render too.
This begs the question - how can we tell which side of a face is the front, and which the back?
For the default plane, the face pointing upwards, or towards the positive local z-axis, is considered the front, whereas the bottom is considered the back. In the rest of the default meshes in Blender, such as the cube, spheres, or even Suzanne, all the faces pointing towards the inside of the object are considered back faces.
This means that if you have backface culling enabled and you view a closed mesh from the outside, you will be able to see it. However, if you view it from the inside, none of the interior faces will be visible and you can essentially see through the mesh as if it wasn't even there or is transparent.
To toggle backface culling on and off, head to the viewport shading dropdown in the top right header in the 3D viewport. Under 'Options', enable 'backface culling' by checking the box.

If you frequently switch between having backface culling enabled and disabled, you can add the toggle to your quick favourites by right clicking on it and pressing 'Add to quick favourites'. Now you can use it anytime your cursor is over the 3D viewport by pressing Q and toggle it from the popup.
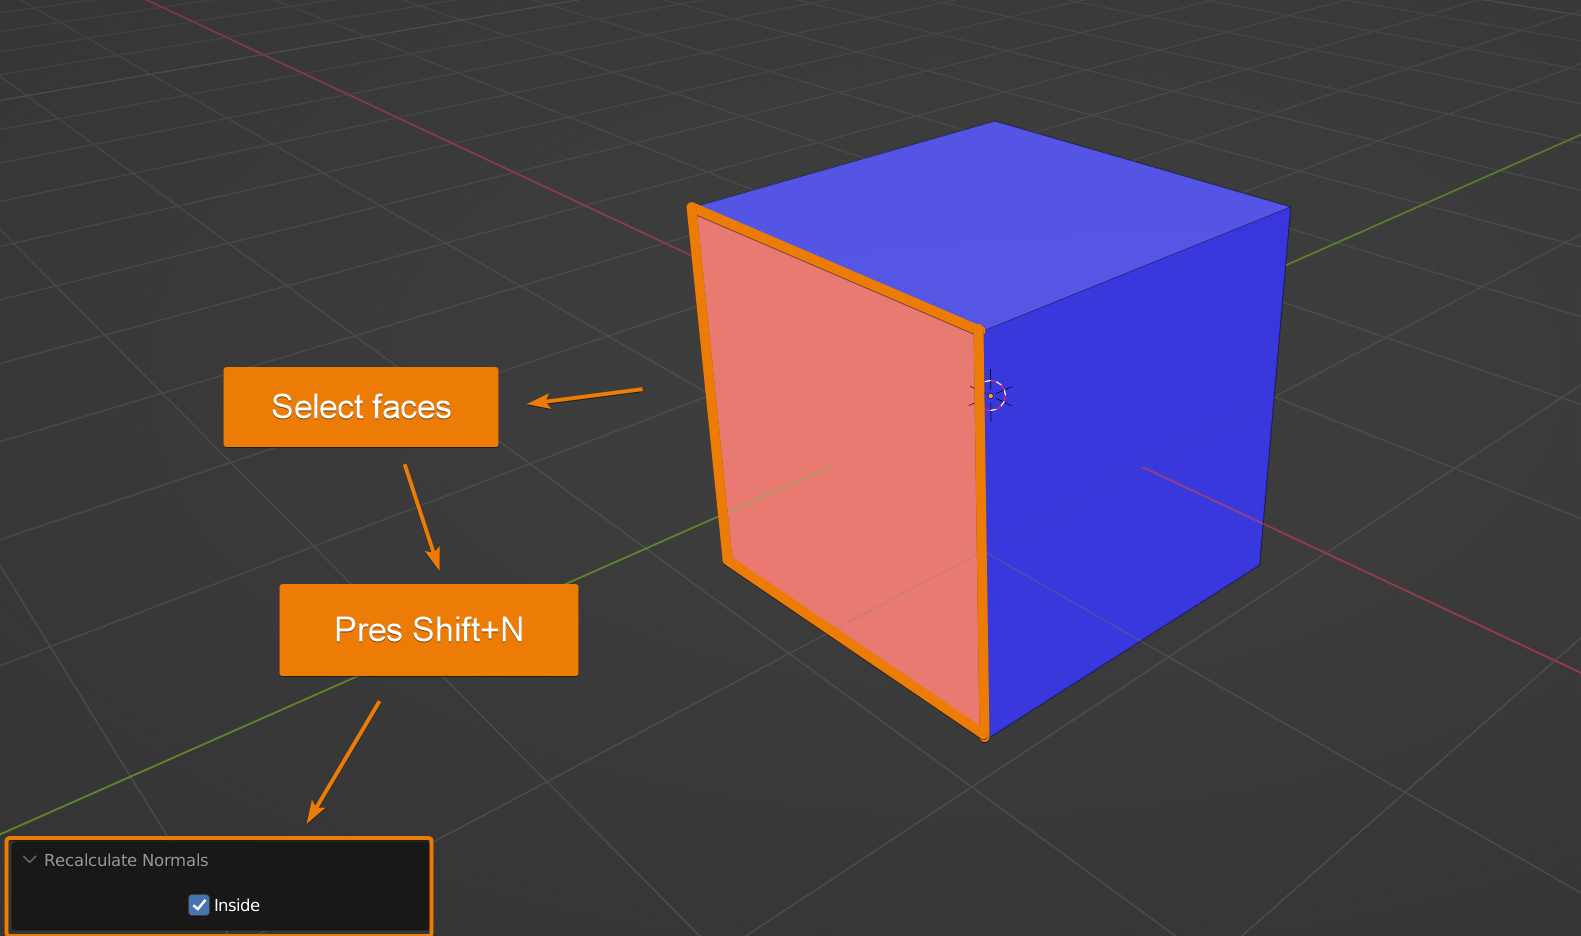
It is also possible to manually change which polygons Blender considers to be a front or a back face, so we can decide which faces are visible and which aren't when backface culling is enabled.
To do this, select the "Viewport Overlays" dropdown from the top right corner of the 3D viewport. Next, select "Face orientation" from the menu to enable it.
Now all the front sides will be coloured blue, whereas the back sides of all faces will be coloured red. If you're not seeing any red faces from any angle whatsoever, you most likely already have backface culling enabled, so they are already being hidden.
Changing the normal orientation of these faces can now be done in edit mode. Simply select the desired faces or hit A to select everything, then in the 'Mesh' properties in the top header of the 3D viewport, select Normals > Recalculate Outside. Alternatively, you can also use the Shift+N shortcut to quickly recalculate face normals.
Next, in the small popup box in the bottom left corner, toggle the inside setting to switch which side of the face is the front and which is the back.
Backface culling is incredibly useful when you want to avoid different parts of a mesh coming in your way while modelling. A simple example of this is for when you have an object lying on a plane, which may be a backdrop:
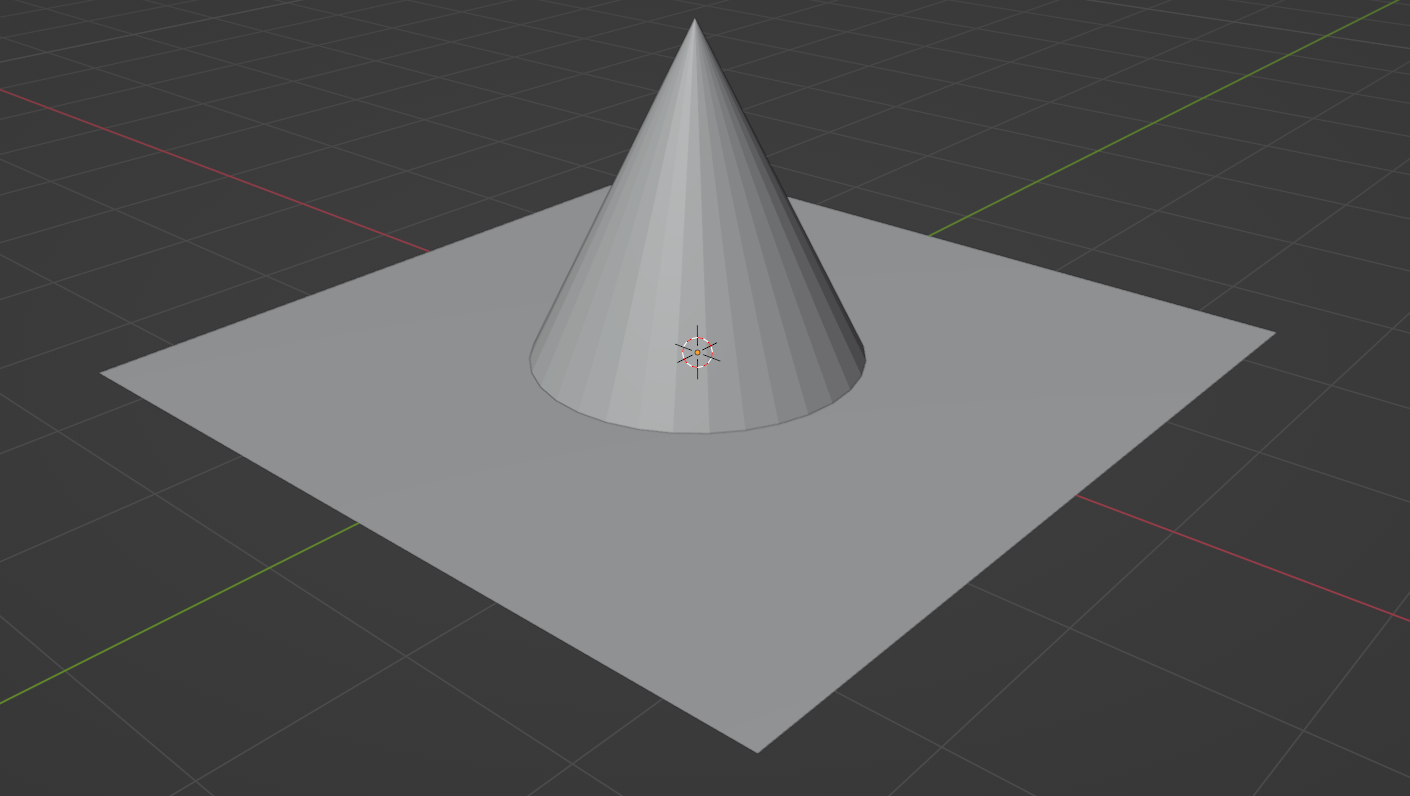
In this case, we may want to edit the bottom of the cone, but clearly the plane would then be in the way. While we could switch off the visibility of the plane of switch to x-ray or wireframe mode, this might become very repetitive to toggle if you need to do it on many different occasions.
In this case, it's helpful to use backface culling such that the plane is visible whenever we view it from the top, but becomes transparent whenever we have to view it from underneath to edit the bottom of another object.
Similarly, you may want to create one mesh inside of the other, without the other coming in the way. In this case, again, using backface culling can significantly speed up your workflow.
By default, Blender textures both sides of a face with the same material. However, there are workarounds to this, which allow you to make a single material which shows two different textures on the inside and the outside of each face. This effect is accomplished by taking advantage of the "backfacing" output available on the geometry node to mix different shaders by inputting it into the fac slot of a mix shader. So what's the difference between backface culling and these materials?
Backface culling only makes the back faces transparent, such that they are no longer visible whatsoever. While you could set up double-sided materials in such a way that inner faces are assigned a material driven by a transparent shader, you could also use just about any other material on the interior faces as well, not just make them transparent.
Moreover, double-sided materials are often more complex to calculate, and hence might increase render times as each face needs to have multiple materials processed. On the other hand, enabling backface culling actually often enhances processing speeds as certain faces don't need to be considered or shown whatsoever.
We've gone over some of the basics of how backface culling works in Blender, and looked at sample scenarios where it might be useful. Using this feature can greatly speed up your workflow and save you lots of time otherwise spent on repetitively hiding and un-hiding different meshes as soon as they get in your way. By using it in combination with the face orientation overlay, you can control exactly when to show whichever faces you prefer!
Thanks for reading, and get modelling!
