


Having an appropriate and suitable camera angle for your renders can be crucial to help in showcasing your beautiful scenes and objects. In this article, we will explore the process of positioning the camera to capture an object within the scene.
To aim the camera at an object in Blender, pan around the viewport using the middle mouse button to rotate and Shift+Middle-Mouse to move around, then centre the object in the view. Next, press Ctrl+Alt+Numpad 0 to align the camera object to the set view. Alternatively, go to View > Align View > Align Active Camera to View.
Let's now go into a bit more detail on how to setup cameras in Blender, and how to make the entire process easier using object constraints.
A default new Blender file comes with a camera already added to your simple scene. In case it's already been deleted, simply add a new camera by pressing Shift+A and selecting camera in the list.
To transform the camera, select it like any other object and use the move tool (keyboard shortcut: G) or rotate tool (keyboard shortcut: R) to move it around.
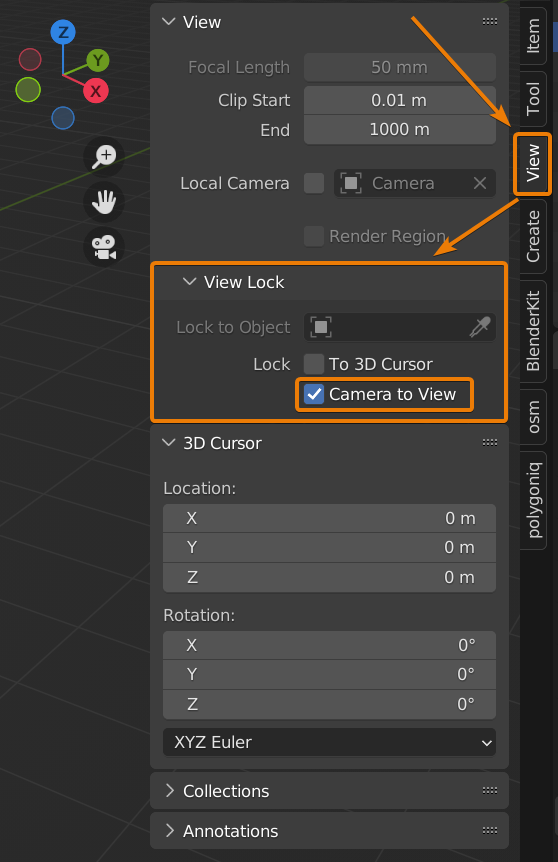
You can also toggle the camera to the view by pressing Numpad 0 or selecting the camera icon on the right end of the 3D viewport:

Once in the camera view, you can now use the move and rotate tools just as before so that you can see what the camera will be seeing after the translations are made.
There are multiple different ways to aim the camera at your object. First, the above mentioned method can be used to insert a camera and manually move and rotate it until it is aimed at the subject.
However, this process can be a bit tedious, and it is always easier to pan around in the 3D viewport. Hence, a more efficient way to accomplish this is:
If you wish to move the camera view around in the same way in which you pan around the viewport, then:
If you don't have a number pad to perform shortcuts to speed up your workflow, you can go to Edit > Preferences > Input and select "Emulate Numpad". This turns the top row of numbers on your regular keyboard into numpad keys, meaning all numpad shortcuts can be performed with these now.
It should be noted that emulating numpad removes the ability to use the vertex, edge, and face select shortcuts in edit mode. Check out the article Shortcut for vertex, edge, and face select in Blender to help with this!
If you are constantly moving around the subject of your scene for an animation or even just to try out different layouts, it will most definitely get tedious to continually have to align the camera with the object. Not to worry, because there is a simple and efficient fix for this as well.
Now, if you move around the selected object, the camera will rotate accordingly to constantly have the object in view.
The track to constraint has multiple different settings to customise the tracking and achieve some interesting effects depending on the requirements of your scene. One of these settings includes the 'Influence' option, which can be adjusted to reduce the amount of influence the subject's location has on the rotation of the camera.
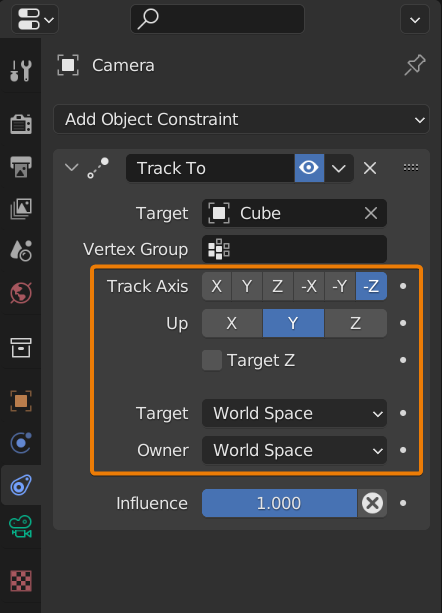
If you have problems with the rotation of the camera, try cahning the track axis and up axis setting. Usually, you would want to set the track axis to Z or -Z and the up setting to X or Y.
We can also combine the track to constraint with a follow path constraint so that our camera moves along a path while automatically aiming at an object that it passes by.
For this to work, add the follow path constraint on top of the track to constraint in the constraint stack. Then add a curve object to your scene and set it as the target in the follow path constraint.
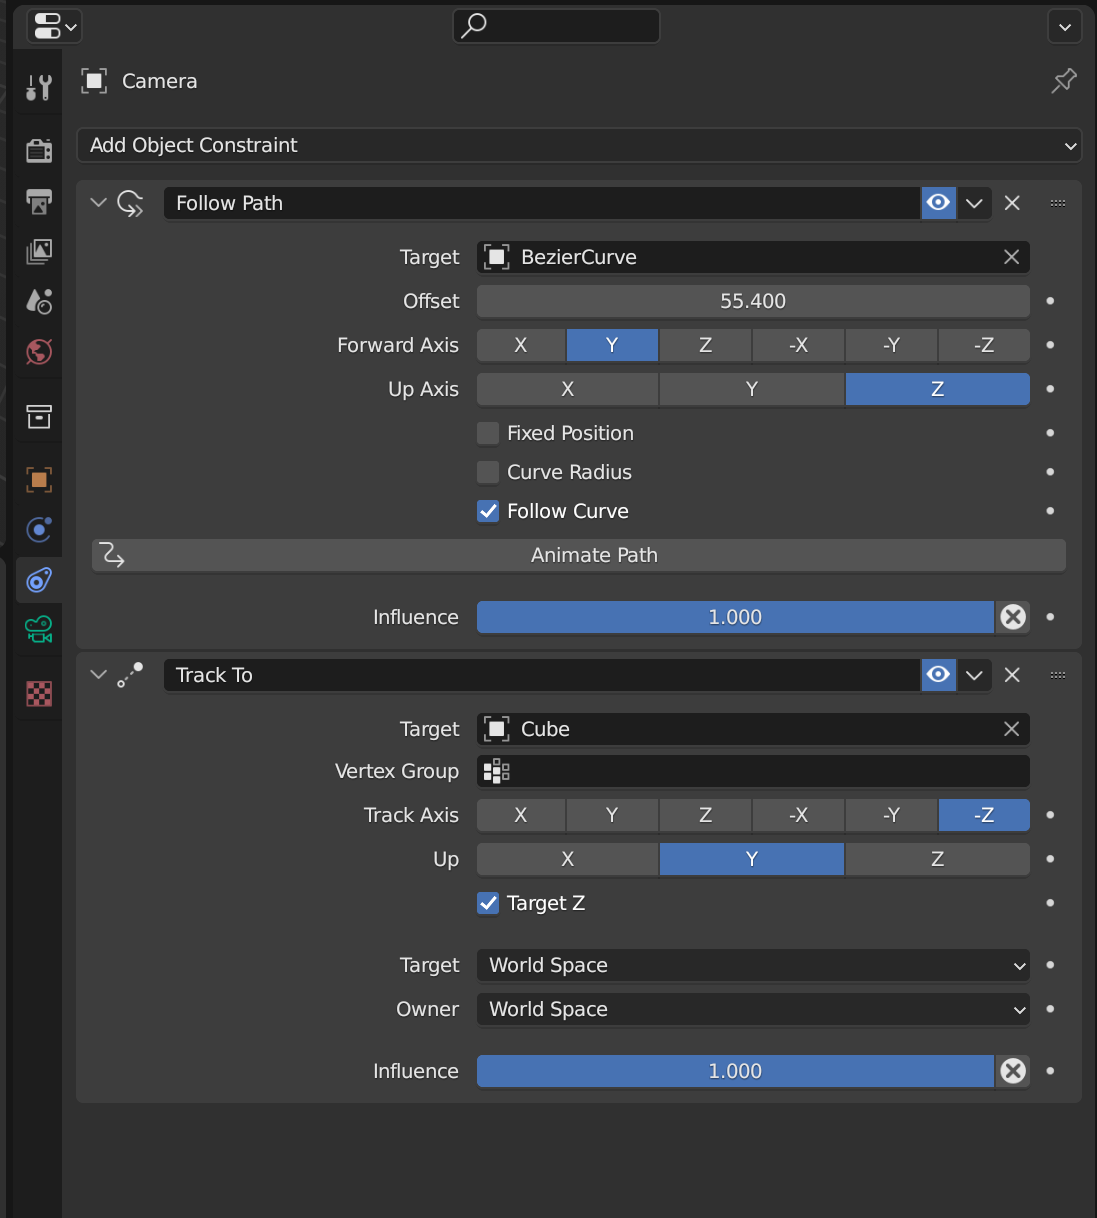
Depending on the angles and positions in the scene you likely have to adjust the constraint settings or the position of the curve and camera in relation to each other until you get the right rotation and position of the camera.
To move the camera along the curve, you can animate the offset setting on the follow path modifier.
You can also press the animate path button to have Blender add an F-curve modifier to the curve object. To find this, open the graph editor, select the curve, press N and go to the modifiers tab in the graph editor to see a generator modifier added to the curve that creates the motion in this case.
We can parent the camera to the object by selecting first the camera then shift click the object, so that the object becomes the active object, the press Ctrl+P and choose object. If the then move the object in the scene the camera will follow.
If the camera is preaimed at the object using the instructions above the camera will aim at the object and follow it at the same time.
Related content: How parenting works in Blender
Setting up a camera is a straightforward process in Blender, but problems can arise nevertheless especially if you have a more complex scene or the camera is constrained to an object that is quite far away.
If the object or mesh that the camera is aimed at is very far away, it is possible that it stops being visible to the camera due to clipping. Clipping is a real-time optimisation for renders, which limits the distance to which the scene will be visible to the user in order to save processing memory.
The default clip end for cameras in Blender is set to 100 meters. This means that any object that is more than a hundred meters away from the camera will not be visible.
To increase the clip end for a camera, select it and head to the object properties tab in the properties editor, indicated by a green video-camera icon. Under the Lens section, increase the End value till the object becomes visible in the camera view.
If your camera is constrained to tracking an object, the object may get so close or so far to the camera that it appears too big or too small in the view. Alternatively, the perspective of the object could also seem off based on it's distance from the camera if the lens type is set to perspective.
A simple fix for this is to change the focal length of the camera. To do this, head to the object properties tab for the camera and change the focal length under the Lens category. The default focal length for a camera in Blender is set to 50mm, and this can be adjusted to whatever suits the type of scene best.
If you use an object tracking constraint on the camera, it may be the case that the camera behaves unnaturally or unexpectedly. An example of this could be that the camera rotates in the wrong direction when the object moves, and hence doesn't keep the object centered in the view.
A simple check for this is to ensure the location and rotation have been applied for both the camera and the object. To do this, simply select both and press Ctrl+A, then select location/rotation from the list to apply.
If the issues still exist, it may be due to the settings of the tracking constraint. Make sure to cycle through the different 'Track Axis' or 'Up' options until the camera behaves as desired.
Whether you want to reposition the camera just once in a still scene or you want it to follow an object in an animated sequence, we've gone over it all in this article. The possibilities for different scene compositions are endless.
Thank you for your time!
