


Align Euler to vector is a node that takes in a rotation value and then offsets it to line up with a direction or position. This can allow us to do quite a few things we would otherwise need to do with constraints, modifiers, and particle systems.
In the rest of this article, we'll go over the align Euler vector node, what it does, and what we can do with it. We'll also go over how it works and when it might be useful.
Related content: Blender geometry nodes fundamentals guide
The Align Euler to Vector node allows us to pick an axis that it will then rotate to match a vector. We can think of the vector as either a position or direction that the node will try to rotate towards.
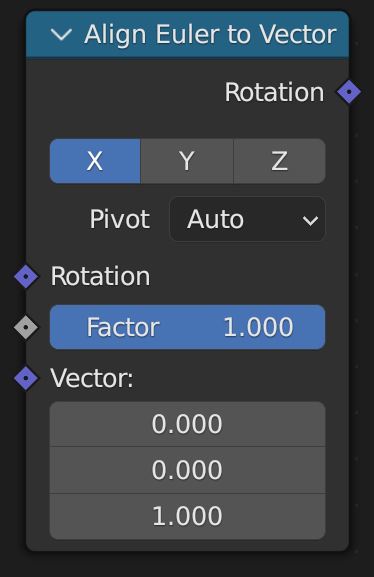
What this means is that the axis we choose is the one that aligns exactly. When thinking of it like a position though it's important to note that this is a position offset from the object we're rotating. So, when we move the rotated object, its rotation will stay the same.
Then if just rotating that axis won't allow the rotation to match the vector the other axes will be rotated. This rotation requires the smallest total rotation to align to the vector, kind of like the shortest path. To visualize this, if we aligned an object by the X axis then the side of the object would face towards the vector.
With the Pivot we can choose to allow rotation on only one axis when trying to align with the vector. We can also combine multiple align Euler to vector nodes to align multiple axes. The last node in that chain will be the one that is the most closely aligned to its selected axis.
We can also use the node with animations, whether that's by just using keyframes in the node or with inputs that are animated. This video by CG Cookie also provides a great explanation of how the node works:
Rotation input is the rotation value that the node will try to align to the direction of the vector. This input is not necessary and the output rotation will still be aligned to the vector.
Factor lets us change how aligned the object is to the vector. If we've not provided a rotation value this will just control the strength of the node.
Vector is the position or direction that our rotation will align to. This allows for inputs like position as well as normals. Regardless of how far away the point is it will not affect the output.
Rotation output This is the output of the node, we can connect this rotation value to any node that takes in a rotation value.
A reference to this node can be found in the Blender Manual here:
External Content: Blender Manual - Align Euler to Vector Node
There are quite a few uses for the align Euler to vector node. The most common uses are aligning to normals or facing toward an object or direction. We can also use the node as an alternative to tracking constraints for geometry nodes.
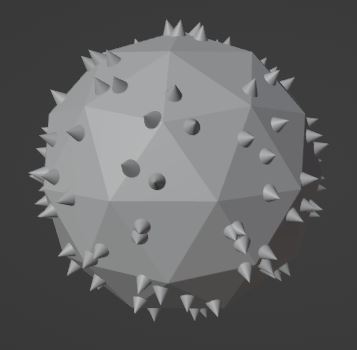
By inputting the normal value of the object we've generated points from we can get a rotation value for each point that is aligned to the surface. Actually getting this normal value will depend, some nodes that generate points will just output the normals.
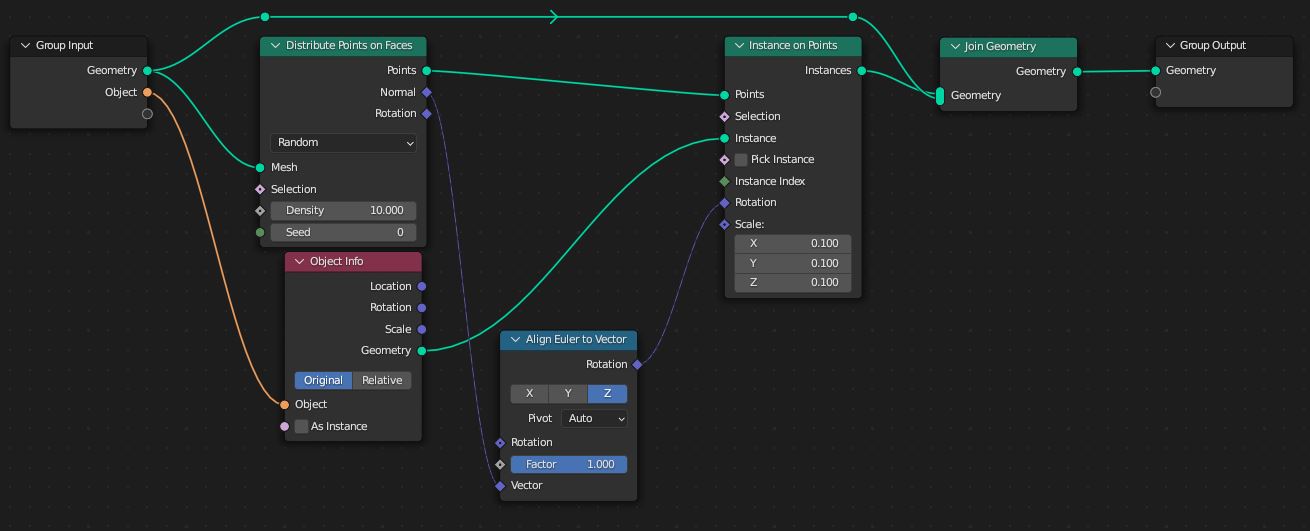
In the case that it doesn't we can also use the capture attribute node to get the normals. By setting the capture attribute node to vector and connecting a normal node to the vector input we'll get the normals of the geometry as the attribute output.
Then all we need to do is connect the geometry output to the point generator and we can use the attribute for our align Euler node vector. This also supports custom normals on the object we're getting the normals from.
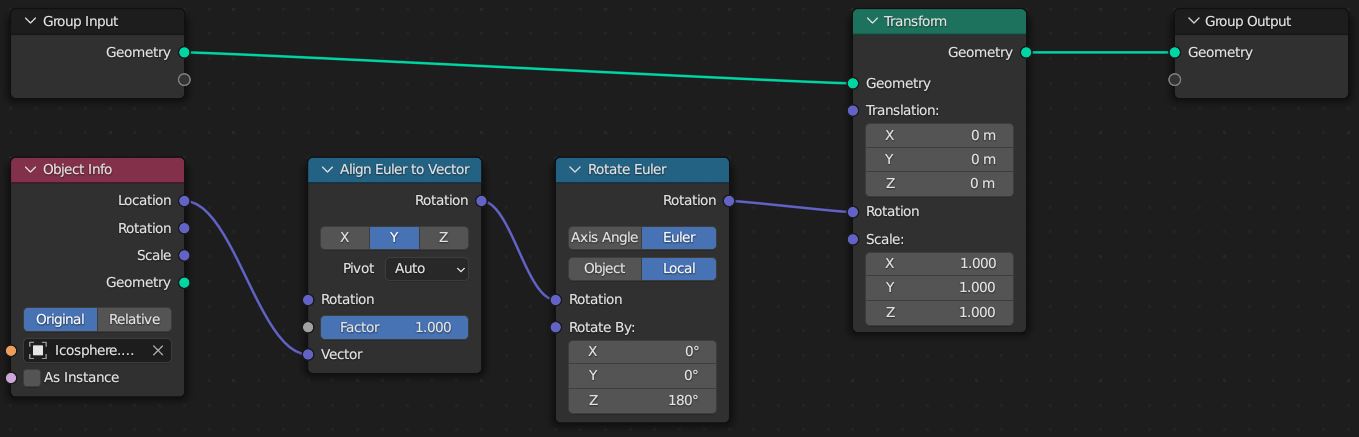
We can achieve this by just using an object info node to get an object and then using its location as the vector for Align Euler to Vector node. To flip this around we can use a vector math node with all 3 axes set to -1 applied to the position. We can also use a rotate Euler on the output to flip the rotation.
If we use a rotate Euler node we'll likely also need to use local rotation so that the facing isn't inverted.
The position doesn't need to necessarily use an object for this either. We can also set up a position value and use it for the vector. To help visualize this we could create an object in the graph and move it to this point.
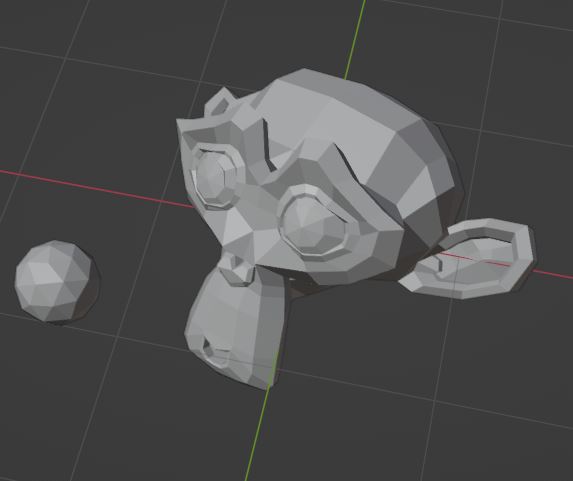
When using the align euler to vector node sometimes the rotation will flip around weirdly. This is especially noticeable when moving objects or when we're aligning to a very rough surface.
This can happen when we're only aligning to one vector. The axis we've selected will face the vector correctly during the flip. The orientation of the other two vectors will still be able to flip around because they're not aligned to anything.
To fix this we can align one of these other axes to a direction. To align it we'll use another Align Euler to Vector node. Connect the first's output to the second's rotation input.
Make sure to set these to the two axes you want to align, and the two objects or positions you want to use to align. Now we can use the first axis to keep the rotation from flipping and the second for the direction we want our object to face.
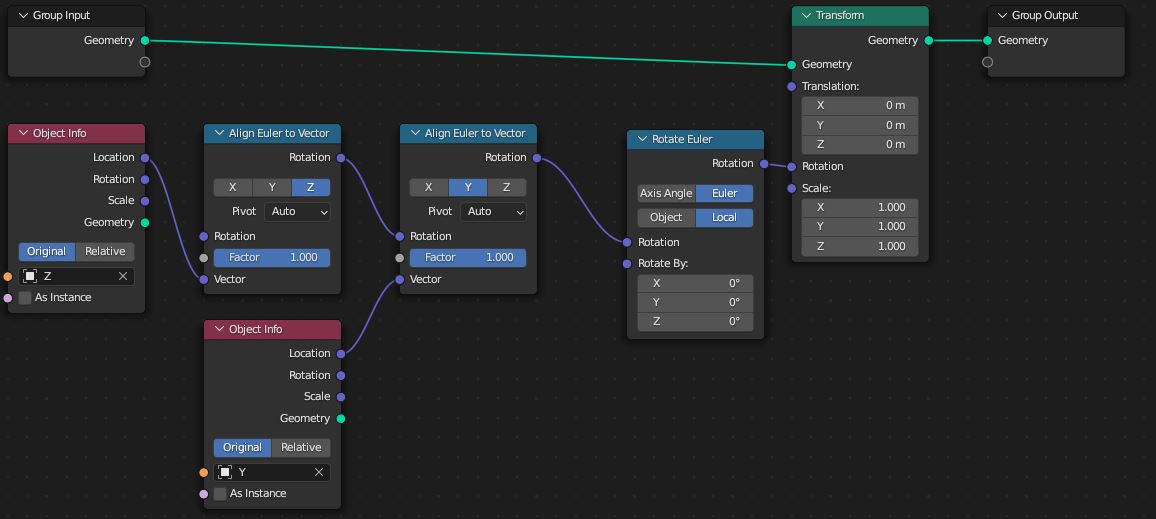
An important note about using multiple align euler to vector nodes is that the last node in the chain will have priority. Basically, whatever axis you want to align exactly with the vector should be last. This is because the last node will change the rotation to align it to the axis.
As well as that we can also just set the pivot to an axis. In most cases, this will solve this issue but obviously, the rotation will only pivot on that one axis.
Align Euler to Vector can have several uses. While it can be a bit tough to wrap your head around once you have an idea of how it works it's not too bad. In general geometry nodes can be quite handy and this is one of the nodes we'll be using often.
To recap we can think of it like grabbing the direction of an object and moving it to the direction of the vector.
Thank you for your time.
