


EXR is one of the many image formats Blender can export. It can allow us to include multiple layers in one image and can hold much more information and is therefore useful when doing compositing and post-processing of the image. So how do we use EXR in Blender?
To use the EXR format follow these steps:
In the rest of this article, we'll go into more details about EXR and how to use it. We'll also talk about MultiLayer EXR, how it works, and how to output layers to it.
To save renders as EXR:
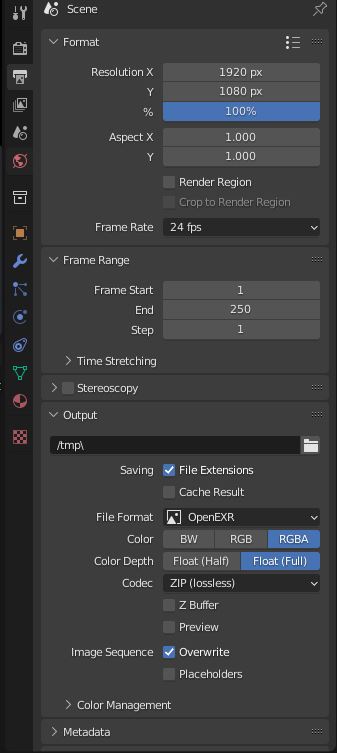
As you can see its fairly easy to setup the EXR format, it will basically act like any other format just without compression artifacts and a much higher bit depth.
In terms of the format options there's a lot to pick from but usually ZIP is going to be the smallest lossless format. DWAA is the smallest, but it is lossy so we're not going to get exactly the same data we have in the render. If we're not taking advantage of the alpha channel, we can set the Color to RGB to save space.
Color Depth gives us the option to choose between 32 bit (Full) or 16bit (Half) Both of these are going to look great but the higher bit depth will increase the range of possible values which will help with color banding.
To setup Multi Layer EXR:
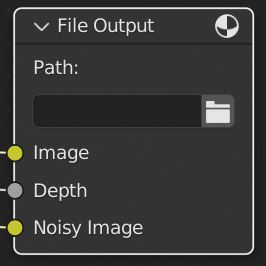
If we need data from other passes to do our compositing, we can use EXR MultiLayer to pack all of those passes into one image file.
Related content: Blender compositing render layers(passes)
This allows us to export as many layers as we want in the compositor. Just like a normal EXR we can use the MultiLayer EXR for animations and Blender will export a single EXR for each frame of the animation containing all passes we selected.
We can also add whatever image we want to the layer outputs, these don't just have to be from the render layer outputs.
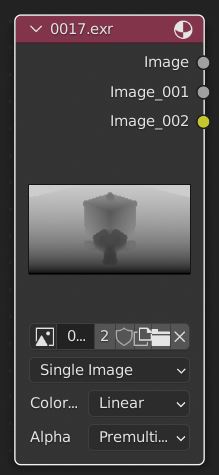
To open an EXR:
In general Blender completely supports the use of EXR files in place of any other type of image format. This goes for shaders, world materials, modifiers etc.
For MultiLayer EXR Blender will usually just use the first layer unless it gives us the option to pick layers. For example the Shading editor image node doesn't let us access the EXR layers.
We can also import an EXR image sequence just like any other image sequence. When in the file browser click on the first image in the sequence then hold shift and click on the last image in the sequence. Now just click Open Image.
EXR is useful when we want a lossless high bit depth image format. Basically we'll be able to get out the exact same image we had when we rendered. Just to give a quick example of what bit depth is, if you zoom in on an images pixels you'll likely see the banding of colors.
EXR is capable of storing high dynamic range as opposed to low dynamic range that is saved in regular image file formats, such as jpeg or png. This means that we can use the high dynamic range to retrieve information from completely white or completely black areas of an image.
While a png file has values between 0 and 1 for each pixel, an exr file format can store values that are much higher than 1 and bring back details in these blown out areas of an image in the compositing part of our workflow.
With a higher bitdepth we can have a wider range of values which results in a smoother transition between colors and brightness values. A practical example of how this would be useful is if we want to save a mist pass, with the higher bitdepth we can have a wider range of values to adjust.
If we have a lot of small changes in our mist pass the higher bit depth will make it easier to separate those as we'll have a wider range of depth values to work with.
EXR MultiLayer has all the same features as well as having a convenient way to store multiple passes, for example we may want to render first and do our compositing later or in another program.
We can export as many layers as we want to an EXR file which can be very useful for adjusting our renders after we've rendered them. We don't need to export separate images for each layer, instead we can use the EXR MultiLayer format to pack all of our layers into one file.
The EXR format is also very portable. Whether we want to composite our render in another program or just have a very high quality copy of our render that we can use in another program we can use the EXR format for this.
EXR files take up much more space than most other formats such as png. This can make storing animations in EXR format not very viable. This can also become an issue with very high-resolution images or a lot of layers.
Due to the size of EXR files they also take longer to load. This can become an issue if we have a long animation. It can also just be quite tedious when we're importing the files especially on slower hardware.
EXR isn't meant to be used as a final format either and is mainly used to store compositing information for later. This means that we'll need to render out our EXR files in another more common format later.
For example as a png, jpeg or for web we might use the newer webp file format.
A lot of times the precision of EXR files is just unnecessary and will only add complexity to our workflow. Remember that the main advantage of the EXR format is the accuracy of the image. If we don't need that accuracy we should just use another format such as png or even jpg which will usually look just as good.
An example of when the EXR format might be overkill is if we're creating a youtube video or a web image where the image or video is just going to end up being compressed anyways. For compositing if we're not going to be heavily adjusting the image colors or brightness it's just better to use a smaller format.
The EXR format is very useful for storing renders. We can maintain quality as well as being able to pack multiple layers into one image. The EXR format also can be used in a wide range of programs making it much more portable than other lossless formats.
Thank you for your time.
