


When thinking of green screens and when to use them, Blender might not be the first thing to come to mind. Green screens can actually be quite a useful alternative to alpha though.
Green screens can help us cut down on image sequence file size by including the alpha channel as a color, we can also use them to include transparency with video files. So how do we set up a green screen background in Blender?
To add a green screen background to Blender:
In the rest of this article, we'll go into more detail about setting up the green screen background. We'll also go over how to convert our green screen back to transparency in the blender compositor.
Related content: How to use alpha transparent textures in Blender
Before we can set up the green screen we'll need to change the color management. Blender defaults to filmic which usually gives renders a much nicer look. The problem with filmic is that it will shift all the colors in our render. To solve this we'll be switching the view transform to standard.
To change the color management go to properties > render properties > color management and change view transform to standard.
Related content: How to change the background in Blender?
First, go to the shading workspace, then at the top left of the shader graph set the type from object to world. Next, go to add > search > mix shader and place it in the graph. Repeat this for a light path node, and an RGB node.
Connect the light path is camera ray output to the mix shader fac input. Next, Connect the background node output to the first input of the mix shader node. Finally, Connect the RGB color output to the second input of the mix shader node.
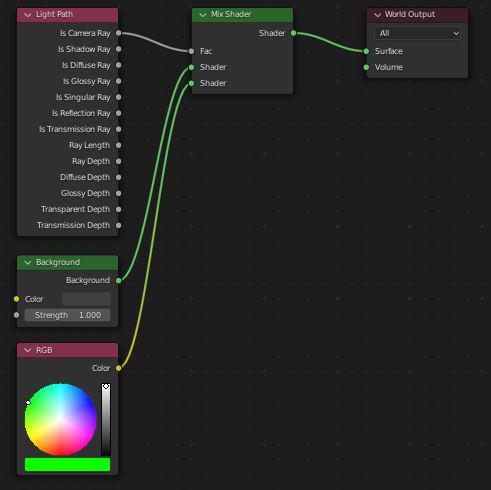
Now we can just use the RGB node to set the color of our green screen. We could search online for an exact color value to use but really we can just use whatever color isn't in our render. Green screens don't even have to be green and in some cases, other colors may work better.
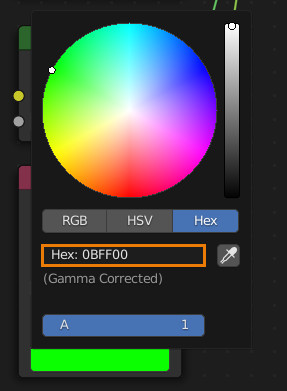
As a bit of a time saver for later, while the color wheel is open click on the hex option. Copy the hex value and save it for later. This will allow us to just paste in the exact value when we're converting it back to transparency.
With that our background green screen is now configured. We can set up the background node however we want for lighting without it affecting the green screen. The green screen also won't affect the lighting of our scene since we've set it to only appear for camera rays.
Once we've configured everything let's go ahead and set up our scene for rendering. In properties go to output properties > output and set the file format to whatever you'd like to export your render as. This can be a video file or an image format of your choice.
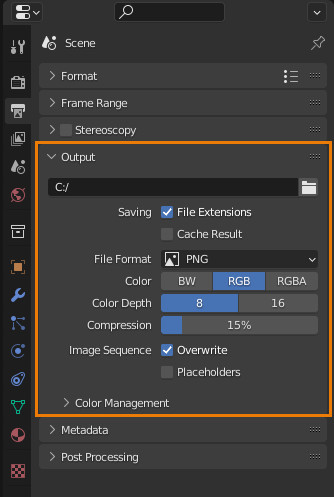
In output make sure color is set to RGB and not RGBA if it isn't done already so that our images don't include an alpha / transparency channel. Now, all we have to do is press F12 to render or Ctrl + F12 to render an animation.
The advantage of exporting transparency through a green screen rather than just including an alpha channel with images is that we save on file size especially when longer uncompressed image sequences. It's also less data to load later on when we reimport the sequence.
As well as providing smaller file sizes for image sequences, green screens are also one of the few ways to include transparency with a video file.
Once we have our image / video file we can move on to compositing. If we're still working with the same project file that we made our video in I recommend setting up a new scene for the compositing. This is so that we can disable the rendering of the scene and save time.
To create a new scene, click on the new scene button at the top left of the window next to the scene dropdown.
Switch to the compositing workspace and enable use nodes. Next, go to add > search > chroma key and place it in the graph. Repeat that process for an image node. Connect the image node image output to the chroma key image input. Connect the chroma key image output to the composite image input.
Make sure to open the file we've exported with the image node as well.
To make the process of adjusting our settings more convenient let's also set up a viewer node. Go to add > search > viewer and place that under the composite node. Next just connect the output going to the composite image in to the viewer image in as well.
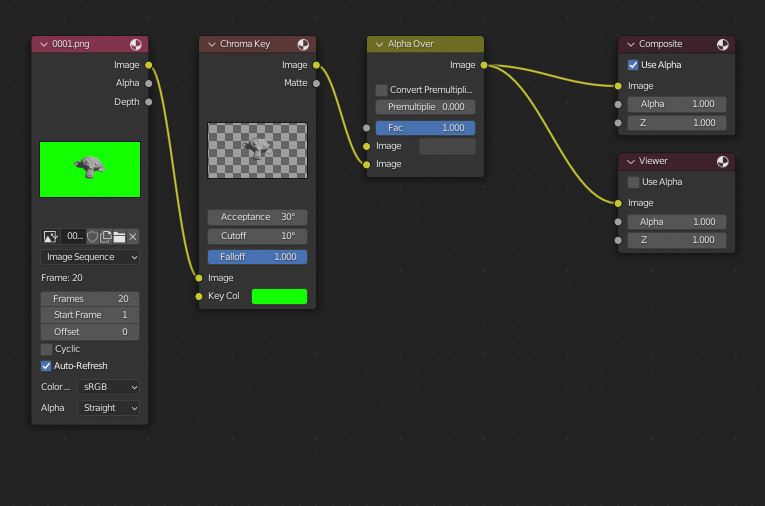
Now press N to open the side panel and in the view tab enable backdrop if it's not already and then click fit. Press F12 to render a single frame and now we can start configuring the chroma key node. Click on the key color and in the hex section paste the green screen hex value.
In the case that we don't have the green screen hex value or the color space has somehow been changed we can instead use the eyedropper. To use the eyedropper go back to the hsv section and click on the eyedropper then select the color of the green screen using the background preview.
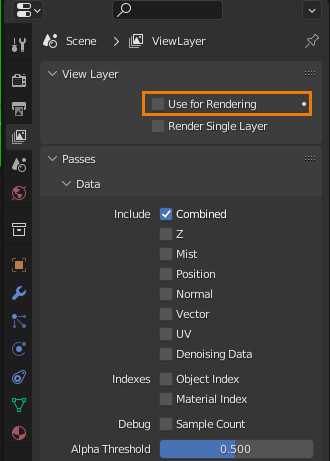
Before we render, if we've set up a second scene we can go to properties > view layer properties > view layer and disable use for render to save rendering time. We can also go ahead and set the view transform back to filmic in this scene, this will only affect the output and not the image node.
Don't forget to set the file path as well as the format again if we're using a separate scene.
Related content: Top 12 post-processing effects to enhance your Blender renders
With that, we should now know how to both set up and use a green screen in Blender. At first, it may seem like something we'd only use for real-life footage but it does have its uses in 3D Rendering.
Green screens can help us keep file sizes down as well as include transparency in formats that don't support it. They also aren't too hard to use in the Blender's compositor, with the chroma key node we can just plug in our video file and adjust a couple of values and get great results.
Thank you for your time.
