


The common recommendation is to use Blender with a desktop computer, but as hardware grows more powerful and the demand for mobility increase year by year, even for 3D artists, the laptop is increasingly becoming the hardware of choice. With that comes certain challenges when you are trying to create the artwork of your career.
Go to Edit->preferences and check "Emulate numpad" and "Emulate 3 button mouse". Your number row now act as the numpad, enabling you to navigate, and you can use Alt+LMB to orbit the camera, Alt+Shift+LMB to pan and Alt+Ctrl+LMB to zoom.
There are more changes we may want to make and features that may help us create art more effectively. But it depends on what features our laptop has. Read on for the full story to an effective mobile 3D art creation experience using Blender.
If you plan to use a laptop with Blender, at the very least I would recommend you get a standard mouse with two buttons and a clickable scroll wheel. You will be a lot more efficient using a mouse than relying on your trackpad.
If you want to stay compact, there are even options to mix it with a numpad. In the razor Naga series for instance there are several mouse models with nine buttons on the side that you can set up as a number pad. If you search for "mmo mouse" on Google, you will find several alternatives to this series as well.
If you still want to use a trackpad though, the biggest problems you will have is navigation and selection. You should follow these steps to enable "Emulate 3 button mouse" in Blender.

What this does is that it allows you to use the Alt, Alt+Shift and Alt+Ctrl keys together with a left trackpad click to emulate the orbit, pan and zoom according to the list below:
For more information on viewport navigation, you can read this guide.
Related content: How to move the camera in Blender
We can also use the overlay gizmo buttons on the right side of the 3D viewport to navigate. You can click and drag the axis widget to orbit or click on specific axis in the graphics to go to the corresponding orthographic view.
Related content: How to use the gizmo in Blender?
We can also use the hand and magnifying glass icons to click and drag to perform zooming panning.
The primary conveniences we miss out on is related to navigation when we don't have a numpad. The numpad provide us with hotkeys to quickly move to precise camera angles, like left, right, top or bottom. The number zero on the number pad also switches to the camera view and numpad period let us zoom to our selection. A very handy navigation shortcut.
Related content: Blender shortcut keys: How to find, manage, change, and reset
Depending on our mouse setup we have a few options for the number pad if our laptop is missing one.
We may have opted for a mouse/numpad combination with an "mmo mouse" or we could get an external number pad that we plug into a USB port on our computer. These external number pads are often quite cheap and there are both wired and wireless alternatives out there.
But if we don't want a hardware solution, what can we do?
The software solution is to "emulate numpad". Follow these steps:

This changes so that our number row acts as the numbers on the numpad. We can now press 1 on the number row to navigat to the front orthographic view, 3 for right orthographic view and 7 for top view.
However, we lose the ability to quickly switch between vertex, edge and face selection modes in edit mode using the numbers 1,2 and 3.
We will instead need to rebind those keys to another set of keys. Follow these steps.
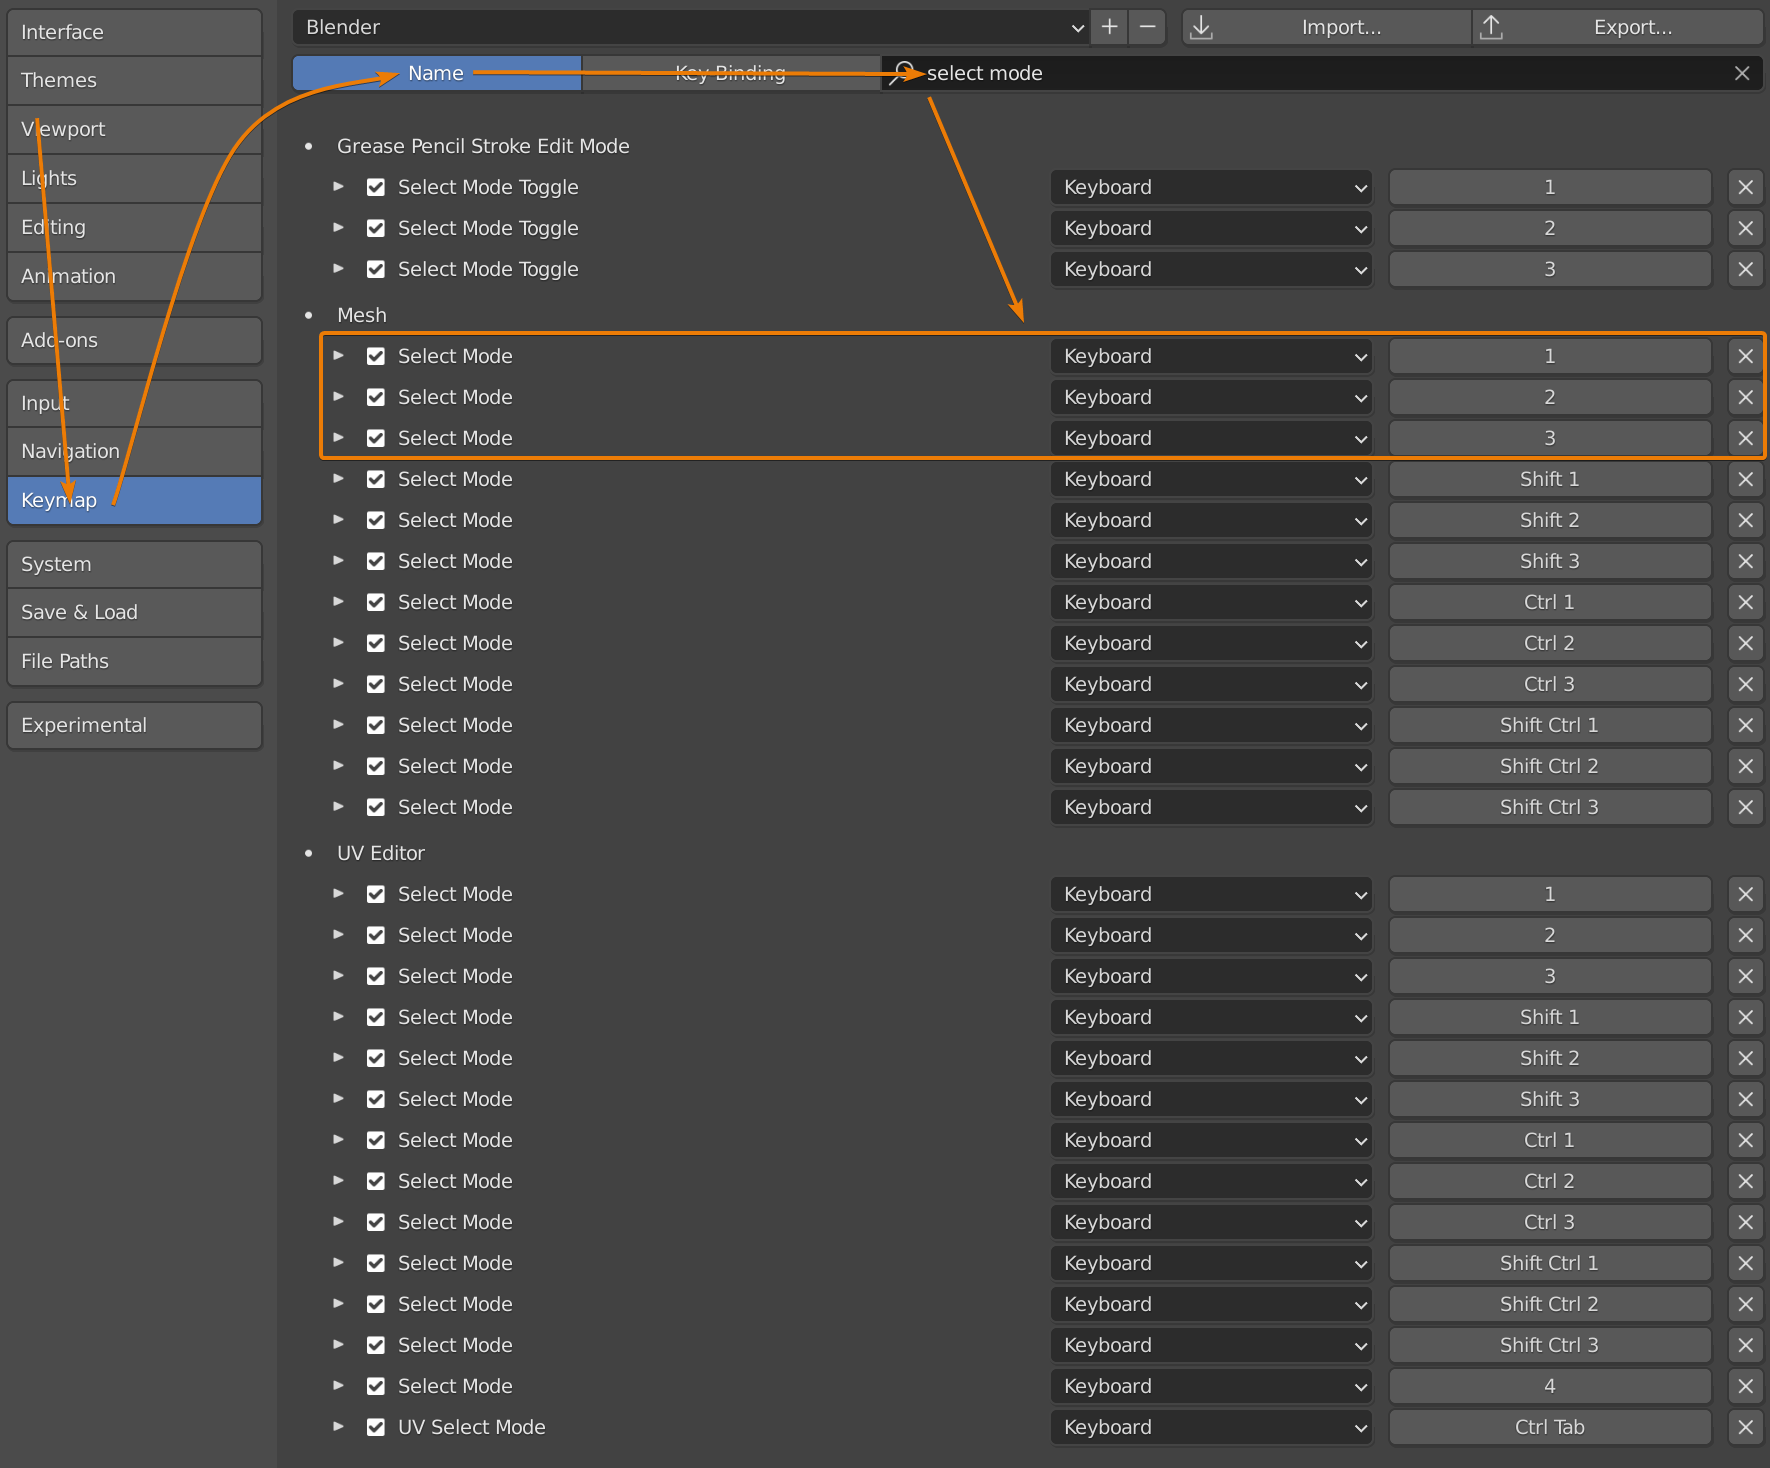
You will see that there are several "select mode" entries. If you intend to work with grease pencil and UV editing, you will have to change the keymap for those modes as well here.
If you find yourself not using the modifiers, like Shift+1, 2 and 3 you can remove those and use Shift+1, 2 and 3 for your regular selection mode switch. To remove a hotkey, press the X on the right side.
If you are considering between a laptop or a desktop for Blender, a crucial factor about laptops to consider is throttling.
Throttling is when the computer heats up so much that its overheating prevention kicks in. This is called throttling, and the effect is that the computer downclocks itself degrading performance significantly to not overheat, crash and prevent damage to the hardware.
Desktops can also overheat, but it is a much more widespread problem on laptops thanks to their compact design.
Rendering is an extremely taxing process on your compute device, and it heats up the internal components of the hardware significantly. So, if you plan to get yourself a laptop for Blender, you will want to know how well its cooling works.
Before settling on a specific laptop model, therefore investigate how well the computer handles heat for longer periods of time. For instance, personally I have a Lenovo 720 Yoga. I can work quite well on this laptop, but I must move projects over to my desktop or use a render farm for final renders since the laptop throttles after about 10 minutes of intense rendering using the GPU.
While working however, the laptop has some time to cool off between shorter bursts of heavy load.
If I were to rely on a laptop alone today, I would consider the ASUS Zenbook Pro Duo series.
If your laptop supports touch and stylus such as the Lenovo Yoga series or a Surface Pro. Accepting both pen and touch input, you should consider getting Tablet Pro.
External content: Tablet Pro website
You can get it from the Microsoft store. It is a free trial with an in-app purchase if you decide that it works well for you.
The app is a customizable on-screen keyboard. You can use your pen in one hand and setup a custom keyboard on one side of your screen. This enables you to have quick access to your most useful features through touch, just like you would if you had a stylus monitor with quick buttons on the side.
It is also fully customizable.
Together with Blender, this makes for an extraordinarily strong combination, allowing you to sculpt on screen with access to navigation and shortcut keys.
On a laptop, you may find yourself quickly running out of screen space while working in Blender. You may want to have reference images on screen and all your tools available while also leaving space for your actual viewport. Setting up Blender in an efficient way can be hard sometimes.
One way to get around this is to utilize the workspaces to your advantage. Setting up a workspace for each task and switching between them.
You can switch between workspaces using Ctrl+Page UP and Page down. These shortcuts can also be changed by searching for "workspace" in the keybindings inside your user preferences.
Another way is to control the resolution scale. If you find your interface too small or too large, you can change the scale of the interface. Go to Edit->Preferences and open the interface section.
At the top you will find "Resolution scale". Change the value to a higher value, such as 1.2 for a larger interface and to a smaller value, like 0.8 for more space for your viewport and working area.
There are ways to make life easier when working with Blender on a laptop. But working with a touchpad in Blender just won't do it in the long run. You would be at a very rough disadvantage and likely learn at a much slower pace than if you just invested $10 in at least a mouse.
But there are some software tools that can make you way more productive, like the tablet pro software.
I hope these tips has been valuable in finding the solution that works for you in your situation.
Thanks for your time.
