


There are many cases where we might want to setup a mask in the VSE. While there is a mask strip option it just adds a mask as a black and white strip. So how do we setup a mask in the Blender VSE?
To use a mask in Blender VSE follow these steps:
In the rest of this article, we'll go into more detail about masking in the Blender VSE. We'll go over how to use Blenders masks as well as how to use a strip as a mask.
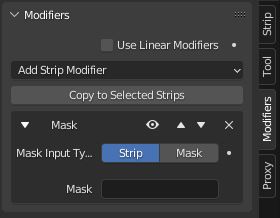
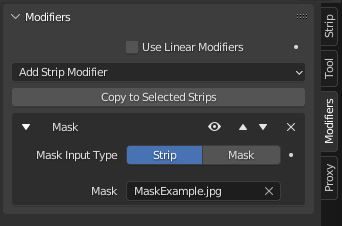
To actually setup a mask the first thing we'll need to do is select a strip and add a mask modifier to it.
In the VSE select a strip and then press N to open the side panel. In modifiers click add strip modifier and select mask. Inside the modifier we can either select a strip or a mask to use as a mask for the current strip.
Now we'll either just setup a mask that we can directly plug into the modifier or we'll setup a strip that we can use as a mask in our modifier.
There are quite a few ways we can go about creating a mask. We could use a plain black and white image or a video. We could setup a scene strip with a scene that uses white emissive objects and a black background.

We'll just need to make sure whichever method we use we create a strip in the VSE that aligns to the strip we're masking. We'll hide this strip later so it may be better to put it on top so we can view it.
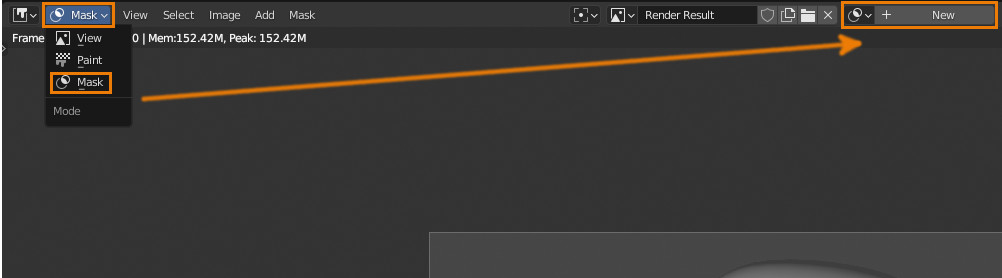
To setup a mask go to the Rendering workspace and on the top left click on the view dropdown and set it to mask. In the middle on the browse masks dropdown add a new mask and name it.
The shortcuts for creating the mask are:
| Tool | Shortcut |
| Create Point | Ctrl + Click |
| Scale Feather | Alt + S |
| Move Point | G |
| Point options | W |
The article below has a section that goes into more depth about how to use the image editor mask tools. The mask tools can be a bit confusing to figure out so I recommend giving it a quick read through.
Related Content: Masking for the compositor in Blender
Note that we can also animate the mask by first select all the points in our mask with A then pressing I to insert a keyframe. Go to the frame we want the mask to be done moving by and then adjust the mask to the shape we want and press I again.
We can also insert a frame by going to mask > animation > insert shape key.
Something to keep in mind when using a Video or Image mask is that the color space or the compression of the mask may make the white in our image not completely white. This can result in a very small amount of transparency.
To solve this issue we can select our mask strip and press N to open the side panel. In modifiers click add modifiers and select Bright/Contrast and increase the contrast until the slight transparency disappears.
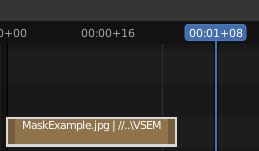
Once we have any one of the types of masks mentioned above we can add them as a strip in the VSE, this can be a video, image, or a mask strip.
To add an image to the timeline go to add > image. For videos go to add > Movie. For masks go to add > mask and selecting the mask we want to use. Each one of these should result in a black and white clip in the video editor.
On the strip we want to add the mask to select it and press N to open the side panel. In modifiers select the mask and then strip and set the mask strip we've added as the strip.
Now to actually see our mask in action we'll need to hide the mask strip. This won't stop the mask from working but will just make the actual black and white strip not visible anymore. Select the mask strip and press H to hide it. We can also select it and press Alt + H to unhide it. This will also apply in renders.
Like mentioned earlier we can add modifiers to our mask strip and adjust it however we want. This can be a bit weird and may not update right away. Usually if we just move the playhead around it will update.
Make sure if we're using an animated mask that we align the mask with the clip we're masking. We'll also want to make sure the length of the mask clip matches the length of the video or else the mask will cut off too early.
If we're using a Blender mask we can also just use the mask directly in the modifier. This will save us a couple steps as well as adding less to the VSE but we won't have as much control over the mask.
Creating the mask strip allows us to modify the mask just like any other strip and then apply it to another strip using the mask modifier. Like any other strip we scale a mask strip as well as adding modifiers to it.
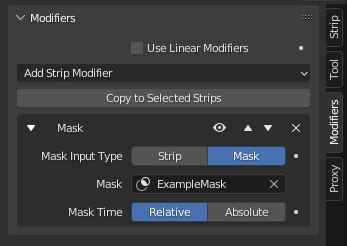
The main advantage of directly plugging the mask in is that we can avoid a few steps and cut down clutter. If our mask isn't animated and we don't want to modify it, this is the best way to set the mask.
With what we've covered in this article we should be able to do quite a bit with masking in the VSE. We can setup basic masks with images or any strip in the VSE. We can also use videos and Blenders masking system to create complex animated masks.
With the ability to setup and align our masks as strips in the VSE as well as adding modifiers to them we can achieve quite a few effects.
Thank you for your time.
