Sometimes when we're working on a project in Blender, we may want to composite our shadows separately or isolate them from the object they're being cast onto such as when we're compositing a render over a background. So how do we do that?
To make an object a shadow catcher in Blender follow these steps:
In the rest of this article, we'll go over more details about what shadow catchers are, how to set them up, and how to use them in Blender.
Note that we'll go over how to make a Shadow Catcher in Cycles if you're looking for a guide on how to do this in Eevee check out this article:
Related content: How to create a shadow catcher with Eevee in Blender

A Shadow Catcher is a transparent object that only shows the shadows cast onto it. It can also cast diffuse light onto other objects and show up in their reflections depending on the object's settings.
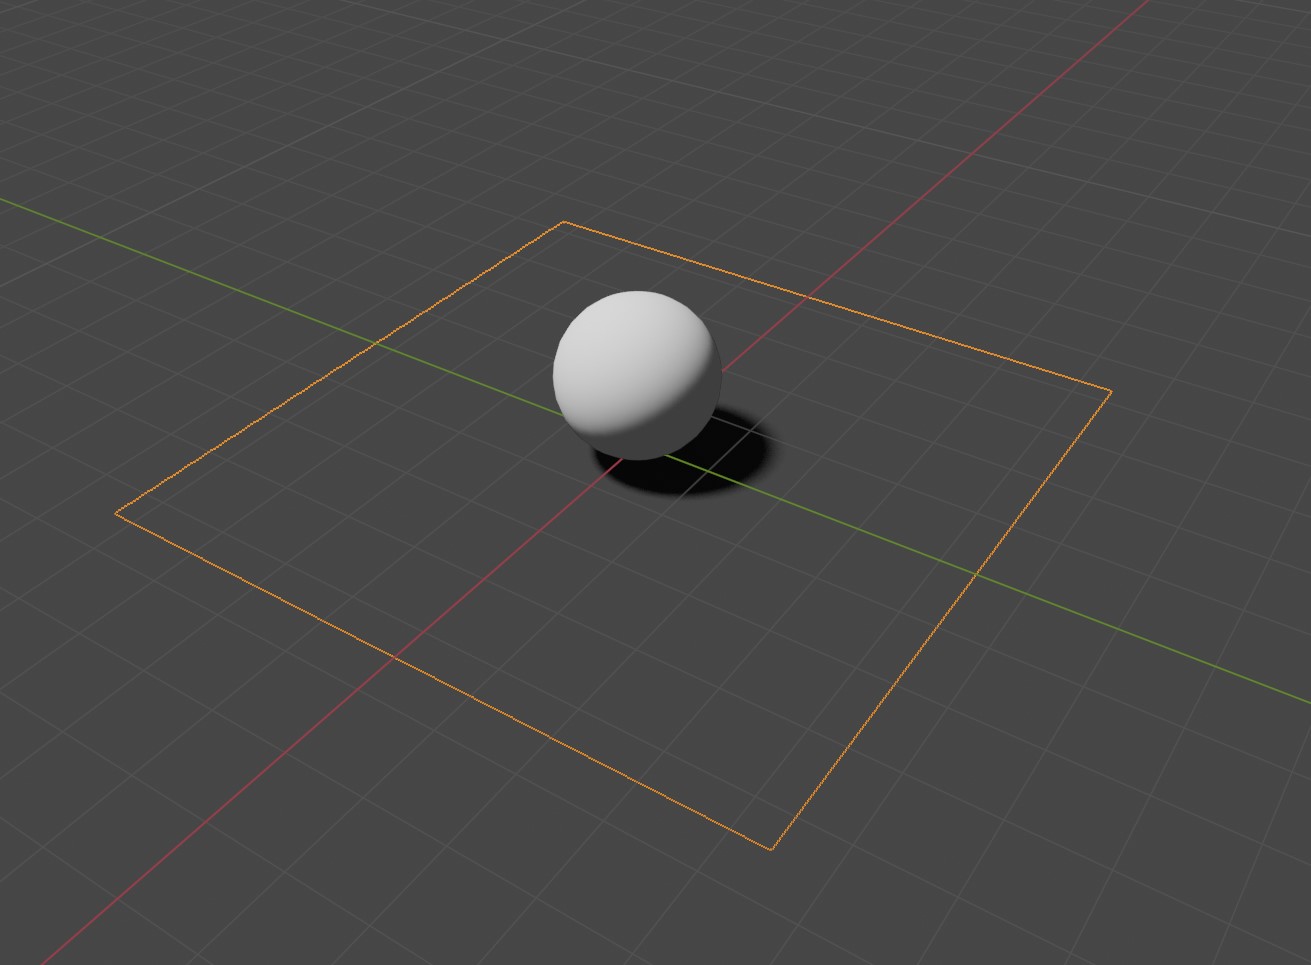
In this example, the plane catching the shadow is the shadow catcher. The sphere is just a regular object.
In blender there are a couple common methods for creating a shadow catcher, one method is just to toggle an object's ray visibility so that it only receives shadows, but the main method is just to use Blender's built-in shadow catcher system.
Shadow Catchers are commonly used when compositing a 3D render over a photo or footage as they allow us to capture an objects shadow without blocking the background. We can also model our shadow catchers so that they roughly fit the scene allowing for more accurate shadows.
To create a shadow catcher in Blender using Cycles we will go through an example following these steps.
Let's start by aligning the camera before we move on to creating the shadow catcher.
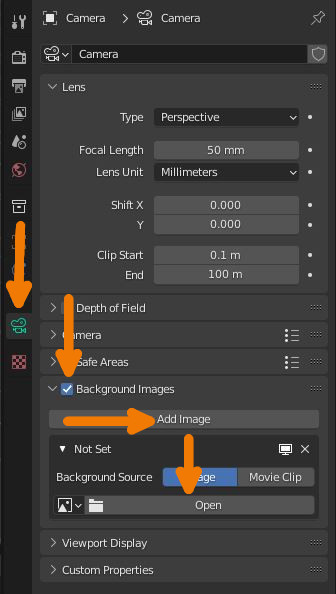
Next, we will align our camera so that it roughly matches the perspective of the background. To help with the process we can set the background we are overlaying our render onto as the background of the camera.
We can do this by select our camera, going to the Object Data Properties > Enable Background Images. Next open the section and go to Add Image > Open and select your background.
This is just for previewing. Later we can take the same image and add it to the compositor and composite our 3D objects on top of it.
We can now adjust the cameras position and focal length so that the 3D objects fit nicely with the background. For this it is a good idea to go into camera view with numberpad 0 or by pressing the camera widget icon in the top right corner of the 3D viewport.
We will also want to expand the right-side properties panel by pressing N and going to the view tab. Expand the view lock section and check "camera to view" to have the cameras position follow your navigation.
Also keep the camera properties open so that you can adjust the focal length of the camera object.
It can also be a good idea to add one or more primitive objects to our scene as reference to match the footage against, or we can use the objects we intend to have in the finished scene.
Related content: How to move the camera in Blender
This can be a difficult process if the camera was rotated when the footage was shot and depending on what we know about the camera and its settings. To make this process more exact we can use another application and Blender add-on called fSpy. You can find it here:
External content: fSpy addon
This will help with matching the perspective and focal length of our background as well as setting up the base scene in Blender. Keep in mind that if you're overlaying your render onto an animation rather than a still image, you'll need to motion track your footage instead.
Next, we'll need the shadow catcher itself. This is the object our shadows will be cast on to.
You should model this to roughly fit the background. If your background footage is a room, it is a good idea to model the walls, floor and possibly ceiling depending on your lighting setup. The model you make will determine where shadows will be cast.
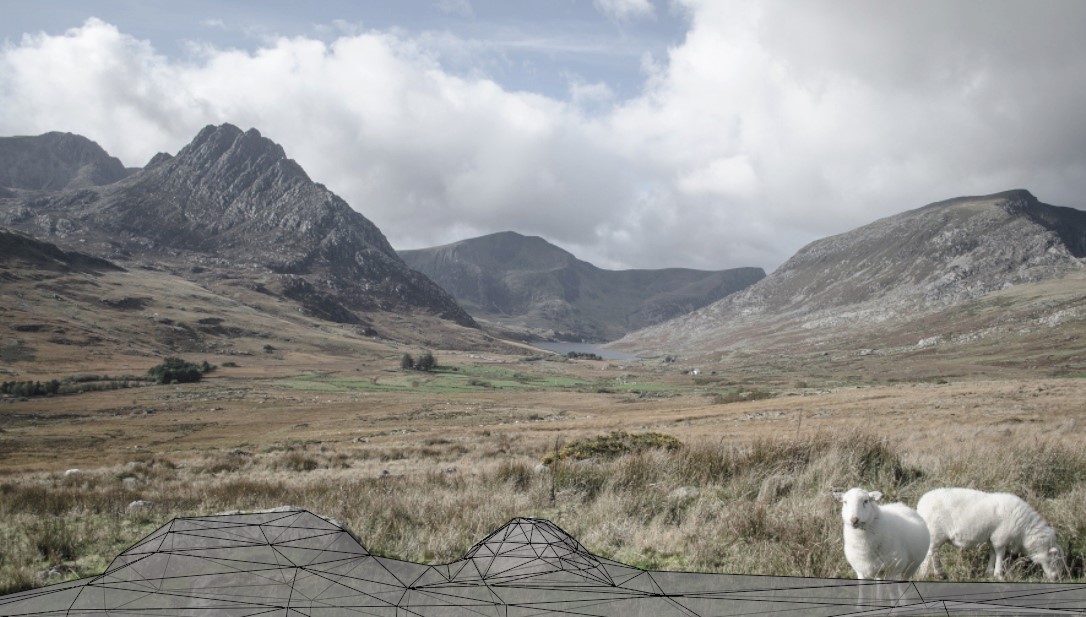
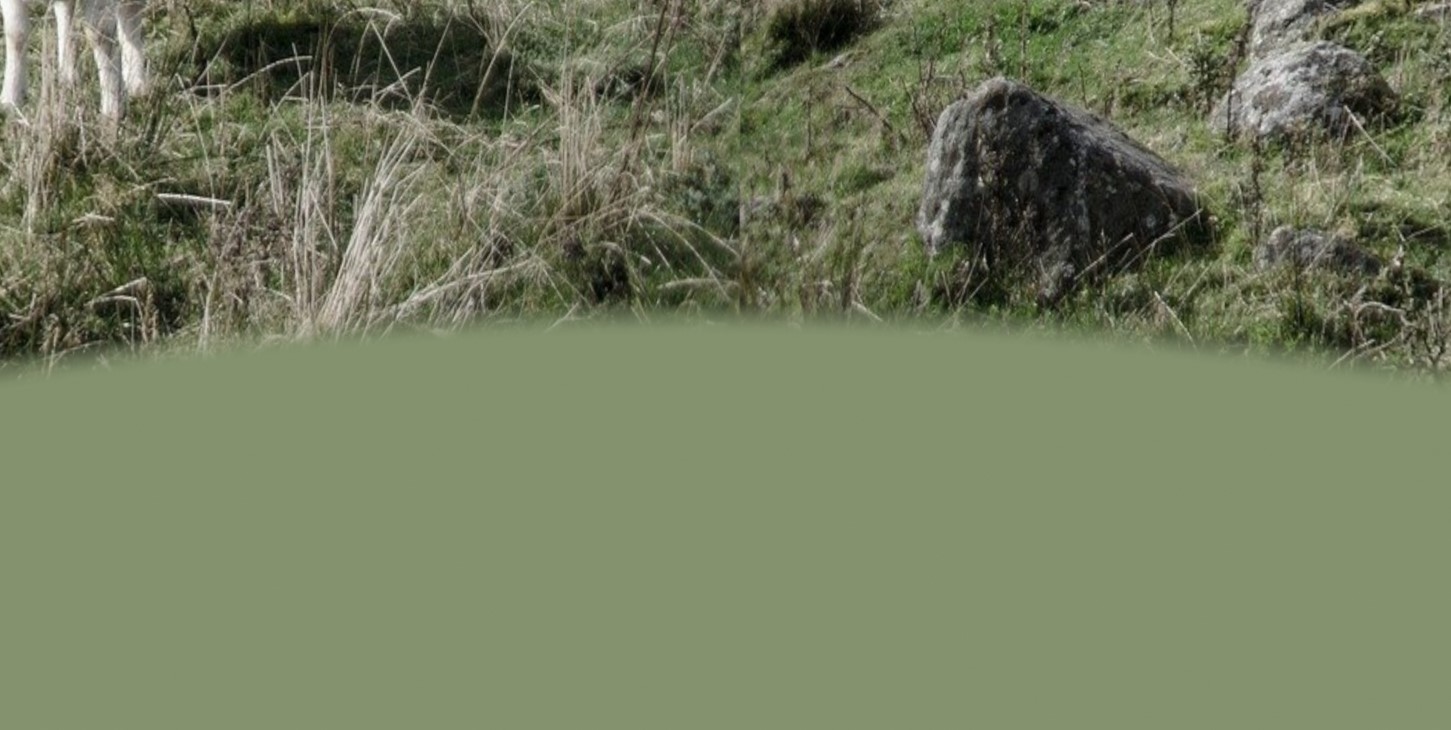
If your background is an outdoor scene with some uneven ground, it is a good idea to rough out a floor for the ground that roughly follows the curvature of the ground. The better the shadow catcher object and the background are aligned, the better your result will be in the end.
For a test scene we can also just create a plane that will catch the shadows in our scene.
Related content: More than 30 Blender modeling tools explained
For example, we will use this scene below and create a shadow catcher that roughly matches the ground. Then we will add a couple of objects that will cast shadows on the ground next to the sheep in the scene.
We can create a material for our shadow catcher. This is required if we want to have reflections cast from the surface of the shadow catcher in our scene. But for simpler setups, this step is optional.
To setup the shadow catcher material we can use the background as the texture for our material that we UV project from the camera's perspective. This will give a stretched result from all angles except for the camera. But it works good enough for most cases.
Related content: How the light path node works in Blender
Follow these steps to set up the shadow catcher material:
Related content: The complete beginners guide to Blender nodes, Eevee, Cycles and PBR

From our example above the shadow catcher looks like this from outside the view of the camera. It will help to sell the reflections that bounce on to surrounding objects.

After we've got our shadow catcher modeled, we can go ahead and Enable the Shadow Catcher Setting
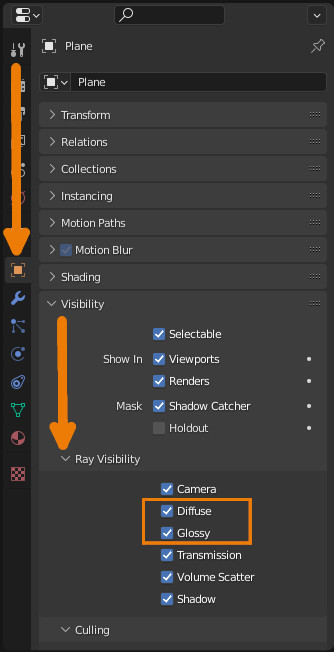
Go to the object properties->Visibility and Check Shadow Catcher.
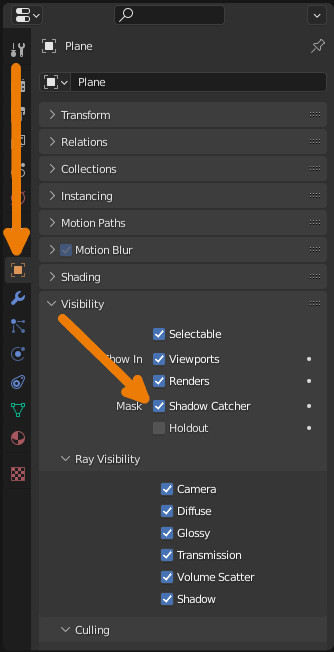
There are some cases where we may not want our shadow catcher to reflect any color or light onto our scene, this can be achieved by going to the object panel -> Visibility -> Ray Visibility and uncheck Diffuse and Glossy.
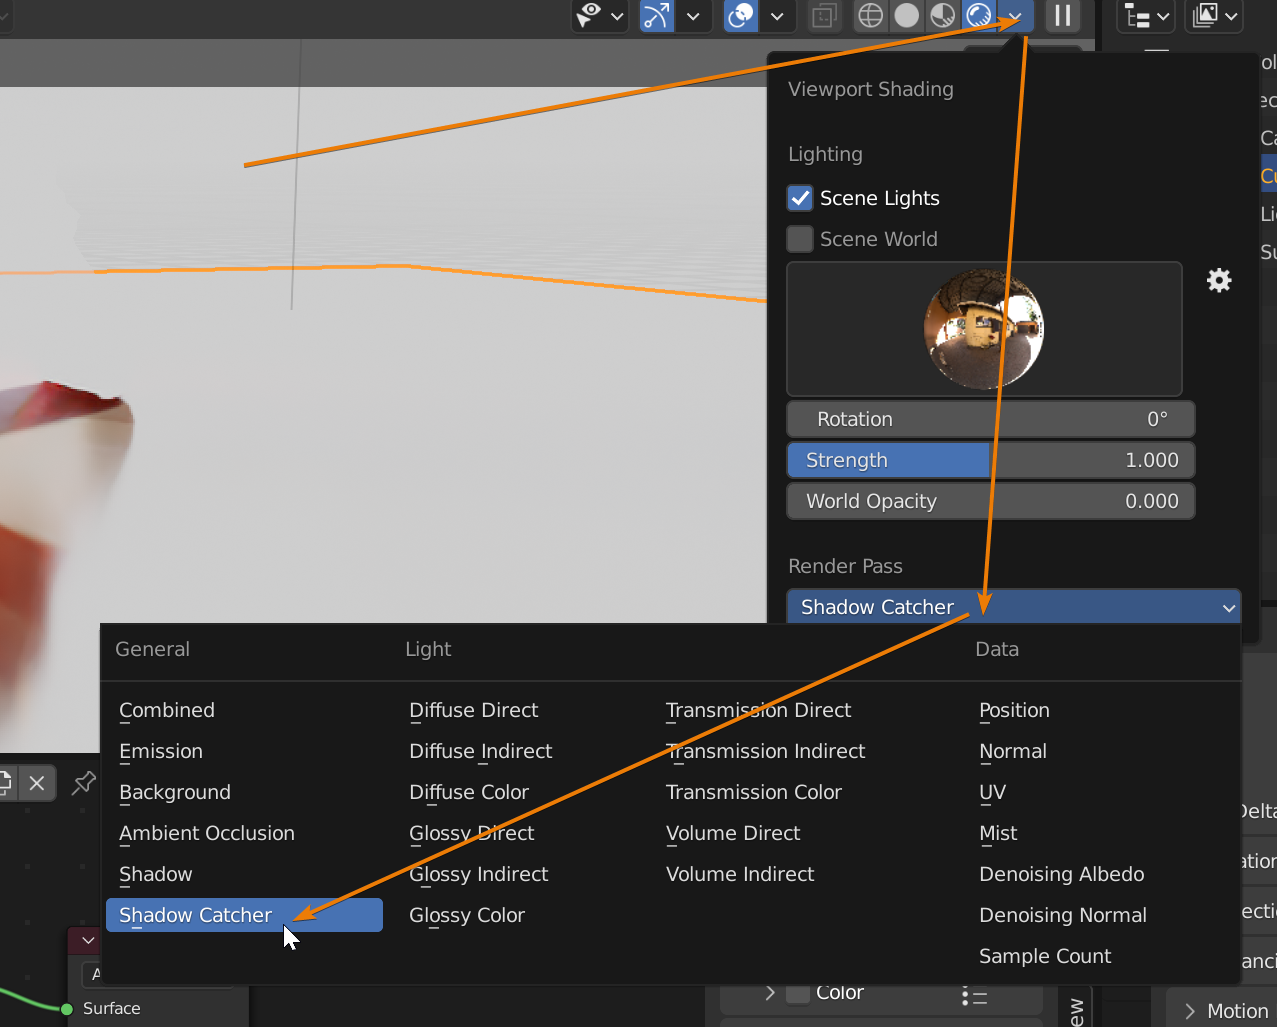
We can view what the shadow catcher result looks like by viewing the shadow catcher pass separately. To do this go to the top right corner of the 3D viewport and click the down arrow next to the viewport display modes.
At the bottom you will find render pass. Switch it to "Shadow catcher".
Another important aspect of getting our shadow catcher to look right is matching the lighting of our background, here are a few methods for doing so:
Related content: How to change the background in Blender?
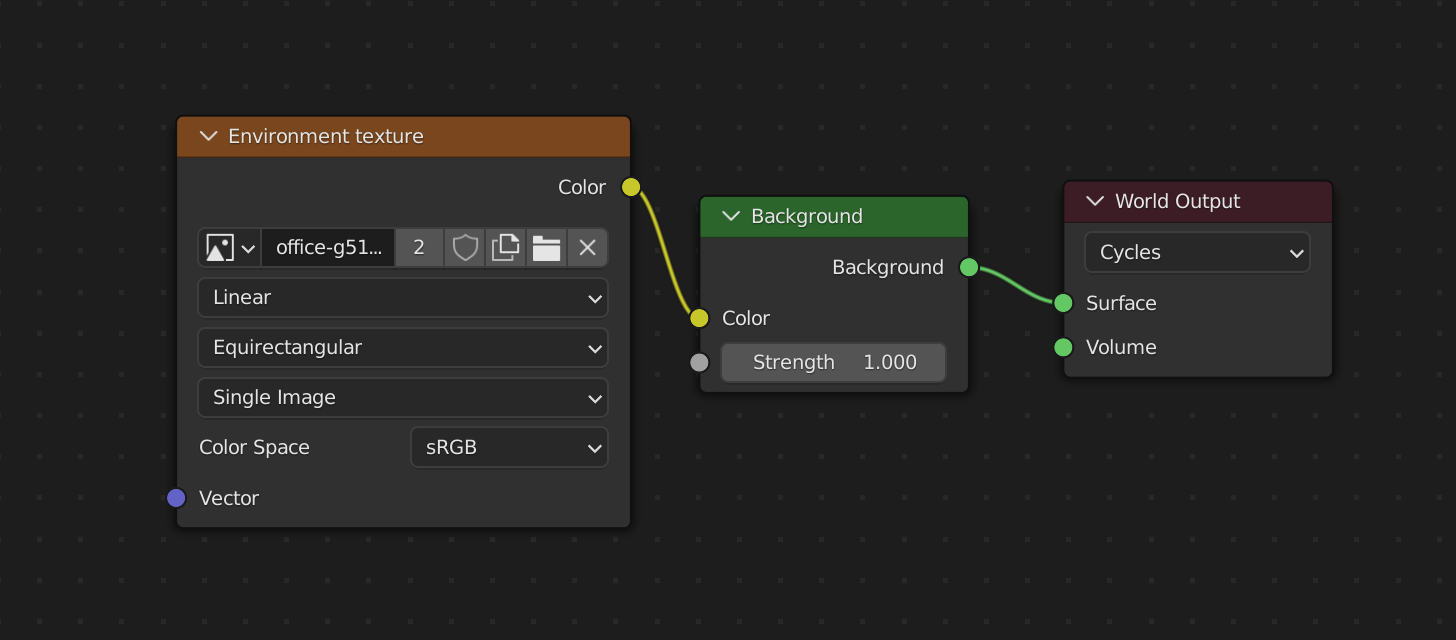
Simply using the background image as an environment texture despite any visible seams or projection problems is probably going to be the fastest way to match the lighting of the background with the objects in your scene. So, in most cases, try this first and see if it gives you the results you are after.
For this example, we'll use a slightly more involved technique just to show a second example. This is the node setup that I came up with.
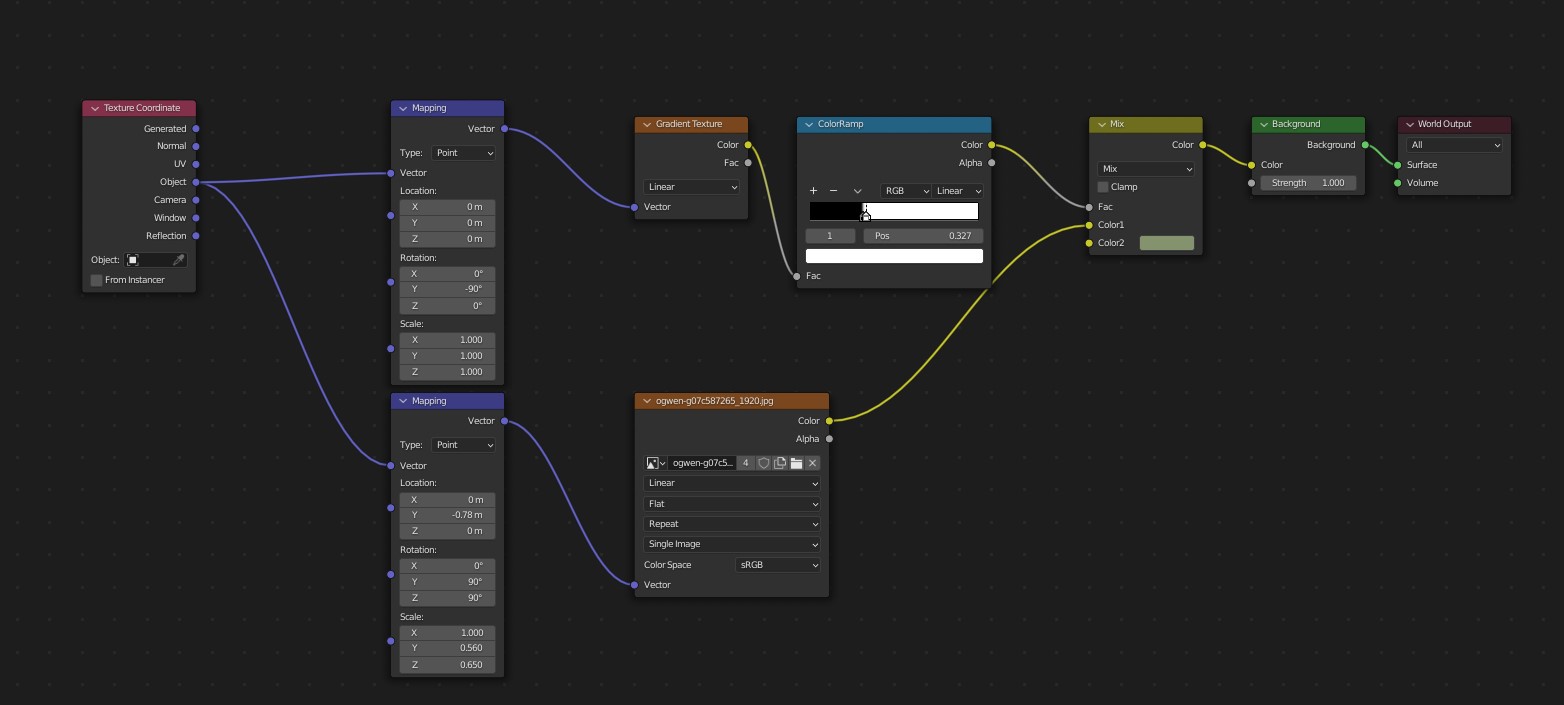
This node setup scales the background image so that it doesn't repeat as well as using a gradient to cut off the bottom of the texture. I do this so that I can avoid scaling the image too much, the color it overlays was just sampled from the ground of the background image.
In the case that a reflection is going to be viewed close up we might want to paint a 360 image as this allows us to clean up any seams and keep distortion to a minimum, but this is a much more involved process.
Another thing we likely want to enable is a transparent background so that we can later composite our render over the background. This can be done by going to our render settings > Film and checking Transparent.
Related content: How to use alpha transparent textures in Blender
With our scene setup and ready to render we'll finally want to composite the render onto our background.
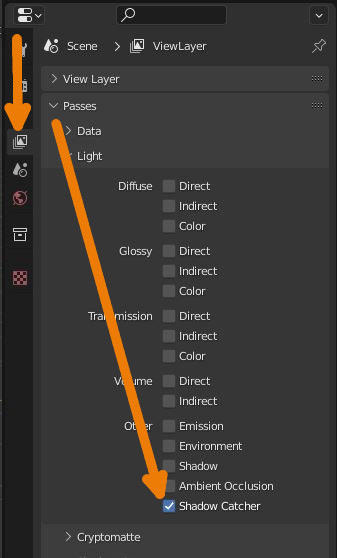
The first thing we'll want to do is enable the Shadow Catcher pass, this can be done by going to the View Layer Properties > Passes > Light and Enabling Shadow Catcher.
After we've enabled the Shadow Catcher Pass we can go over to the Compositing Workspace and setup the node graph.
The final compositor node setup should look like the image below.
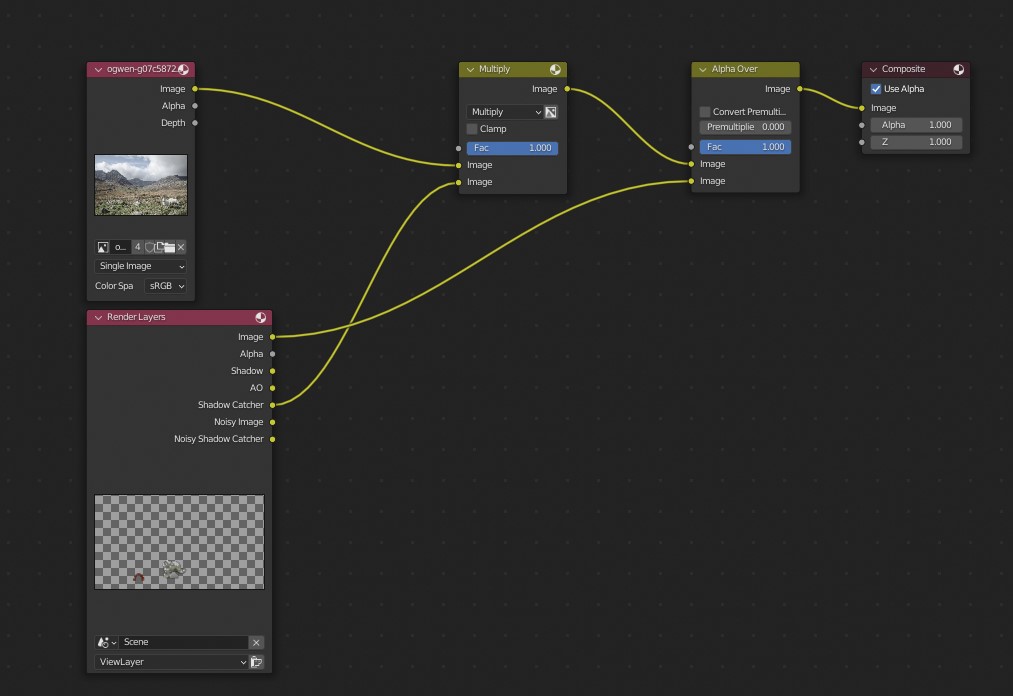
In this example the bottom input is the scene we're rendering and overlaying onto our background and the top input is the background we're using. We take the output from the shadow catcher pass and multiply it with our photo and then in this example we use the alpha over node to overlay our render onto the background.
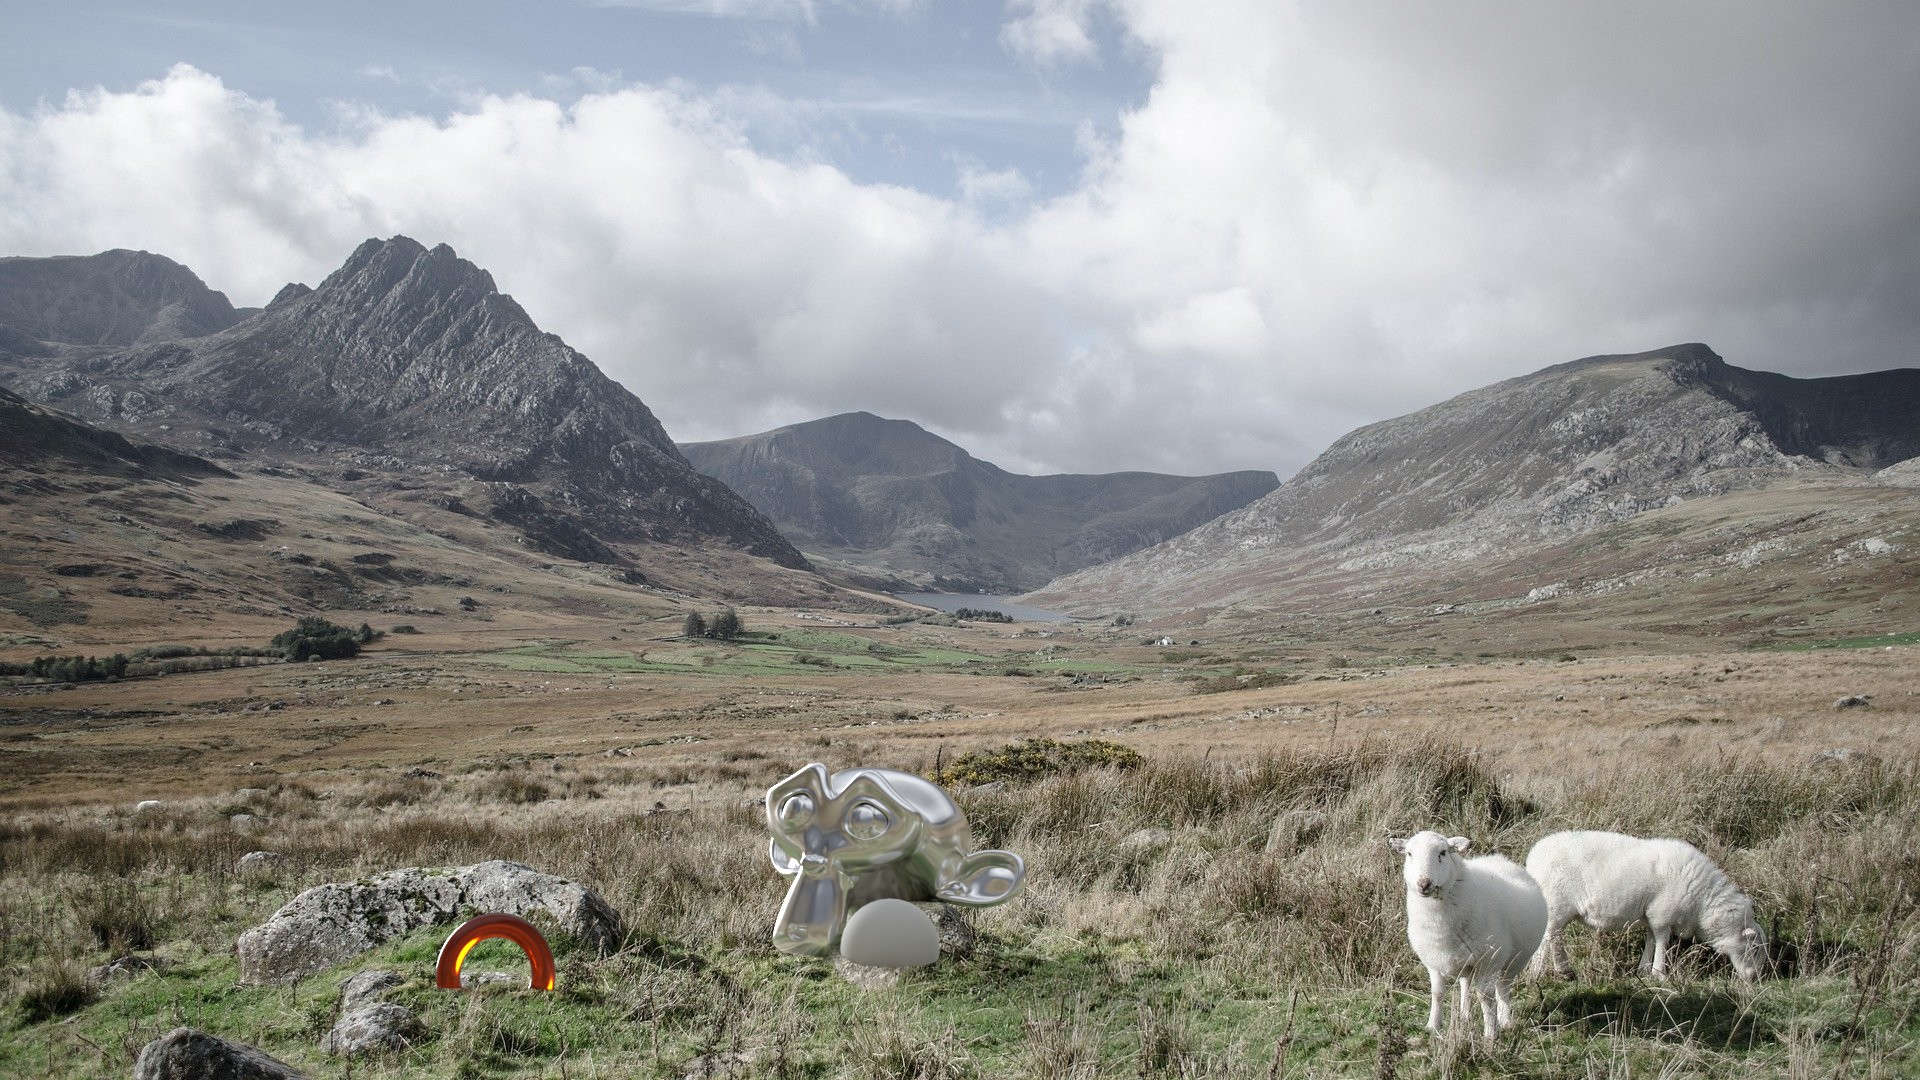
As you can see our Shadow Catcher pass and Render are now correctly composited together with the background. In this example I wasn't happy with the shadow's darkness so I setup a node graph that gave more control over the shadows.
Here is the composite node graph I ended up going with to darken and match the shadows. You can compare the shadows on the 3D objects with the shadow coming from the two sheep in the scene.
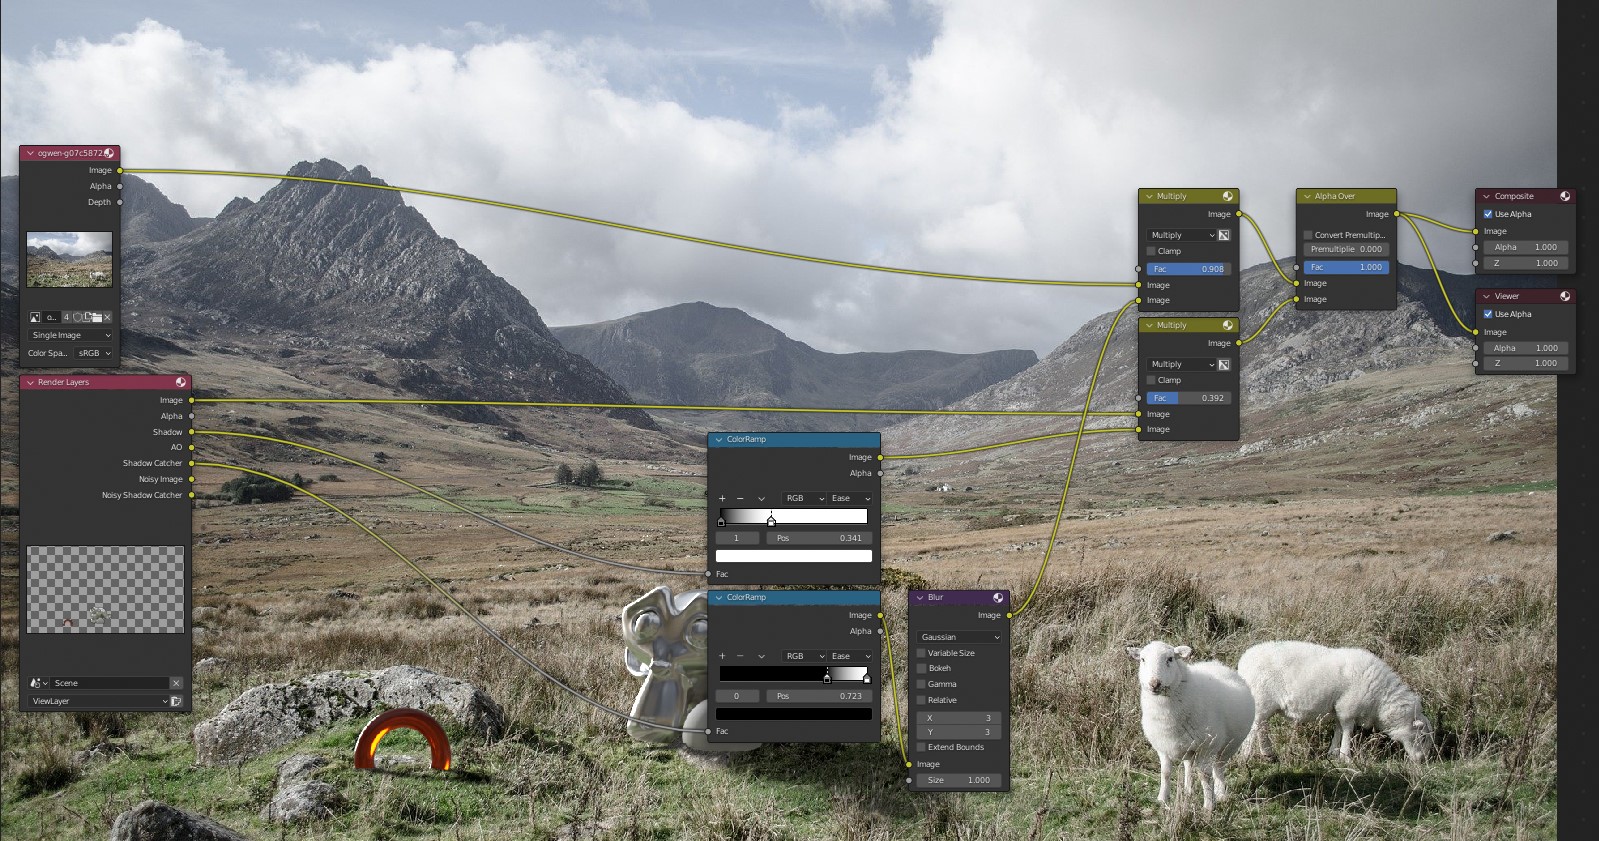
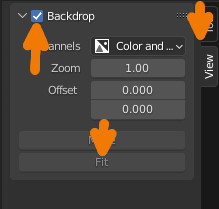
A few things have changed in this example, the background is now a preview of the output, I set this up by adding a viewer node and connecting our final output to it and then hitting N and going to the view tab and enabling backdrop, then aligning it by selecting Fit.
I've also enabled the Shadow Pass and connected it and the render's image output to a mix node set to multiply. Both the shadow and the Shadow Catcher Pass are also connected to a color ramp that allow more control over the falloff of the shadows.
Related content: How the color ramp node works in Blender
The multiply values on the mix nodes allow me to control the intensity of the shadows so that I can better match the background.
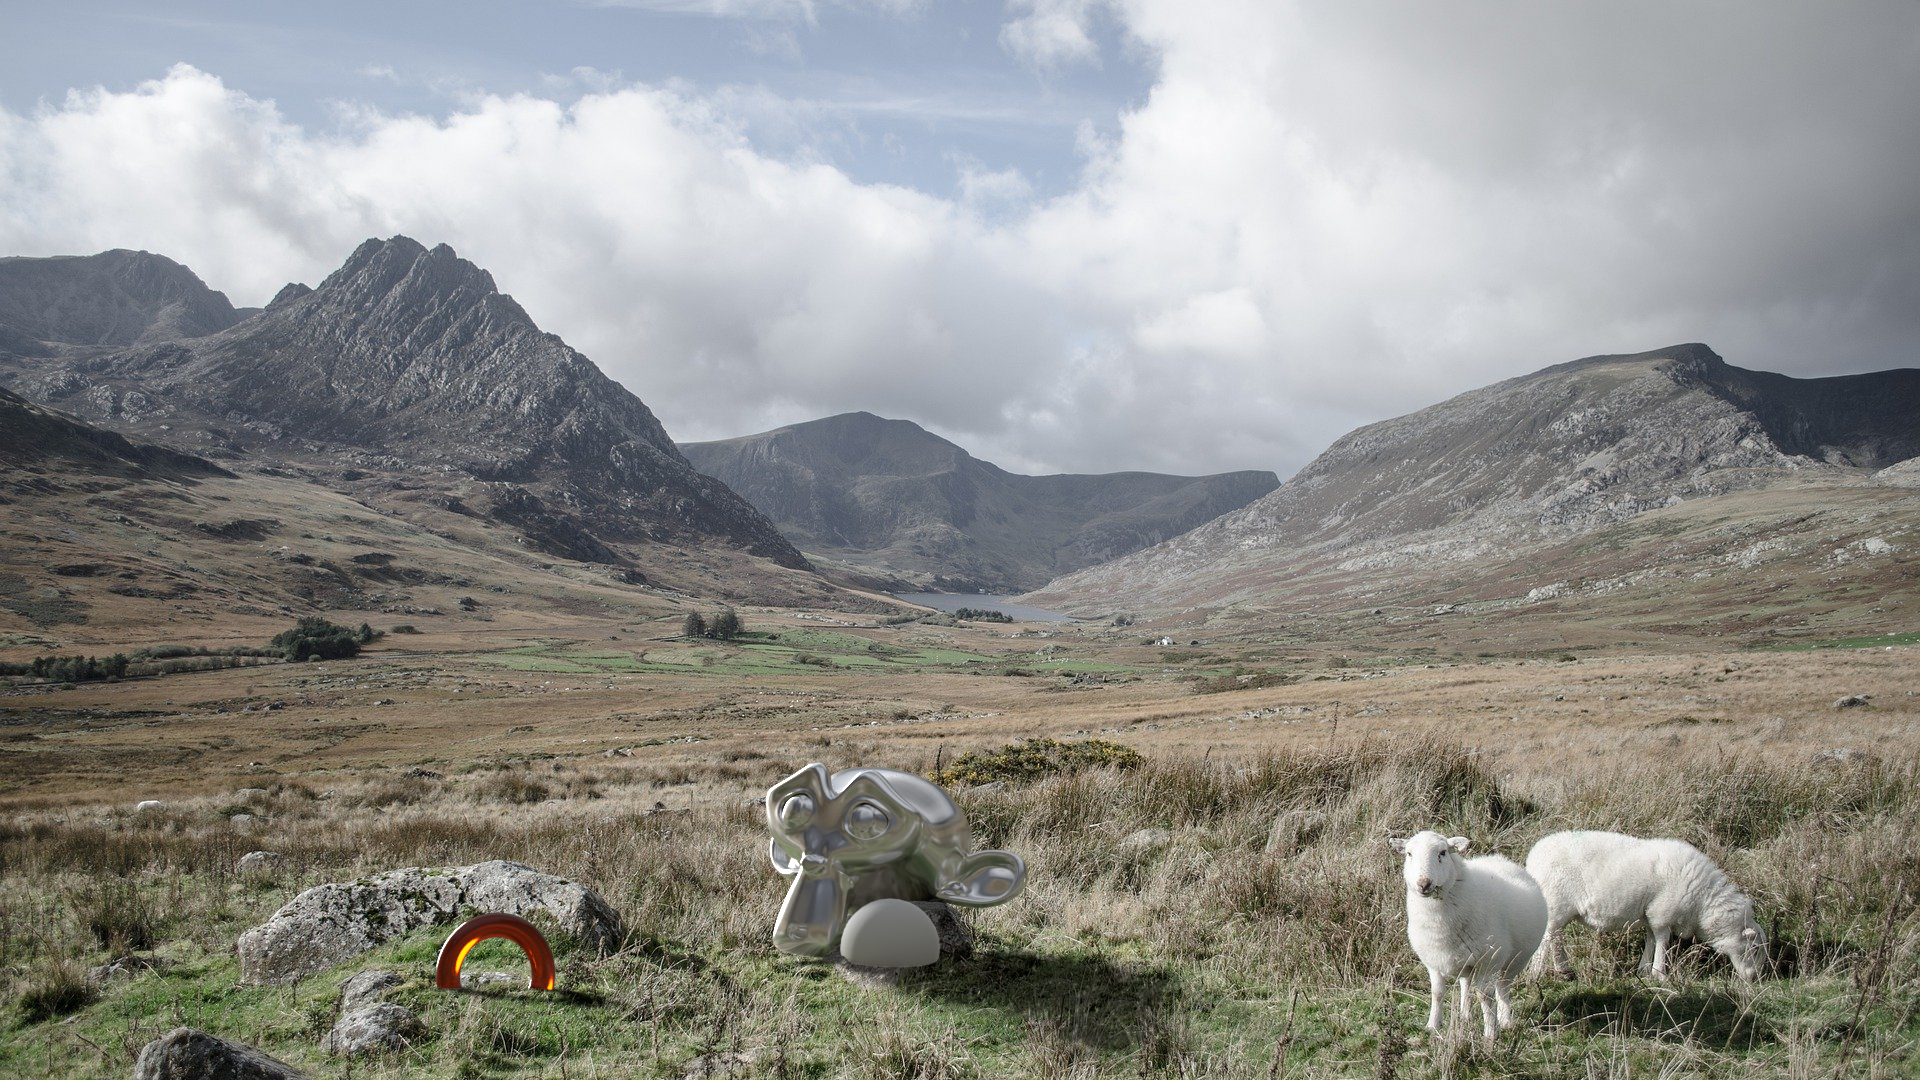
As you can see this composite setup allowed me to match the background much better. Of course, compositing will vary from scene to scene so feel free to make changes when compositing your own scene.
In general Shadow Catchers can be very useful in many cases. They can streamline the process of inserting our renders either into pre existing renders, photos, or footage and can be fine-tuned to allow for the best results. They make it much easier for us to composite and adjust our renders.
Thank you for your time.