


Adding objects is one of the most common actions in Blender. It is important that we can do this quickly, because every time we need to go through the menu, we waste valuable seconds that add up over time.
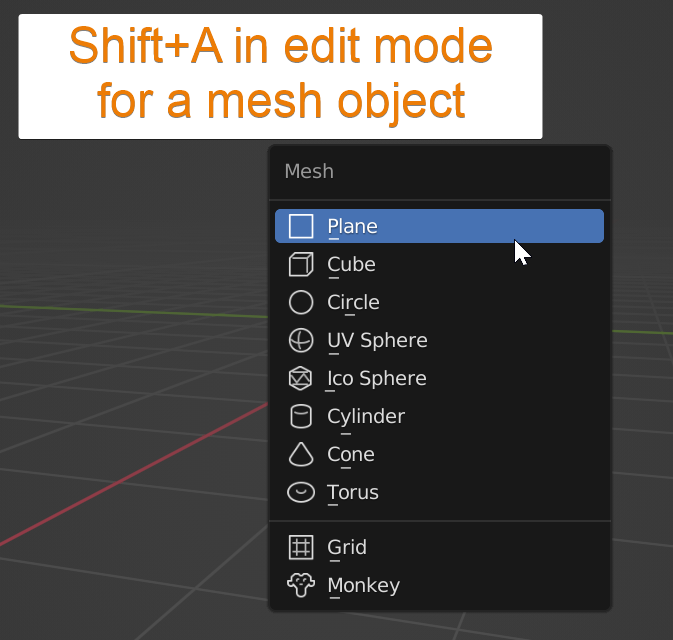
To add an object in Blender, use the shortcut key Shift+A while in object mode and select the object you want from the menu. For mesh and curve objects you can also use the Shift+A hotkey in edit mode to add a primitive object mesh inside the object currently being edited.
In Blender, many shortcuts are made so that they reoccur in many parts of the interface. The same applies to the Shift+A add menu shortcut. For example, we can use Shift+A in the shader editor, compositor, and geometry nodes to add nodes. We can also use this shortcut in the video sequence editor to add various strips to the timeline for example.
Let's see how this shortcut works in detail when we add objects in Blender.
Related content: Blender shortcut keys: How to find, manage, change, and reset
In object mode, after pressing Shift+A we can follow up by using menu shortcuts so that we don't have to use the mouse at all to add objects. For example, to add a mesh plane, Press Shift+A followed by M and then P. This combination will traverse the add menu into the mesh submenu and add a plane.
You can see the shortcut key combinations for each object by looking at the underlined letters in the menu. But here is a list you can reference as well.
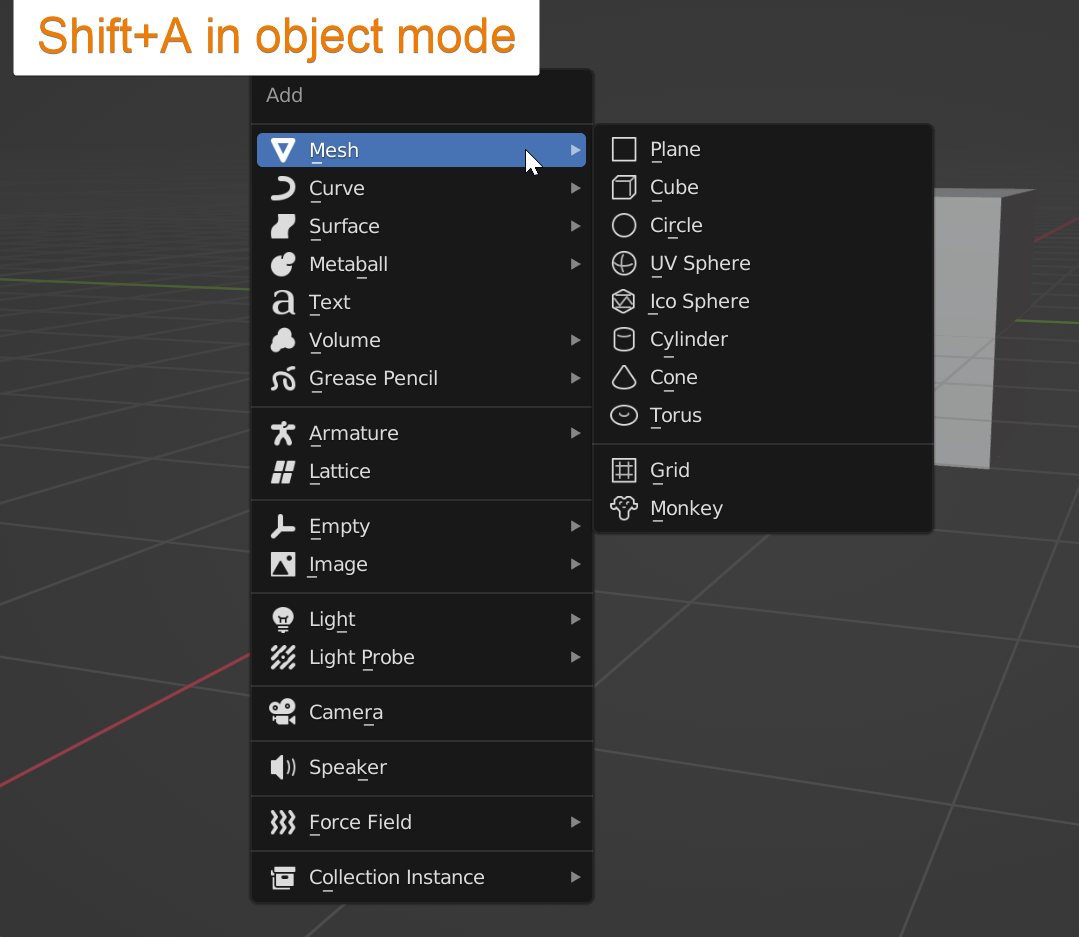
After pressing Shift+A in object mode, use the letter to access the correct submenu and then the letter for the object you need as the list below suggests.
For the collection instance objects access the submenu with O. Blender will then dynamically add shortcut keys depending on the names of your collection by using the first available letter in each collections name.
This is actually how all shortcut keys for menus in Blender are generated.
So, if you have additional add-ons enabled that add entries to the add menu they will each get their own generated shortcut key. You can see what key Blender uses by looking for the underlined letter in each menu entry.
Examples of add-ons that add more object options are the extra objects add-ons, rigify and import images as planes to name a few.
Related content: Blender add-on overview: Extra objects mesh
The add menu in object mode is not organized alphabetically, instead it is organized into sections, starting with object types that holds geometry and starting with the most common first. The mesh objects, then the curve objects that are undoubtedly the second most common object type that holds geometry.
When an object is added we can also access the operator panel in the bottom left corner to adjust some of its settings. We can also access this panel by pressing F9 in the 3D viewport.
If we adjust some of the settings in the operator panel, these settings will be kept and used the next time we add the same kind of object.
When we use Shift+A in edit mode as opposed to object mode we generally add data to the object we are in edit mode for instead of creating a new object.
For example, if we are in edit mode for the default cube and press Shift+A, we will get a list of mesh primitives that we can add directly into the current object as additional mesh.
We will see no additional object in the outliner because we only created more data, mesh or curve in an existing object.
But it also depends on what object type are in edit mode for. If we are in edit mode for a curve object, we can only add additional curves and if we are in edit mode for a mesh object, we only have access to add primitive meshes.
When we add a new object in object mode or some kind of geometry in edit mode it always ends up at the location of the 3D cursor. We also still have access to the operator panel in both cases.
Related content: How to use the 3D cursor in Blender
Also note that for some object types there is no edit mode and for some there is an edit mode but you still cannot add extra data using the add menu. But the most common are still curve and mesh objects and both of these can have extra curves or mesh added in edit mode.
There is still the option to assign our own hotkey to add a specific object with a single shortcut. We can do this by pressing Shift+A to open the add menu, navigate to the object you want to add a shortcut for and right click it.
Now choose assign shortcut and choose a shortcut key or combination that you want. To learn more about managing shortcut keys, you can read this article:
Related content: Blender shortcut keys: How to find, manage, change, and reset
In this article we looked at how we can add objects using only the keyboard through shortcut keys. We can use a combination of keys after one another to access any primitive object
thank the reader
