


Framing the camera in Blender can be a bit of a challenge when we're just working with the transformation and rotation tools. Blender comes with a much easier way of positioning our camera though, instead of manually positioning the camera we can instead just snap it to the viewport.
So how do we snap the camera to view in Blender?
To snap the camera to view in Blender, press Ctrl+Alt+Numpad 0. The active camera will instantly snap to your current view in the viewport.
This is quite a useful shortcut but there are also a few other aspects of camera and viewport positioning that can help us. In the rest of this article, we'll go into more detail about the ways we can position the camera and viewport.

When working in the scene view we'll mostly be moving around the viewport. Camera objects on the other hand are used for rendering. Essentially the viewport is like a master camera that we use to navigate the scene.
Another difference is that the viewport won't render hidden objects but a camera will when rendering the scene if the object is enabled for render. An object that is disabled for rendering will still be visible in the viewport as long as it's not hidden.
Finally, unlike the camera, we can't translate the viewport or animate its position or rotation. In the case that we need our viewport animated, we'd have to align our viewport to an animated camera.
The quickest way to snap our viewport to specific angles is with the Numpad. 1 - Front 3 - Right 7 - Top. Holding Ctrl down while pressing any of these directions will snap to the opposite direction. Pressing 9 on the Numpad will flip the viewport's current direction.
We can also snap our viewport by using the widget at the top right of the viewport. By clicking on one of the X, Y, or Z circles the viewport will snap to face the opposite direction of that axis.

Basically, when looking at the widget, the camera would be the circle. The line coming off of the circle would be the direction the camera faces.
Finally, if we want to still use the shortcuts to align our viewport but do not have a Numpad we can instead enable Numpad emulation, with Numpad emulation enabled we can instead use the row of numbers at the top of the keyboard for Numpad shortcuts.
To enable Numpad emulation go to edit > preferences > input and under keyboard enable Emulate Numpad.

For a longer list of all the viewport navigation shortcuts check out the article below:
Related Content: Blender viewport navigation shortcuts
To access the camera to view option press N to open the side menu and under view enable Camera to View. Now if we don't have our viewport snapped to the camera you may notice that the camera doesn't actually follow the viewport.
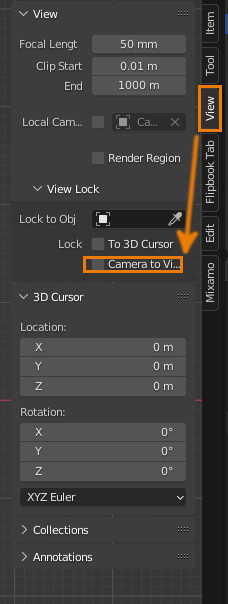
For camera to view to work we'll need to press Numpad 0 to align the view first. Now when we move the viewport the camera will now follow. Now that our view is aligned with the camera when we move the view the camera will follow.
Note that once we've enabled this option the camera will snap to the viewport but the viewport will also snap to the camera when its position is changed. For example, if our camera has keyframes and we change the current frame our camera will snap back to the previous keyframe moving our view with it.
To get into camera view we'll need to first set that camera to active if it's not already. When we only have 1 camera in the scene that is the one that will be active. We'll also need to make sure our cursor is over the 3D Viewport. Once we've done both we can just press Numpad 0 to align our view to the camera.
We can also snap our view to the camera by going to view > cameras > active camera. To get out of the camera we just need to select active camera again. We can also just press Numpad 0 again or just rotate the viewport to get out of camera view.
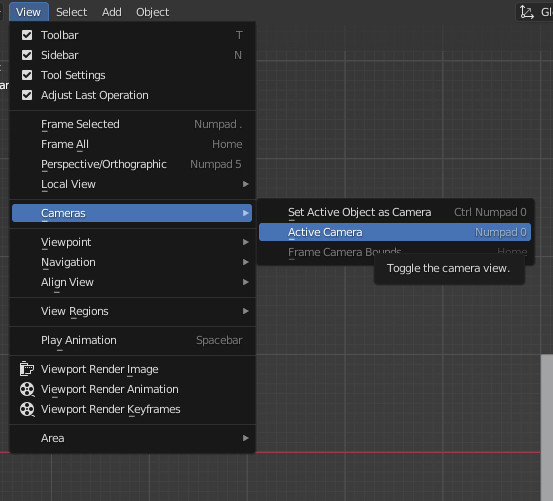
There is also an option to fit the viewport to the camera bounds. To fit the viewport bounds to the camera bounds go to view > Cameras > Frame Camera Bounds. This can also be done by pressing home.
One mistake I've often made when trying to change the camera's position is just trying to select the camera I want to align and then using the shortcuts. When we do this instead of the selected camera moving, we'll instead just move the active camera.
This isn't an issue when we're working with one camera but with multiple how do we align different cameras?
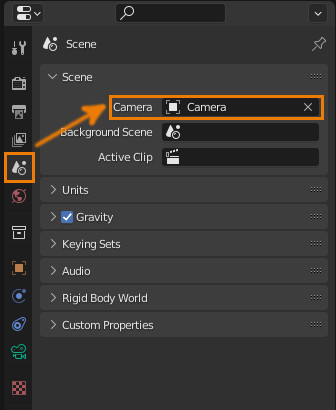
The first way to change the active camera is just to select the camera we want to be active, then go to view > Cameras > Set Active Object as Camera. The second way to change the active camera is through the scene properties. In the scene properties, we can also view which camera is active.
Go to the properties editor > Scene Properties > Scene. Here we can see the camera field which we can click on to select the camera we want to use.
For a more in-depth guide on everything to do with active cameras, as well as how to change the camera during an animation check out this article:
Related Content: How to change the active camera in Blender
While snapping the camera to view may seem pretty basic, considering how handy it is we'll likely be using it very often. Knowing a few other ways we can move both the camera and viewport around can also make the process of positioning both much more convenient.
Understanding the active camera system can help us avoid confusion when positioning our cameras. As well as that understanding how multiple cameras work can make the process of working with them much easier.
Thank you for your time.
